Using Cordova Plugins in Hosted Web Apps
Plugins allow you to extend your hosted web app to take advantage of native device capabilities. Using plugins in a Cordova-based hosted web app is very simple and requires few steps.
-
Add one or more Cordova plugins to the app. The Cordova platform offers a wide range of plugins to choose from. For example:
cordova plugin add cordova-plugin-camera cordova-plugin-dialogsNote: The app should already include the Hosted Web App plugin, which is the case for apps created with ManifoldJS. If you start with a "plain" Cordova app, you should also add cordova-plugin-hostedwebapp and a W3C app manifest. For more information, see the Quick Start section.
-
Update the app's W3C manifest to enable API access and inject the Cordova runtime environment into one or more pages of the hosted web app.
{
  ...
  "mjs_api_access": [
    { "match": "http://yoursite.com/path1/*", "platform": "android,ios,windows", "access": "cordova" },
    { "match": "*://yoursite.com/path2/profile.html", "platform": "windows", "access": "cordova" }
    ...
  ]
}
For more information, see Enabling API Access.
-
Optionally, set the Cordova plugin mode to choose between 'client' or 'server' modes. In 'client' mode, the cordova.js file and the plugin interface script files are retrieved from the app package. In 'server' mode, these files are downloaded from the server along with the rest of the app's content. The default is 'client' mode.
Client mode
{
  ...
  "mjs_cordova": {
    "plugin_mode": "client"
  }
}
Server mode
{
  ...
  "mjs_cordova": {
    "plugin_mode": "server",
    "base_url": "js/cordova"
  }
}
(In 'server' mode, the Cordova files and plugin interface scripts must be deployed to the site to the path specified in base_url.)
For more information, see Plugin Modes.
Having plugins loaded in a page is not very useful until there is code that uses them. The hosted web app plugin provides a mechanism to include app-specific scripts that you can use to inject code that takes advantage of plugins added to an app.
To import scripts into the hosted web content:
-
Update the app's W3C manifest to list the imported scripts.
{
  ...
  "mjs_import_scripts": [
    { "src": "js/alerts.js" },
    { "src": "http://yoursite.com/js/app/contacts.js" },
    { "src": "js/camera.js", "match": "http://yoursite.com/profile/*" },
    ...
  ]
}
Imported scripts can be retrieved from the app package or downloaded from a remote source. An optional URL match attribute controls which pages will have the script injected.
-
For app-hosted scripts, copy the script files to the Cordova project. The path in mjs_import_scripts must be specified relative to the 'www' folder of the project. Server-hosted scripts must be deployed to the site.
For more information, see Importing Scripts.
There are two different modes for injecting plugin code into the pages of a hosted web app: client and server.
In client mode, the cordova.js file and the plugin interface script files are retrieved from the app package and injected into the hosted web content. This is the simplest mode and requires no changes to the hosted site making possible the use of plugins even in sites that you don't control.
Client mode is enabled by adding an mjs_cordova section to the manifest and setting its plugin_mode to client. This is the default mode.
...
"mjs_cordova": {
 "plugin_mode": "client"
}
...
Some advantages of client mode include:
- Avoids versioning conflicts between the native code embedded in the app package and the injected Cordova runtime and plugin scripts
- Faster load times since scripts are injected without additional round trips to the server
- Does not require ownership of a site in order to use plugins (for example, in mashup apps)
- Scripts and plugins are supported in pages that define a Content Security Policy (CSP)
In server mode, the cordova.js file and the plugin interface script files are downloaded from the server along with the rest of the app's content. To use it, you only need to deploy the plugin interface scripts and the cordova.js and cordova-plugins.js file for each platform to the server. No changes to the site are necessary in this mode either. Even though the script content is retrieved from the server, all the scripts are injected by the app.
Since the Cordova files are different for each platform, the app needs to retrieve the correct set of files. This feature is implemented in a way that doesn't require the server to perform platform detection to serve the appropriate files. Instead, this is handled by the app itself provided the Cordova files on the server are renamed to specify the platform in their names so that cordova.js and cordova_plugins.js become, in the case of Android for example, cordova-android.js and cordova_plugins-android.js respectively. The plugin interface scripts are platform independent and can remain unchanged, though not all platforms will necessarily use the same scripts.
To make it easier to package the scripts and deploy them to the site, you can use the [Script Export Tool](ADD LINK TO TOOL) to extract the necessary files. When you point this tool to a Cordova app, it copies all the script files that need to be deployed to the server, creating the necessary folder structure and renaming each platform-specific file appropriately. You can then simply copy the output of the tool to your site.
Note: The Script Export Tool has not been released yet. The link will be updated once the tool is published.
Server mode is enabled by adding an mjs_cordova section to the manifest and setting the plugin_mode to server. In addition, you need to specify a base_url setting with the virtual path to the Cordova and plugin files in the site. Note that the Content Security Policy (CSP) of the hosted site must allow scripts from the origin specified in the base_url setting.
"mjs_cordova": {
 "plugin_mode": "server",
 "base_url": "content/js/cordova"
}
As a side note, "server" mode is a misnomer, suggesting that new plugins can be added to an app by simply updating the site. While this is true for Javascript-only plugins, other plugins first need to be added to the app in order to embed their native code in the package and the app needs to be re-published.
Any updates to cordova.js and the plugin interface files in the server must remain compatible with native code already packaged in the app. Moreover, using this mode may require special handling when multiple versions of an app coexist and each one loads different versions of the Cordova runtime and the plugin scripts.
Imported scripts are scripts that you configure in the app's manifest and are injected into the hosted web content. Typically, these scripts provide code that takes advantage of the plugins injected into a page, though they can also be used independently of the Cordova runtime, making them useful for injecting arbitrary code.
Having the app control the injection of these scripts allows including app-specific code in a page without having to make any changes to the site, which always serves the same content and remains agnostic to the type of client.
They are also particularly useful during development since the developer of the hosted app may not necessarily have control over the site’s content, which might be managed by a different person, team, or organization. In this scenario, adding scripts needed by the app to a page or updating existing scripts can cause friction if you need to ask the site’s owner to apply these changes. If needed, once an app is ready to be published, any imported scripts in the manifest can be disabled and the site changed to load the script from its pages instead. It's worth noting that imported scripts do not necessarily need to be loaded from the app package. They can also be referenced via URLs and hosted remotely, thus sharing the same benefits of other hosted web content.
To import a script into one or more pages, it should be added to the mjs_import_scripts section of the manifest. Each entry needs to specify a src attribute with the path of the script relative to the www folder of the Cordova app (e.g. "js/alerts.js") or a full URL to a server hosted script (e.g. "http://yourdomain.com/scripts/alerts.js"). If the src attribute specifies a relative path, it is interpreted as an app relative path and the corresponding script file needs to be copied to the correct location in the project so that it can be packaged with the app.
An optional match attribute that contains one or more URL matching expressions specifies whether a script applies to a given page. The URL expressions may contain wildcards to match a range of pages. A script will only be injected into a page if its URL matches one of the expressions in the list. If its match attribute is omitted, the script will be injected into every page.
"mjs_import_scripts": [
  {
    "src": "js/alerts.js"
  },
  {
    "src": "http://yourdomain.com/js/script1.js"
  },
  {
    "src": "js/contacts.js",
    "match": ["*://yourdomain.com/index.html", "*://*/*/Readme.md"]
  },
  {
    "src": "js/camera.js",
    "match": ["https://yourdomain.com/profiles/*"]
  }
]API access must be enabled for a page before it can use an API, whether it's the Cordova runtime or, in the case of Windows 10 hosted web apps, the Windows Runtime.
Note: All mentions in the following content to the windows10 platform refer to Windows 10 hosted web apps.
For Cordova apps, enabling API access ensures that Cordova and the plugin interface scripts are injected into a page. The mjs_api_access section of the manifest controls which pages load the Cordova runtime environment. It contains a list of URL matching rules and the type of runtime access allowed for each rule.
...
"mjs_api_access": [
  { "match": "http://shiftr.azurewebsites.net/*", "access": "cordova", "platform": "ios,windows,android" },
  { "match": "https://github.com/*", "access": "Cordova", "platform": "android,ios,windows" },
  { "match": "*://shiftr.azurewebsites.net/*", "access": "allowForWebOnly", "platform": "windows10" }
]
...
Multiple rules can be added to the mjs_api_access section of the manifest, each one containing a match attribute with an expression that matches the URL of one or more pages where API access needs to be enabled. The expressions may contain wildcards to allow rules to handle a range of pages.
The access attribute specifies the type of API access enabled by a rule. Currently, these are the access types defined by each platform:
| Platform | API Access Types |
|---|---|
| ios, android, windows | cordova |
| windows10 | all, allowForWebOnly |
| all platforms | none |
Since the mjs_api_access section of the manifest is used for different platforms, some of which are not Cordova-based, it may contain rules that are not compatible across all platforms. Therefore, rules typically include a platform attribute listing the platforms for which they apply. Moreover, a rule can only specify an access type that is compatible with every platform in its platform attribute. For example, the cordova access type is only compatible with the ios, android, and windows platforms, which can all share the same rule. However, the same rule cannot specify the windows10 platform. Similarly, a rule can specify all or allowForWebOnly access, but it can only target the windows10 platform.
For Cordova apps, specifying the cordova access type will ensure that the Cordova runtime environment is available in any matching page.
Windows 10 hosted web apps access the Windows Runtime by specifying all or allowForWebOnly access types. For more information, see Create hosted web apps.
A none access type in a rule is used to deny API access to a matching set of pages and is compatible with all platforms. This access type is useful when granting API access to a wide range of pages with one rule, and then having a second, more specific rule that uses the none access type to restrict access for a subset of pages in the first range.
If a rule omits the access attribute, it will grant the most privileged level of API access available in the platforms for which it applies. Similarly, if platform is left unspecified, the rule applies in every platform. Note, however, that only an access type compatible with every platform shared by the rule is allowed, which essentially restricts the choices to either using none to deny API access, or omitting the access attribute altogether to grant the most privileged level of access.
Below, are some examples that cover different scenarios.
The following rule grants maximum access in all pages for every platform.
...
"mjs_api_access": [
  { "match": "*" }
]
...
The following API access rule enables the Cordova runtime environment in all pages for the android, ios, and windows platforms.
...
"mjs_api_access": [
  { "match": "*", "access": "cordova", "platform": "ios,windows,android" }
]
...
The following API access rule enables the Cordova runtime environment to pages in 'http://shiftr.azurewebsites.net' or 'https://shiftr.azurewebsites.net' for the android, ios, and windows platforms.
...
"mjs_api_access": [
  { "match": "*//shiftr.azurewebsites.net/*", "access": "cordova", "platform": "ios,windows,android" }
]
...
The following API access rule enables access to custom C# or C++ code in the app package to pages in 'https://shiftr.azurewebsites.net' for the windows10 platform.
...
"mjs_api_access": [
  { "match": "https://shiftr.azurewebsites.net/*", "access": "allowForWebOnly", "platform": "windows10" }
]
...
The following API access rule enables access to the Windows Runtime to pages in 'https://github.com/aspnet' for the windows10 platform.
...
"mjs_api_access": [
  { "match": "https://github.com/aspnet/*", "access": "all", "platform": "windows10" }
]
...
The following API access rules enable the Cordova runtime for all pages in 'https://github.com' for the android, ios, and windows platforms except for pages under the 'https://github.com/strongloop/express' path for the ios and windows platforms.
...
"mjs_api_access": [
     { "match": "https://github.com/*", "access": "Cordova", "platform": "android,ios,windows" },
     { "match": "https://github.com/strongloop/express/*", "access": "none", "platform": "ios,windows" }
]
...Here's a quick list of steps to start playing with this feature.
Note: The plugin support is part of ManifoldCordova (cordova-plugin-hostedwebapp), so the following information applies to Cordova projects in general. You can also generate a project with ManifoldJS and work in its cordova folder, in which case you should skip the steps that create the app and add the hosted web app plugin.
- Create a new Cordova project.
cordova create pluginDemo
- Copy the manifest.json file for your hosted web app to the root folder of the Cordova app, alongside config.xml.
{
  "name": "Hello World App",
  "short_name": "HelloWorld",
  "icons": [
    ...
  ],
  ...
  "start_url": "http://yourdomain.com/",
}
- Add the required platforms (e.g. windows, android, ios). For example:
cordova platform add android ios windows
- Add the updated ManifoldCordova plugin.
cordova plugin add cordova-plugin-hostedwebapp
Note: This step is not required if you start with an app generated with ManifoldJS.
- Add the dialogs plugin to the project.
cordova plugin add cordova-plugin-dialogs
- Update manifest.json and add mjs_cordova, mjs_custom_scripts, and mjs_api_access sections to enable Cordova and inject a custom script that will use the dialogs plugin.
{
  ...
  "mjs_cordova": {
     "plugin_mode": "client"
  },
  "mjs_import_scripts": [
    { "src": "js/alerts.js" }
  ],
  "mjs_api_access": [
    { "match": "*" }
  ]
  ...
}
Note: The configuration above enables client plugin mode, which is the easiest to start playing with since it doesn't require deploying any scripts to the server. To test "server" plugin mode, you need to copy the Cordova files and plugin scripts to the hosted web site and include the base_url setting in the configuration with the path to the Cordova files in the site.
In this configuration, Cordova is enabled in all pages. A more restrictive match expression can be specified to enable the Cordova runtime only in specific pages.
- Add the alerts.js script to the www/js folder of the app.
(function () {
var app = {
initialize: function () {
this.bindEvents();
},
bindEvents: function () {
document.addEventListener('deviceready', this.onDeviceReady, false);
},
onDeviceReady: function () {
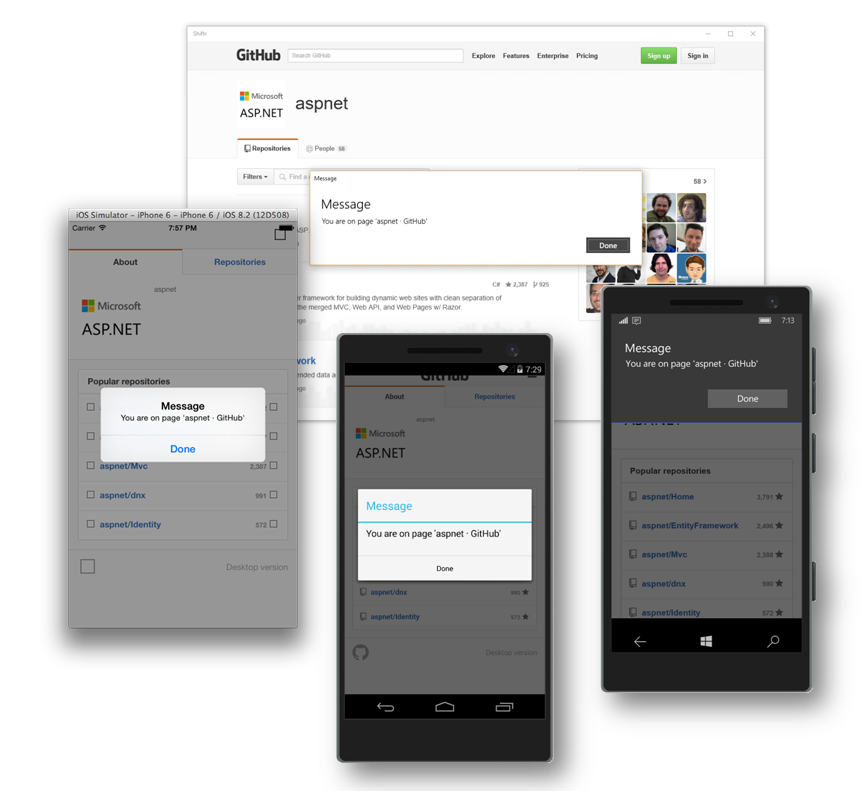
navigator.notification.alert(
"You are on page '" + document.title + "'", // message
function () { console.log('Alert callback called!'); }, // callback
'Message', // title
'Done' // buttonName
);
},
};
app.initialize();
})();
Note: The script above shows a native alert dialog box with the name of the current page and is triggered by the deviceready event so it will happen after a page is loaded. If your hosted site is a single page application, you will only see this alert once. You can always change the script above to show the alert as a result of a different trigger, for example, the click of an element.
Regardless, you should always wait until the deviceready event is fired before using a plugin. This is always the case with Cordova, so this is just a reminder that the same applies in this case.
- Test the app in each of the platforms that you generated.