用最简单的方式来创建虚线视图吧 👀 !
[FDottedLine] 为开发者提供了创建虚线的能力。同时支持为一个 [Widget] 创建虚线边框。支持控制虚线的粗细,间距,以及虚线边框的边角。
主理人:纽特(coorchice.cb@alibaba-inc.com)
English | 简体中文
感觉还不错?请投出您的 Star 吧 🥰 !
-
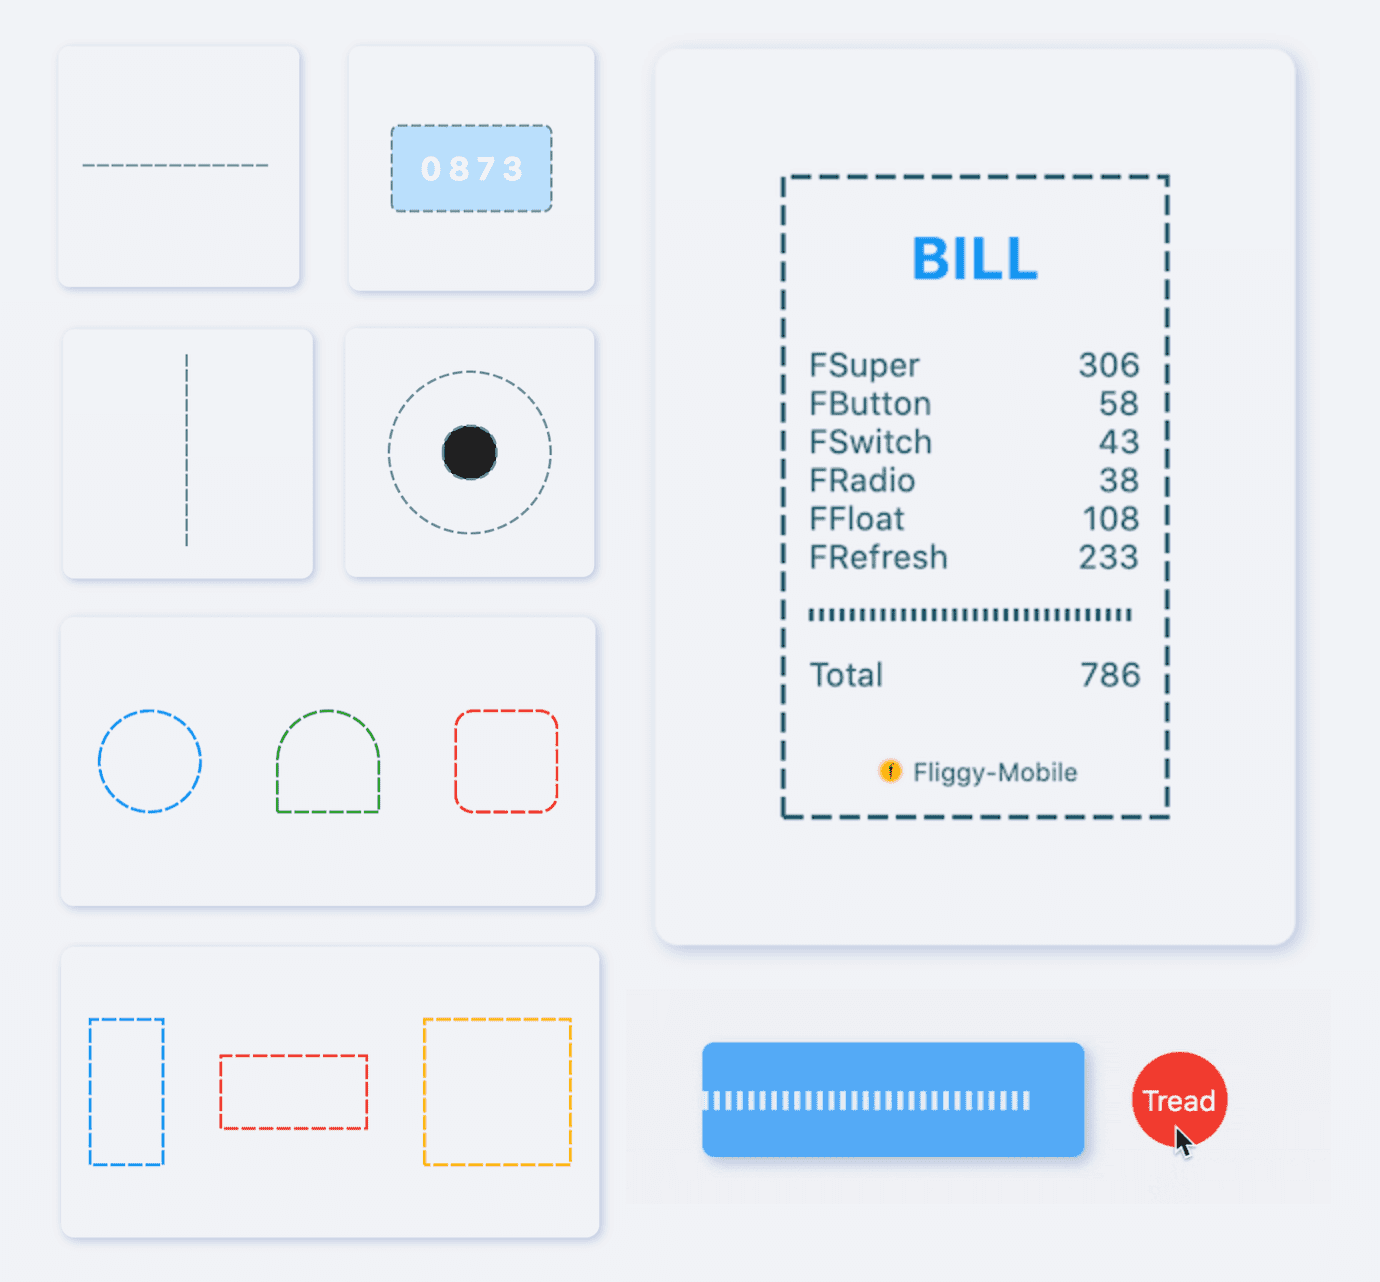
同时支持水平、垂直两个方向的虚线
-
支持创建虚线形状
-
提供超简单的方式为 Widget 添加虚线边框
-
支持创建灵活的虚线边角效果
| 参数 | 类型 | 必要 | 默认值 | 说明 |
|---|---|---|---|---|
| color | Color | false | Colors.black |
虚线颜色 |
| height | double | false | null | 高。如果只有 [height],而没有 [width],将获得一个垂直方向的虚线。如果同时有 [width] 和 [height],将获得一个虚线边框。 |
| width | double | false | null | 宽。如果只有 [width],而没有 [height],将获得一个水平方向的虚线。如果同时有 [width] 和 [height],将获得一个虚线边框。 |
| strokeWidth | double | false | 1.0 | 虚线的厚度 |
| dottedLength | double | false | 5.0 | 虚线中每一小段的长 |
| space | double | false | 3.0 | 虚线中每段间的距离 |
| corner | FDottedLineCorner | false | null | 虚线边框的边角。详见 [FDottedLineCorner] |
| child | Widget | false | null | 如果设置了 [child],[FDottedLine] 将会作为 [child] 的虚线边框。此时,[width] 和 [height] 将不再有效。 |
FDottedLine(
color: color,
width: 160.0,
strokeWidth: 2.0,
dottedLength: 10.0,
space: 2.0,
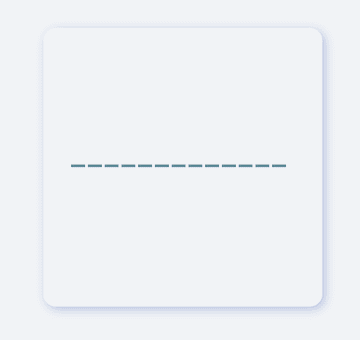
)通过 FDottedLine 创建一个水平虚线,异常简单。
开发者只需要设置 width 参数,而不设置 height 参数,这就是开发者为此所要做的所有事情。
如果想要控制虚线的厚度,设置 strokeWidth 就好了。
通过 dottedLength 和 space 参数,开发者可以自由控制虚线中每一小段的长度,以及它们之间的距离。
FDottedLine(
color: color,
height: 160.0,
strokeWidth: 2.0,
dottedLength: 10.0,
space: 2.0,
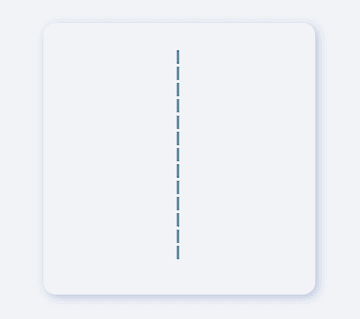
)如果想要创建垂直方向的虚线,同样很简单。
开发者只需要给 height 赋值,而让 width 保持为 null 或者 0 即可。
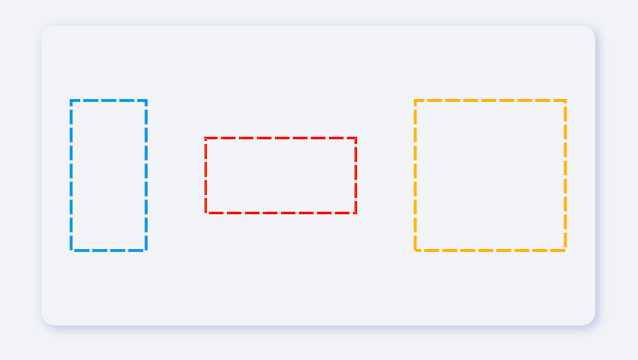
FDottedLine(
  color: Colors.lightBlue[600],
  height: 100.0,
  width: 50,
  strokeWidth: 2.0,
  dottedLength: 10.0,
  space: 2.0,
)
FDottedLine 可不仅仅只能创建简单的虚线 🌝。
当开发者同时为 width 和 height 都赋值时,将能够获得一个虚线矩形!不可思议吧。

FDottedLine(
  color: Colors.lightBlue[600],
  height: 70.0,
  width: 70.0,
  strokeWidth: 2.0,
  dottedLength: 10.0,
  space: 2.0,

  /// 设置边角
  corner: FDottedLineCorner.all(50),
)
通过 FDottedLine ,开发者甚至可以创建出虚线矩形的边角效果。比如:虚线圆角矩形,虚线圆形..

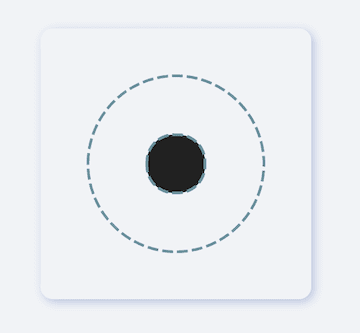
FDottedLine(
  color: color,
  strokeWidth: 2.0,
  dottedLength: 8.0,
  space: 3.0,
  corner: FDottedLineCorner.all(6.0),

  /// 添加 widget
  child: Container(
    color: Colors.blue[100],
    width: 130,
    height: 70,
    alignment: Alignment.center,
    child: Text("0873"),
  ),
)
在过去,想要为一个 Widget 添加虚线边框,是件十分困难的事情。因为官方没有为我们提供很好的解决方案。
但是现在, FDottedLine 让事情变得空前简单。开发者只需要将自己的 Widget 作为 FDottedLine 的 child 就行。
/// #1
FDottedLine(
  color: color,
  strokeWidth: 2.0,
  dottedLength: 8.0,
  space: 3.0,
  corner: FDottedLineCorner.all(75.0),
  child: Container(
    width: 130,
    height: 130,
    alignment: Alignment.center,
    /// #2
    child: FDottedLine(
      color: color,
      strokeWidth: 2.0,
      dottedLength: 8.0,
      space: 3.0,
      corner: FDottedLineCorner.all(20.0),
      child: Container(
        width: 43.0,
        height: 43.0,
        color: Colors.grey[900],
      ),
    ),
  ),
)
这也就意味着,通过 FDottedLine 的嵌套,可以创建出很多超级有趣的视图。

看看 FDottedLine 都能干些什么!
当拥有了如此简单的方式创建虚线,开发者可以自由构建出更多精彩绝伦的视图。
更多关于 FDottedLine 的应用,期待开发者们的探索 🔆。
在项目 pubspec.yaml 文件中添加依赖:
dependencies:
  fdottedline: ^<版本号>
⚠️ 注意,请到 pub 获取 FDottedLine 最新版本号
dependencies:
  fdottedline:
    git:
      url: 'git@github.com:Fliggy-Mobile/fdottedline.git'
      ref: '<分支号 或 tag>'
⚠️ 注意,分支号 或 tag 请以 FDottedLine 官方项目为准。
Copyright 2020-present Fliggy Android Team <alitrip_android@list.alibaba-inc.com>.

Licensed under the Apache License, Version 2.0 (the "License");
you may not use this file except in compliance with the License.
You may obtain a copy of the License at following link.

    http://www.apache.org/licenses/LICENSE-2.0

Unless required by applicable law or agreed to in writing, software
distributed under the License is distributed on an "AS IS" BASIS,
WITHOUT WARRANTIES OR CONDITIONS OF ANY KIND, either express or implied.
See the License for the specific language governing permissions and
limitations under the License.
感觉还不错?请投出您的 Star 吧 🥰 !
1.clone 工程到本地
2.进入工程 example 目录,运行以下命令
flutter create .
3.运行 example 中的 Demo