Note
This component is in beta. APIs may change before becoming stable. This feature requires a full installation of Ray using pip install "ray[default]".
Ray Job submission is a mechanism to submit locally developed and tested applications to a remote Ray cluster. It simplifies the experience of packaging, deploying, and managing a Ray application.
Jump to the API Reference<ray-job-submission-api-ref>, or continue reading for a quick overview.
- Job: A Ray application submitted to a Ray cluster for execution. Consists of (1) an entrypoint command and (2) a
runtime environment<runtime-environments>, which may contain file and package dependencies. - Job Lifecycle: When a job is submitted, it runs once to completion or failure. Retries or different runs with different parameters should be handled by the submitter. Jobs are bound to the lifetime of a Ray cluster, so if the cluster goes down, all running jobs on that cluster will be terminated.
- Job Manager: An entity external to the Ray cluster that manages the lifecycle of a job (scheduling, killing, polling status, getting logs, and persisting inputs/outputs), and potentially also manages the lifecycle of Ray clusters. Can be any third-party framework with these abilities, such as Apache Airflow or Kubernetes Jobs.
Let's start with a sample job that can be run locally. The following script uses Ray APIs to increment a counter and print its value, and print the version of the requests module it's using:
# script.py

import ray
import requests

ray.init()

@ray.remote
class Counter:
    def __init__(self):
        self.counter = 0

    def inc(self):
        self.counter += 1

    def get_counter(self):
        return self.counter

counter = Counter.remote()

for _ in range(5):
    ray.get(counter.inc.remote())
    print(ray.get(counter.get_counter.remote()))

print(requests.__version__)
Put this file in a local directory of your choice, with filename script.py, so your working directory will look like:
| your_working_directory ("./")
| ├── script.py
Next, start a local Ray cluster:
❯ ray start --head
 Local node IP: 127.0.0.1
 INFO services.py:1360 -- View the Ray dashboard at http://127.0.0.1:8265
Note the address and port returned in the terminal---this will be where we submit job requests to, as explained further in the examples below. If you do not see this, ensure the Ray Dashboard is installed by running pip install "ray[default]".
At this point, the job is ready to be submitted by one of the Ray Job APIs<ray-job-apis>. Continue on to see examples of running and interacting with this sample job.
Ray provides three APIs for job submission:
- A
command line interface<ray-job-cli>, the easiest way to get started. - A
Python SDK<ray-job-sdk>, the recommended way to submit jobs programmatically. - An
HTTP REST API<ray-job-rest-api>. Both the CLI and SDK call into the REST API under the hood.
All three APIs for job submission share the following key inputs:
Entrypoint: The shell command to run the job.
- Example:
python my_ray_script.py - Example:
echo hello
- Example:
Runtime Environment: Specifies files, packages, and other dependencies for your job. See
Runtime Environments<runtime-environments>for details.- Example:
{working_dir="/data/my_files", pip=["requests", "pendulum==2.1.2"]} Of special note: the field
working_dirspecifies the files your job needs to run. The entrypoint command will be run in the remote cluster's copy of the working_dir, so for the entrypointpython my_ray_script.py, the filemy_ray_script.pymust be in the directory specified byworking_dir.- If
working_diris a local directory: It will be automatically zipped and uploaded to the target Ray cluster, then unpacked to where your submitted application runs. This option has a size limit of 100 MB and is recommended for rapid iteration and experimentation. - If
working_diris a remote URI hosted on S3, GitHub or others: It will be downloaded and unpacked to where your submitted application runs. This option has no size limit and is recommended for production use. For details, seeremote-uris.
- If
- Example:
The easiest way to get started with Ray job submission is to use the Job Submission CLI.
Jump to the API Reference<ray-job-submission-cli-ref>, or continue reading for a walkthrough.
First, start a local Ray cluster (e.g. with ray start --head) and open a terminal (on the head node, which is your local machine).
Next, set the RAY_ADDRESS environment variable:
export RAY_ADDRESS="http://127.0.0.1:8265"This tells the jobs CLI how to find your Ray cluster. Here we are specifying port 8265 on the head node, the port that the Ray Dashboard listens on. (Note that this port is different from the port used to connect to the cluster via Ray Client <ray-client>, which is 10001 by default.)
Now you are ready to use the CLI. Here are some examples of CLI commands from the Quick Start example and their output:
❯ ray job submit --runtime-env-json='{"working_dir": "./", "pip": ["requests==2.26.0"]}' -- python script.py
2021-12-01 23:04:52,672 INFO cli.py:25 -- Creating JobSubmissionClient at address: http://127.0.0.1:8265
2021-12-01 23:04:52,809 INFO sdk.py:144 -- Uploading package gcs://_ray_pkg_bbcc8ca7e83b4dc0.zip.
2021-12-01 23:04:52,810 INFO packaging.py:352 -- Creating a file package for local directory './'.
2021-12-01 23:04:52,878 INFO cli.py:105 -- Job submitted successfully: raysubmit_RXhvSyEPbxhcXtm6.
2021-12-01 23:04:52,878 INFO cli.py:106 -- Query the status of the job using: `ray job status raysubmit_RXhvSyEPbxhcXtm6`.

❯ ray job status raysubmit_RXhvSyEPbxhcXtm6
2021-12-01 23:05:00,356 INFO cli.py:25 -- Creating JobSubmissionClient at address: http://127.0.0.1:8265
2021-12-01 23:05:00,371 INFO cli.py:127 -- Job status for 'raysubmit_RXhvSyEPbxhcXtm6': PENDING.
2021-12-01 23:05:00,371 INFO cli.py:129 -- Job has not started yet, likely waiting for the runtime_env to be set up.

❯ ray job status raysubmit_RXhvSyEPbxhcXtm6
2021-12-01 23:05:37,751 INFO cli.py:25 -- Creating JobSubmissionClient at address: http://127.0.0.1:8265
2021-12-01 23:05:37,764 INFO cli.py:127 -- Job status for 'raysubmit_RXhvSyEPbxhcXtm6': SUCCEEDED.
2021-12-01 23:05:37,764 INFO cli.py:129 -- Job finished successfully.

❯ ray job logs raysubmit_RXhvSyEPbxhcXtm6
2021-12-01 23:05:59,026 INFO cli.py:25 -- Creating JobSubmissionClient at address: http://127.0.0.1:8265
2021-12-01 23:05:23,037 INFO worker.py:851 -- Connecting to existing Ray cluster at address: 127.0.0.1:6379
(pid=runtime_env) 2021-12-01 23:05:23,212   WARNING conda.py:54 -- Injecting /Users/jiaodong/Workspace/ray/python to environment /tmp/ray/session_2021-12-01_23-04-44_771129_7693/runtime_resources/conda/99305e1352b2dcc9d5f38c2721c7c1f1cc0551d5 because _inject_current_ray flag is on.
(pid=runtime_env) 2021-12-01 23:05:23,212   INFO conda.py:328 -- Finished setting up runtime environment at /tmp/ray/session_2021-12-01_23-04-44_771129_7693/runtime_resources/conda/99305e1352b2dcc9d5f38c2721c7c1f1cc0551d5
(pid=runtime_env) 2021-12-01 23:05:23,213   INFO working_dir.py:85 -- Setup working dir for gcs://_ray_pkg_bbcc8ca7e83b4dc0.zip
1
2
3
4
5
2.26.0

❯ ray job list
{'raysubmit_AYhLMgDJ6XBQFvFP': JobInfo(status='SUCCEEDED', message='Job finished successfully.', error_type=None, start_time=1645908622, end_time=1645908623, metadata={}, runtime_env={}),
'raysubmit_su9UcdUviUZ86b1t': JobInfo(status='SUCCEEDED', message='Job finished successfully.', error_type=None, start_time=1645908669, end_time=1645908670, metadata={}, runtime_env={})}Above, we ran the "Quick Start" example on a local Ray cluster. When connecting to a remote cluster via the CLI, you need to be able to access the Ray Dashboard port of the cluster over HTTP.
One way to do this is to port forward 127.0.0.1:8265 on your local machine to 127.0.0.1:8265 on the head node. If you started your remote cluster with the Ray Cluster Launcher <ref-cluster-quick-start>, then the port forwarding can be set up automatically using the ray dashboard command (see monitor-cluster for details).
To use this, run the following command on your local machine, where cluster.yaml is the configuration file you used to launch your cluster:
ray dashboard cluster.yamlOnce this is running, check that you can view the Ray Dashboard in your local browser at http://127.0.0.1:8265.
Next, set the RAY_ADDRESS environment variable:
export RAY_ADDRESS="http://127.0.0.1:8265"(Note that this port is different from the port used to connect to the cluster via Ray Client <ray-client>, which is 10001 by default.)
Now you will be able to use the Jobs CLI on your local machine as in the example above to interact with your remote Ray cluster.
The instructions above still apply, but you can achieve the dashboard port forwarding using kubectl port-forward: https://kubernetes.io/docs/tasks/access-application-cluster/port-forward-access-application-cluster/
Alternatively, you can set up Ingress to the dashboard port of the cluster over HTTP: https://kubernetes.io/docs/concepts/services-networking/ingress/
The Job Submission Python SDK is the recommended way to submit jobs programmatically. Jump to the API Reference<ray-job-submission-sdk-ref>, or continue reading for a quick overview.
SDK calls are made via a JobSubmissionClient object. To initialize the client, provide the Ray cluster head node address and the port used by the Ray Dashboard (8265 by default). For this example, we'll use a local Ray cluster, but the same example will work for remote Ray cluster addresses.
from ray.job_submission import JobSubmissionClient

# If using a remote cluster, replace 127.0.0.1 with the head node's IP address.
client = JobSubmissionClient("http://127.0.0.1:8265")
Then we can submit our application to the Ray cluster via the Job SDK.
job_id = client.submit_job(
    # Entrypoint shell command to execute
    entrypoint="python script.py",
    # Runtime environment for the job, specifying a working directory and pip package
    runtime_env={
        "working_dir": "./",
        "pip": ["requests==2.26.0"]
    }
)
Tip
By default, the Ray job server will generate a new job_id and return it, but you can alternatively choose a unique job_id string first and pass it into submit_job. In this case, the Job will be executed with your given id, and will throw an error if the same job_id is submitted more than once for the same Ray cluster.
Now we can write a simple polling loop that checks the job status until it reaches a terminal state (namely, JobStatus.SUCCEEDED, JobStatus.STOPPED, or JobStatus.FAILED), and gets the logs at the end. We expect to see the numbers printed from our actor, as well as the correct version of the requests module specified in the runtime_env.
from ray.job_submission import JobStatus
import time

def wait_until_finish(job_id):
    start = time.time()
    timeout = 5
    while time.time() - start <= timeout:
        status = client.get_job_status(job_id)
        print(f"status: {status}")
        if status in {JobStatus.SUCCEEDED, JobStatus.STOPPED, JobStatus.FAILED}:
            break
        time.sleep(1)


wait_until_finish(job_id)
logs = client.get_job_logs(job_id)
The output should be as follows:
status: JobStatus.PENDING
status: JobStatus.RUNNING
status: JobStatus.SUCCEEDED

1
2
3
4
5

2.26.0
Tip
Instead of a local directory ("./" in this example), you can also specify remote URIs for your job's working directory, such as S3 buckets or Git repositories. See remote-uris for details.
A submitted job can be stopped by the user before it finishes executing.
job_id = client.submit_job(
    # Entrypoint shell command to execute
    entrypoint="python -c 'import time; time.sleep(60)'",
    runtime_env={}
)
wait_until_finish(job_id)
client.stop_job(job_id)
wait_until_finish(job_id)
logs = client.get_job_logs(job_id)
To get information about all jobs, call client.list_jobs(). This returns a Dict[str, JobInfo] object mapping Job IDs to their information.
For full details, see the API Reference<ray-job-submission-sdk-ref>.
Under the hood, both the Python SDK and the CLI make HTTP calls to the job server running on the Ray head node. You can also directly send requests to the corresponding endpoints via HTTP if needed:
Submit Job
import requests
import json
import time

resp = requests.post(
    "http://127.0.0.1:8265/api/jobs/",
    json={
        "entrypoint": "echo hello",
        "runtime_env": {},
        "job_id": None,
        "metadata": {"job_submission_id": "123"}
    }
)
rst = json.loads(resp.text)
job_id = rst["job_id"]
Query and poll for Job status
start = time.time()
while time.time() - start <= 10:
    resp = requests.get(
        "http://127.0.0.1:8265/api/jobs/<job_id>"
    )
    rst = json.loads(resp.text)
    status = rst["status"]
    print(f"status: {status}")
    if status in {JobStatus.SUCCEEDED, JobStatus.STOPPED, JobStatus.FAILED}:
        break
    time.sleep(1)
Query for logs
resp = requests.get(
    "http://127.0.0.1:8265/api/jobs/<job_id>/logs"
)
rst = json.loads(resp.text)
logs = rst["logs"]
List all jobs
resp = requests.get(
    "http://127.0.0.1:8265/api/jobs/"
)
print(resp.json())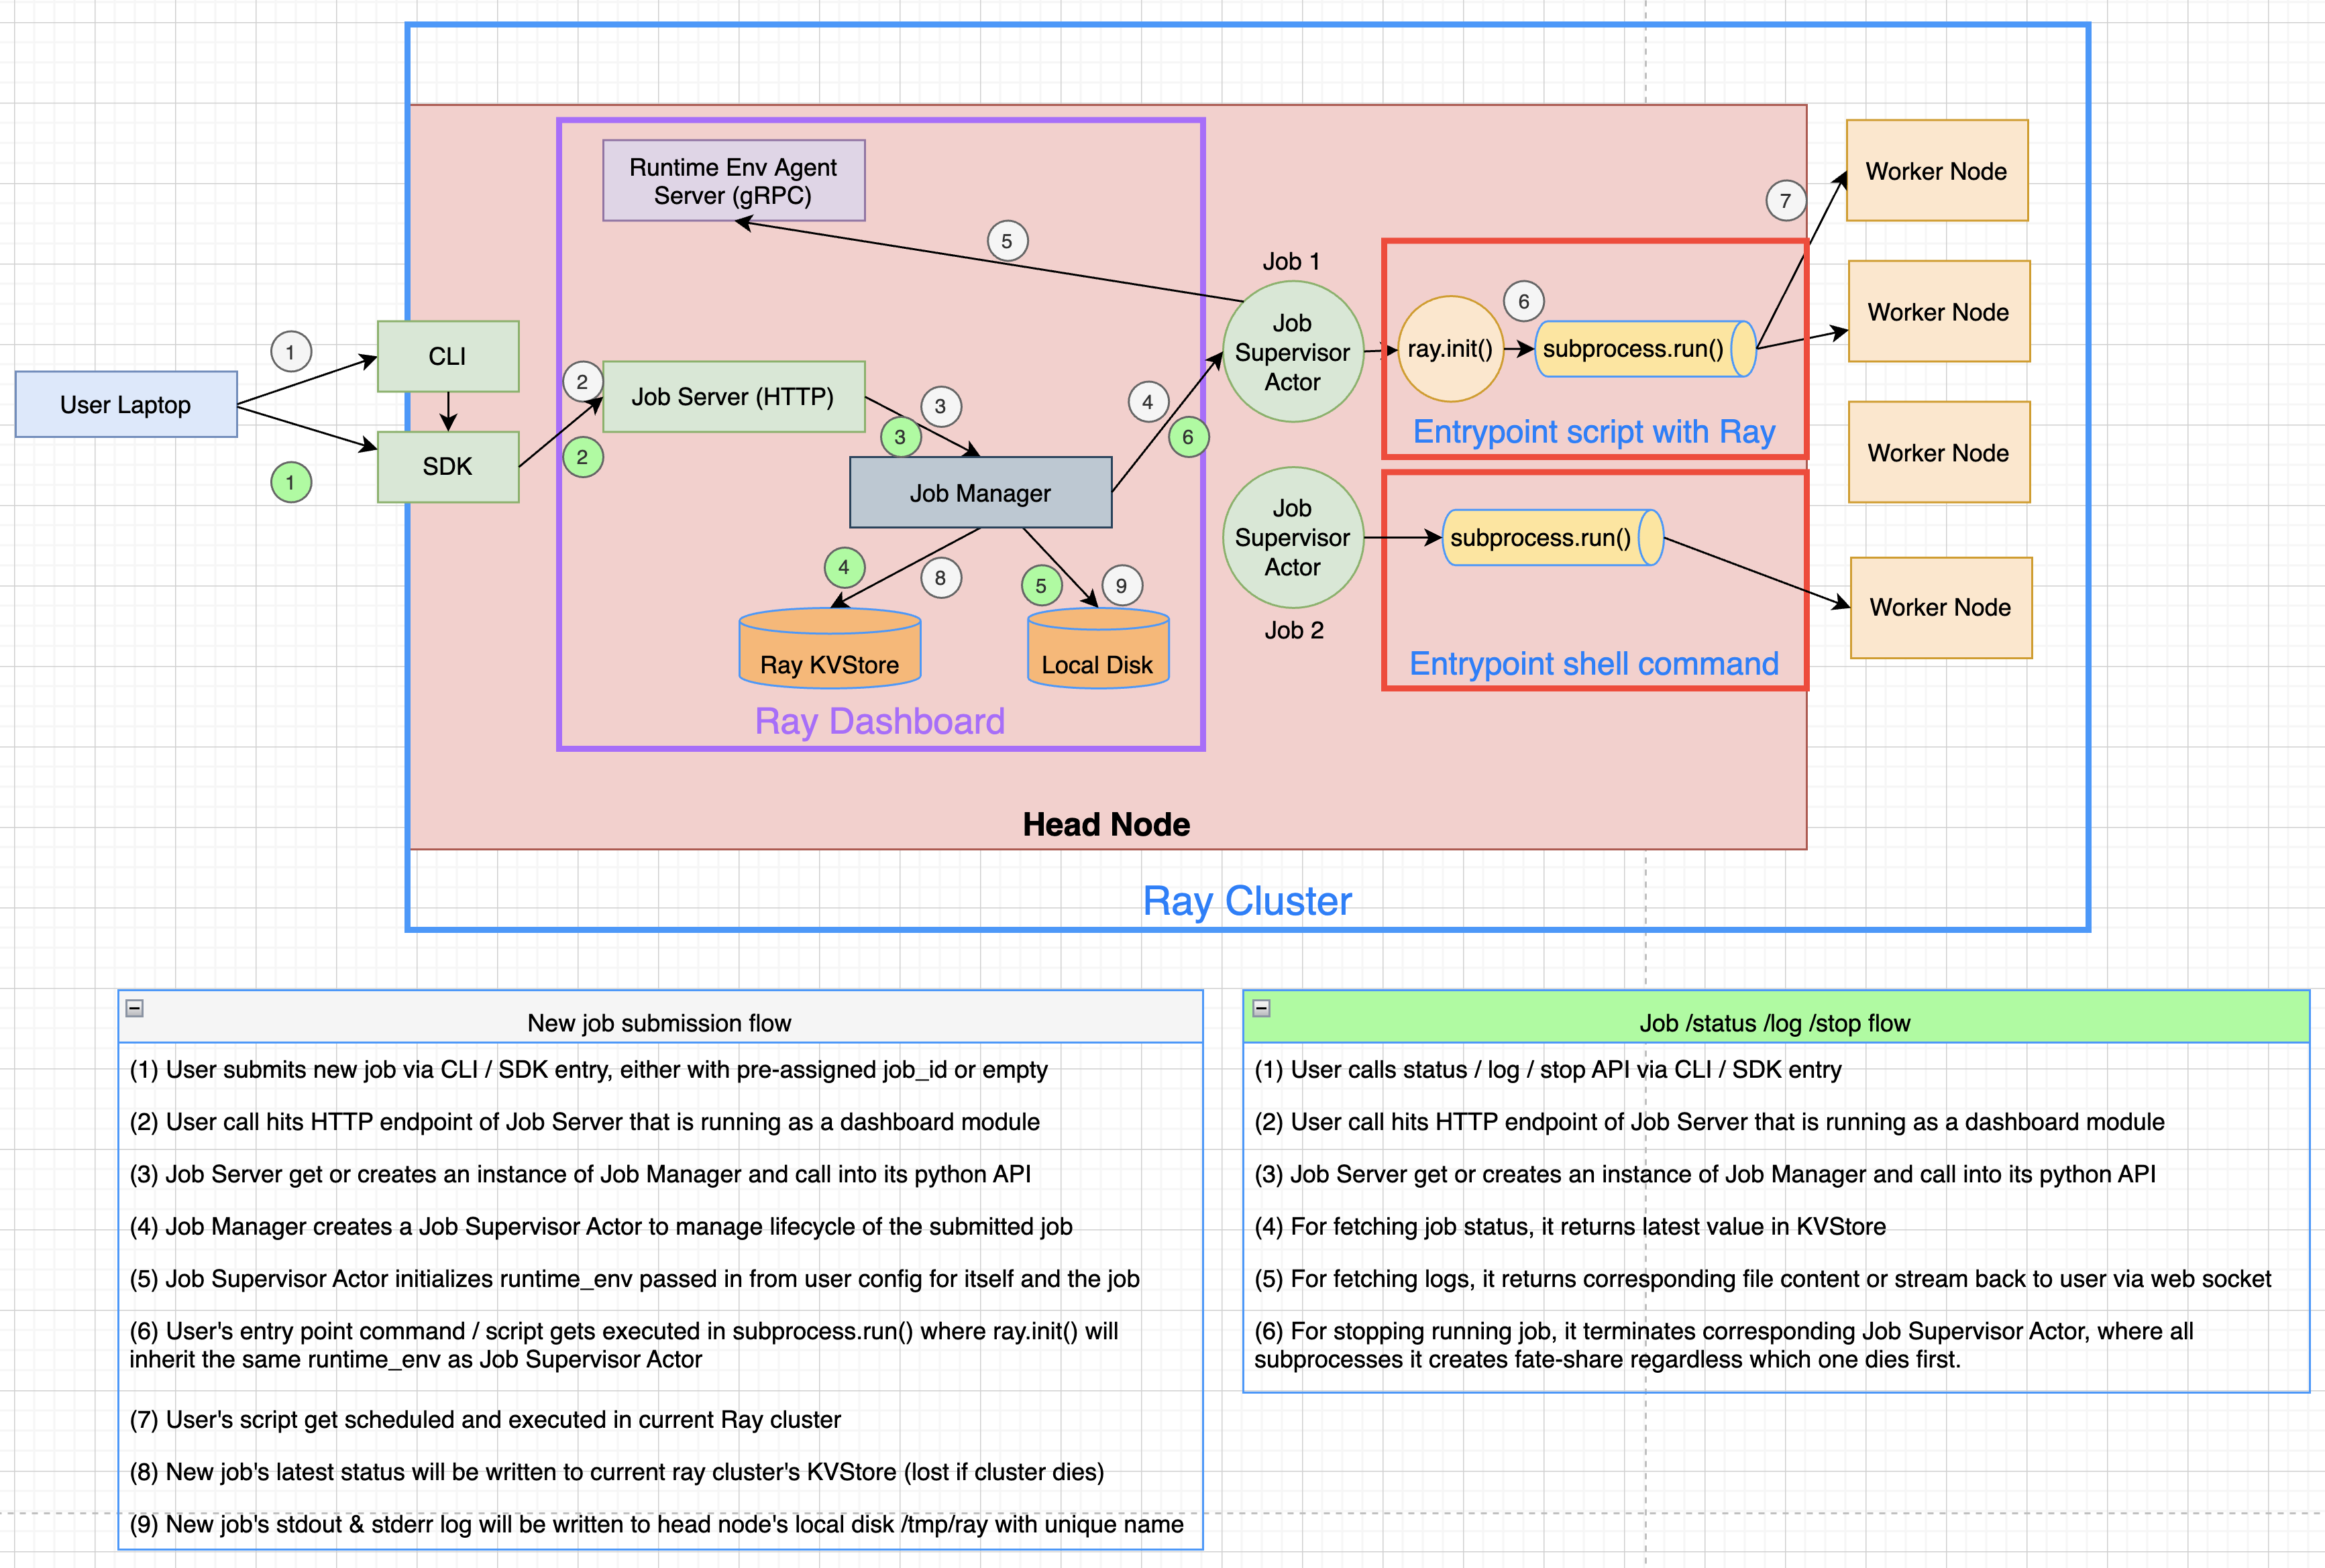
# {"job_id": {"metadata": ..., "status": ..., "message": ...}, ...}The following diagram shows the underlying structure and steps for each submitted job.