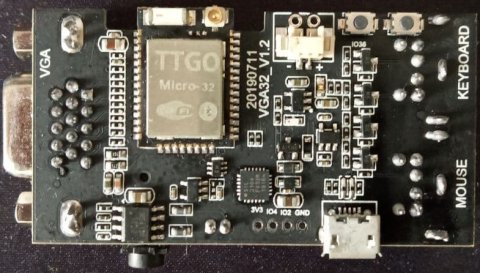
Galaksija emulator port to TTGO VGA32 v1.x (1.0, 1.1, 1.2, 1.4) board with ESP32.
Based on the x86 emulator by Miodrag Jevremovic, Tomaž Šolc and Peter Bakota.
- Ported from x86 PC to ESP32
- No PSRAM used, running on ESP32 with 520 KB RAM (TTGO VGA32 v1.x)
- Use of a single core
- Low resource OSD
- Created project compatible with Arduino IDE and Platform IO
- Project compatible with Web Editor and ArduinoDroid (6.3.1) with tool makearduinodroidwin.bat and makearduinodroidlinux.sh
- Support for mode 8 and 64 colors (reduced version by Ricardo Massaro).
- VGA 360x200, 320x200 and 320x240
- Startup video mode selection in build.
- Video mode selection at boot (500 ms) by pressing a key.
- Switching video mode on the fly, at any time and without rebooting.
- Crt b&w, green or orange color filter
- Reduced emulation from 64KB of RAM to just 8KB. Only Galaksija's 6 KB of RAM is emulated.
- Mapping ROMs to Flash, instead of RAM
- Various optimizations in video dump and CPU emulation.
- Reduced Z80 emulation code to only 2 files (Z80Z80.h and Z80Z80.cpp).
- Reduction and compaction of the project to be able to be taken to more limited platforms than the ESP32.
- CPU and Video Statistics in OSD.
- Free RAM statistics from OSD.
- UART remote keyboard.
- 360x200
- 320x200
- 320x240
Video modes can be selected during boot (500 ms) or reboot, and another time can be specified in gbConfig.h in the use_lib_boot_time_select_vga section , by simply pressing the same key, from '0' to 'F'.
The startup video mode can also be set in the build, but it is most convenient to hot-switch it from the OSD at any time.
Likewise, for each video mode, there is the possibility of using the Espressif pll adjustment function, or a custom one, which prevents the ESP32 from hanging. This special video mode has the addition of the apll.
Different video settings are also allowed, with fabgl or bitluni modes.
- black and white
- green match
- Orange
- 3 bpp (8 colors)
- 6 bpp (64 colors)
https://github.com/rpsubc8/ESP32TinyGalaksija/tree/main/esp32/precompile
We must choose the ESP32 type:

- TTGO VGA32 v1.x (1.0, 1.1, 1.2, 1.4)
- Visual Studio 1.48.1 PLATFORMIO 2.2.1 Espressif32 v3.3.2
- Arduino IDE 1.8.11 Espressif System 1.0.6
- ArduinoDroid (6.3.1)
If we are on Android with termux or Linux, we must run makearduinodroidlinux.sh.
The 'notdelete' directory is internal to the script and is used to copy the gbCompileOpt.h.
At the end of the script itself, we can open the galaksija.ino, and recompile from the ArduinoDroid, without anything special. The script has a pause at the beginning, in case we want to stop the script from outside, as well as a stop at the end, to see the results of the process.
This script searches for the files going up levels until it reaches TinyGalaksijattgovga32/galaksija, so it is required to download the complete project with the entire structure:
 TinyGalaksijattgovga32
  galaksija
   dataFlash
  include
  lib
  test
 tools
  arduinodroid
   galaksija
  data2h
The ArduinoDroid (6.3.1) with ESP32 support only works with 64-bit processors.
The project is already prepared, so no bitluni or fabgl library is needed. We must disable the PSRAM option, and if the binary exceeds 1 MB, select 4 MB partition when uploading. Although the code does not use PSRAM, if the option is active and our ESP32 does not have it, an exception will be generated and it will restart in loop mode.
- Load or select a tape (GTP)
- Load or select a snapshot (GAL)
- Select language Spanish or English
- Select 16 video modes
- Change the color green, orange or black and white, like retro monitors
- Show CPU and video statistics
- Enable USB debugging output (serial)
- Help
- Reset the ESP32 or the emulator
- Intercept the tape routine when we type the OLD command from BASIC, and we have selected a GTP, instead of loading and executing it.
- Change polling milliseconds for video, keyboard
- View free RAM
You can always exit the OSD with the ESC key.
The Up and Down cursors allow you to navigate through each action. If they are held down for a couple of milliseconds, they allow quick action.
- Load: Allows us to load it.
- Select: It only selects it, being able to read it from BASIC with the OLD command.
It is advisable to have a clean execution, whenever we load games, that is, restart the emulator, to leave everything as good as possible.
When memory errors occur, a trace is left through the serial port, and after a couple of them, the emulator (not the ESP32) restarts itself, leaving us a trace.
GALs must be 8268 bytes in size.
- CPU time (20 milliseconds)
- Video dump time (20 milliseconds)
The statistics have been placed on the right and vertically, so as not to interfere at any time on the emulated screen.
| Field | Description |
|---|---|
| C | ESP32 microseconds that it takes to process the current 20 milli frame |
| M | Microseconds of the ESP32 that it takes to process the fastest frame of 20 millis in 1000 millis |
| MX | Microseconds of the ESP32 that it takes to process the slowest frame of 20 millis in 1000 millis |
| I | ESP32 free microseconds in a 20 milli frame, counting the video dump |
| FPS | Real FPS processed by the emulator at 1000 millis |
| FND | FPS that would give us no limit at 20 millis per frame, setting the CPU menu to 0 ms (fast) |
| V | Microseconds of the ESP32 that it takes to dump a frame of 20 millis |
| F | Real FPS we are actually dumping the video at |
The Galaksija has a 54-element keystroke buffer.
The following keys are emulated:
| Emulator keys | Keys (real PS/2 keyboard) | Buffer Galaksija |
|---|---|---|
| 0 .. 9 | 0 .. 9 | 32 .. 41 |
| A .. Z | A .. Z | 1 .. 26 |
| Above | Above | 27 |
| Below | Below | 28 |
| Left | Left | 29 |
| Right | Right | 30 |
| Space bar | Space bar | 31 |
| Delete | Delete | 29 |
| ; | ; | 42 |
| " | ' | 43 |
| , | , | 44 |
| = | = | 45 |
| . | . | 46 |
| / | / | 47 |
| ENTER | ENTER or RETURN | 48 |
| CONTROL | CONTROL | 50 |
| SCROLL | SCROLL | 52 |
| SHIFT | SHIFT left or right | 53 |
Galaksija entry 51, which would be DELETE, is not mapped in the emulator.
The F1 key on the PS/2 keyboard brings up the emulator's OSD menu.
The remote keyboard does not have the same response as a real keyboard, since key commands are sent, and not a map of pressed characters.
It cannot be used in the Arduino IDE console, because it always waits for ENTER to be sent to accept commands.
We have to activate the use_lib_log_keyboard_uart pragma in gbConfig.h, compile and run.
Not all the keys are mapped, and it is something basic, useful for testing, without failing to use the real PS/2 keyboard.
| PC keys | Function |
|---|---|
| F2 or TAB | Shows the OSD menu |
| ESC | Exit menu |
| Above | Above |
| Below | Below |
| Left | Left |
| Right | Right |
| Delete or DEL | Delete |
| ENTER | ENTER |
| 0 .. 9 | 0 .. 9 |
| A .. Z | A .. Z |
| . | . |
| - | Left shift |
If we press the '-' at the same time as another key, for example, the 'A' is the equivalent of pressing (SHIFT + A) in the emulator.
-
Keyboard:
- KEYBOARD_DATA - (32)
- KEYBOARD_CLK - (33)
-
VGA syncs:
- HSYNC_PIN - (23)
- VSYNC_PIN - (15)
-
VGA red
- PIN_RED_LOW - (21)
- PIN_RED_HIGH -(22)
-
VGA green
- PIN_GREEN_LOW - (18)
- PIN_GREEN_HIGH - (19)
-
VGA blue
- PIN_BLUE_LOW - (4)
- PIN_BLUE_HIGH - (5)
When we use 6 bpp, we are using all the VGA GPIOs, but when we use 3 bpp, we only use:
- PIN_RED_HIGH - (22)
- PIN_GREEN_HIGH - (19)
- PIN_BLUE_HIGH - (5)
- use_lib_boot_time_select_vga: The higher the value, the longer it will take to boot. If during this time, we press the keys from 0 to 9 or the letters from A to F, we will be choosing a video mode. It is also valid for reboot.
- use_lib_boot_vga_360x200x70hz_bitluni_3bpp: 360x200 8 colors.
- use_lib_boot_vga_360x200x70hz_bitluni_apll_3bpp: 360x200 8 colors apll correction, for ESP32 that hang.
- use_lib_boot_vga_320x200x70hz_bitluni_3bpp: 320x200 8 colors.
- use_lib_boot_vga_320x200x70hz_fabgl_3bpp: 320x200 8 colors with fabgl parameters.
- use_lib_boot_vga_320x200x70hz_bitluni_apll_3bpp: 320x200 8 colors apll correction, for ESP32 that hang.
- use_lib_boot_vga_320x240x60hz_bitluni_3bpp: 320x240 8 colors.
- use_lib_boot_vga_320x240x60hz_fabgl_3bpp: 320x240 8 colors with fabgl parameters.
- use_lib_boot_vga_320x240x60hz_bitluni_apll_3bpp: 320x240 8 colors apll correction, for ESP32 that hang.
- use_lib_boot_vga_360x200x70hz_bitluni_6bpp: 360x200 64 colors
- use_lib_boot_vga_360x200x70hz_bitluni_apll_6bpp: 360x200 64 colors apll correction, for ESP32 that hang.
- use_lib_boot_vga_320x200x70hz_bitluni_6bpp: 320x200 64 colors
- use_lib_boot_vga_320x200x70hz_fabgl_6bpp: 320x200 64 colors with fabgl parameters.
- use_lib_boot_vga_320x200x70hz_bitluni_apll_6bpp: 320x200 64 colors apll correction, for ESP32 that hang.
- use_lib_boot_vga_320x240x60hz_bitluni_6bpp: 320x240 64 colors
- use_lib_boot_vga_320x240x60hz_fabgl_6bpp: 320x240 64 colors with fabgl parameters.
- use_lib_boot_vga_320x240x60hz_bitluni_apll_6bpp: 320x240 64 colors apll correction, for ESP32 that hang.
There are more options.
- use_lib_log_serial: Logs are sent via USB serial port.
- use_lib_fix_double_precision: Do not use FPU for PLL calculation.
- use_lib_debug_i2s: Detailed information of video mode initialization.
- use_lib_keyboard_uart: Allows you to use a remote keyboard via UART via putty or the VStudio console.
- use_lib_log_keyboard_uart: The remote keyboard trace.
It is recommended to have short file names. Additionally, the tool cuts to 32 characters to display in the OSD.
 input/
  gal/
  gtp/
 output/
  dataFlash/
   gal/
   gtp/
Later we must copy the dataFlash directory to the TinyGalaksijattgovga32\galaksija project, overwriting the previous dataFlash folder. It is recommended to clean the project and compile again.
This tool is very simple, and does not control errors, so it is recommended to leave the files with very simple names and as simple as possible.
Since the source code is available, it can be compiled for Linux or for Android under Termux. In Termux we have to install the gcc or clang package and compile:
gcc -s data2h.cpp -odata2h.aIt must be done from the home data directory of the Android device, so if we do it in any other directory, the data2h.a created will never be able to be executed, unless the device is rooted.
board_build.partitions = huge_app.csvIn the Arduino IDE, we must choose the Partition Scheme (Huge APP) option.

The VGA video output is for 8 colors (3 pins). The same thing, if we connect a monitor of questionable condition, although the VGA is for output, we could be scared.
Although it is very simple, it requires minimal knowledge of electronics, so if you don't know what you are doing, it is better not to do anything. I ignore what may happen.