SharePoint on premise addin only authentication
This type of authentication uses addin only policy and OAuth bearer tokens for authenticating http requests.
-
clientId- required string, client id obtained when registering the addin -
issuerId- required string, issuer id you provided when registering the addin -
realm- required string, actually this is your farm id, you can get realm by runningGet-SPFarm | Select IdorGet-SPAuthenticationRealm, value will be the same -
rsaPrivateKeyPath- required string, path to your private part of the certificate you created when registering the addin. File need to be inpemformat (read below) -
shaThumbprint- required string, sha thumbprint of the.pfxcertificate
Read further to see how to obtain all this values. Actually, this authentication option requires the most comprehensive configuration, so be patient :).
{
    clientId: 'ded561d0-05dc-48b8-8c64-9b161392b9e8',
    issuerId: '9e9e46c4-6329-4990-a0b8-13b87b3ba56a',
    realm: '3bf32a1f-9ea9-4adb-8727-aad194f89785',
    rsaPrivateKeyPath: './test/integration/spaddin.key',
    shaThumbprint: 'v4HGgYynTnuL8gZk368JlFw9FeE'
}{
headers: {
'Authorization': 'Bearer <token>'
}
}In short, you need to configure addin environment (if not yet configured), generate certificates for addins (if not yet generated), register the addin, extract private key from .pfx file, convert to .key and extract sha thumbprint.
All steps in details:
-
Configure your environment for apps for SharePoint - msdn article or use other internet resources if you want, there are plenty information regarding this topic. This task involves configuring the Subscription Settings and App Management service applications, app url, dns, etc.
-
You need to create certificate for your addins communication with SharePoint. Private part will be inside your addin, public will be added to SharePoint via PowerShell scripts. You can use IIS to create self-signed certificate for development, or you can use
makecertin order to generate certificate. Additional info in the msdn article - Create high-trust SharePoint Add-ins (Obtain a certificate or create a public and private test certificate).
IIS self-signed certificate valid for 1 year, withmakecertyou can generate certificate valid for 10 years, you can also provide your own common name you want:makecert.exe -r -pe -n "CN=<common name, for example sp2013dev>" -m 120 -len 4096 -a sha256 -eku 1.3.6.1.5.5.7.3.1 -ss my -sr localMachine -sky exchange -sp "Microsoft RSA SChannel Cryptographic Provider" -sy 12This certificate will be valid for 10 years (
-m 120). Certificate generated with code above is available under IIS server certificates. -
Export private '.pfx' and public '.cer' parts of generated certificate and save in common place. How to export keys you can find using msdn article above ('Create high-trust SharePoint Add-ins')
-
Now you need to configure SharePoint to use certificates and configure trust for your addin. You can use article 'Create high-trust SharePoint Add-ins' or can use my script CreateTrust.ps1, update parameters
$publicCertPath,$authorityName,$issuerId,$tokenIssuerName. -
You may need to disable https requirements for SharePoint by running folowing PowerShell:
$serviceConfig = Get-SPSecurityTokenServiceConfig
$serviceConfig.AllowOAuthOverHttp = $true
$serviceConfig.Update()
-
Register an addin inside SharePoint - open url
https://sp2013/sites/dev/_layouts/15/appregnew.aspx. -
Click on 'Generate' for Client id and Client Secret, fill in Title, App Domain, Redirect URI (you can type in any values you want)
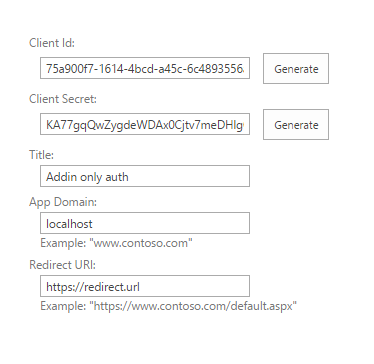
-
Click on 'Create' and save generated Client Id (Client Secret is not needed since we are on-premise and using S2S authentication).
-
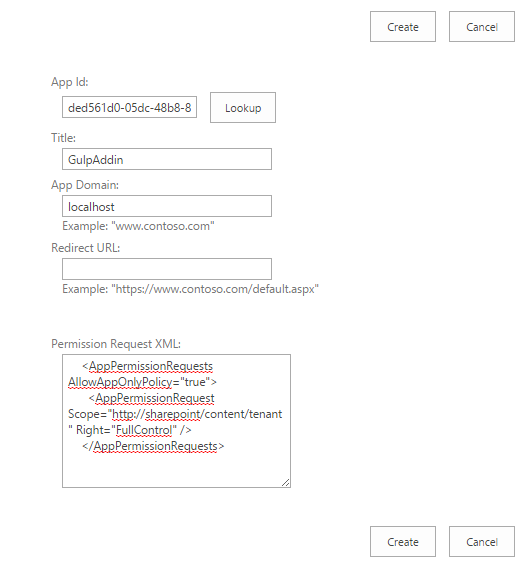
Apply permissions to the addin - open
https://sp2013/sites/dev/_layouts/15/appinv.aspx, paste in Client Id from previous step into 'App Id' field and click 'Lookup', then paste in following xml into the field 'Permission Request XML' (SharePoint admin rights required) and click 'Create':<AppPermissionRequests AllowAppOnlyPolicy="true"> <AppPermissionRequest Scope="http://sharepoint/content/tenant" Right="FullControl" /> </AppPermissionRequests>
-
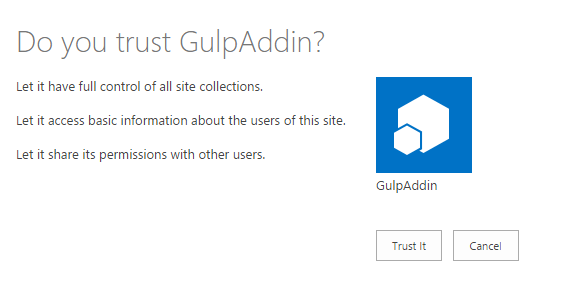
You will be prompted with trust confirmation, click 'Trust it'
-
In order to sign tokens from nodejs we need private key in format, different from
.pfx..pfxis used mostly for Windows environment, we need to convert it to.keyfile with help ofopenssltool. Download suitalbe version for you from here Win OpenSSL. For exampleWin64 OpenSSL v1.1.0b Lightfor windows x64. Installopenssl. -
Create private
.keyand sha thumbprint by running CreateKeys.ps1. Update params$openSSLPath,$pfxPath,$pfxPassword.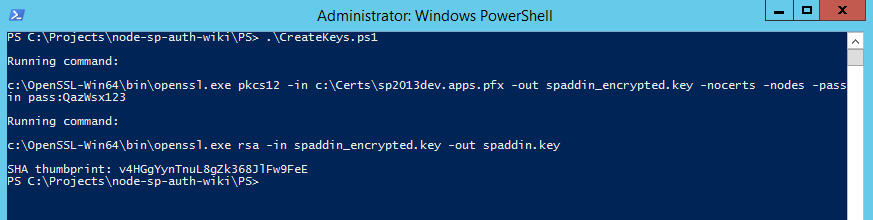
-
After running sha thumbprint will be available in the end of the script's output.
spaddin.keywill be created, save it under common place. -
Update your credentials object with appropriate values:
-
clientid- Client Id generated on step 8 -
realm- this is your farm id, you can get realm by runningGet-SPFarm | Select IdorGet-SPAuthenticationRealm, value will be the same -
issuerid- issuer id from step 4 -
rsaPrivateKeyPath- path to.keyfile created on step 13 -
shaThumbprint- sha thumbprint from step 13
import * as spauth from 'node-sp-auth';
import * as request from 'request-promise';

spauth
  .getAuth('https://sp2013dev/sites/dev/', {
    clientId: 'ded561d0-05dc-48b8-8c64-9b161392b9e8',
    issuerId: '9e9e46c4-6329-4990-a0b8-13b87b3ba56a',
    realm: '3bf32a1f-9ea9-4adb-8727-aad194f89785',
    rsaPrivateKeyPath: 'spaddin.key',
    shaThumbprint: 'v4HGgYynTnuL8gZk368JlFw9FeE'
  })
  .then(data => {
    let headers = data.headers;
    headers['Accept'] = 'application/json;odata=verbose';

    request.get({
      url: 'https://sp2013dev/sites/dev/_api/web',
      headers: headers,
      json: true,
      rejectUnauthorized: false
    }).then(function (response) {
      console.log(response.d.Title);
    });
  });