Running 32 bit Raspbian Packages on your 64 bit Gentoo System
Install 32-bit apps from Raspbian, and run them alongside your Gentoo 64-bit ones!
As the 64-bit ARM architecture is still in its early phases with Gentoo, you may sometimes find yourself wishing you could just install and run a particular 32-bit package from Raspbian, if it has not yet been added to the Gentoo arm64 tree.
Well, the good news is you can, while still running your gentoo-on-rpi-64bit system, since mixed-mode userland is permitted on ARMv8! In this tutorial, I'll show you how to set it up — the process involved isn't difficult ^-^
Now, since as shipped, your gentoo-on-rpi-64bit system is not "multilib" (i.e., contains only 'pure' 64-bit libraries), but the ARMv8 spec requires that a 32-bit app must have access to 32-bit versions of all its library dependencies, we'll square the circle by first setting up a 'donor' 32-bit system image on USB (in this case, Raspbian Lite). We'll then chroot into it from our 64-bit Gentoo environment when we need to install or run Raspbian 32-bit packages. Apps (even, as we'll see, desktop apps) can be launched from the Raspbian chroot, and run happily (as first-class citizens) alongside 64-bit apps on your Gentoo system.
Advanced users are of course free to select any distro and configuration they like (e.g. an Arch Linux system contained within a subdirectory of the main Gentoo root, on the same drive, etc.). I have chosen to use a Raspbian Lite image (written to a separate drive) here as the 'donor', since it is a popular distribution for the RPi4/3 (using the 'Lite' variant, since the desktop is already supplied by the 64-bit 'host'). Placing its filesystem on a separate drive makes it easy for users to write the image, and also makes it possible to boot the image standalone, to ensure its initial setup has properly completed (root partition expanded etc.) prior to using it as a 'donor'.
Begin by downloading the latest Raspbian Lite ZIP file from https://www.raspberrypi.org/downloads/raspbian/.
I recommend using the 'Lite' version here: it's much smaller than the full Raspbian variant, largely because it has no desktop GUI included (unnecessary for our purposes, since the 'host' 64-bit Gentoo system already has an Xfce4 desktop running).
Once you have it downloaded, write it to an (unused) USB stick (2GB minimum, be sure to choose a boot-compatible device) using a tool such as Etcher. The full process is described here (but remember to write to a USB stick, rather than a micro SD card — Etcher supports both).
Users familiar with command line tools can of course
unzip, thencatorddthe image directly to the target USB stick, rather than using Etcher.
The writing process should take no more than around 15 minutes to complete.
Next, you'll need to configure your RPi3 to boot from USB.
Don't worry: micro SD card booting will still be supported, and will always be tried first, even when your RPi3 is configured in this way, so you won't lose any functionality.
USB boot is not yet supported on the RPi4, but will be soon.
For the RPi3 Model B+, you don't need to do anything! The necessary one time programmable fuse has already been set at the factory, so proceed directly to the next step now.
For the RPi3 Model B, you need to add the following line to the end of your /boot/config.txt file (you can use e.g. sudo mousepad /boot/config.txt, to access the file for editing):
program_usb_boot_mode=1Once you have added the line and saved the file, reboot your RPi3 B (still running Gentoo at this point), to have the change applied.
After rebooting, the additional line can be safely deleted from
/boot/config.txt(it will have no further effect if left in, since setting the fuse is a 'one time' operation).
Next, shutdown your RPi, and then disconnect the power. Remove your current gentoo-on-rpi-64bit micro SD card (leaving the slot empty), and plug in the USB stick you just wrote the Raspbian image to (you can use any of the Pi's four USB ports, it doesn't matter).
With that done, reconnect the power. The RPi3 should now boot Raspbian Lite off of the USB stick (since this contains a valid bootable image, the OTP fuse bit is set, and the micro SD slot on the board is currently empty).
It isn't necessary to actually boot the image to be able to use it, of course, but doing so ensures that the various once-off initialization tasks (such as resizing the root filesystem to fill the drive) are completed, which is better hygiene.
Raspbian will go through its familiar boot-up sequence (including an automatic reboot, to allow the root filesystem to be resized). You will eventually be greeted with a (textual, since this is the 'Lite' version) login prompt.
When this appears, log in as the pi user (password, raspberry), and then immediately issue:
pi@raspberrypi:~ $ sudo poweroffOnce the shutdown has completed, your 32-bit Raspbian 'donor' image is ready for use! Remove the power cable from the RPi, then remove the Raspbian USB stick.
Re-insert your gentoo-on-rpi-64bit micro SD card, and apply power.
Once your system has booted up into the Xfce4 desktop, open a terminal, and become root:
demouser@pi64 ~ $ sudo su --login root
pi64 ~ #
Unless you have changed the default configuration, the above command will not require a password.
Next, insert the Raspbian USB stick (into any of the RPi's USB ports). You should see translucent rootfs and boot icons appear on the desktop, but don't click on them at this stage. Instead, we'll mount the Raspbian root partition ('rootfs') manually, at a known location. Working as root at the terminal, issue
pi64 ~ # mkdir -pv /mnt/raspbian
pi64 ~ # mount -v /dev/sda2 /mnt/raspbian
mount: /dev/sda2 mounted on /mnt/raspbian.
Of course, if you have other storage devices attached, the device path of your Raspbian root filesystem may be something other than
/dev/sda2, in which case adjust accordingly. For example, if your Gentoo system is itself running off a USB stick, then you'll probably need to use/dev/sdb2in the above commands.
With this done, our 'donor' root filesystem is available at /mnt/raspbian. You can check this out:
pi64 ~ # ls /mnt/raspbian
bin   dev  home  lost+found  mnt  proc  run   srv  tmp  var
boot etc lib media opt root sbin sys usrWith the 'donor' image mounted, we need to perform some initial preparations, to ensure that the host system's special filesystems (viz.: /dev, /proc, /sys and /tmp) are available inside it. To do so, we'll bind-mount them (for more details, please see here and here):
pi64 ~ # mount -v --rbind /dev /mnt/raspbian/dev
pi64 ~ # mount -v --make-rslave /mnt/raspbian/dev
pi64 ~ # mount -v -t proc /proc /mnt/raspbian/proc
pi64 ~ # mount -v --rbind /sys /mnt/raspbian/sys
pi64 ~ # mount -v --make-rslave /mnt/raspbian/sys
pi64 ~ # mount -v --rbind /tmp /mnt/raspbian/tmp
Next, to ensure DNS works as expected, we'll copy the 'host' system's /etc/resolv.conf file and /etc/hosts into the 'donor':
pi64 ~ # cp -v -L /etc/{hosts,resolv.conf} /mnt/raspbian/etc/Then, to allow the pi user to launch desktop apps, we'll provide it with a copy of demouser's .Xauthority 'magic cookie' file.
pi64 ~ # cp -v /home/demouser/.Xauthority /mnt/raspbian/home/pi/This isn't a 'production quality' solution of course, just a quick way to enable access, for demo purposes, in this tutorial. For a more detailed discussion of X11's security (and how to bolster it), please see e.g., my article here.
Now we are ready to enter the chroot! Issue:
pi64 ~ # chroot /mnt/raspbian /bin/bash
root@pi64:/#
Within the
chrootterminal, the path/mnt/raspbianon the 'host' will appear as the "true" root,/(hence the name of the command, change root), and paths on the host such as '/bin' (that haven't been bind-mounted) will be inaccessible (i.e.,/bininside the chroot will refer to the path/mnt/raspbian/binoutside). For avoidance of doubt, if you open another terminal on the desktop of course, that will be outside of thechroot, still running in 64-bit mode, and with a 'normal' view of the filesystem.
We're in, but the console prompt is a bit confusing! As everything we do (at this prompt) is running inside a 32-bit Raspbian system, we should modify it for clarity. Issue:
root@pi64:/# export PS1="${PS1//\\h/chroot-32}"
root@chroot-32:/#
Next, make sure that the pi user owns the .Xauthority file we copied in above, and then log in as the 'pi' user (no password required, since we're coming from the root account):
root@chroot-32:/# chown pi:pi /home/pi/.Xauthority
root@chroot-32:/# su --login pi
pi@pi64:~ $
Then, fix the pi user's prompt too:
pi@pi64:~ $ export PS1="${PS1//\\h/chroot-32}"
pi@chroot-32:~ $
Next, ensure that desktop apps launched by the pi user from this session know to use this .Xauthority when talking to the X server:
pi@chroot-32:~ $ export XAUTHORITY="/home/pi/.Xauthority"
pi@chroot-32:~ $ export DISPLAY=":0.0"
And that's the setup complete! Have a look around your chroot 'jail':
pi@chroot-32:~ $ ls /
bin   dev  home  lost+found  mnt  proc	run   srv  tmp	var
boot  etc  lib	 media	     opt  root	sbin  sys  usr
If you open another terminal on your Gentoo desktop, you can compare this with the contents of the 'outer' root, by running
lsthere (for example, it has nolib64directory, obviously!).
That was a 32-bit ls you just ran, but the kernel is unchanged:
pi@chroot-32:~$ file $(which ls)
/bin/ls: ELF 32-bit LSB executable, ARM, EABI5 version 1 (SYSV), dynamically linked, interpreter /lib/ld-linux-armhf.so.3, for GNU/Linux 3.2.0, BuildID[sha1]=c24d547f9d1a35be487f168d83c3cbfcebeaa39c, stripped
pi@chroot-32:~ $ uname --all
Linux pi64 4.14.33-v8-0a76b56e61cf+ #2 SMP PREEMPT Wed Apr 11 13:16:14 BST 2018 aarch64 GNU/Linux
Your output may of course differ (different kernel, BuildID etc.), but the take-home point is: you just ran a 32-bit program on a 64-bit system.
Nevertheless, you can do much more than that! As we are chrooted inside a full Raspbian system (in this terminal window), we aren't limited to apps that ship with its baseline image, like ls: we can install anything we like that is available in the Raspbian repos. Let's try that out next!
For starters, since this is a full 32-bit OS (hosted by our 64-bit kernel) we can do all the usual package maintenance operations.
So, (assuming you have a working network connection on your 'outer' RPi system) we can begin by updating our Raspbian repo metadata, using the familiar command:
pi@chroot-32:~$ sudo apt-get update -y
... additional output suppressed ...
With that done, we can install any package we like from the Raspbian repos. To prove that doesn't just apply to 'simple' things, let's install the 'Lazarus' Pascal graphical IDE (and 32-bit build of the Free Pascal Compiler):
pi@chroot-32:~$ sudo apt-get install -y lazarus
... additional output suppressed ...
This command may take some time to complete, as there are a lot of (binary) packages to install, and you are starting from a fairly minimally populated system.
Remember, we are still running Gentoo on the 'host', this is all happening in our 32-bit chroot 'donor'.
Now we have lazarus installed, we can run it, so (e.g.):
pi@chroot-32:~$ lazarus-ide &>/dev/null&And the 32-bit IDE should start up, displaying on your 'outer', 64-bit system desktop:
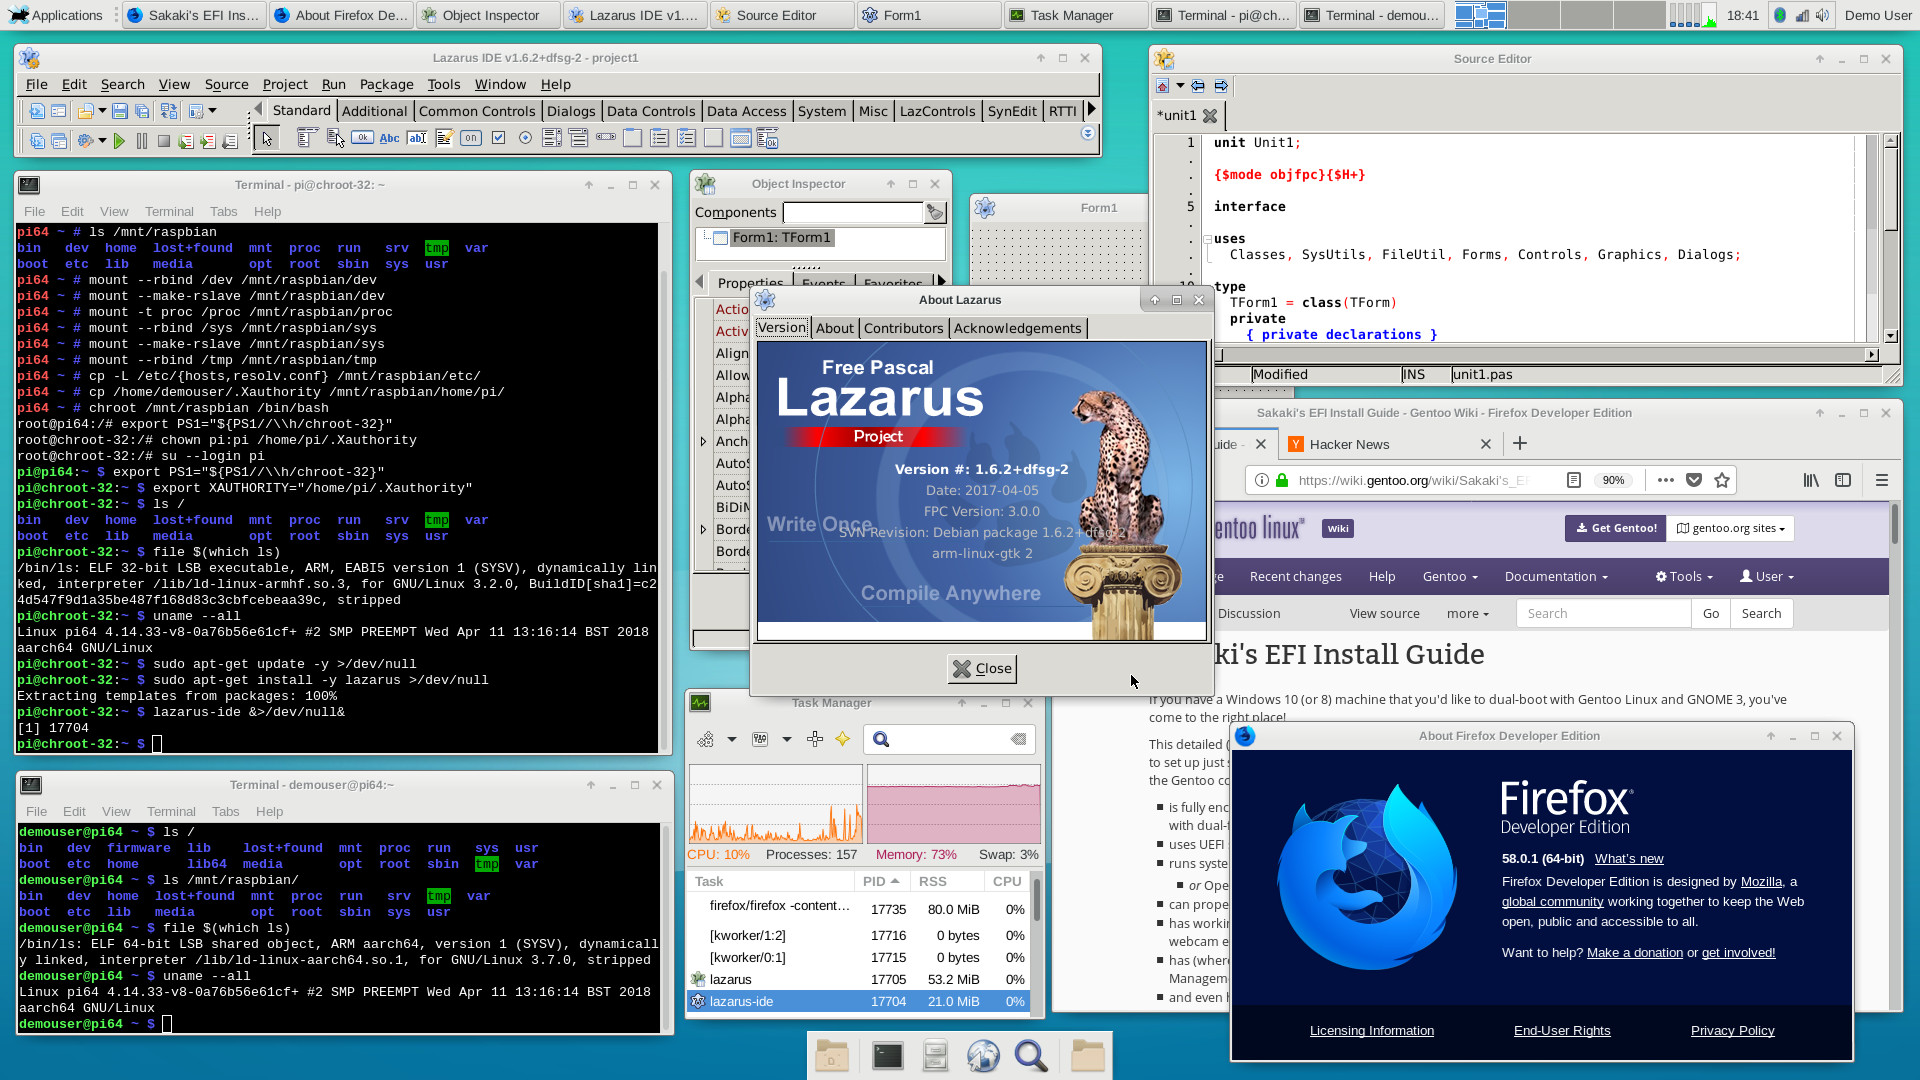
There is nothing 'magic' about this 32-bit lazarus-ide process: as you can see in the above screenshot, it appears within the task manager on the main desktop (provided this is set to show processes from all users), along with processes from e.g., the 64-bit Firefox Quantum instance.
Please remember that files in the chrooted filesystem may be viewed (and with appropriate permission, modified) from the 'outer', 64-bit system, you just have to prefix the path with /mnt/raspbian (in the case of this example), but files on the 'outer' filesystem (e.g., /home/demouser) are invisible inside the chroot (unless you explicitly bind-mount them, as we did for e.g. /tmp, which is shared). So, for example, what lazarus-ide sees as /home/pi, would be /mnt/raspbian/home/pi to applications running natively on the 64-bit 'outer' system.
You can install and run any 32-bit applications you like in this way. Have fun ^-^
However, what you cannot do is link a 32-bit library into a 64-bit app, or vice versa. Not something you're even likely to try, but just for the record ^-^
Certain applications (such as Mathematica) check the machine type on startup via uname: to override this so those programs will start, you can e.g., put an executable script like the following at /usr/local/bin/uname (inside the chroot filesystem, that is):
#!/bin/bash
# Override reported uname --machine type in chroot, to armv7l
# as some programs like mathematica check this
#
# Copyright (c) 2018 sakaki <sakaki@deciban.com>
# License: GPL v3+
# NO WARRANTY

if ((1==${#})) && [[ "-m" == "${1}" || "--machine" == "${1}" ]]; then
	echo "armv7l"
else
	# pass to default handler
	/bin/uname ${@}
fiWhen you're done, close (e.g.) the lazarus-ide application (and anything else you started from inside the chroot) and then exit the chroot itself:
pi@chroot-32:~$ exit
root@chroot-32:/# exit
pi64 ~ #
You're now back natively in the 'outer' system within this terminal.
Dismount the special bind-mounts we set up:
pi64 ~ # umount -lv /mnt/raspbian/{proc,sys,dev,tmp}
pi64 ~ # umount -lv /mnt/raspbian
That's ell-vee, the '-l' being the short-form for
--lazy, without which you have to follow a very strict order to get dismounting to work correctly.
Once this completes, you can safely remove the Raspbian USB stick, if desired.
To re-enter the chroot again, simply re-insert the stick, and then follow the instructions from "Rebooting into 64-bit Gentoo, and Mounting the 32-bit Image", above (there is no need to restart your Gentoo system this time, of course). Applications you have previously installed inside the chroot (such as e.g. lazarus, in this case) will still be present and ready to use, when you come back in again in this manner.
