my life's gotten a lot more chaotic, and as a result, addition to this guide has mostly come to a stop. I'm not going to abandon it, but for the time being commits will be few and far between, but hopefully contain a lot more actual content. things seem to be a bit better now, but there probably still won't be any commits for the next few weeks as i have exams coming up. the writing will also be different, as now i'll be prioritising content over format. It's been well over year of no activity, and I've ended up abandoning this guide as i stopped using passthrough, and so have no ambition to keep working on this guide as i've started to forget a lot of stuff. don't lose hope yet, i might come back to finish it before 2077.
Note: if at anytime you're a little confused at to what something means, i've included a list of terms in this repo as well.
Thanks for checking out this guide. If you use Linux and have have 2 GPUs (integrated graphics count too!), and plan to make for example a Gaming VM with windows on it to pass a card to, this guide will help you get started.
Though in this guide I'll be using Libvirt hooks, like the greeting mentions, this guide is best if you have 2 GPUs instead of just one. Though even just a single GPU will work fine (given some things are modified), i still recommend 2. Even your CPU's integrated graphics processor (hereby referred to as the "iGP") will do just fine. - I recommend 2 proper dedicated GPUs if you plan to do any gaming on the host - one (ideally AMD one) for the host, and another (ideally NVIDIA one) for the guest.
So, why all of this? Well, that's for you to decide. For me it was moving my workflow off of windows for the sake of privacy, stability, and reliability, while still retaining the ability to play certain games. And you might be asking "Why not use Wine, or play natively?" and the answer is that sometimes, its easier to run the VM then jumping through hoops applying patches and using Wine, or the fact that certain anticheats only support windows and not even Proton. With that out of the way, before i get started on the guide, Let's layout some details.
1: This guide focuses on Arch, and certain things will only apply to Arch and Manjaro. I'll try to leave Debian commands as well, but i won't be supporting distros like RHEL, Fedora, and Gentoo. Certain steps will also only apply to Arch, and I'll point those out when i get to them
2: Since this is both my first guide, and a beginner-friendly tutorial, i'll leave out more advanced topics like CPU Pinning and Disk Tuning from Bryan Steiner's guide
3: This guide is based off of some other guides linked at the bottom, but it also has my own hardware in mind so your results may vary. You can take a look at my own hardware as a pointer to see if it might work, but this is a very loose reference and should work in most cases regardless.
| Thing | Value |
|---|---|
| CPU | AMD Ryzen 5 5600G |
| GPU | ASUS NVIDIA Geforce RTX 2060 12GB |
| RAM | 16GB G.SKILL Aegis DDR4 3000 with XMP |
| Motherboard | ASUS Prime B550 Plus |
| BIOS Version | 2803 |
| Linux | Arch Linux x86_64 |
| Kernel | 6.0.8-zen1-1-zen |
| QEMU Version | QEMU emulator version 7.1.0 |
| Libvirt Version | 8.8.0 |
So, without further ado, lets get started!
**Note: All of these options and all the pictures provided are from ASUS PRIME AM4 motherboards. Since i don't have experience with other boards, you'll have to hunt for those options yourself, or consult your board manufacturer since they may not be called the same thing shown here. On Intel boards IOMMU is typically called VT-d, and Virtualisation is typically called VT-x. And for AMD users, Virtualisation could be called AMD-V, and IOMMU could be called AMD-Vi. These are sadly the only pointers i can give for other boards.
**Note for 1.3: This setting might not apply at all to your board, or only one of the two options may apply
The first thing you'll want to enable in the BIOS is Virtualisation. For my board, or generally any ASUS PRIME AM4 board, this can be found under the Advanced tab in CPU Configuration
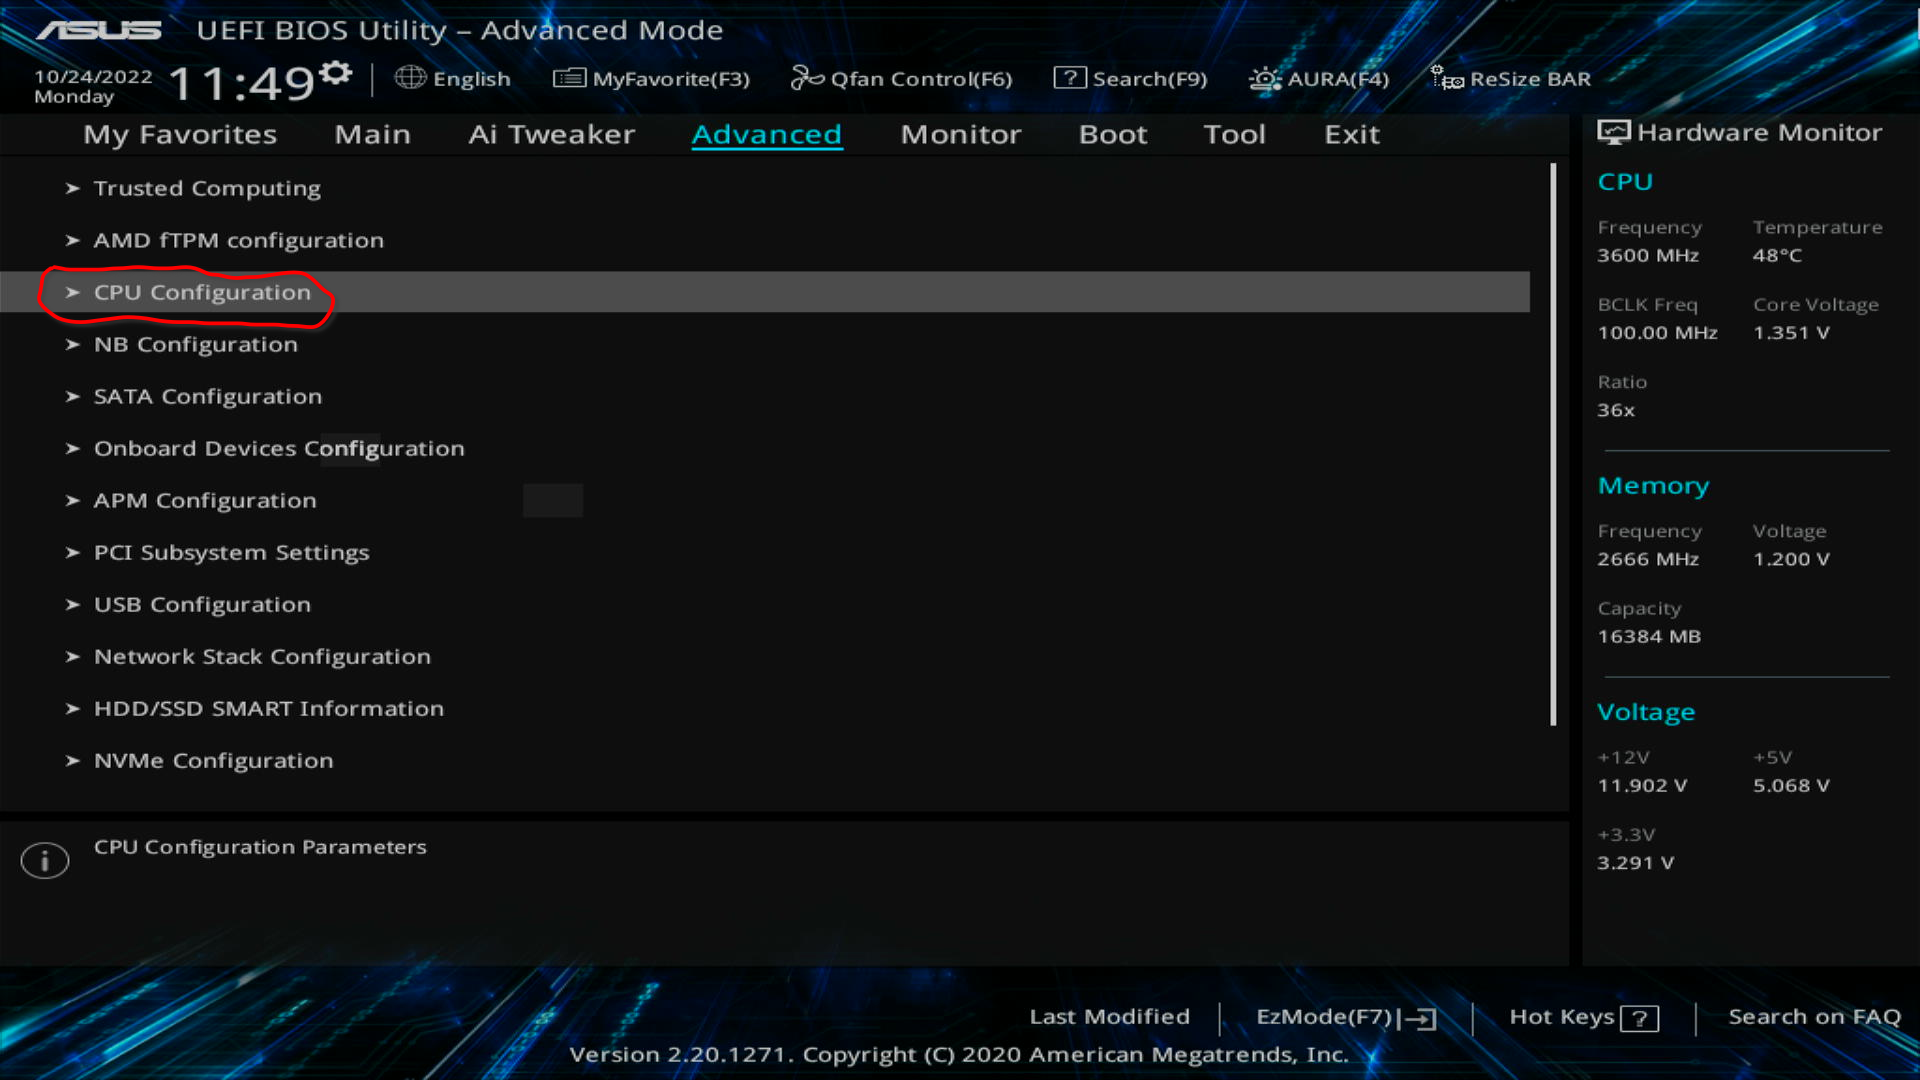 Within here, you're gonna wanna look for
 SVM Mode or SVM, and make sure it's set to enabled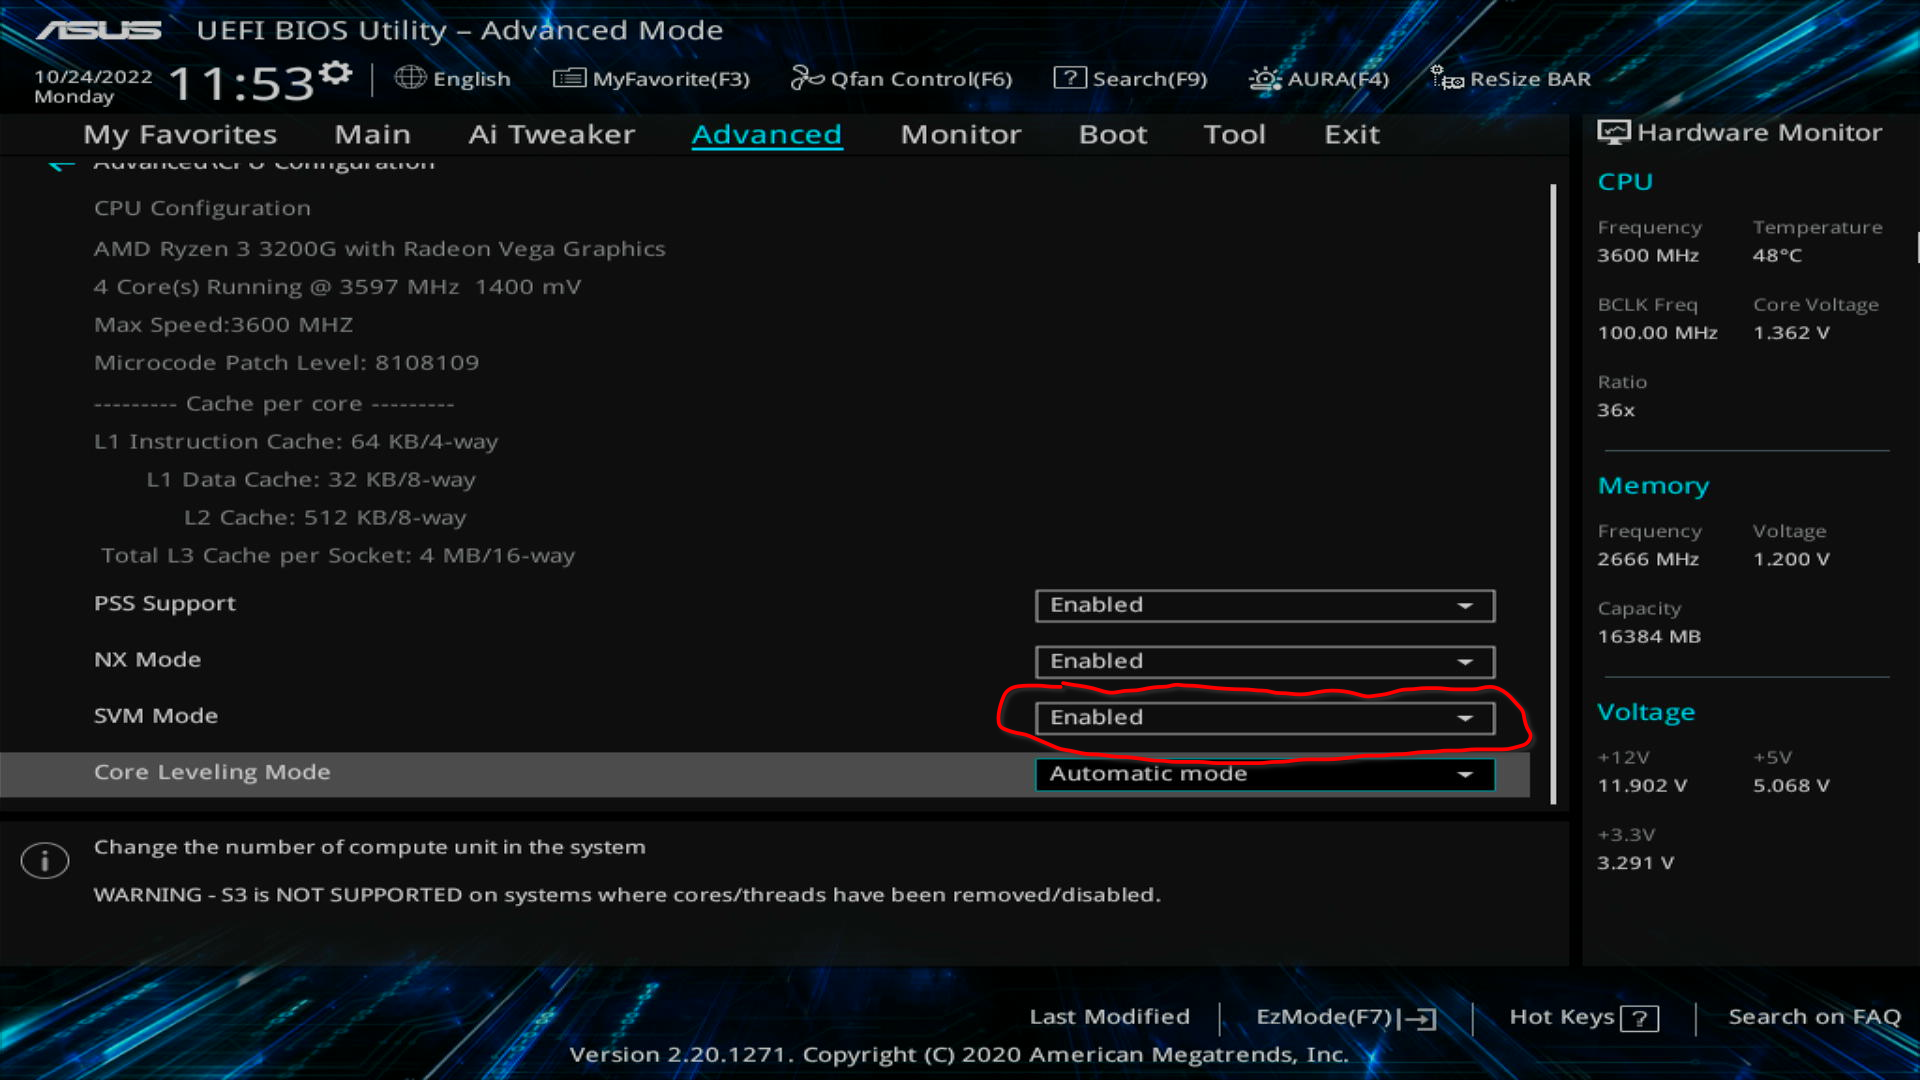
Now, before you can do anything in 1.1, you have to do this. This option is crucial to the rest of the guide since it all depends on IOMMU With that out of the way, this is how to enable IOMMU on ASUS PRIME AM4 boards. Under the Advanced tab again, look for AMD CBS, or something similar it should be near the bottom, so scroll down if necessary.  Within this menu, look for
 IOMMU, and make sure it's set to Enabled. This is important. make sure this is enabled, because the rest of the guide depends on this being on  .
.
1.0.3: Enabling the iGP and Making it the Primary Video Output (see warning)
So in order to enable these things yo wanna go back to the advanced tab, and go to NB Configuration 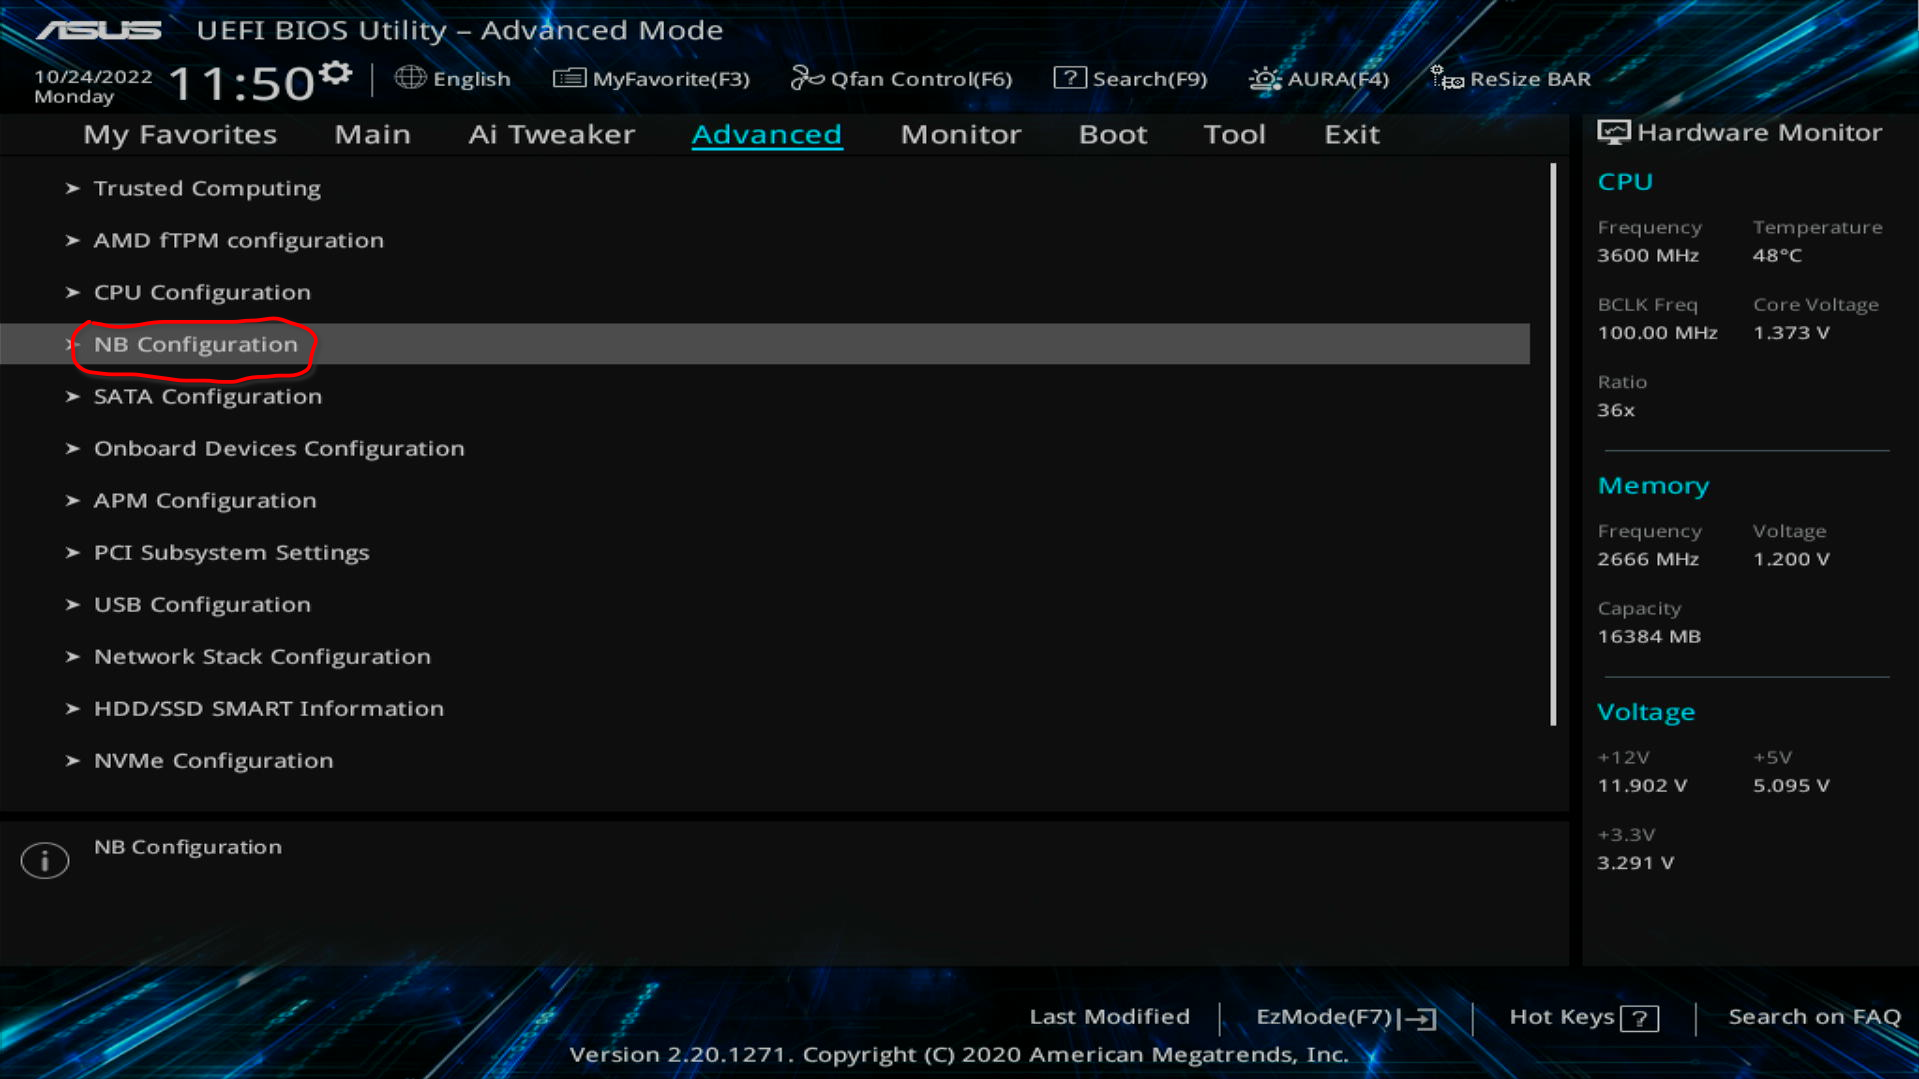 Within this menu, make sure
 IGFX Multi-Monitor is set to Enabled, and Primary Video Device is set to IGFX Video, like in the image below. 
With that done, the BIOS settings should all be good, and you should be ready to move on to 1.1!
Before we can get started, we need to install some packages and dependencies. 1, for Arch based distros you'll need an AUR helper. I recommend pacaur. Another option is yay. You can get yay from the official mnajaro repos by sending sudo pacman -Syu yay to a terminal. If you prefer pacaur, you can build it from the AUR. for the puropse of this guide, i'll be using yay for Arch based distros. If you prefer a gui approach, i recommend octopi. If none of these are in the official repos of your distro, i've provided a pacaur build script so you can use pacaur.
**Note for autocompile scripts: I'll be asking sudo privileges for running one of these scripts to add the scream binary to /bin. if you don't trust me, you can open the scripts in an editor or check the contents using cat. alternatively, you can compile the packages yourself.
So we wanna install a few things.
virt-managerto create and manage the VM,cockpit, andcockpit-machinesto manage the VM directly, or remotely over LAN when you're away using something like ZeroTier after it's been setup properlyedk2-ovmffor the UEFI VM firmware, since Legacy BIOS doesn't support passthrough PCIqemu-fullKVMebtablesallows for networkingdnsmasquseful for bridginglibvirtwhich will manage hooks and devices, backend for virt-manager, and the virtualisation api we'll be usinglooking-glasswhich is an AUR package we'll be using to connect to the client's screen while maintaining minimal latency using a shared framebiffer.screamthis is a package you need to compile from source, and i've added a script to this repo that does it for you.- (optional)
parsec-bin(AUR) for low latency streaming to the VM remotely - (optional, doesn't matter but i recommend)
sunshine(AUR) to access the host using NVIDIA gamestream API. can be used for remote access usingmoonlightin the windows VM using Parsec or via remote LAN solutions like ZeroTier.
make it a one liner with pacaur -Syu libvirt qemu-full virt-manager cockpit cockpit-machines edk2-ovmf ebtables dnsmasq looking-glass parsec-bin sunshine you might wanna edit /etc/pacman.conf to allow for parallel downloads to speed up the download process. note that this command may take a while since AUR packages need to be compiled locally.
mostly the same stuff, but with different names.
ebtablesdnsmasqvirt-managerlooking-glass-clientlibvirt-daemon-systemlibvirt-clientsqemu-kvmqemu-utilsovmfcockpitcockpit-machineslibpulse-devprerequisite to scream.- **
screammust be compiled locally. if you're not familiar with this process, you can use the automated script utility to do it automatically. if you don't trust me, you can read the contents of the script using a text editor, or usecat. see this note for more info on autocompile scripts. - parsec (optional) must be downloaded via deb package. from what i know they don't offer a cli install on debian based systems
make it a one liner with sudo apt install ebtables dnsmasq virt-manager looking-glass-client libvirt-daemon-system libvirt-clients qemu-kvm qemu-utils ovmf cockpit cockpit-machines libpulse-dev -y make sure your system and package lists are up to date before running this command. i don't think you can make that part of the install command like with pacman, but im probably wrong.
This step is mostly the same in every guide. I'll be using Grub, so I'll provide the instructions for Grub, but also for Systemd Boot. The general parameter you're gonna wanna add is intel_iommu=on for an Intel CPU, or amd_iommu=on for AMD, as well as iommu=pt for both manufacturers, and this will apply to both Grub, and Systemd. **note: I've read in certain guides that assuming IOMMU is enabled in BIOS, The Linux Kernel will automatically enable it on AMD systems. I'm not 100% sure of this so I've added the correct parameter to my own setup just in case. i advise you do the same.
In order to enable IOMMU, you need to edit the Grub settings file. To do that, you can use any text editor you want, but I'll be using nano. To open the file you can use root directly, but i'll be using sudo. In my case I'll type in sudo nano /etc/default/grub. once that's done, you should get a screen like this: 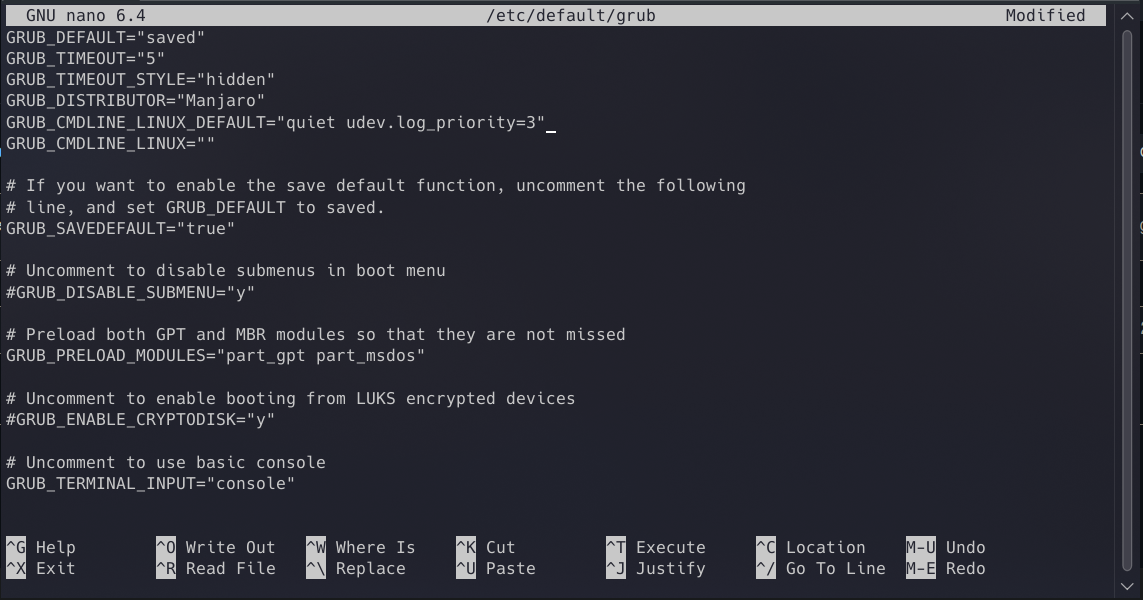
Now, where it says GRUB_CMDLINE_LINUX_DEFAULT="quiet udev.log_priority=3"(this line might look different depending on your distro), you're going to remove quiet (to make debugging your boot a little easier + it looks cooler), and add the command for your CPU's IOMMU, as well as iommu=pt. So in my case, since I have an AMD CPU, mine would look like this: GRUB_CMDLINE_LINUX_DEFAULT="udev.log_priority=3 iommu=pt amd_iommu=on". Then, just save and quit. For nano, that's Ctrl+O, Enter, and Ctrl+X. So all well and good. Now, to apply these changes, we'll have to regenerate the Grub configuration file. This is super easy, and is universal across any distro that uses Grub. just type sudo grub-mkconfig -o /boot/grub/grub.cfg into a terminal, and you're good to go.
For Systemd Boot you can use a tool that comes preinstalled with Pop!_OS called kernelstub. You can also install it on other distros. Unfortunately, it doesn't seem like any Manjaro repositories or even the AUR has kernelstub, but Debian based distros should be able to install it using sudo apt install kernelstub. So, in order to allow the Kernel to access IOMMU on Systemd Boot distros, all you have to do is put in the following commands: sudo kernelstub --add-options "intel_iommu=on" && sudo kernelstub --add-options "iommu=pt" for Intel CPUs, or sudo kernelstub --add-options "amd_iommu=on" && sudo kernelstub --add-options "iommu=pt" for AMD CPUs.
With that, we're done enabling IOMMU! Time for the next step.
If you did all those steps correctly, then you should be able to move on to this step, to ensure your IOMMU groups have been configured properly.
In order to verify it worked, the first thing you're going to do it put in this command: sudo dmesg | grep VT-d for Intel, and sudo dmesg | grep AMD-Vi for AMD. If you were successful, you should see something similar to this for AMD CPUs
[    0.292288] pci 0000:00:00.2: AMD-Vi: IOMMU performance counters supported
[    0.292888] pci 0000:00:00.2: AMD-Vi: Found IOMMU cap 0x40
[    0.603347] perf/amd_iommu: Detected AMD IOMMU #0 (2 banks, 4 counters/bank).
[    0.613744] AMD-Vi: AMD IOMMUv2 loaded and initialized
So what you wanna do here, is run the script provided in the repo, or you can make the script yourself. If you wanna make the script yourself, i recommend placing it in a separate vfio directory within your Home directory. Assuming you've done that, paste this glob of code into it, and then run it.
#!/bin/bash
for d in /sys/kernel/iommu_groups/*/devices/*; do
  n=${d#*/iommu_groups/*}; n=${n%%/*}
  printf 'IOMMU Group %s ' "$n"
  lspci -nns "${d##*/}"
done
once run, it should give an output similar to this (ids and names may look different or your system)
IOMMU Group 0 00:01.0 Host bridge [0600]: Advanced Micro Devices, Inc. [AMD] Renoir PCIe Dummy Host Bridge [1022:1632]
IOMMU Group 10 09:00.0 VGA compatible controller [0300]: Advanced Micro Devices, Inc. [AMD/ATI] Cezanne [1002:1638] (rev c9)
IOMMU Group 11 09:00.1 Audio device [0403]: Advanced Micro Devices, Inc. [AMD/ATI] Renoir Radeon High Definition Audio Controller [1002:1637]
IOMMU Group 12 09:00.2 Encryption controller [1080]: Advanced Micro Devices, Inc. [AMD] Family 17h (Models 10h-1fh) Platform Security Processor [1022:15df]
IOMMU Group 13 09:00.3 USB controller [0c03]: Advanced Micro Devices, Inc. [AMD] Renoir/Cezanne USB 3.1 [1022:1639]
IOMMU Group 14 09:00.4 USB controller [0c03]: Advanced Micro Devices, Inc. [AMD] Renoir/Cezanne USB 3.1 [1022:1639]
IOMMU Group 15 09:00.6 Audio device [0403]: Advanced Micro Devices, Inc. [AMD] Family 17h/19h HD Audio Controller [1022:15e3]
IOMMU Group 1 00:01.1 PCI bridge [0604]: Advanced Micro Devices, Inc. [AMD] Renoir PCIe GPP Bridge [1022:1633]
IOMMU Group 2 00:02.0 Host bridge [0600]: Advanced Micro Devices, Inc. [AMD] Renoir PCIe Dummy Host Bridge [1022:1632]
IOMMU Group 3 00:02.1 PCI bridge [0604]: Advanced Micro Devices, Inc. [AMD] Renoir/Cezanne PCIe GPP Bridge [1022:1634]
IOMMU Group 4 00:08.0 Host bridge [0600]: Advanced Micro Devices, Inc. [AMD] Renoir PCIe Dummy Host Bridge [1022:1632]
IOMMU Group 5 00:08.1 PCI bridge [0604]: Advanced Micro Devices, Inc. [AMD] Renoir Internal PCIe GPP Bridge to Bus [1022:1635]
IOMMU Group 6 00:14.0 SMBus [0c05]: Advanced Micro Devices, Inc. [AMD] FCH SMBus Controller [1022:790b] (rev 51)
IOMMU Group 6 00:14.3 ISA bridge [0601]: Advanced Micro Devices, Inc. [AMD] FCH LPC Bridge [1022:790e] (rev 51)
IOMMU Group 7 00:18.0 Host bridge [0600]: Advanced Micro Devices, Inc. [AMD] Cezanne Data Fabric; Function 0 [1022:166a]
IOMMU Group 7 00:18.1 Host bridge [0600]: Advanced Micro Devices, Inc. [AMD] Cezanne Data Fabric; Function 1 [1022:166b]
IOMMU Group 7 00:18.2 Host bridge [0600]: Advanced Micro Devices, Inc. [AMD] Cezanne Data Fabric; Function 2 [1022:166c]
IOMMU Group 7 00:18.3 Host bridge [0600]: Advanced Micro Devices, Inc. [AMD] Cezanne Data Fabric; Function 3 [1022:166d]
IOMMU Group 7 00:18.4 Host bridge [0600]: Advanced Micro Devices, Inc. [AMD] Cezanne Data Fabric; Function 4 [1022:166e]
IOMMU Group 7 00:18.5 Host bridge [0600]: Advanced Micro Devices, Inc. [AMD] Cezanne Data Fabric; Function 5 [1022:166f]
IOMMU Group 7 00:18.6 Host bridge [0600]: Advanced Micro Devices, Inc. [AMD] Cezanne Data Fabric; Function 6 [1022:1670]
IOMMU Group 7 00:18.7 Host bridge [0600]: Advanced Micro Devices, Inc. [AMD] Cezanne Data Fabric; Function 7 [1022:1671]
IOMMU Group 8 01:00.0 VGA compatible controller [0300]: NVIDIA Corporation TU106 [GeForce RTX 2060 12GB] [10de:1f03] (rev a1)
IOMMU Group 8 01:00.1 Audio device [0403]: NVIDIA Corporation TU106 High Definition Audio Controller [10de:10f9] (rev a1)
IOMMU Group 9 02:00.0 USB controller [0c03]: Advanced Micro Devices, Inc. [AMD] 500 Series Chipset USB 3.1 XHCI Controller [1022:43ee]
IOMMU Group 9 02:00.1 SATA controller [0106]: Advanced Micro Devices, Inc. [AMD] 500 Series Chipset SATA Controller [1022:43eb]
IOMMU Group 9 02:00.2 PCI bridge [0604]: Advanced Micro Devices, Inc. [AMD] 500 Series Chipset Switch Upstream Port [1022:43e9]
IOMMU Group 9 03:00.0 PCI bridge [0604]: Advanced Micro Devices, Inc. [AMD] Device [1022:43ea]
IOMMU Group 9 03:02.0 PCI bridge [0604]: Advanced Micro Devices, Inc. [AMD] Device [1022:43ea]
IOMMU Group 9 03:03.0 PCI bridge [0604]: Advanced Micro Devices, Inc. [AMD] Device [1022:43ea]
IOMMU Group 9 03:08.0 PCI bridge [0604]: Advanced Micro Devices, Inc. [AMD] Device [1022:43ea]
IOMMU Group 9 03:09.0 PCI bridge [0604]: Advanced Micro Devices, Inc. [AMD] Device [1022:43ea]
IOMMU Group 9 05:00.0 Network controller [0280]: Realtek Semiconductor Co., Ltd. RTL8821CE 802.11ac PCIe Wireless Network Adapter [10ec:c821]
IOMMU Group 9 08:00.0 Ethernet controller [0200]: Realtek Semiconductor Co., Ltd. RTL8111/8168/8411 PCI Express Gigabit Ethernet Controller [10ec:8168] (rev 15)
Now, the biggest thing to look for here, is that your GPU's Audio and Video (and any other GPU component) is in the same group, and isolated, since you can only pass a full group.
Since my GPU's group looks like this, i'm good.
IOMMU Group 8 01:00.0 VGA compatible controller [0300]: NVIDIA Corporation TU106 [GeForce RTX 2060 12GB] [10de:1f03] (rev a1)
IOMMU Group 8 01:00.1 Audio device [0403]: NVIDIA Corporation TU106 High Definition Audio Controller [10de:10f9] (rev a1)
What you want to look for here, is the first number, in my case the 01 to be that same, and for that to only have one card in it. for example, a
IOMMU Group 1: NVIDIA Video
IOMMU Group 1: NVIDIA Audio
is good, but
IOMMU Group 1: NVIDIA Video
IOMMU Group 1: NVIDIA Audio
IOMMU Group 1: Second Video Component
IOMMU Group 1: Second Audio Component
is bad.
If there are other things in there, or if your second GPU is also in there, like the second one, you'll have to perform the ACS Override Patch to ensure your GPU is in its own isolated group.
If your IOMMU groups aren't valid, then you'll have to perform the ACS Override Patch. There's 2 ways to do it, and you can do whichever one you choose. You can choose to a, Patch the Kernel yourself, which Bryan Steiner also covers, or b) install a different Kernel, notably the Zen Kernel or the linux-vfio Kernel, which have the ACS Override Patch built in, and you just need to specify pcie_acs_override=downstream in the boot parameters to ensure the Kernel loads it
This process is very straightforward. All you have to do is type pacaur -S linux-vfio for the VFIO Kernel on Arch systems. On Manjaro, its pacaur -S linux-vfio-manjaro. Make sure you use linux-vfio-manjaro on a Manjaro system. i wasn't able to compile the normal kernel on my PC. it ended up crashing. (haha 4.5GHz w stock cooling go brr) For the Zen Kernel, just replace linux-vfio, with linux-zen on Arch based systems. On Manjaro, look it up in the Add/Remove Software Utility (pamac). After installing one of the Kernels that has it built in, you then need to specify the ACS Override Patch in the boot process. For grub, just edit /etc/default/grub and add the parameter pcie_acs_override=downstream to GRUB_CMDLINE_LINUX_DEFAULT so, with all the modifications we've made it should look like this (for AMD - Intel has a dfferent IOMMU param [intel_iommu=on])

Now since I'm not especially well versed in this area, I've linked Bryan Steiner's guide, which does go over this process. This should get you almost all the way through, minus passing it as a param if you use Grub. For that look at 1.3.1 For systemd boot on Debian based systems, Bryan Steiner's guide covers that part with kernelstub. - *note that he does it for Debian based systems. if you're on Arch, i recommend installing a different kernel. instructions for that are linked in 1.3.1
And that should do it for the ACS Override Patch. Still with me so far? Good. Next, we'll look at getting some ISOs.
Getting ISOs is easy, and is basically the last step before we start doing the cool things. I'll link the 2 ISO's you need, so its nice and easy to get them and continue on. I'll also provide a little explanation for those that need it.
The first ISO to get is one for Windows 10 (windows 11 sucks) - How are you going to install windows in your VM without an ISO? Alternatively, you can get ISO "build files" for any modern version of Windows from UUPdump. If you choose to get a "custom" ISO, i recommend version 22000.1, with a few tweaks.
Next, we're going to get virtIO Drivers. virtIO drivers are available in an ISO and are distributed via Red Hat, the people behind RHEL, and Fedora. These drivers will help with things like Network. This step is mandatory to install windows, since it doesn't natively support the virtIO bus.
So you finally made it past section 1! In this section we're gonna configure Libvirt to dynamically unbind and rebind the GPU from, and to the host. There are a number of reasons to do this. the first, is flexibility. if you're doing for example some compute work on the host, you can do that. Another reason would be hardware restraints, for example if you only have one GPU and/or no iGP (which is totally alright!)
While Libvirt hooks will allow for single GPU passthrough, there are some caveats. notable,
- You won't be able to access the host via gui while using the VM (ssh should still work)
- You can only use one system at a time so if you want to say, stream from Linux, that's not going to be an option.
- NVIDIA drivers are hit or miss with this. for me, it didn't work well until i force unbound the driver.
If ryou plan to passthrough the NVIDIA card, then make sure there's no driver assigned to it because it will screw shit up and mess up everything. if you end up keeping the driver, then refer the process used for Single GPU Passthrough later on.
This process is fairly easy, and so there's no sub sections. First, make the directory that the hooks will go in with sudo mkdir -p /etc/libvirt/hooks. Next, get the Libvirt Hook Helper provided by Passthrough Post by running sudo wget 'https://raw.githubusercontent.com/PassthroughPOST/VFIO-Tools/master/libvirt_hooks/qemu' \ -O /etc/libvirt/hooks/qemu. make qemuexecutable withsudo chmod +x /etc/libvirt/hooks/qemu. after this, start libvirtdand the logging componentvirtlogd. for systemd, run sudo systemctl enable --now libvirtd virtlogd.socket. for openrc, run rc-service libvirtd start && rc-service virtlogd add && rc-update enable libvirtd && rc-update enable virtlogd` (i dont know a better way to do this sorry maybe just fork it and make a pull request with a better command? 'preciate it)
done? good. next, we move to 2.1: making scripts
this step will cover the making of the hooks 1 to bind, 1 to unbind, and some performance tweaks in [3.0?](no link)
for this: first run a tree of your hooks with tree /etc/libvirt/hooks. you should get an output like this
<output>
now within here make a directory called qemu.d (mkdir /etc/libvirt/hook/qemu.d)