NOTE: This plugin is deprecated. Use Sanity Scheduled Publishing instead.
This is the Sanity Studio v3 version of sanity-plugin-content-calendar.
For the v2 version, please refer to the v2-branch.
Schedule and view your editorial calendar, right where you store your content. Prioritize and get organized on the fly with a visual calendar in your Studio.
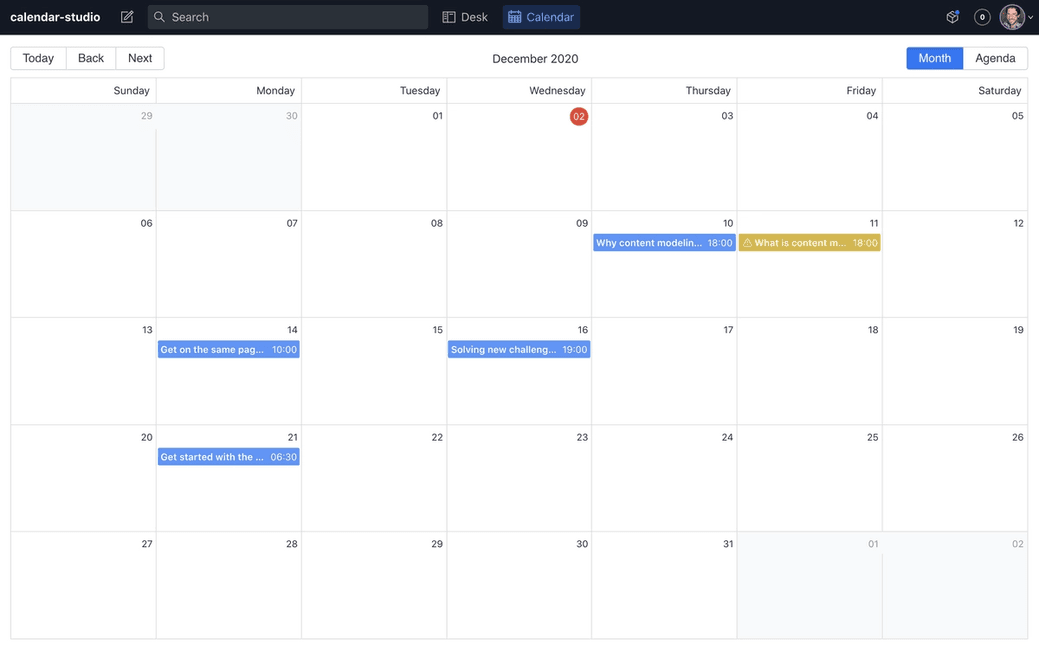
- Graphical representation of your editorial calendar
- At-a-glance schedule review
- Quick prioritization of content to review
- More time to create content, less time spent scheduling
Run the following command in your studio directory
npm install --save sanity-plugin-content-calendar@studio-v3or
yarn add sanity-plugin-content-calendar@studio-v3To use the calendar, the plugin needs to know which document types to display and what fields to use for scheduling documents.
Add it as a plugin in sanity.config.ts (or .js):
import { defineFunction } from "sanity";
import { contentCalendar } from "sanity-plugin-content-calendar";

export default defineFunction({
  // ...
  plugins: [
    contentCalendar({
      types: [
        {
          type: "post",
          field: "publishedAt",
          titleField: "title"
        },
      ]
    })
  ]
})The content calender can be configured according to the CalendarConfig interface.
All configuration defaults shown below:
{
  calendar: {
    types: [],
    events: {
      dateFormat: 'MMMM dd, yyyy',
      timeFormat: 'HH:mm',
      dialogTitle: 'Schedule details'
    },
    nativeOptions: {
      views: ['month', 'agenda']
    },
    showAuthor: true
  },
  filterWarnings: []
}
types.titleField also supports nested properties, like title.en.
The type.field option signals when this post should be scheduled to release, this requires us to add a "date" or "datetime" field to the document you want to enable scheduling for.
In the configuration values, you can also modify how the dates and times are formatted on the calendar, as well as being able to show the document author.
If edits are made to a Document after it has been Scheduled, a Warning will show. However, if you want to hide this, use the filterWarnings key. This will evaluate the Document for a matching condition, so for example:
"filterWarnings": [
  {"_type": "article", "title.en": "Hello!"},
  {"isLive": true},
]
If an Event matches all the conditions in an any of the Objects in the Array, the Warning will be hidden.
In the example above:
- A document with the type
articleAND atitle.envalue ofHello!will not show Warnings OR - Any document with an
isLivefield value oftruewill not show Warnings
By default, this plugin adds the Schedule, Unschedule, and Reschedule actions to your configured document action by appending them to any other actions the Studio may have.
However, by default, Publish and Delete actions are replaced with content-calendar compatible versions. If you have other plugins that also modifies these actions you either have to:
- Put the document-calendar plugin first in the
sanity.config.tsplugins-array - OR manually compose actions as a last step in your studio configuration
Right:
export default defineFunction({
  // ...
  plugins: [
    contentCalendar({ /* */ }),
    pluginThatModifiesPublishOrDeleteAction()
  ]
})
Wrong:
export default defineFunction({
  // ...
  plugins: [
    pluginThatModifiesPublishOrDeleteAction(),
    contentCalendar({ /* */ }),
  ]
})Use the document.actions factory-function in defineFunction to compose your actions in whatever way
makes sense for your particular Studio setup.
Look to addActions for how this plugin handles action composition by default, and make sure to add/replace/compose/wrap previousActions PublishAction/DeleteAction with CalendarPublishAction and CalendarDeleteAction.
import { contentCalendar, CalendarPublishAction, CalendarDeleteAction } from "sanity-plugin-content-calendar";

export default defineFunction({
  // ...
  plugins: [
    otherPluginThatModifiesPublishOrDeleteAction().
    contentCalendar({ /* */ }),
  ],
  document: {
    actions: (previousActions, context) => {
      /* Compose actions in whatever way makes sense using CalendarDeleteAction and CalendarPublishAction,
        filter previousActions or otherwise create a new actions array */
      const actions = [...previousActions]
      return actions
    }
  },
})By default, this plugin adds the ScheduledBadge to your configured document badges by appending them to any other badges the Studio may have.
This plugin does not perform the publishing of documents on its own, as it is just a Studio plugin running in an editors' browser. In order to actually perform the scheduled publishing, a script needs to run either periodically, or at the given publishing times to perform the publish action.
We advise setting up a cronjob running for instance every minute that checks if any document should be published and then perform that action. A full script that does this is represented below.
When the publish event eventually occurs, any newer draft will be discarded. This is why the plugin warns you if you make further changes to a document after you schedule it. If you don't want to lose the newer changes an editor will need to Reschedule them. The plugin will prompt for this with a warning in the calendar view and an updated document action.
To publish documents, you can set up a serverless function to poll for pending scheduled events and perform the action. Typically, this can be run from a cronjob every minute or from another scheduled action.
Alternatively, you could schedule this script to run at specific times by using webhooks and listening for new schedule.metadata documents.
const sanityClient = require('@sanity/client')
const client = sanityClient({
  projectId: 'your-project-id',
  dataset: 'your-dataset-name',
  // Need a write token in order to read schedule metadata and publish documents
  token: 'your-write-token',
  useCdn: false
})

// Query for any scheduled publish events that should occur
const query = `* [_type == "schedule.metadata" && !(_id in path("drafts.**")) && datetime <= now()]`

const publish = async (metadata, client) => {
  const dataset = client.config().dataset
  const id = metadata.documentId
  const rev = metadata.rev

  // Fetch the draft revision we should publish from the History API
  const uri = `/data/history/${dataset}/documents/drafts.${id}?revision=${rev}`
  const revision = await client
    .request({uri})
    .then(response => response.documents.length && response.documents[0])

  if (!revision) {
    // Here we have a situation where the scheduled revision does not exist
    // This can happen if the document was deleted via Studio or API without
    // unscheduling it first.
    console.error('Could not find document revision to publish', metadata)
    return
  }

  // Publish it
  return (
    client
      .transaction()
      // Publishing a document is simply writing it to the dataset without a
      // `drafts.` prefix. The `documentId` field on the metadata already does
      // not include this prefix, but the revision we fetched probably does, so
      // we overwrite it here.
      .createOrReplace(Object.assign({}, revision, {_id: id}))
      // Then we delete any current draft.
      .delete(`drafts.${id}`)
      // And finally we delete the schedule medadata, since we're done with it.
      .delete(metadata._id)
      .commit()
  )
}

client
  .fetch(query)
.then(response => Promise.all(response.map(metadata => publish(metadata, client))))The Studio V3 version differs from the v2 versions in a few ways:
- Actions and badges now auto-compose with other document actions by default. This is the opposite of how the v2 version behaves: It is no longer necessary to compose actions and badges manually when there are other plugins that add those to studio.
MIT-licensed. See LICENSE.
This plugin uses @sanity/plugin-kit with default configuration for build & watch scripts.
See Testing a plugin in Sanity Studio on how to run this plugin with hotreload in the studio.
Run "CI & Release" workflow. Make sure to select the v3 branch and check "Release new version".
Semantic release will only release on configured branches, so it is safe to run release on any branch.