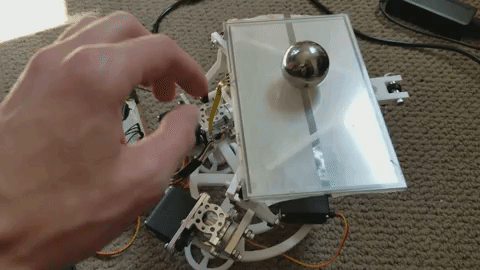
This goal of this project is to effectively control a weighted ball on a flat surface. Control is accomplished by the following mechanisms:
- A resistive 4 wire touchscreen is used to find ball position
- 3 Servo motors are positioned in an equilateral triangle for tilting the plate
- An Arduino Due is used to perform calculations - reading the touchscreen and moving the servos
- A python/kivy frontend is used for end user control
The entire project is built around using a PID method to properly move the ball to the setpoint. For those not familiar, a PID control loop equation looks like the following:

Where e is the error and Kp, Ki, and Kd are all user defined constants.
For the purpose of this project, error will be calculated as the distance from the ball to the line perpendicular to each particular servo's line of action centered around the setpoint.
The use of this PID control system allows for some interesting functionality:
- Keeping Ball Centered:
- Moving the ball among "corners":

- Moving the ball in a circle:

And more! You're basically limited to your imagination, as the base algorithm allows for changing the setpoint during runtime (and many more tuning options).
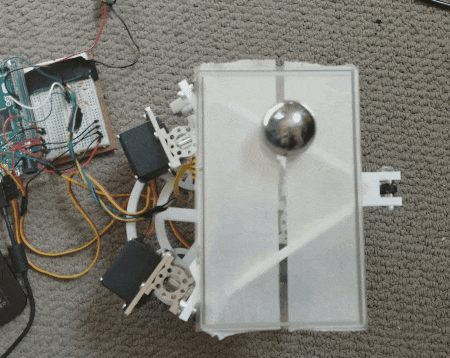
The machine operates mechanically with the following components:
- A triangular bracket to securely mount the touch screen
- 3 'fork' arms with rod ends on all sides to translate servo movements to plate tilt
- 3 Aluminum servo mounts to securely mount the servos
- These include ball bearings and a pinion attachment to allow for purely rotational movement
- A circular base for the servo mounts to attach to
- 3 circular feet to elevate the base
This design allows for a full range of motion by all servo arms without any binding regardless or the other 2 servos.
All components were designed in Solidworks and 3D printed other than the servo mounts and some misc. hardware. Find all STL files needed to build this system in the STL_Files folder.
The machine utilizes the following electrical components:
- A 5V/4A power supply delivers power from the wall to the 3 servos
- The Arduino Due microcontroller uses a micro-USB connection for both power and serial communication
- Each servo runs off of 5V power, and is position controlled by a PWM pin on the Due
- The resistive touchscreen uses 4 wires read by analog ports of the Due to determine ball position
- A serial 0.1uF capacitor (to ground) is added to each touchscreen wire to help filter input
The Arduino Due does the majority of calculations and directly controls all components.
Here's a top level look at the arduino side control flow:

There are too many small implementation details to go over in the readme, but some highlights are:
- Touchscreen reading is done using a running median filter
- Functionality for changing PID parameters during runtime is built in but not used
- 2nd derivative damping functionality is added but also not used
The basis of the program is performing PID calculations for a given ball position and setpoint (which can and will be moved around during runtime). All other features are built around the core PID method.
The computation time (amount of elapsed time between running PID calculations) can be changed at compile time, but was found to be most stable at ~10ms
To make the machine more user friendly, a python front end was built on top of Kivy framework to show analytics and control the operations.
Features include:
- Real time graphing or each servo's error measurements (remember, PID output is calculated individually per servo as they all have different lines of action!)


- PID value sliders - allowing adjustment and tuning of the algorithm during run time
- Various buttons to control the operation of the machine (circle, center, corners, as well as some platform only demo functionality)
- Real time position graphing - both of the ball's actual position as well as the setpoint (if it is moving)

Of course all the other wonderful benefits that come with the Kivy framework are baked in - including touchscreen optimization, size scalability, and cross platform usage.
This project has come a long way, but there is still plenty of functionality left to add! Some of the things I'm interested in adding are:
- Joystick functionality: Control where the ball moves with an analog joy stick!
- PCB/Enclosure: I've been sitting on a PCB design that will simplify the rats nest. With the addition of a PCB, building a full enclosure for the machine will be much easier
- Computer Vision: Essentially the revision 2 of the project - use the same PID control algorithm but use a top mounted webcam with openCV for input instead of the resistive touchscreen. This allows for a more versatile selection of balls, as the touchscreen is limited to especially heavy ball bearings