Home
Before you can communicate with Simplify to tokenize a card, you must first initialize the SDK with your public API key. To retrieve a usable public API key, first log in to simplify.com and click on "API Keys" in the dropdown menu next to your name. From there, you can create a new public key specific to your app, or use an existing one. Be sure to use a "live" key for your production app. Card tokens created with a sandbox API key can not be used to process real payments!
To initialize the SDK, create an instance with your public API key.
Simplify simplify = new Simplify("YOUR_API_PUBLIC_KEY");
When originating a payment from your mobile app, you must first collect and tokenize card information. There are a few ways to collect card information using the Simplify SDK:
- Manually build a Card object (using your own custom card entry fields)
- Retrieve a Card object from the provided CardEditor view
- Android Pay
If you are using your own UI to collect card data from the user, you should manually build a Simplify Card object with this data. Refer to the CardToken API docs for the minimum required fields to tokenize a card.
// create a new card object
SimplifyMap card = new SimplifyMap()
    .set("number", "5555555555554444")
    .set("expMonth", "01")
    .set("expYear", "99")
    .set("cvc", "123")
    .set("addressZip", "12345");

// tokenize the card
simplify.createCardToken(card, new SimplifyCallback() {
    @Override
    public void onSuccess(@NonNull SimplifyMap response) {
        // TODO grab the card token information from the response map
        // TODO and pass it to your server to process a payment
    }

    @Override
    public void onError(@NonNull Throwable throwable) {
        // TODO handle error condition
    }
});
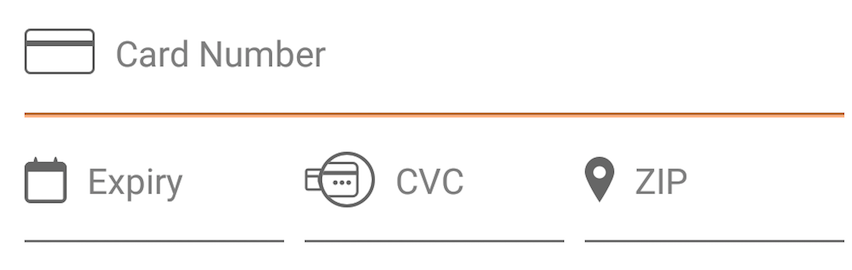
If you would prefer to use our provided UI to collect card information, simply drop the CardEditor view into your layout.
<com.simplify.android.sdk.CardEditor
    android:id="@+id/card_editor"
    android:layout_width="match_parent"
    android:layout_height="wrap_content"/>
Within your context, you can register a state change listener to receive notifications when the valid state of the view has changed after the user has entered details. You may use this to enable/disable a checkout button as demonstrated below.
// init card editor
final CardEditor cardEditor = (CardEditor) findViewById(R.id.card_editor);
final Button checkoutButton = (Button) findViewById(R.id.checkout_button);

// add state change listener
cardEditor.addOnStateChangeListener(new CardEditor.OnStateChangedListener() {
    @Override
    public void onStateChange(CardEditor cardEditor) {
        // isValid() == true : card editor contains valid and complete card information
        checkoutButton.setEnabled(cardEditor.isValid());
    }
});

// add checkout button click listener
checkoutButton.setOnClickListener(new OnClickListener() {
    @Override
    public void onClick(View v) {
        // create a card token
        simplify.createCardToken(cardEditor.getCard(), new SimplifyCallback() {
            @Override
            public void onSuccess(@NonNull SimplifyMap response) {
                // ...
            }

            @Override
            public void onError(@NonNull Throwable throwable) {
                // ...
            }
        });
    }
});
By default, the CardEditor view will inherit the styles of the theme you apply to it's context. However, you may change the appearance in a couple of ways, as shown below.
Apply a new theme for EditText and/or AlertDialog (used to choose expiration date):
<style name="AppTheme" parent="Theme.AppCompat.Light">
    <item name="colorAccent">@color/accent</item> <!-- sets the divider color on the number pickers in the expiration date dialog -->
    <item name="android:editTextStyle">@style/EditText</item>
    <item name="alertDialogTheme">@style/AlertDialogTheme</item>
</style>

<style name="AlertDialogTheme" parent="Theme.AppCompat.Light.Dialog.Alert">
    <item name="colorAccent">@color/accent</item> <!-- sets the action button text color -->
    <item name="android:textColorPrimary">#000000</item> <!-- sets the title text color -->
</style>

<style name="EditText" parent="Widget.AppCompat.EditText">
    <item name="android:minHeight">50dp</item>
</style>
Set custom attributes on the CardEditor view in your layout:
<!-- Add xmlns:auto="http://schemas.android.com/apk/res-auto" -->
<!-- to the root element of your layout to use custom attributes -->

<com.simplify.android.sdk.CardEditor
        android:id="@+id/card_editor"
        android:layout_width="match_parent"
        android:layout_height="wrap_content"
        auto:iconColor="@color/my_custom_icon_color"
        auto:enabled="true"/>
Or in code:
cardEditor.setIconColor(getColor(R.color.my_custom_icon_color));
cardEditor.setEnabled(true);
Regardless of which method you are using to collect card information, you should ultimately end up with a Simplify CardToken object. This one-time token should be sent back to your servers for processing. This is a highly recommended step to ensure your payment processing and your private API keys are kept secure.
For an example on how to start processing payments from your server, refer to https://github.com/simplifycom/simplify-php-server
Friendly reminder: DO NOT BUNDLE YOUR PRIVATE KEY WITHIN YOUR APP!
Your private keys are considered sacred and can be used to process payments, issue refunds, and more. A common development mistake is to simply include the Java SDK in an app and use a private key to complete the transaction lifecycle without involving a server. While it may seem like an easy way to integrate payments, distributing your private key in an app leaves it vulnerable through simple reverse engineering. Once compromised, an attacker can use your key to perform almost every operation offered through our APIs. This is bad security practice. In addition, since keys can be revoked from the API Keys page, they are also considered volatile. If a private key is revoked, any app using it will be broken until an update is released with a new key. The bottom line is this: Don't do it. We will find you. :)
If being reactive is your thing, then we've got you covered. Include the RxJava library in your project. Then, utilize the appropriate methods provided in the Simplify class.
Single<CardToken> single = simplify.createCardToken(card);
For more information on how to set up your payment system, see the API documentation and our tutorial.
This project includes a sample app to demonstrate SDK usage. To configure the sample app, add your public key to the gradle.properties file in the root of the project.
# Add your Simplify API key here
simplifyApiKey=sbpb_OTA0Nzkw...