| icon |
|---|
simple/arduino |
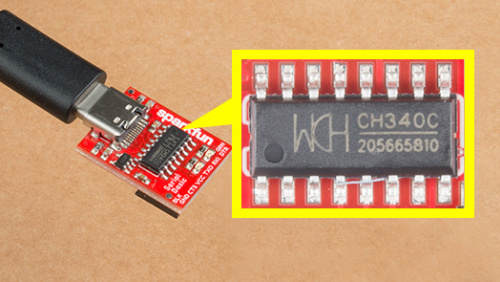
Users will need to install the appropriate driver for their computer to recognize the serial-to-UART chip on their board/adapter. Most of the latest operating systems will recognize the CH340C chip on the board and automatically install the required driver.
To manually install the CH340 driver on their computer, users can download it from the WCH website. For more information, check out our How to Install CH340 Drivers Tutorial.
[](https://learn.sparkfun.com/tutorials/908) [**How to Install CH340 Drivers**](https://learn.sparkfun.com/tutorials/908)!!! tip For first-time users, who have never programmed before and are looking to use the Arduino IDE, we recommend beginning with the SparkFun Inventor's Kit (SIK), which is designed to help users get started programming with the Arduino IDE.
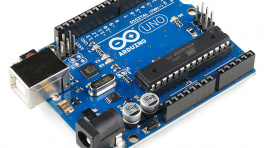
Most users may already be familiar with the Arduino IDE and its use. However, for those of you who have never heard the name Arduino before, feel free to check out the Arduino website. To get started with using the Arduino IDE, check out our tutorials below:

](https://learn.sparkfun.com/tutorials/908)
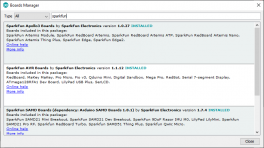
Install the latest ESP32 board definitions in the Arduino IDE.
[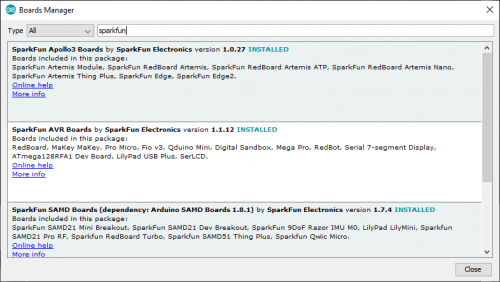](https://learn.sparkfun.com/tutorials/1265)](https://learn.sparkfun.com/tutorials/1265)
[**Installing Board Definitions in the Arduino IDE**](https://learn.sparkfun.com/tutorials/1265)
!!! info
For more instructions, users can follow this tutorial on Installing Additional Cores provided by Arduino. Users will also need the .json file for the Espressif Arduino core:
https://raw.githubusercontent.com/espressif/arduino-esp32/gh-pages/package_esp32_index.json
When selecting a board to program in the Arduino IDE, users should select the SparkFun ESP32 Thing Plus C from the Tools drop-down menu _(i.e. Tools > Board > ESP32 Arduino > SparkFun ESP32 Thing Plus C). Alternatively, users can also select the ESP32 Dev Module; however, they may lose some pin assignments.
??? info "Arduino IDE 2.x.x - Alternative Method"
In the newest version of the Arduino IDE 2.x.x, users can also select their board (green) and port (blue) from the Select Board & Port dropdown menu (yellow).
<figure markdown>
[{ width="400" }](./assets/img/hookup_guide/board_selection-alt.png)
<figcaption markdown>Selecting the **SparkFun ESP32 Thing Plus C** and **COM5** port from the **Select Board & Port** drop-down menu in the Arduino IDE (v2.0.3).</figcaption>
</figure>
The SparkFun TMAG5273 Arduino Library can be installed from the library manager in the Arduino IDE.
[{ width="400" }](./assets/img/hookup_guide/TMAG5273_library.png) SparkFun TMAG5273 Arduino library in the library manager of the Arduino IDE.??? tip "Arduino IDE (v1.x.x)" In the Arduino IDE v1.x.x, the library manager will have the following appearance for the SimpleFOC library:
<figure markdown>
[{ width="400" }](./assets/img/hookup_guide/TMAG5273_library-legacy.png)
<figcaption markdown>SparkFun TMAG5273 Arduino library in the library managerof the Arduino IDE (v1.x.x).</figcaption>
</figure>
This library will be primarily used to interact with the TMAG5273 hall-effect sensor and return the rotation angle of the motor.
The Simple Field Oriented Control Library can be installed from the library manager in the Arduino IDE.
[{ width="400" }](./assets/img/hookup_guide/FOC_library.png) SimpleFOC library in the library manager of the Arduino IDE.??? tip "Arduino IDE (v1.x.x)" In the Arduino IDE v1.x.x, the library manager will have the following appearance for the SimpleFOC library:
<figure markdown>
[{ width="400" }](./assets/img/hookup_guide/FOC_library-legacy.png)
<figcaption markdown>SimpleFOC library in the library manager of the Arduino IDE (v1.x.x).</figcaption>
</figure>
This library utilizes a motor control scheme called field oriented control (FOC), which can utilize a feedback control loop to drive a motor with a higher power efficiency and precision characteristics, like evenly distributed torque control.
!!! info For more details about the library, check out the online documentation.
!!! note "Supported Hardware" For a detailed and up-to-date list of the hardware supported by this library, check out the library's documentation. The following are excerpts taken from the library's documentation page:
=== "Microcontrollers"

	--8<-- "https://raw.githubusercontent.com/simplefoc/simplefoc.github.io/master/docs/simplefoc_library/hardware/mcus/index.md:14:15"

	--8<-- "https://raw.githubusercontent.com/simplefoc/simplefoc.github.io/master/docs/simplefoc_library/hardware/mcus/index.md:35:49"

	!!! info
		For more details, please refer to the [SimpleFOC Arduino library documentation](https://docs.simplefoc.com/microcontrollers).

=== "Motor Drivers"

	--8<-- "https://raw.githubusercontent.com/simplefoc/simplefoc.github.io/master/docs/simplefoc_library/hardware/drivers/index.md:19:23"

	??? warning "Current Limitations"
		--8<-- "https://raw.githubusercontent.com/simplefoc/simplefoc.github.io/master/docs/simplefoc_library/hardware/drivers/index.md:30"

	!!! tip
		While the TMC6300 isn't directly listed as part of the supported hardware for the SimpleFOC Arduino library, we have verified that is compatible with the library.

	!!! info
		For more details, please refer to the [SimpleFOC Arduino library documentation](https://docs.simplefoc.com/bldc_drivers).

=== "Motors"

	Arduino SimpleFOClibrary supports two types of BLDC motors:

	- BLDC motors
		- 3 phase (3 wire):

			??? info "Gimbal Motors"
				--8<-- "https://raw.githubusercontent.com/simplefoc/simplefoc.github.io/master/docs/simplefoc_library/hardware/motors/BLDC_motors.md:20:22"

				--8<-- "https://raw.githubusercontent.com/simplefoc/simplefoc.github.io/master/docs/simplefoc_library/hardware/motors/BLDC_motors.md:23:28"

			??? info "High-performance Motors"
				--8<-- "https://raw.githubusercontent.com/simplefoc/simplefoc.github.io/master/docs/simplefoc_library/hardware/motors/BLDC_motors.md:43:43"
	- Stepper motors
		- 2 phase (4 wire)

	??? warning "Current Limitations"
		--8<-- "https://raw.githubusercontent.com/simplefoc/simplefoc.github.io/master/docs/simplefoc_library/hardware/motors/index.md:28"

	!!! info
		For more details, please refer to the [SimpleFOC Arduino library documentation](https://docs.simplefoc.com/bldc_motors).
Users will need to utilize the BLDCDriver6PWM class to provide the six PWM signals required for the TMC6300 motor driver.
BLDCDriver6PWM
: This class provides an abstraction layer for most of the common BLDC drivers, which require six PWM signals. This method offers more control than a three PWM motor drivers, since each of the 6 half-bridges MOSFETs can be controlled independently.
--8<-- "https://raw.githubusercontent.com/simplefoc/simplefoc.github.io/master/docs/simplefoc_library/code/drivers/bldc_driver/bldc_driver_6pwm.md:28:36"

!!! note "Microcontroller Considerations"
	=== "Arduino Uno"
		--8<-- "https://raw.githubusercontent.com/simplefoc/simplefoc.github.io/master/docs/simplefoc_library/code/drivers/bldc_driver/bldc_driver_6pwm.md:42:50"

	=== "STM32"
		--8<-- "https://raw.githubusercontent.com/simplefoc/simplefoc.github.io/master/docs/simplefoc_library/code/drivers/bldc_driver/bldc_driver_6pwm.md:54:54"

		--8<-- "https://raw.githubusercontent.com/simplefoc/simplefoc.github.io/master/docs/simplefoc_library/code/drivers/bldc_driver/bldc_driver_6pwm.md:55:56"

		<div class="grid cards" markdown>

		-   **Hardware PWM**

			---

			--8<-- "https://raw.githubusercontent.com/simplefoc/simplefoc.github.io/master/docs/simplefoc_library/code/drivers/bldc_driver/bldc_driver_6pwm.md:59:69"

		-   **Software PWM**

			---

			--8<-- "https://raw.githubusercontent.com/simplefoc/simplefoc.github.io/master/docs/simplefoc_library/code/drivers/bldc_driver/bldc_driver_6pwm.md:72:93"

		</div>

	=== "ESP32"
		--8<-- "https://raw.githubusercontent.com/simplefoc/simplefoc.github.io/master/docs/simplefoc_library/code/drivers/bldc_driver/bldc_driver_6pwm.md:96:96"

!!! info
	For more details about the `BLDCDriver6PWM` class, check out the [online documentation](https://docs.simplefoc.com/bldcdriver6pwm).
All BLDC motors are handled with the BLDCMotor class.
BLDCMotor
: This class implements the BLDC FOC algorithm, motion control loops, and monitoring.
--8<-- "https://raw.githubusercontent.com/simplefoc/simplefoc.github.io/master/docs/simplefoc_library/code/motors/bldc_motors.md:23:30"

!!! note "Motor Considerations"
	While, the datasheet for our [gimbal motor](https://www.sparkfun.com/products/20441), indicates that there are **8 pole pairs**, we have found that the motor operates more smoothly if the `BLDCMotor` class is instantiated with **7 pole pairs** instead.

	```cp
	BLDCMotor motor = BLDCMotor(7);
	```

!!! info
	For more details about the `BLDCMotor` class, check out the [online documentation](https://docs.simplefoc.com/bldcmotor).
In order to incorporate the TMAG5273 hall-effect sensor into the FOC algorithm, users will need to utilize the GenericSensor class.
GenericSensor
: This class allows users to link a custom position sensor (not already implemented in the SimpleFOC library) by incorporating a few functions into their sketch.
1. Implement two functions; one to initialize the TMAG5273 and another to read and return the sensor's current position.

	--8<-- "https://github.com/simplefoc/simplefoc.github.io/raw/master/docs/simplefoc_library/code/sensors/generic.md:29:33"

	--8<-- "https://github.com/simplefoc/simplefoc.github.io/raw/master/docs/simplefoc_library/code/sensors/generic.md:20:26"

2. Instantiate the `GenericSensor` class and initialize the class by providing it pointers to the two functions.

	--8<-- "https://github.com/simplefoc/simplefoc.github.io/raw/master/docs/simplefoc_library/code/sensors/generic.md:37:42"

3. There are two ways to use sensors implemented within the SimpleFOC library:
	* As standalone position sensor
		* In this configuration users would simply read the sensor's position, independently from incorporating the readings into the FOC algorithm.
	* Incorporate it as the motor position sensor for FOC algorithm

		1. Initialize the sensor in the `setup()` loop:

			```cpp
			--8<-- "https://github.com/simplefoc/simplefoc.github.io/raw/master/docs/simplefoc_library/code/sensors/generic.md:88:97"
			```

		2. Link the sensor in the `setup()` loop:

			```cpp
			--8<-- "https://github.com/simplefoc/simplefoc.github.io/raw/master/docs/simplefoc_library/code/sensors/generic.md:138:147"
			```
!!! info
For more instructions on incorporating the GenericSensor class, please refer to the SimpleFOC documentation.
In order to incorporate the current sensing into the FOC algorithm, users will need to utilize the InlineCurrentSense class.
InlineCurrentSense
: This class allows users to link a custom position sensor (not already implemented in the SimpleFOC library) by incorporating a few functions into their sketch.
1. Instantiate the `InlineCurrentSense` class and initialize the class by providing the hardware configuration.

	--8<-- "https://github.com/simplefoc/simplefoc.github.io/raw/master/docs/simplefoc_library/code/current_sense/inline.md:38:46"

2. Incorporate the current sensor into the FOC algorithm:

	1. Initialize the sensor in the `setup()` loop:

		--8<-- "https://github.com/simplefoc/simplefoc.github.io/raw/master/docs/simplefoc_library/code/current_sense/inline.md:100:103"

	2. Link the sensor to the motor driver in the `setup()` loop:

		--8<-- "https://github.com/simplefoc/simplefoc.github.io/raw/master/docs/simplefoc_library/code/current_sense/inline.md:126:129"

	2. Link the sensor to the motor in the `setup()` loop:

		--8<-- "https://github.com/simplefoc/simplefoc.github.io/raw/master/docs/simplefoc_library/code/current_sense/inline.md:138:141"

	--8<-- "https://github.com/simplefoc/simplefoc.github.io/raw/master/docs/simplefoc_library/code/current_sense/inline.md:145:168"
!!! info
For instructions on incorporating the InlineCurrentSense class, please refer to the SimpleFOC documentation.