!!! tip Users unfamiliar with using Arduino shields should refer to the Arduino Shields (v2) tutorial first.
The pins for the USB Host Shield are broken out to 0.1"-spaced pins on the outer edges of the board. When selecting headers, be sure you are aware of the functionality you need.
[{ width="400" }](../assets/img/hardware/assembly-headers.jpg) Soldering headers to the USB Host Shield.The Arduino Stackable Header Kit - R3 is a great option as it allows users to stack shields (w/ Uno/R3 footprint); with the pins still accessible through the female headers.
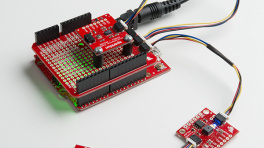
[{ width="400" }](../assets/img/hardware/assembly-stack_shield.jpg) Stacking the USB Host Shield on the [SparkFun RedBoard Plus](https://www.sparkfun.com/products/18158).!!! tip If you have never soldered before or need a quick refresher, check out our How to Solder: Through-Hole Soldering guide.
<p align="center">
	<a href="https://learn.sparkfun.com/tutorials/5">How to Solder: Through-Hole Soldering<br>
	<img alt="tutorial thumbnail" src="https://cdn.sparkfun.com/c/264-148/assets/e/3/9/9/4/51d9fbe1ce395f7a2a000000.jpg"></a>
</p>
The USB port is utilized for the host/peripheral interface. Users only need to connect a USB device to the USB host shield or connect the shield to a computer with a USB-C cable.
[{ width="400" }](../assets/img/hardware/assembly-usb_device.jpg) The USB Host Shield with a [USB-C adapter](https://www.sparkfun.com/products/21870) and [flash drive](https://www.sparkfun.com/products/14658) attached. The shield sits on top of a RedBoard Plus connected to a computer.