| title | description |
|---|---|
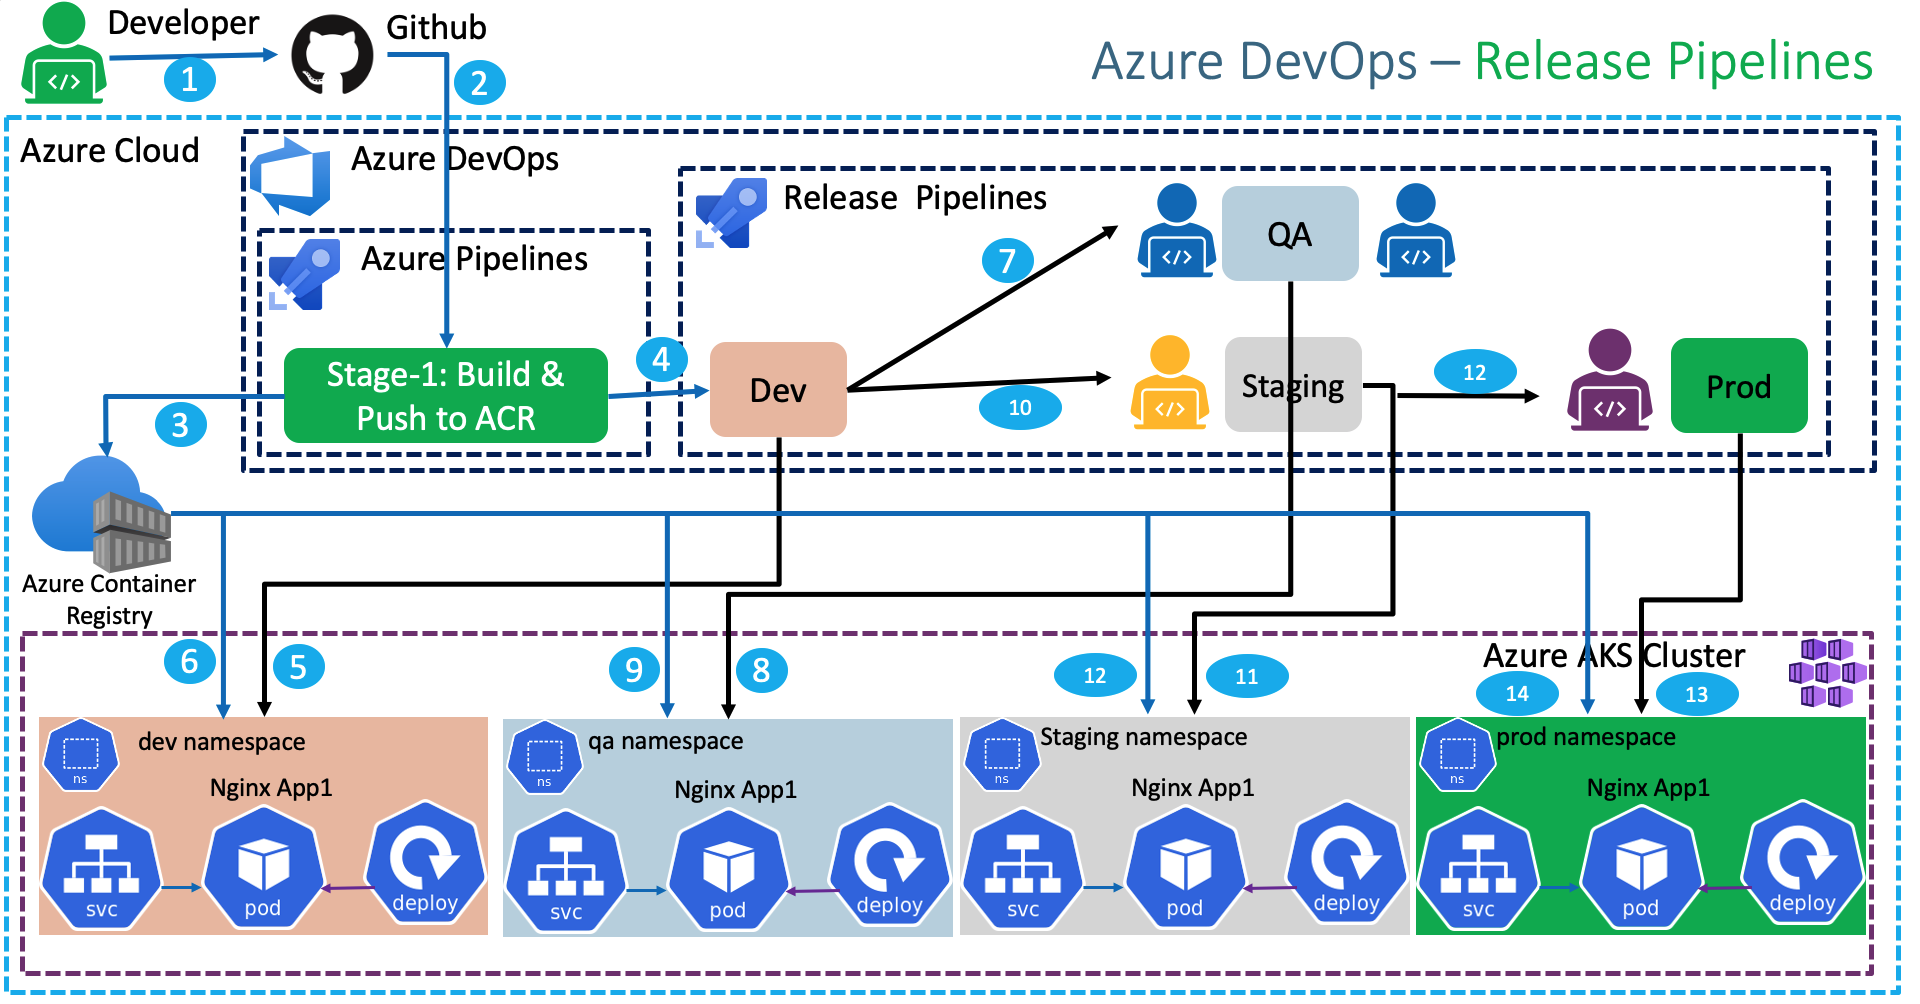
Azure DevOps Release Pipelines for AKS Kubernetes |
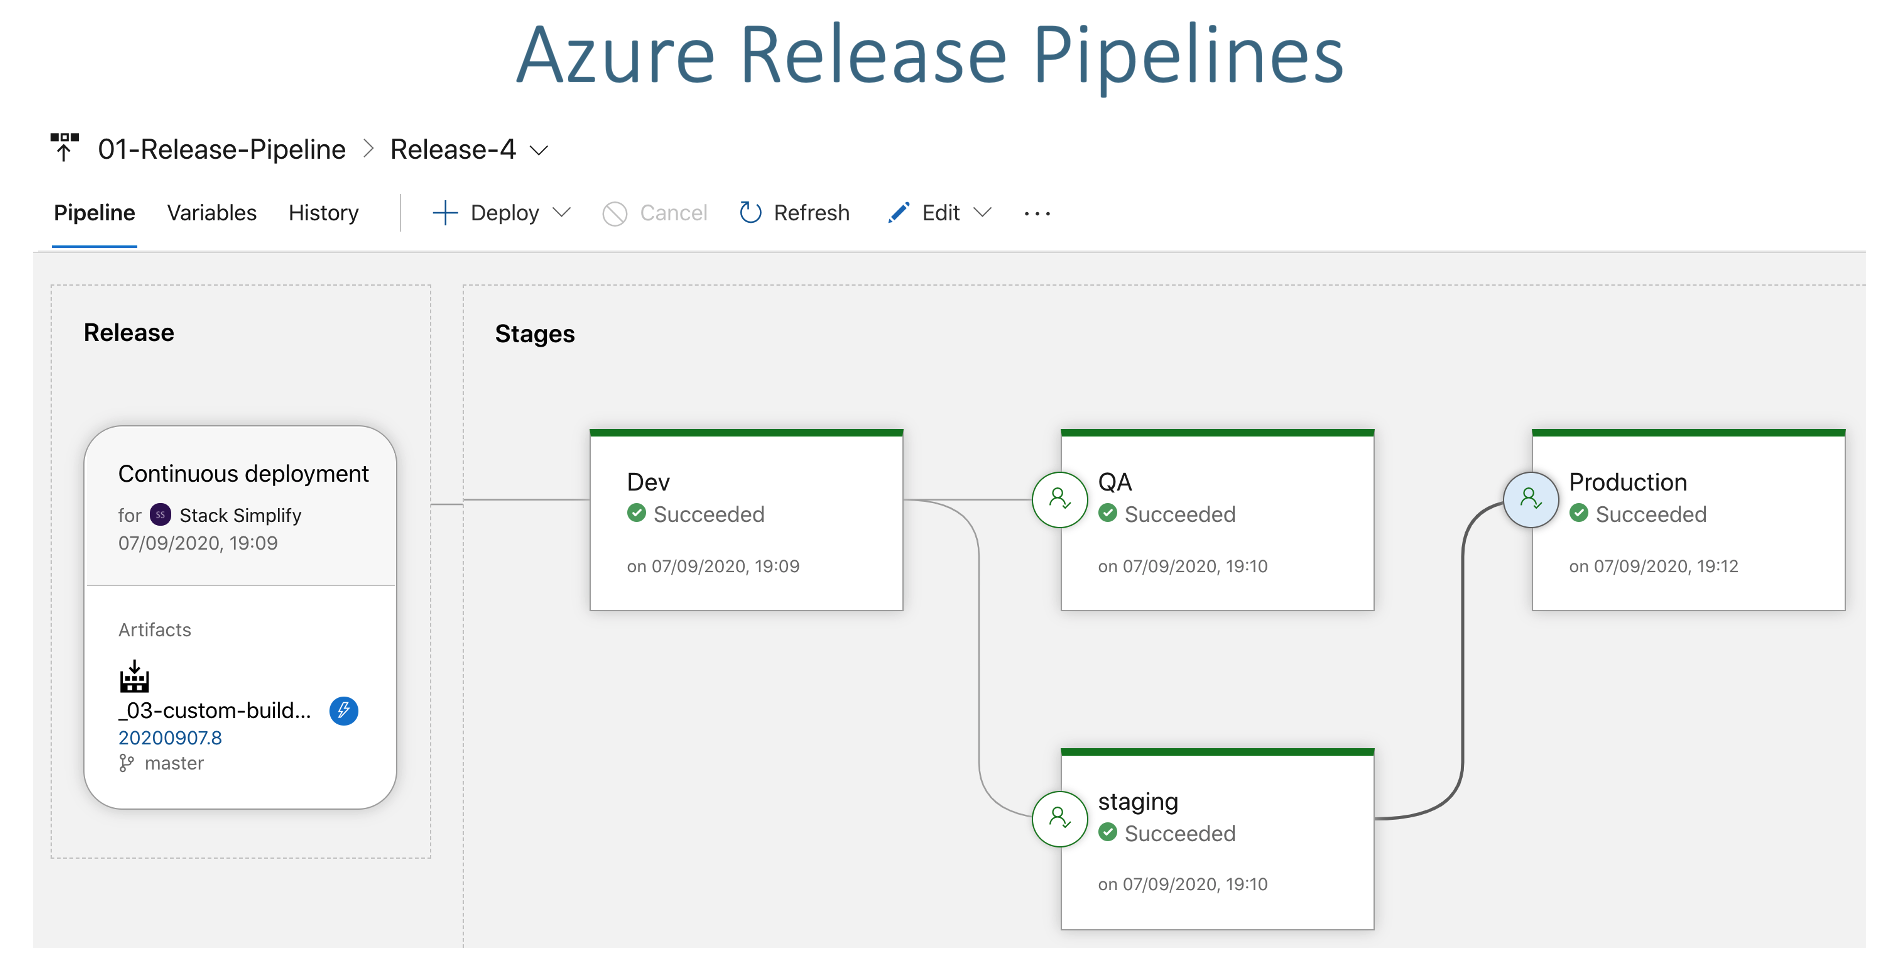
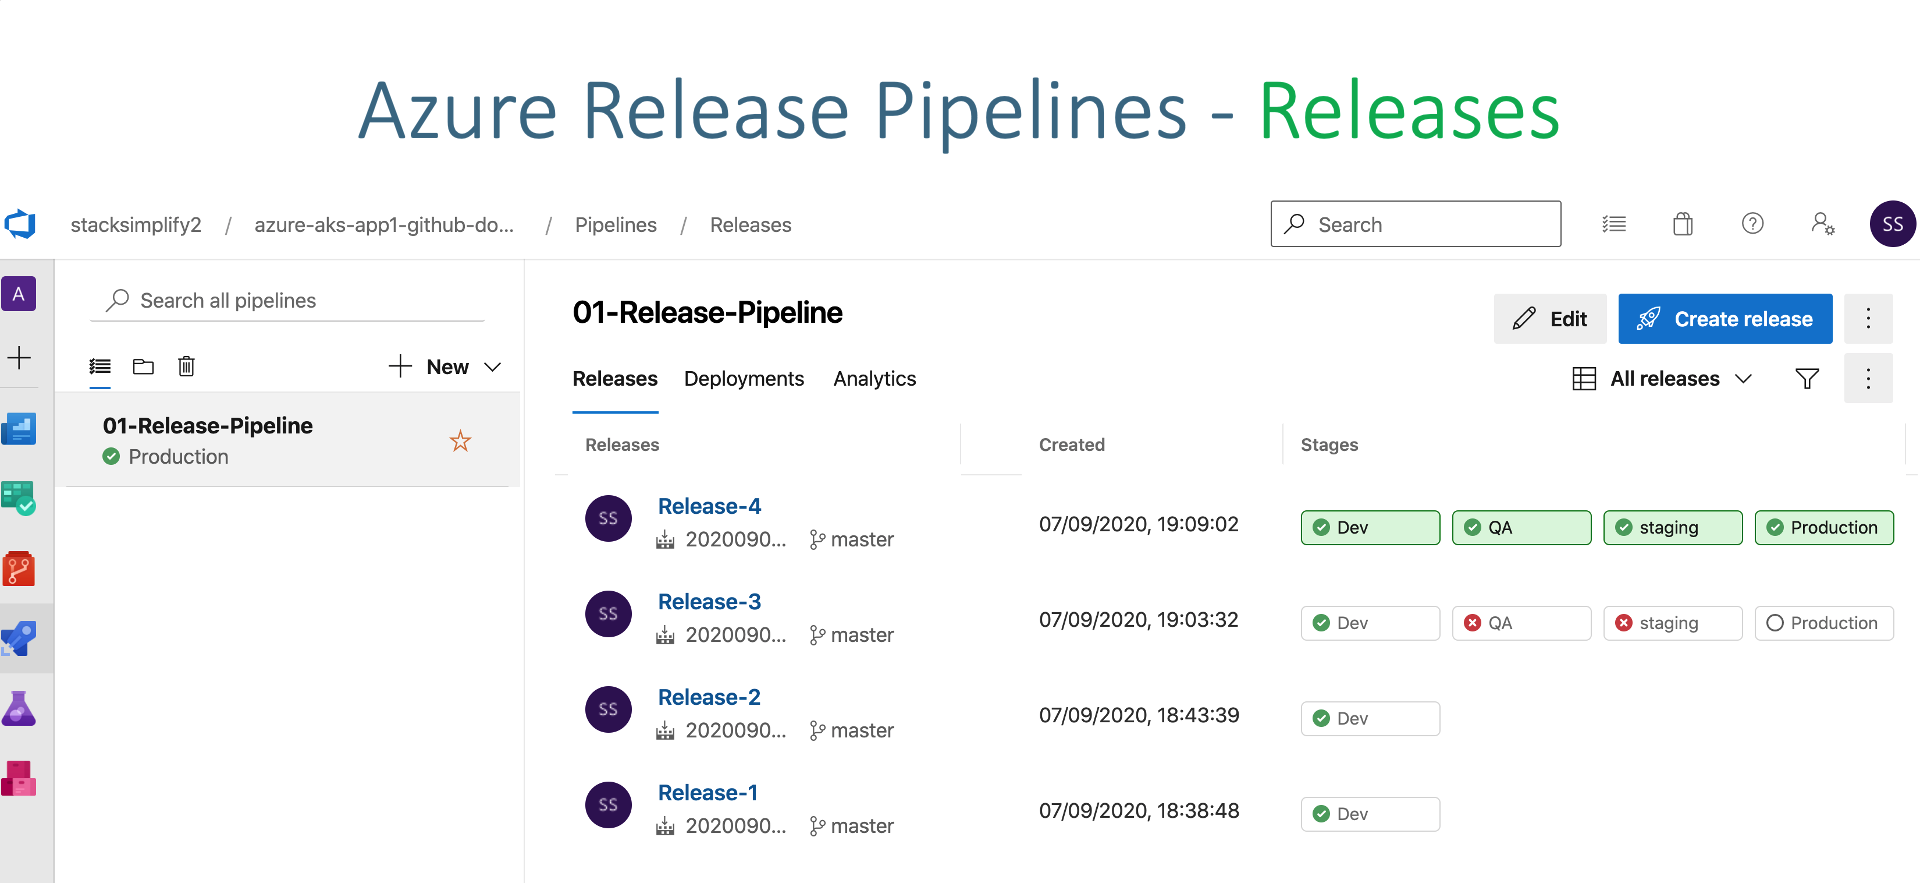
Create Azure Release Pipeline to Deploy Kubernetes Workloads to Dev, QA, Staging and Prod Environments |
- Understand Release Pipelines concept
- Create Release Pipelines to Deploy to Kubernetes Dev, QA, Staging and Prod namespaces
- Add Pre-Deployment email approval for QA, Staging and Prod environment deployments
# List Namespaces
kubectl get ns

# Create Namespaces
kubectl create ns dev
kubectl create ns qa
kubectl create ns staging
kubectl create ns prod

# List Namespaces
kubectl get ns
- Go to Project -> azure-devops-github-acr-aks-app1 -> Project Settings -> Pipelines -> Service Connections
- Click on New Service Connection
- Choose a service or connection type: kubernetes
- Authentication Method: Azure Subscription
- Username: Azure Cloud Administrator
- Password: Azure Cloud Admin Password
- Cluster: aksdemo2
- Namespace: dev
- Service connection name: dev-ns-k8s-aks-svc-conn
- Description: Dev Namespace AKS Cluster Service Connection
- Security: Grant access permission to all pipelines (default Checked)
- Click on SAVE
- Go to Project -> azure-devops-github-acr-aks-app1 -> Project Settings -> Pipelines -> Service Connections
- Click on New Service Connection
- Choose a service or connection type: kubernetes
- Authentication Method: Azure Subscription
- Username: Azure Cloud Administrator
- Password: Azure Cloud Admin Password
- Cluster: aksdemo2
- Namespace: qa
- Service connection name: qa-ns-k8s-aks-svc-conn
- Description: QA Namespace AKS Cluster Service Connection
- Security: Grant access permission to all pipelines (default Checked)
- Click on SAVE
- Go to Project -> azure-devops-github-acr-aks-app1 -> Project Settings -> Pipelines -> Service Connections
- Click on New Service Connection
- Choose a service or connection type: kubernetes
- Authentication Method: Azure Subscription
- Username: Azure Cloud Administrator
- Password: Azure Cloud Admin Password
- Cluster: aksdemo2
- Namespace: staging
- Service connection name: staging-ns-k8s-aks-svc-conn
- Description: Staging Namespace AKS Cluster Service Connection
- Security: Grant access permission to all pipelines (default Checked)
- Click on SAVE
- Go to Project -> azure-devops-github-acr-aks-app1 -> Project Settings -> Pipelines -> Service Connections
- Click on New Service Connection
- Choose a service or connection type: kubernetes
- Authentication Method: Azure Subscription
- Username: Azure Cloud Administrator
- Password: Azure Cloud Admin Password
- Cluster: aksdemo2
- Namespace: prod
- Service connection name: prod-ns-k8s-aks-svc-conn
- Description: Production Namespace AKS Cluster Service Connection
- Security: Grant access permission to all pipelines (default Checked)
- Click on SAVE
- Release Pipeline Name: 01-app1-release-pipeline
- Source Type: Build
- Project: leave to default (azure-aks-app1-github-acr)
- Source (Build Pipeline): App1-Pipelines\04-custom2-BuildPushToACR-Publish-k8s-manifests-to-AzurePipelines
- Default Version: Latest (auto-populated)
- Source Alias: leave to default (auto-populated)
- Click on Add
- Continuous deployment trigger: Enabled
- Go to Pipelines -> Releases
- Create new Release Pipeline
- Stage Name: Dev
- Create Task
- Agent Job: Change to Ubunut Linux (latest)
- Display Name: Create Secret to allow image pull from ACR
- Action: create secret
- Kubernetes service connection: dev-ns-k8s-aks-svc-conn
- Namespace: dev
- Type of secret: dockerRegistry
- Secret name: dev-aksdevopsacr-secret
- Docker registry service connection: manual-aksdevopsacr-svc
- Rest all leave to defaults
- Click on SAVE to save release
- Comment: Dev k8s Create Secret task added
- Display Name: Deploy to AKS
- Action: deploy
- Kubernetes Service Connection: dev-ns-k8s-aks-svc-conn
- Namespace: dev
- Strategy: None
- Manifest: Select 01-Deployment-and-LoadBalancer-Service.yml from build artifacts
# Sample Value for Manifest after adding it
Manifest: $(System.DefaultWorkingDirectory)/_04-custom2-BuildPushToACR-Publish-k8s-manifests-to-AzurePipelines/kube-manifests/01-Deployment-and-LoadBalancer-Service.yml
- Container: aksdevopsacr.azurecr.io/custom2aksnginxapp1:$(Build.BuildId)
- ImagePullSecrets: dev-aksdevopsacr-secret
- Rest all leave to defaults
- Click on SAVE to save release
- Comment: Dev k8s Deploy task added
- Review the image value and update it from Container registry if required
- File: kube-manifests/01-Deployment-and-LoadBalancer-Service.yml
    spec:
      containers:
        - name: app1-nginx
          image: aksdevopsacr.azurecr.io/custom2aksnginxapp1
          ports:
- containerPort: 80- Update index.html
# Commit and Push
git commit -am "V11 Commit"
git push
- View Build Logs
- View Dev Release logs
- Access App after successful deployment
# Get Public IP
kubectl get svc -n dev

# Access Application
http://<Public-IP-from-Get-Service-Output>
- Go to Release Pipelines -> 01-app1-release-pipeline -> Edit -> Dev Tasks
- Go to Deploy to AKS Task
- Replace
#Before
Containers: aksdevopsacr.azurecr.io/custom2aksnginxapp1:$(Build.BuildId)

# After
Containers: aksdevopsacr.azurecr.io/custom2aksnginxapp1:$(Build.SourceVersion)
- Click on SAVE to save release
- Comment: Dev Container Tag changed from Build Id to Build Source Version
- Update index.html
# Commit and Push
git commit -am "V12 Commit"
git push
- View Build Logs
- View Dev Release logs
- Access App after successful deployment
# Get Public IP
kubectl get svc -n dev

# Access Application
http://<Public-IP-from-Get-Service-Output>
- Verify Github Commit Id on Github Repository and Container Registry
- Create QA, Staging and Prod Stages
- Add Email Approvals
- Click on SAVE to save release
- Go to Releases -> 01-app1-release-pipeline -> Edit
- Select Dev Stage -> Add -> Clone Stage
- Stage Name: QA
- Kubernetes service connection: qa-ns-k8s-aks-svc-conn
- Namespace: qa
- Secret name: qa-aksdevopsacr-secret
- Click SAVE
- Commit Message: QA Create Secret task updated
- Kubernetes service connection: qa-ns-k8s-aks-svc-conn
- Namespace: qa
- ImagePullSecrets: qa-aksdevopsacr-secret
- Click SAVE
- Commit Message: QA Deploy to AKS task updated
- Update index.html
# Commit and Push
git commit -am "V13 Commit"
git push
- View Build Logs
- View Dev Release logs
- Access App after successful deployment
- Approve deployment at qa, staging and prod stages
# Get Public IP
kubectl get svc -n dev
kubectl get svc -n qa
kubectl get svc -n staging
kubectl get svc -n prod
kubect get svc --all-namespaces

# Access Application
http://<Public-IP-from-Get-Service-Output>
# Before Clean-Up: List all Pods and Services
kubectl get pod,svc --all-namespaces

# Clean-Up all Apps in Kubernetes
kubectl delete ns dev
kubectl delete ns qa
kubectl delete ns staging
kubectl delete ns prod

# After Clean-Up: List all Pods and Services
kubectl get pod,svc --all-namespaces


