A Cloud providers aggregator demo using Blockchain(Chainlink) Currently, blockchains are divided into three categories: public chains, private chains, and consortium chains [1]. The public chain means that any node can directly reach a consensus, and all data records are also open to the public. The opposite of the public chain is the private chain. For a private chain, only a specific organization or individual node can participate in reaching a consensus. The consortium chain is between the public chain and the private chain. It is a consensus reached by some network nodes that have passed verification. Since the public chain is open, the project used the Ethereum public chain for testing. Since running on the Ethereum main chain will require a lot of expenditure (ETH), the project is mainly based on the Ethereum Kovan test net for verification.
The project still uses an important function of the blockchain smart contracts. If we want to use smart contracts to implement a decentralized cloud aggregation platform, we must first consider several questions: 1. How to save user information? 2. How to save the service provider information? 3. How to save the application information? 4. How to verify whether the service provider successfully runs the application?
Because every user who uses a smart contract needs to pay through a wallet, and each wallet corresponds to an address on the blockchain, we can use the wallet (MetaMask) address to store user and service provider information. The cloud service aggregation platform uses Docker containers as the smallest running granularity, so we only need to save the container image address. To verify whether the service provider successfully runs the application, we refer to the liveness probe mechanism of Kubernetes. The user first sets the return information of the specified port after the container is started. When the container is started, the smart contract sends a GET request to obtain whether the corresponding port of the container is returned. Suppose the returned message is consistent with the keyword set by the user. In that case, it is determined that the Docker container application has been successfully started, and if it is inconsistent, it is determined that the container has failed to start.
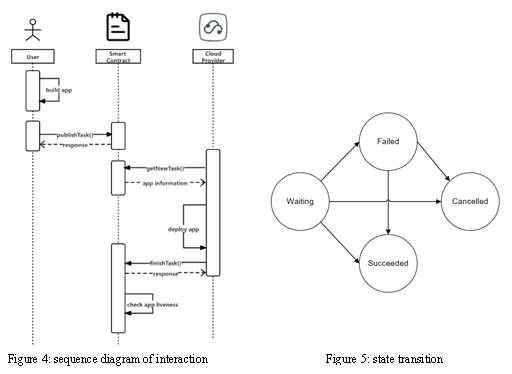
As shown in figure 4, the user first packages the application into a docker image and then calls the smart contract to publish tasks. Then the cloud service provider calls the smart contract to query the newly published tasks. And the docker application is deployed. After the deployment procedure is completed, the finishTask() method of the smart contract is called. Finally, the smart contract determines whether the application is successfully deployed and then completes the transaction. The tasks are divided into four stages in the smart contract: Waiting, Failed, Succeeded, Canceled, waiting indicates that the application publishing task is waiting to be completed, Failed indicates that the current state of the application publishing task is failed, and the Succeeded state indicates the task has been completed. Canceled means that the user has canceled this task. Their state transition diagram is shown in figure 5.
To complete the above process, we need to provide the following methods in the smart contract: publishTask(). This method needs to record several key parameters, including the image tag of the application, the port to be specified and exposed by the application, the keywords set by the user, the URL path corresponding to the keywords set by the user, and the time when the task is released. (Because the blockchain itself cannot obtain the timestamp of the external world, it can only be input when called by the user). In this method, the smart contract records all the key information, which has been used by the cloud service provider for inquiries later. And it should be noted that the task is a payable function, and the user needs to pay the deployment cost (0.01ETH by default) when calling this method. When the task is completed, the cost will be transferred from the smart contract to the cloud service provider. If the task is not released after a timeout, the user can retrieve this part of the fee through the “returnMoneyBack()” operation.
retrieveTasksForUser(). This function accepts a parameter, that is, the user’s wallet address. By giving the wallet address, all the tasks that this user has submitted will return. This function will be used to show tasks information and status on web pages. retrieveAllUnfinishedTasks(). This function is mainly provided to cloud service providers to get the unfinished tasks. The cloud service provider can get information on all the tasks that are not completed by calling this function, which mainly includes: the Docker image label, port to be exposed, task id. The first two returns are mainly used for cloud services. The third parameter is mainly used for cloud service providers to submit tasks after completing tasks.
returnDeposit(). The main purpose of the return deposit is to allow the user to get back the cost of the task when it is time out(1 hour by default). This method requires the user to provide the number of the specified task, and the function will determine: 1. The current time minus task creation time has exceeded the unit interval (default is 1H) 2. Whether the status of the task to be canceled is Wait or fail.
commitTask(). Once the cloud service provider completes the deployment procedure of the task, write back the deployment information of this task by calling this method. This method accepts two parameters. The first is the IP address of the container application, and the second is the ID of the completed task. The smart contract will send a GET request to the verification port through :< PORT>: and determine whether the return value is the same as the user’s preset verification value. If they are the same, the deployment fee will be transferred to the cloud service provider. If it’s different, change the task status to Failed. Since the native smart contract of Ethereum cannot access data outside the blockchain, to complete the verification process, we make the smart contract inherit the ChainlinkClient. Then it can access the outside world information through the Oracle mechanism of Chainlink.
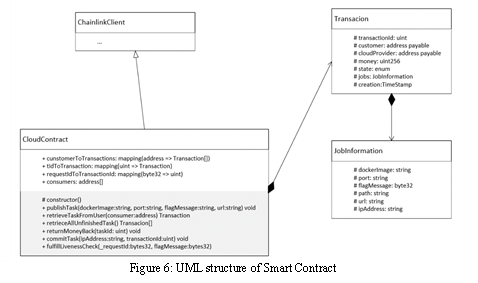
Since the smart contract cannot store pointers of data and frequent access to the variables in the function will cause a lot of temporary variables and cause a higher GAS Fee, we save the task information through two map variables in the smart contract. The first map stores and saves the mapping of user information to all related tasks published by the user so that all tasks of the specified user can be found quickly; the second map stores the mapping from the specified task number to the specified task, ensuring that the using the task number can find the specified task in O(1) time; at the same time, we consider that sending a GET request through Chainlink will result in asynchronous return through the callback function, so we need to record the task information corresponding to the specified Chainlink request, so we use another map to save the Chainlink request number to the corresponding task so that the status of the specified task can be changed to Succeeded or Failed in the Chainlink callback function. The UML structure of the smart contract is shown in figure 6.

It is unrealistic for most users to write programs and call the smart contract functions, so we designed the front-end page for users to use. We divide the front-end page into several parts. The first is the page for task submission, and the second is the page where the task is displayed. Since the front-end page cannot directly access the data on the Ethereum blockchain, we also implemented the backend program to query and expose the RESTful interface to the front-end query.
Through analysis, it can be seen that the front-end needs the following interfaces: 1. query all submitted tasks of the current user 2. submit new tasks 3. retrieve the cost of unpublished applications that have timed out. We use the Vue framework and AntV front-end component library to implement the front-end page, and we use Golang to write the backend program. This part first introduces the design of the backend program and then introduces the design and implementation of the front-end pages.
To realize the interaction between the backend program and the Ethereum-based smart contract, we need to use the following tools:** 1. the official Ethereum client of the Go language (go-ethereum). 2. the ABI format file of the smart contract program. 3. use go-ehtereum to convert the ABI file of the specified smart contract into a Go language file. 4. apply for the Infura project to connect to Ethereum. After the above steps, we can develop the corresponding backend program. Most of the logic of the three interfaces is related to ETH itself. As shown in figure 7, only the core logic is different. There are the following steps for creating a new task: 1. get the Ethereum client. 2. get the corresponding Transaction adapter through the smart contract address. 3. change the encoding of the flag message from the front end from string to byte32. 4. set the transaction fee (default is 0.1ETH) 5. send the transaction to Ethereum and get the return (the hash value of the transaction in the blockchain). Search the related tasks of a current user including the following steps: 1. get the Ethereum client. 2. get the corresponding Call adapter through the smart contract address. 3. pass the user account address as a parameter to search all related tasks of the current user(Solidity does not support returning complex data structures, so we need to assemble it into a JSON structure and return it to the front end). 4. return the response. Retrieving the deposit of overtime tasks includes the following steps: 1. get the Ethereum client. 2. get the corresponding transaction adapter through the smart contract address. 3. call the transaction adapter and pass in the task ID. 4. return the hash of the transaction on the current Ethereum chain value.**

We use a containerized layout for the front page to divide the page into a left container, a top container, and the main container. The wallet address of the current user is obtained through the API provided by MetaMask. The tasks submitted by the current user are displayed in the form of a list, mainly showing the task ID, task status, task creation time, docker image, liveness keyword, liveness port, and accessible URL addresses. As shown in Figure 8, the current user has published three tasks, and their staus are waiting, canceled, and succeeded. The waiting time of the waiting task has exceeded one hour, so the user can click the “withdraw” button to retrieve the deposit of the task. And the deposit of the canceled task and the succeeded task cannot be retrieved, so the “withdraw” button is not displayed. Users can also create tasks through the page shown in figure 9.
When the task is successfully submitted, the upper right corner will pop up the Hash value of the transaction. And users are required to pay gas fees and a transaction deposit of 0.01 ETH for each transaction.