- Xcode
- Versioning
- Comments
- Blocks, delegates or data source
- View controllers
- Assets
- Property Observing
- Networking
- View layout
- Swift style guide
The recommended version of Xcode (and Swift) for all purposes is the current available in the App Store.
Enable warnings by adding -Weverything to your Build Settings under "Other Compiler Flags". If you need to ignore a specific warning you can use Clang's pragma feature or add -Wno-warning-to-be-disabled (for example -Wno-gnu-conditional-omitted-operand).
To version our open source projects we use semantic versioning, and it's important that minor releases are backwards compatible otherwise don't feel shy to make it a major release.
When making backwards compatible changes, flag your old APIs as deprecated like this:
@available(*, deprecated: 4.3.0, message: "Use `objectAt(index index: Int)` instead") public func objectAtIndex(index: Int)When it comes to apps, patch releases are bug fixes, minor releases are small new features and major releases are re-designs or big features.
When they are needed, comments should be used to explain why a particular piece of code does something instead of what. Any comments that are used must be kept up-to-date or deleted. This does not apply to those comments used to generate documentation.
Preferred:
/*
  Workaround: So far this is the scroll-to-bottom method that worked best,
  with proper animation, and no issues so far, regardless of scrollview content size.
  If this looks and feels like a hack, it's because it kinda is.
  By creating a rect that's 1x1, pointed at the bottom-right side of the scrollview's content
  and telling it to scroll there, regardless of insets and offsets, it will scroll to the very bottom.
*/
func scrollToBottom() {
    let contentSize = self.collectionView.contentSize
    let bottomRect = CGRect(x: contentSize.width - 1, y: contentSize.height - 1, width: 1, height: 1)
    let visibleRect = self.collectionView.layer.visibleRect
    if !visibleRect.intersects(bottomRect) {
        self.collectionView.scrollRectToVisible(bottomRect, animated: true)
    }
}
Not Preferred:
// Scrolls to the bottom of the view
func scrollToBottom() {
    let contentSize = self.collectionView.contentSize
    let bottomRect = CGRect(x: contentSize.width - 1, y: contentSize.height - 1, width: 1, height: 1)
    let visibleRect = self.collectionView.layer.visibleRect
    if !visibleRect.intersects(bottomRect) {
        self.collectionView.scrollRectToVisible(bottomRect, animated: true)
    }
}
Workaround comment:
func override viewWillAppear(animated: Bool) {
    super.viewWillAppear(animated)

    /*
     Workaround: Selected cell only gets deselected when pressing the back button
     dragging the screen to go back doesn't deselect the selected cell.
     So, `self.clearsSelectionOnViewWillAppear = true` only works sometimes.
     */
    let selectedIndexPath = self.tableView.indexPathForSelectedRow()
    if selectedIndexPath {
        self.tableView.deselectRowAtIndexPath(selectedIndexPath, animated: true)
    }
}
Comments style
One-line:
// Workaround: This is the commentMultiple-lines:
/*
   Workaround: This is a comment that spans multiple lines.
   Comments should be added when they are not only needed but critical
   to understand the underlying block of code.
*/Choosing when to use a block or closure, a delegate or a dataSource most of the time is a simple decision, but if you're having trouble deciding here are some reminders on what does what.
- Asynchronous (For example: networking operations)
- User inputs with multiple options (For example: UIAlertView's YES and NO)
- Data source driven inputs (For example: A table items with action blocks that were defined in the data source)
- If there’s no tracked state or if the state is defined in the same method
- Synchronous (For example: buttons actions in views that should perform on their parents)
- Shouldn't return values
- Provides control over performing an action (For example: UITextField's shouldEndEditing)
- User input with one action (For example: buttons actions in views that should perform on their parents)
- If tracked state is shared (if state is stored in a property or a constant)
- Returns a value
When naming subclasses of UIViewController or friends UIPageViewController, UICollectionViewController, UITableViewController, you don't have to use the ViewController suffix.
For example instead of BBRecipesTableViewController you would do RecipesController.
- It's better practice to call
dismissViewControllerAnimated:completion:in theUIViewControllerthat did the presenting, not in theUIViewControllerthat was presented.
More information on this blog post.
Image names should be named consistently to preserve organization and developer sanity. They should be named in lower case and separated by dashes, followed by the un-prefixed name of the class or property they are customizing (if there is one), followed by a further description of color and/or placement, and finally their state.
For example:
refresh-bar-button-itemandrefresh-bar-button-item-selectedarticle-navigation-bar-whiteandarticle-navigation-bar-black-selected
Images should live in Images.xcassets, they don't need to be grouped in any way.
It's common that when using property observers any change will update some part of the UI.
For example:
// PhotoViewerController

var photo: Photo? {
    didSet {
        guard let viewerItem = self.viewerItem else { return }
        // Do something with photo, maybe download and so on
    }
}
The problem with this logic is that if for some reason the user of the PhotoViewerController is required to update multiple times his PhotoViewerController instance with the same photo, this will have awful performance issues. And since this user doesn't know the kind of logic processed inside this controller, bugs can occur. So it's better that if the PhotoViewerController is handling property observation, it should also handle the cases where the new introduced value is the same as the one that currently exists:
There are two ways to solve this issue:
One solution would be that the API user (the abuser) makes sure that they don't set a photo item if it has already been set.
// ViewerController (A horizontal array of PhotoViewerController)

let photoViewerController = self.cachedPhotoViewerControllers.objectForKey(photo.id)
if photoViewerController.photo?.id != photo.id {
    photoViewerController.photo = photo
}The other solution would be that the PhotoViewerController takes care of this since it's the one that decided to do property observing, instead of having a separate method to trigger this side effect (downloading photo).
// PhotoViewerController

var changed = false
var photo: Photo? {
    willSet {
        if self.photo?.id != newValue?.id {
            self.changed = true
        }
    }

    didSet {
        guard let photo = self.photo else { return }

        if self.changed {
            // Do something with photo, maybe download and so on
            self.changed = false
        }
    }
}Completion blocks in networking calls should be returned in the main thread.
Completion blocks should contain the error instead of success/failure blocks.
Use a simple NSURLSession wrapper to make things simpler, Networking is a good candidate for this.
Views should be layout using Apple's Auto Layout. No third-party frameworks are recommended at the moment but this is open for change. Just try to use the highest abstraction that's available to you, whether this is UIStackView or NSLayoutAnchor.
Old style layout is still an option for when Auto Layout is not available.
Our overarching goals are conciseness, readability, and simplicity.
Use descriptive names with camel case for classes, methods, variables, etc. Class names should be capitalized, while method names, variables and constants should start with a lower case letter.
Preferred:
class WidgetContainer {
    var widgetButton: UIButton
    let widgetHeightPercentage = 0.85
}
Not Preferred:
let MAX_WIDGET_COUNT = 100

class app_widgetContainer {
    var wBut: UIButton
    let wHeightPct = 0.85
}
For functions and init methods, prefer named parameters for all arguments. Also avoid using underscores in your method names.
Declarations:
class Guideline {
    func combineWithString(incoming incoming: String, options: Dictionary?)
    func upvoteBy(by amount: Int)
    func date(from string: String) -> NSDate
    func timedAction(delay: NSTimeInterval, action: SKAction) -> SKAction!
    func authenticate(username username: String, password: String, completion: (error: NSError?) -> Void)
}
Implementations:
date(string: "2014-03-14")

timedAction(delay: 1.0, action: someOtherAction) {

}

authenticate(username: "elvis", password: "m8eu201je") { error in

}
When in doubt, look at how Xcode lists the method in the jump bar – our style here matches that.
Swift types are all automatically namespaced by the module that contains them. As a result, prefixes are not required in order to minimize naming collisions. If two names from different modules collide you can disambiguate by prefixing the type name with the module name:
import MyModule

var myClass = MyModule.MyClass()
You should not add prefixes to your Swift types.
-
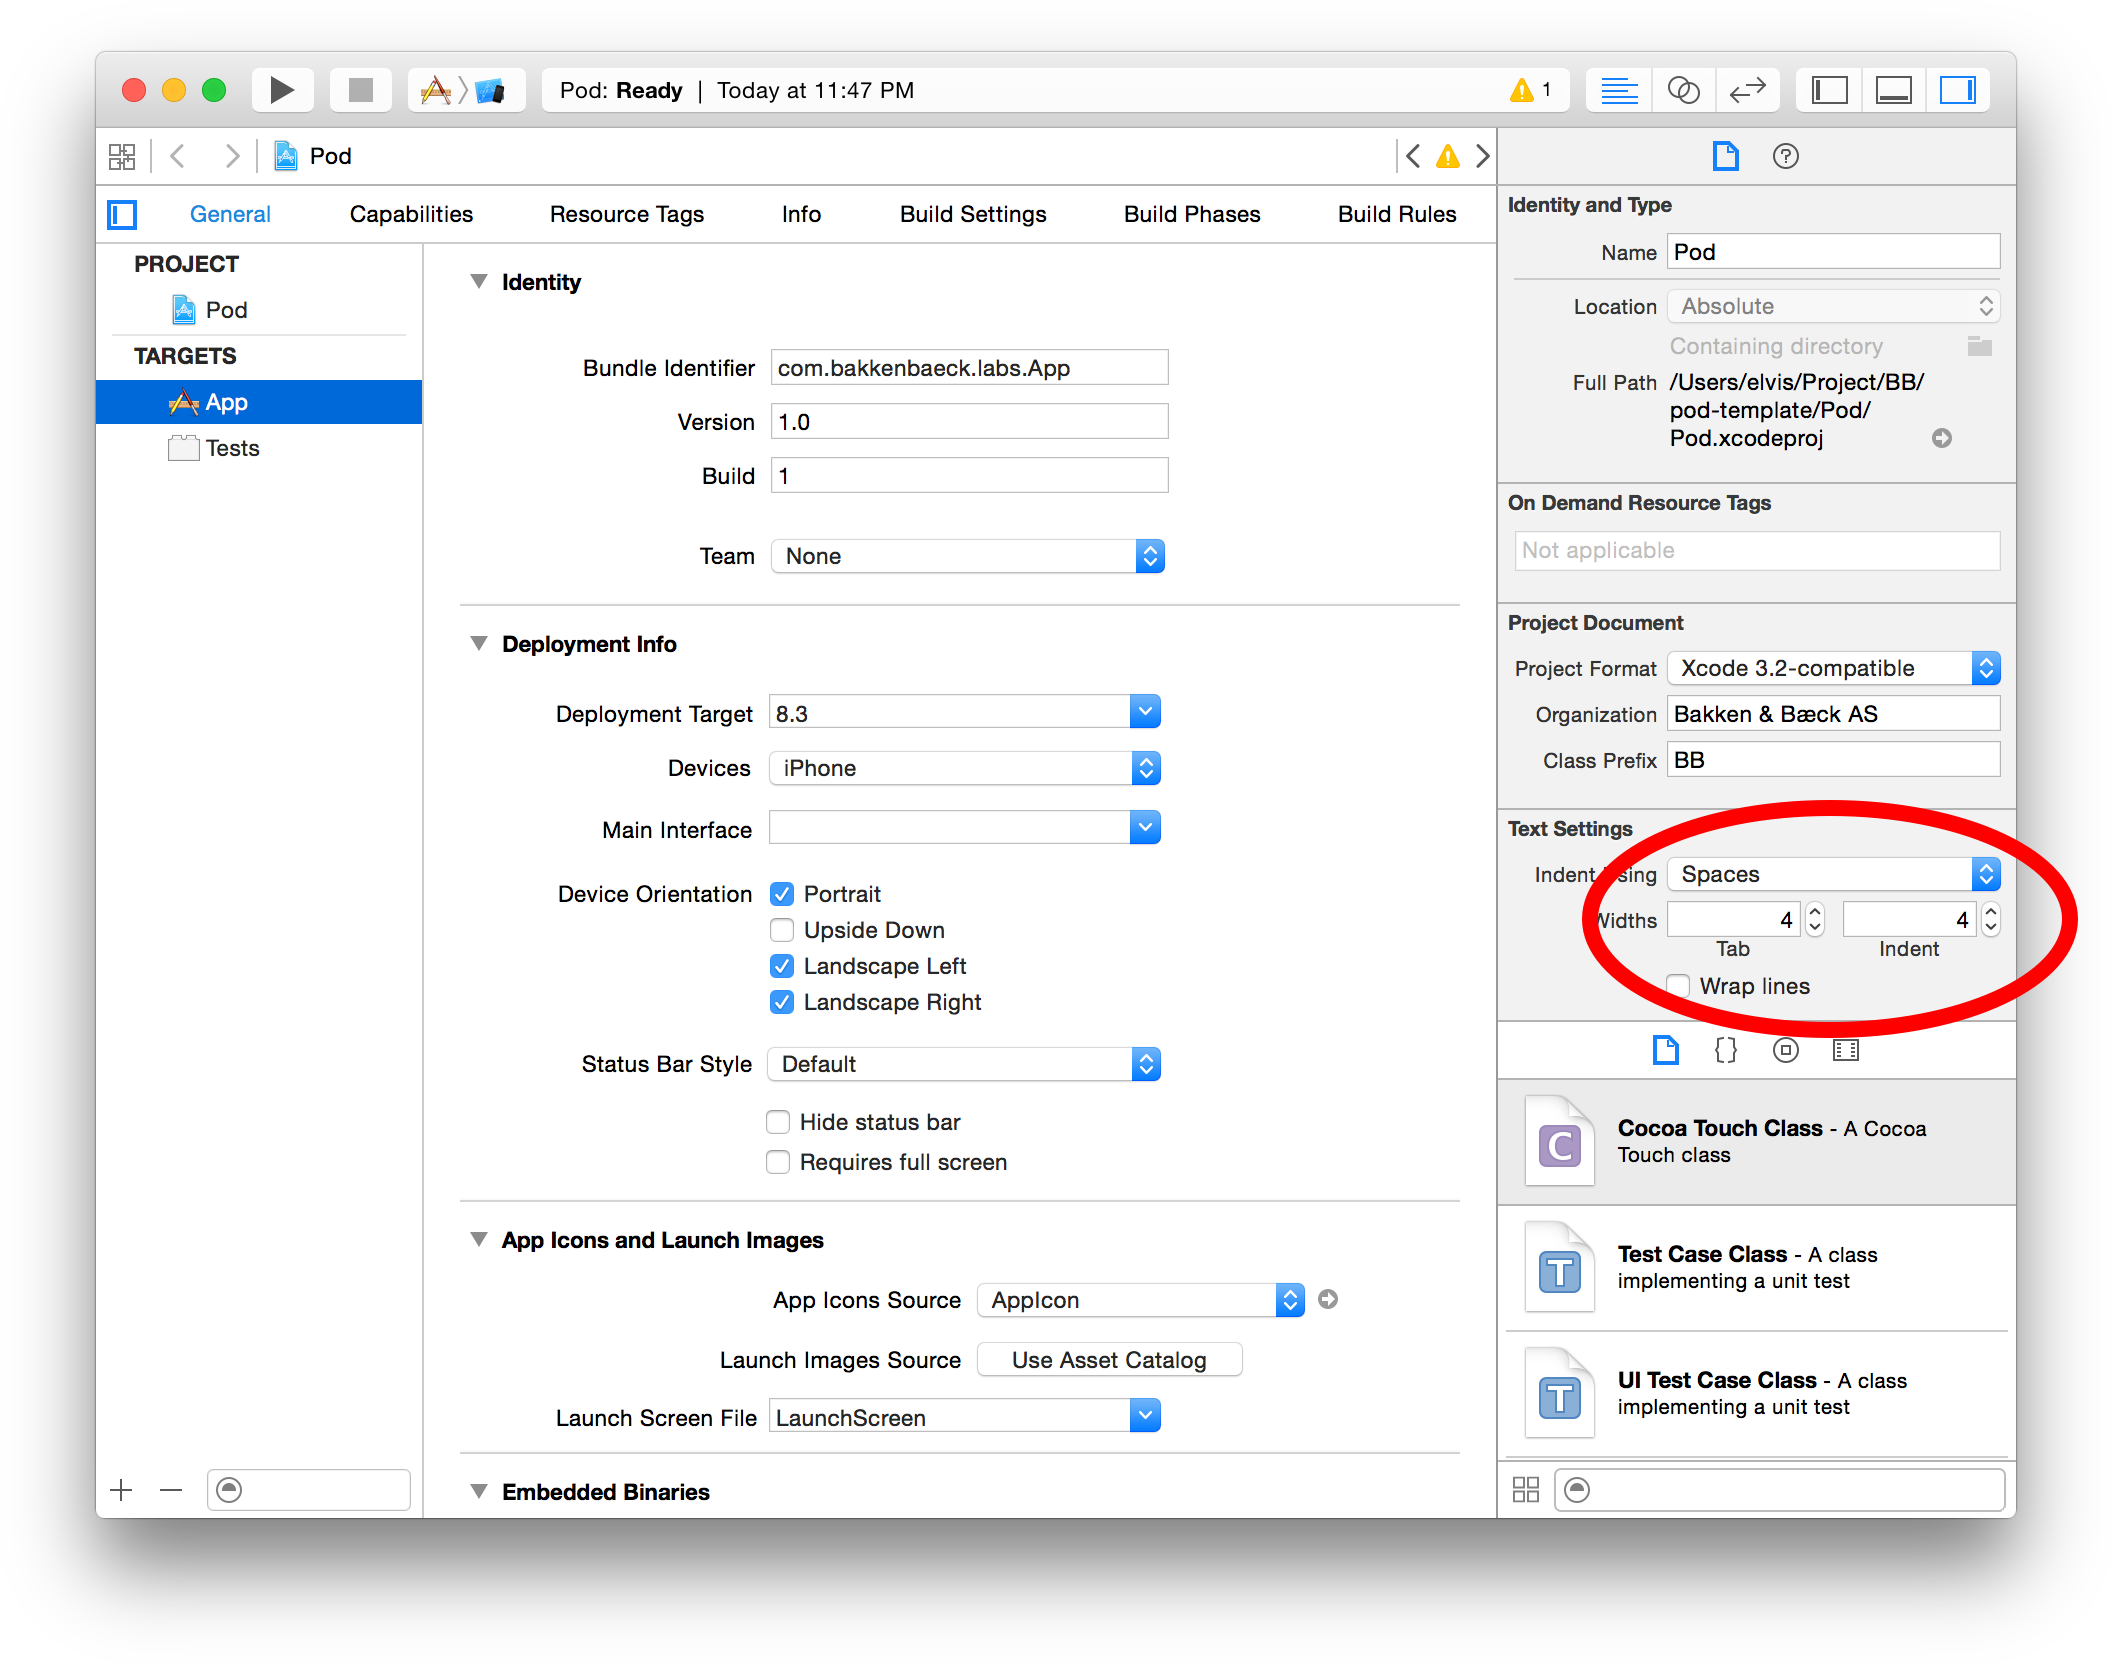
Indent using 4 spaces rather than tabs. This should be configured on the project.
-
Avoid doing method indentation since Swift's indentation is inconsistent, and just keep things in one line as long as is possible. It helps you by not letting you think about manually indenting your code.
Preferred:
let user = User(name: "Igor Ranieri", nickname: "Elland", country: "Germany")Not Preferred:
let user = User(name: "Igor Ranieri",
      nickname: "elland",
country: "Germany")- Method braces and other braces (
if/else/switch/whileetc.) always open on the same line as the statement but close on a new line. - Don't use parentheses.
- Tip: You can re-indent by selecting some code (or ⌘A to select all) and then Control-I (or Editor\Structure\Re-Indent in the menu).
Preferred:
if user.isHappy {
    // Do something
} else {
    // Do something else
}
Not Preferred:
if user.isHappy
{
  // Do something
}
else {
  // Do something else
}- There should be exactly one blank line between methods to aid in visual clarity and organization. Whitespace within methods should separate functionality, but having too many sections in a method often means you should refactor into several methods.
Unless you require functionality that can only be provided by a class, implement a struct instead.
Additional capabilities of classes:
- Inheritance: Enables one class to inherit the characteristics of another
- Type casting: Enables you to check and interpret the type of a class instance at runtime
- Deinitializers: Enable an instance of a class to free up any resources it has assigned
- Reference counting: Allows more than one reference to a class instance
- Compatibility: Classes are available from Objetive-C
Always use self when referencing properties. It will make your life simpler. Trust us.
When adding protocol conformance to a class, prefer adding a separate class extension for the protocol methods. This keeps the related methods grouped together with the protocol and can simplify instructions to add a protocol to a class with its associated methods. Also don't use extensions to split code, but to extend classes or structs with additional functionality. Finally, avoid the // MARK: - it makes code too noisy.
Preferred:
class MyViewcontroller: UIViewController {
    // class stuff here
}

extension MyViewcontroller: UITableViewDataSource {
    // table view data source methods
}

extension MyViewcontroller: UIScrollViewDelegate {
    // scroll view delegate methods
}
Not Preferred:
class MyViewcontroller: UIViewController, UITableViewDataSource, UIScrollViewDelegate {
    // all methods
}

// MARK: - Data download
extension MyViewController {

}For conciseness, if a computed property is read-only, omit the get clause. The get clause is required only when a set clause is provided.
Preferred:
var diameter: Double {
    return radius * 2.0
}
Not Preferred:
var diameter: Double {
    get {
      return radius * 2.0
    }
}Here's an example of a well-styled class definition:
class Circle: Shape {
    var x: Int
    var y: Int
    var radius: Double

    var diameter: Double {
        get {
            return self.radius * 2.0
        }
        set {
            radius = newValue / 2.0
        }
    }

    init(x: Int, y: Int, radius: Double) {
        self.x = x
        self.y = y
        self.radius = radius
    }

    convenience init(x: Int, y: Int, diameter: Double) {
        self.init(x: x, y: y, radius: diameter / 2.0)
    }

    func describe() -> String {
        return "I am a circle at \(self.centerString()) with an area of \(self.computeArea())"
    }

    override func computeArea() -> Double {
        return M_PI * self.radius * self.radius
    }

    private func centerString() -> String {
        return "(\(self.x),\(self.y))"
    }
}
The example above demonstrates the following style guidelines:
- The correct spacing for variable assignations is with a single space after and before the equals mark
=, e.g.x = 3 - Attributes in method signature have the
:next to the name, e.ginit(x: Int, y: Int)same with class inheritance and when using type inference - Indent getter and setter definitions and property observers
- Don't add modifiers such as
internalwhen they're already the default
Keep function declarations on one line including the opening brace, doesn't matter how long they are:
func reticulateSplines(spline: [Double]) -> Bool {
    // reticulate code goes here
}
func reticulateSplines(spline: [Double], adjustmentFactor: Double, translateConstant: Int, comment: String) -> Bool {
// reticulate code goes here
}Use trailing closure syntax wherever possible. In all cases, give the closure parameters descriptive names:
return SKAction.customActionWithDuration(effect.duration) { node, elapsedTime in
    // more code goes here
}
For single-expression closures don't use implicit returns, always use return.
Preferred:
attendeeList.sort { a, b in
    return a > b
}
Not Preferred:
attendeeList.sort { a, b in
    a > b
}Always use Swift's native types when available. Swift offers bridging to Objective-C so you can still use the full set of methods as needed.
Preferred:
let width = 120.0                                    // Double
let widthString = (width as NSNumber).stringValue    // String
Not Preferred:
let width: NSNumber = 120.0                          // NSNumber
let widthString: NSString = width.stringValue        // NSString
Constants are defined using the let keyword, and variables with the var keyword. Any value that is a constant must be defined appropriately, using the let keyword. As a result, you will likely find yourself using let far more than var.
Tip: One technique that might help meet this standard is to define everything as a constant and only change it to a variable when the compiler complains!
Declare variables and function return types as optional with ? where a nil value is acceptable.
Use implicitly unwrapped types declared with ! only for instance variables that you know will be initialized later before use. Correct use of implicitly unwrapped is very rare so be careful with this, since it will crash your app if a nil value is found.
When accessing an optional value, use optional chaining if the value is only accessed once or if there are many optionals in the chain:
textContainer?.textLabel?.setNeedsDisplay()Use optional binding when it's more convenient to unwrap once and perform multiple operations:
if let textContainer = self.textContainer {
    // do many things with textContainer
}
When naming optional variables and properties, avoid naming them like optionalString or maybeView since their optional-ness is already in the type declaration.
For optional binding, shadow the original name when appropriate rather than using names like unwrappedView or actualLabel.
Preferred:
var subview: UIView?

// later on...
if let subview = self.subview {
    // do something with unwrapped subview
}
Not Preferred:
var optionalSubview: UIView?

if let unwrappedSubview = optionalSubview {
    // do something with unwrappedSubview
}Use the native Swift struct initializers rather than the legacy CGGeometry constructors.
Preferred:
let bounds = CGRect(x: 40.0, y: 20.0, width: 120.0, height: 80.0)
var centerPoint = CGPoint(x: 96.0, y: 42.0)
Not Preferred:
let bounds = CGRectMake(40.0, 20.0, 120.0, 80.0)
var centerPoint = CGPointMake(96.0, 42.0)
Prefer the struct-scope constants CGRect.infiniteRect, CGRect.nullRect, etc. over global constants CGRectInfinite, CGRectNull, etc. For existing variables, you can use the shorter .zeroRect.
The Swift compiler is able to infer the type of variables and constants. You can provide an explicit type via a type alias (which is indicated by the type after the colon), but in the majority of cases this is not necessary.
Prefer compact code and let the compiler infer the type for a constant or variable.
Preferred:
let message = "Click the button"
var currentBounds = computeViewBounds()
Not Preferred:
let message: String = "Click the button"
var currentBounds: CGRect = computeViewBounds()NOTE: Following this guideline means picking descriptive names is even more important than before.
Prefer the shortcut versions of type declarations over the full generics syntax.
Preferred:
var deviceModels: [String]
var employees: [Int: String]
var faxNumber: Int?
Not Preferred:
var deviceModels: Array<String>
var employees: Dictionary<Int, String>
var faxNumber: Optional<Int>Swift does not require a semicolon after each statement in your code. They are only required if you wish to combine multiple statements on a single line.
Do not write multiple statements on a single line separated with semicolons.
In Swift it's a good practice to use extensions for accessing elements of asset catalogs, custom colors and fonts. It helps to avoid the error-prone practice of hardcoding strings into your code.
Use a Theme.swift that contains extensions for theming your app. When adding color extensions avoid adding the Color postfix to your color methods, also add some context of how this color is used, just be careful not to have one method per UI element.
Colors should be semantic and context aware, adding the controller or the flow to the color name helps a lot.
Preferred:
self.color = .onboardingButtonNormal
self.highlightedColor = .onboardingButtonHighlighted
Not Preferred:
self.color = .buttonNormal
self.highlightedColor = .buttonHighlighted
For example:
import Hex
import UIKit

extension UIColor {
    class var callToActionNormal: UIColor {
        return UIColor(hex: "A87CF2")
    }

    class var callToActionSelected: UIColor {
        return UIColor(hex: "A87CF2")
    }

    class var callToActionHighlighted: UIColor {
        return UIColor(hex: "A87CF2")
    }
}

extension UIFont {
    class func bold(size: Double) -> UIFont {
        return UIFont(name: "DINNextLTPro-Bold", size: CGFloat(size))!
    }

    class func light(size: Double) -> UIFont {
        return UIFont(name: "DINNextLTPro-Light", size: CGFloat(size))!
    }

    class func medium(size: Double) -> UIFont {
        return UIFont(name: "DINNextLTPro-Medium", size: CGFloat(size))!
    }

    class func regular(size: Double) -> UIFont {
        return UIFont(name: "DINNextLTPro-Regular", size: CGFloat(size))!
    }
}