Version: 3.6.0 January 2019
Authors: Richard Lobb, University of Canterbury, New Zealand. Tim Hunt, The Open University, UK
NOTE: A few sample quizzes containing example CodeRunner questions are available at coderunner.org.nz. There's also a forum there, where you can post CodeRunner questions, such as requests for help if things go wrong, or are looking for ideas on how to write some unusual question type.
- CODE RUNNER
- Introduction
- Installation
- The Architecture of CodeRunner
- Question types
- Templates
- Using the template as a script for more advanced questions
- Template parameters
- Randomising questions
- Grading with templates
- Template grader examples
- Customising the result table
- User-interface selection
- User-defined question types
- Supporting or implementing new languages
- Multilanguage questions
- Administrator scripts
- A note on accessibility
- APPENDIX: How programming quizzes should work
CodeRunner is a Moodle question type that allows teachers to run a program in order to grade a student's answer. By far the most common use of CodeRunner is in programming courses where students are asked to write program code to some specification and that code is then graded by running it in a series of tests. CodeRunner questions have also been used in other areas of computer science and engineering to grade questions in which many different correct answers are possible and a program must be used to assess correctness.
Regardless of the behaviour chosen for a quiz, CodeRunner questions always run in an adaptive mode, in which students can click a Check button to see if their code passes the tests defined in the question. If not, students can resubmit, typically for a small penalty. In the typical 'all-or-nothing' mode, all test cases must pass if the submission is to be awarded any marks. The mark for a set of questions in a quiz is then determined primarily by which questions the student is able to solve successfully and then secondarily by how many submissions the student makes on each question. However, it is also possible to configure CodeRunner questions so that the mark is determined by how many of the tests the code successfully passes.
CodeRunner has been in use at the University of Canterbury for over seven years, running millions of student quiz question submissions in Python, C , JavaScript, PHP, Octave and Matlab. Laboratory work, assignment work and mid-semester tests in the introductory first year Python programming course (COSC121), which has around 650 students in the first semester and 350 in the second, re all assessed using CodeRunner questions. The final exams for COSC121 have also been run using Moodle/CodeRunner since November 2014. Other courses at the University of Canterbury using CodeRunner include:
- ENCE260 Computer Systems
- ENCN305 Programming, Statistics and Optimisation
- EMTH171 Mathematical Modelling and Computation
- SENG02 Software Engineering I
- COSC261 Formal Languages and Compilers
- COSC 262 Algorithms
- COSC367 Computational Intelligence
- ENCE360 Operating Systems
- SENG365 Web Computing Architectures
CodeRunner is also being used at over 600 other sites worldwide.
CodeRunner currently supports Python2 (considered obsolescent), Python3, C, C++, Java, PHP, JavaScript (NodeJS), Octave and Matlab. The architecture allows easy extension to other languages.
CodeRunner can safely be used on an institutional Moodle server, provided that the sandbox software in which code is run ("Jobe") is installed on a separate machine with adequate security and firewalling. However, if CodeRunner-based quizzes are to be used for tests and final exams, a separate Moodle server is recommended, both for load reasons and so that various Moodle communication facilities, like chat and messaging, can be turned off without impacting other classes.
The CodeRunner question type can be installed on any modern Moodle system (version 3.0 or later), on Linux, Windows and Mac. For security reasons submitted jobs are run on a separate machine called the "Jobe server" or "Jobe sandbox machine". CodeRunner is intitially configured to use a small outward-facing Jobe server at the University of Canterbury, and this can be used for initial testing. However, this is not suitable for production use, for which institutions will need to install their own Jobe server. Instructions for installing a Jobe server are given in the Jobe documentation. Once Jobe is installed, use the Moodle administrator interface for the CodeRunner plug-in to specify the Jobe host name and perhaps port number.
A single 4-core Moodle server can handle an average quiz question submission rate of about 60 quiz questions per minute while maintaining a response time of less than about 3 - 4 seconds, assuming the student code itself runs in a fraction of a second. We have run CodeRunner-based exams with nearly 300 students and experienced only light to moderate load factors on an 8-core Moodle server. The Jobe server, which runs student submissions (see below), is even more lightly loaded during such an exam.
This chapter describes how to install CodeRunner. It assumes the existence of a working Moodle system, version 2.6 or later (including Moodle 3).
If you are installing for the first time, jump straight to section 2.2.
The current version of CodeRunner is incompatible with versions prior to 2.4.0. If you're attempting to upgrade from an earlier version, you should first upgrade to the most recent version 2 (checkout branch V2 in the repository). That will upgrade all questions in the database to a format that can be handled by current versions.
If you are already running CodeRunner version 2.4.0 or later, you can upgrade simply by following the instructions in the next two sections.
Upgrading to version 3.1 from version 2.4 through 3.0 should generally be straightforward though, as usual, you should make a database backup before upgrading. To upgrade, simply install the latest code and login to the web interface as an administrator. When Moodle detects the changed version number it will run upgrade code that updates all questions to the latest format.
However, if you have written your own question types
you should be aware that all existing questions in the system
CR_PROTOTYPES category with names containing the
string PROTOTYPE_ are deleted by the installer/upgrader.
The installer then re-loads them from the file
db/questions-CR_PROTOTYPES.xml
Hence if you have developed your own question prototypes and placed them in
the system CR_PROTOTYPES category (not recommended) you must export them
in Moodle XML format before upgrading. You can then re-import them after the
upgrade is complete using the usual question-bank import function in the
web interface. However, it is strongly recommended that you do not put your
own question prototypes in the CR_PROTOTYPES category but create a new
category for your own use.
Versions from 3.1 onwards no-longer allows a question to have both a per-test template and a combinator template: questions must have one or the other. In upgrading from Version 3.0 and earlier, the combinator template is used if "Enable combinator" was set or a combinator template grader is being used, otherwise the per-test template is used. This should not change the behaviour of the question provided the two templates are consistent in the sense that running any test in the per-test template yields exactly the same result as running that same test all by itself in the combinator template.
CodeRunner requires two separate plug-ins, one for the question type and one
for the specialised adaptive behaviour. The plug-ins are in two
different github repositories: github.com/trampgeek/moodle-qbehaviour_adaptive_adapted_for_coderunner
and github.com/trampgeek/moodle-qtype_coderunner. Install the two plugins
using one of the following two methods.
EITHER:
-
Download the zip file of the required branch from the coderunner github repository unzip it into the directory
moodle/question/typeand change the name of the newly-created directory frommoodle-qtype_coderunner-<branchname>to justcoderunner. Similarly download the zip file of the required question behaviour from the behaviour github repository, unzip it into the directorymoodle/question/behaviourand change the newly-created directory name toadaptive_adapted_for_coderunner. OR -
Get the code using git by running the following commands in the top level folder of your Moodle install:
 git clone git://github.com/trampgeek/moodle-qtype_coderunner.git question/type/coderunner
 git clone git://github.com/trampgeek/moodle-qbehaviour_adaptive_adapted_for_coderunner.git question/behaviour/adaptive_adapted_for_coderunner
Either way you may also need to change the ownership and access rights to ensure the directory and its contents are readable by the webserver.
You can then complete the installation by logging onto the server through the web interface as an administrator and following the prompts to upgrade the database as appropriate.
In its initial configuration, CodeRunner is set to use a University of Canterbury Jobe server to run jobs. You are welcome to use this during initial testing, but it is not intended for production use. Authentication and authorisation on that server is via an API-key and the default API-key given with CodeRunner imposes a limit of 100 per hour over all clients using that key, worldwide. If you decide that CodeRunner is useful to you, please set up your own Jobe sandbox as described in Sandbox configuration below.
WARNING: at least a couple of users have broken CodeRunner by duplicating
the prototype questions in the System/CR_PROTOTYPES category. Do not touch
those special questions until you have read this entire manual and
are familiar with the inner workings of CodeRunner. Even then, you should
proceed with caution. These prototypes are not
for normal use - they are akin to base classes in a prototypal inheritance
system like JavaScript's. If you duplicate a prototype question the question
type will become unusable, as CodeRunner doesn't know which version of the
prototype to use.
Once you have installed the CodeRunner question type, you should be able to run CodeRunner questions using the University of Canterbury's Jobe Server as a sandbox. It is recommended that you do this before proceeding to install and configure your own sandbox.
Using the standard Moodle web interface, either as a Moodle administrator or as a teacher in a course you have set up, go to the Question Bank and try creating a new CodeRunner question. A simple Python3 test question is: "Write a function sqr(n) that returns the square of its parameter n.". The introductory quick-start guide in the incomplete Question Authoring Guide gives step-by-step instructions for creating such a question. Alternatively you can just try to create a question using the on-line help in the question authoring form. Test cases for the question might be:
| Test | Expected |
|---|---|
| print(sqr(-7)) | 49 |
| print(sqr(5)) | 25 |
| print(sqr(-1)) | 1 |
| print(sqr(0)) | 0 |
| print(sqr(-100)) | 10000 |
You could check the 'UseAsExample' checkbox on the first two (which results in the student seeing a simple "For example" table) and perhaps make the last case a hidden test case. (It is recommended that all questions have at least one hidden test case to prevent students synthesising code that works just for the known test cases).
Save your new question, then preview it, entering both correct and incorrect answers.
If you want a few more CodeRunner questions to play with, try importing the
files
MoodleHome>/question/type/coderunner/samples/simpledemoquestions.xml and/or
MoodleHome>/question/type/coderunner/samples/python3demoquestions.xml.
These contains
most of the questions from the two tutorial quizzes on the
demo site.
If you wish to run the questions in the file python3demoquestions.xml,
you will also need to import
the file MoodleHome>/question/type/coderunner/samples/uoc_prototypes.xml
or you will receive a "Missing prototype" error.
Also included in the samples folder is a prototype question,
prototype\_c\_via\_python.xml
that defines a new question type, equivalent to the built-in c_program
type, by scripting in Python the process of compiling and running the student
code. This is a useful template for authors who wish to implement their own
question types or who need to support non-built-in languages. It is discussed
in detail in the section "Supporting or implementing new languages".
It is important that students get shown the result table when they click Check. For this to happen the "Specific feedback" checkbox in the Review options for the quiz (under Settings) must be checked in the "During the attempt" column. It will automatically be checked if the quiz was created with the question behaviour set to Adaptive but will otherwise be unchecked by default. Changing the question behaviour after the quiz has been created does not currently change the review options.
Other recommended setting in the "During the attempt column" are:
-
Right answer. This should be unchecked, at least in the "During the attempt" column and possibly elsewhere, if you don't want your sample answers leaked to the whole class.
-
Whether correct. This should probably be unchecked if the quiz includes any non-coderunner questions. It doesn't appear to affect CodeRunner feedback but if left checked will result in other questions types displaying an excessive amount of help when Check is clicked.
-
Marks and General feedback. These should probably be checked.
Although CodeRunner has a flexible architecture that supports various different ways of running student task in a protected ("sandboxed") environment, only one sandbox - the Jobe sandbox - is supported by the current version. This sandbox makes use of a separate server, developed specifically for use by CodeRunner, called Jobe. As explained at the end of the section on installing CodeRunner from scratch, the initial configuration uses the Jobe server at the University of Canterbury. This is not suitable for production use. Please switch to using your own Jobe server as soon as possible.
To build a Jobe server, follow the instructions at https://github.com/trampgeek/jobe. Then use the Moodle administrator interface for the CodeRunner plug-in to specify the Jobe host name and perhaps port number. Depending on how you've chosen to configure your Jobe server, you may also need to supply an API-Key through the same interface.
A video walkthrough of the process of setting up a Jobe server on a DigitalOcean droplet, and connecting an existing CodeRunner plugin to it, is available here.
If you intend running unit tests you
will also need to copy the file tests/fixtures/test-sandbox-config-dist.php
to 'tests/fixtures/test-sandbox-config.php', then edit it to set the correct
host and any other necessary configuration for the Jobe server.
Assuming you have built Jobe on a separate server, the JobeSandbox fully isolates student code from the Moodle server. However, Jobe can be installed on the Moodle server itself, rather than on a completely different machine. This works fine, but is much less secure than running Jobe on a completely separate machine. If a student program manages to break out of the sandbox when it's running on a separate machine, the worst it can do is bring the sandbox server down, whereas a security breach on the Moodle server could be used to hack into the Moodle database, which contains student run results and marks. That said, our Computer Science department used an earlier even less secure Sandbox for some years without any ill effects. Moodle keeps extensive logs of all activities, so a student deliberately breaching security is taking a huge risk.
If your Moodle installation includes the phpunit system for testing Moodle modules, you might wish to test the CodeRunner installation. Most tests require that at least python2 and python3 are installed.
Before running any tests you first need to copy the file
<moodlehome>/question/type/coderunner/tests/fixtures/test-sandbox-config-dist.php
to '/question/type/coderunner/tests/fixtures/test-sandbox-config.php',
then edit it to set whatever configuration of sandboxes you wish to test,
and to set the jobe host, if appropriate. You should then initialise
the phpunit environment with the commands
    cd <moodlehome>
    sudo php admin/tool/phpunit/cli/init.php
You can then run the full CodeRunner test suite with one of the following two commands, depending on which version of phpunit you're using:
sudo -u www-data vendor/bin/phpunit --verbose --testsuite="qtype_coderunner test suite"
or
sudo -u www-data vendor/bin/phpunit --verbose --testsuite="qtype_coderunner_testsuite"
If you're on a Red Hat or similar system in which the web server runs as apache, you should replace www-data with *apache.
TThe unit tests will almost certainly show lots of skipped or failed tests relating to the various sandboxes and languages that you have not installed, e.g. the LiuSandbox, Matlab, Octave and Java. These can all be ignored unless you plan to use those capabilities. The name of the failing tests should be sufficient to tell you if you need be at all worried.
Feel free to email the principal developer if you have problems with the installation.
Although it's straightforward to write simple questions using the built-in question types, anything more advanced than that requires an understanding of how CodeRunner works.
The block diagram below shows the components of CodeRunner and the path taken as a student submission is graded.
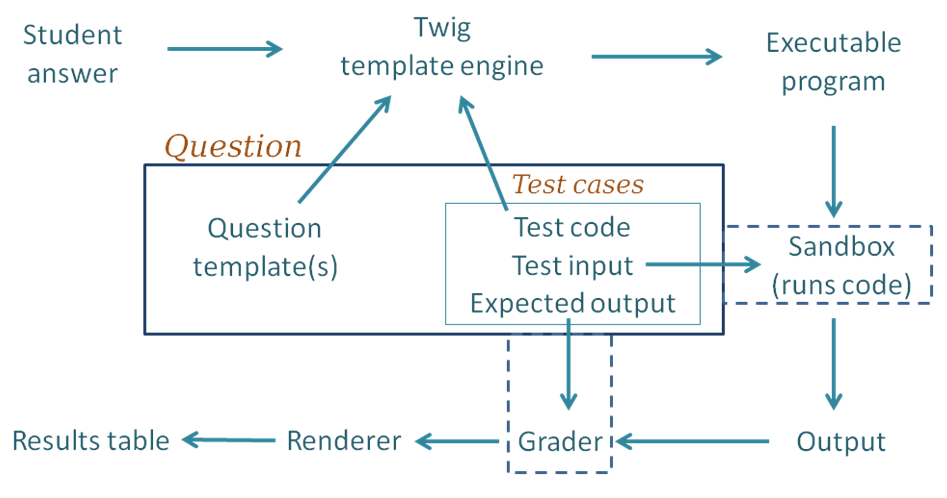
Following through the grading process step by step:
- For each of the test cases, the Twig template engine merges the student's submitted answer with the question's template together with code for this particular test case to yield an executable program. By "executable", we mean a program that can be executed, possibly with a preliminary compilation step.
- The executable program is passed into whatever sandbox is configured for this question (usually the Jobe sandbox). The sandbox compiles the program (if necessary) and runs it, using the standard input supplied by the testcase.
- The output from the run is passed into whatever Grader component is configured, as is the expected output specified for the test case. The most common grader is the "exact match" grader but other types are available.
- The output from the grader is a "test result object" which contains (amongst other things) "Expected" and "Got" attributes.
- The above steps are repeated for all testcases, giving an array of test result objects (not shown explicitly in the figure).
- All the test results are passed to the CodeRunner question renderer, which presents them to the user as the Results Table. Tests that pass are shown with a green tick and failing ones shown with a red cross. Typically the whole table is coloured red if any tests fail or green if all tests pass.
The above description is somewhat simplified.
Firstly, it is not always necessary to run a different job in the sandbox for each test case. Instead, all tests can often be combined into a single executable program. This is achieved by use of what is known as a "combinator template" rather than the simpler "per-test template" described above. Combinator templates are useful with questions of the write-a-function or write-a-class variety. They are not often used with write-a-program questions, which are usually tested with different standard inputs, so multiple execution runs are required. Furthermore, even with write-a-function questions that do have a combinator template, CodeRunner will revert to running tests one-at-a-time (still using the combinator template) if running all tests in the one program gives some form of runtime error, in order that students can be presented with all test results up until the one that failed.
Combinator templates are explained in the Templates section.
Secondly, the above description of the grading process ignores template graders, which do grading as well as testing. These support more advanced testing strategies, such as running thousands of tests or awarding marks in more complex ways than is possible with the standard option of either "all-or-nothing" marking or linear summation of individual test marks.
A per-test-case template grader can be used to define each row of the result table, or a combinator template grader can be used to defines the entire feedback panel, with or without a result table. See the section on grading templates for more information.
CodeRunner support a wide variety of question types and can easily be extended to support others. A CodeRunner question type is defined by a question prototype, which specifies run time parameters like the execution language and sandbox and also the template that define how a test program is built from the question's test-cases plus the student's submission. The prototype also defines whether the correctness of the student's submission is assessed by use of an EqualityGrader, a NearEqualityGrader or RegexGrader. The EqualityGrader expects the output from the test execution to exactly match the expected output for the testcase. The NearEqualityGrader is similar but is case insensitive and tolerates variations in the amount of white space (e.g. missing or extra blank lines, or multiple spaces where only one was expected). The RegexGrader expects a regular expression match instead. The EqualityGrader is recommended for all normal use as it encourages students to get their output exactly correct; they should be able to resubmit almost-right answers for a small penalty, which is generally a better approach than trying to award part marks based on regular expression matches.
Test cases are defined by the question author to check the student's code. Each test case defines a fragment of test code, the standard input to be used when the test program is run and the expected output from that run. The author can also add additional files to the execution environment.
The test program is constructed from the test case information plus the student's submission using the template defined by the prototype. The template can be either a per-test template, which defines a different program for each test case or a combinator template, which has the ability to define a program that combines multiple test cases into a single run. Templates are explained in the Templates section.
The C-function question type expects students to submit a C function, plus possible
additional support functions, to some specification. As a trivial example, the question
might ask "Write a C function with signature int sqr(int n) that returns
the square of its parameter n". The author will then provide some test
cases of the form
printf("%d\n", sqr(-11));
and give the expected output from this test.
A per-test template for such a question type would then wrap the submission and the test code into a single program like:
#include <stdio.h>

// --- Student's answer is inserted here ----

int main()
{
    printf("%d\n", sqr(-11));
    return 0;
}
which would be compiled and run for each test case. The output from the run would then be compared with the specified expected output (121) and the test case would be marked right or wrong accordingly.
That example assumes the use of a per-test template rather than the more complicated combinator template that is actually used by the built-in C function question type. See the section on templates for more.
The file <moodlehome>/question/type/coderunner/db/builtin_PROTOTYPES.xml
is a moodle-xml export format file containing the definitions of all the
built-in question types. During installation, and at the end of any version upgrade,
the prototype questions from that file are all loaded into a category
CR_PROTOTYPES in the system context. A system administrator can edit
those prototypes but this is not recommended as the modified versions
will be lost on each upgrade. Instead, a category LOCAL_PROTOTYPES
(or other such name of your choice) should be created and copies of any prototype
questions that need editing should be stored there, with the question-type
name modified accordingly. New prototype question types can also be created
in that category. Editing of prototypes is discussed later in this
document.
Built-in question types include the following:
-
c_function. This is the question type discussed in the above example, except that it uses a combinator template. The student supplies just a function (plus possible support functions) and each test is (typically) of the form
printf(format_string, func(arg1, arg2, ..))
The template for this question type generates some standard includes, followed by the student code followed by a main function that executes the tests one by one. However, if any of the test cases have any standard input defined, the template is expanded and executed separately for each test case.
The manner in which a C (or any other) program is executed is not part of the question
type definition: it is defined by the particular sandbox to which the
execution is passed. The Jobe sandbox
uses the gcc compiler with the language set to
accept C99 and with both -Wall and -Werror options set on the command line
to issue all warnings and reject the code if there are any warnings.
-
cpp_function. This is the C++ version of the previous question type. The student supplies just a function (plus possible support functions) and each test is (typically) of the form
cout << func(arg1, arg2, ..)
The template for this question type generates some standard includes, followed by the line
using namespace std;
followed by the student code followed by a main function that executes the tests one by one.
-
c_program and cpp_program. These two very simple question types require the student to supply a complete working program. For each test case the author usually provides
stdinand specifies the expectedstdout. The program is compiled and run as-is, and in the default all-or-nothing grading mode, must produce the right output for all test cases to be marked correct. -
python3. Used for most Python3 questions. For each test case, the student code is run first, followed by the test code.
-
python3_w_input. A variant of the python3 question in which the
inputfunction is redefined at the start of the program so that the standard input characters that it consumes are echoed to standard output as they are when typed on the keyboard during interactive testing. A slight downside of this question type compared to the python3 type is that the student code is displaced downwards in the file so that line numbers present in any syntax or runtime error messages do not match those in the student's original code. -
python2. Used for most Python2 questions. As for python3, the student code is run first, followed by the sequence of tests. This question type should be considered to be obsolescent due to the widespread move to Python3 through the education community.
-
java_method. This is intended for early Java teaching where students are still learning to write individual methods. The student code is a single method, plus possible support methods, that is wrapped in a class together with a static main method containing the supplied tests (which will generally call the student's method and print the results).
-
java_class. Here the student writes an entire class (or possibly multiple classes in a single file). The test cases are then wrapped in the main method for a separate public test class which is added to the students class and the whole is then executed. The class the student writes may be either private or public; the template replaces any occurrences of
public classin the submission with justclass. While students might construct programs that will not be correctly processed by this simplistic substitution, the outcome will simply be that they fail the tests. They will soon learn to write their classes in the expected manner (i.e. withpublicandclasson the same line, separated by a single space)! -
java_program. Here the student writes a complete program which is compiled then executed once for each test case to see if it generates the expected output for that test. The name of the main class, which is needed for naming the source file, is extracted from the submission by a regular expression search for a public class with a
public static void mainmethod. -
octave_function. This uses the open-source Octave system to process matlab-like student submissions.
-
php. A php question in which the student submission is a normal php file, with PHP code enclosed in tags and the output is the usual PHP output including all HTML content outside the php tags.
Other less commonly used built-in question types are: python3_w_input, nodejs, pascal_program and pascal_function.
As discussed later, this base set of question types can be customised or extended in various ways.
The following question types used to exist as built-ins but have now been
dropped from the main install as they are intended primarily for University
of Canterbury (UOC) use only. They can be imported, if desired, from the file
uoc_prototypes.xml, located in the CodeRunner/coderunner/samples folder.
The UOC question types include:
-
python3_cosc121. This is a complex Python3 question type that's used at the University of Canterbury for nearly all questions in the COSC121 course. The student submission is first passed through the pylint source code analyser and the submission is rejected if pylint gives any errors. Otherwise testing proceeds as normal. Obviously, pylint needs to be installed on the sandbox server. This question type takes many different template parameters (see the section entitled Template parameters for an explanation of what these are) to allow it to be used for a wide range of different problems. For example, it can be configured to require or disallow specific language constructs (e.g. when requiring students to rewrite a for loop as a while loop), or to limit function size to a given value, or to strip the main function from the student's code so that the support functions can be tested in isolation. Details on how to use this question type, or any other, can be found by expanding the Question Type Details section in the question editing page.
-
matlab_function. Used for Matlab function questions. Student code must be a function declaration, which is tested with each testcase. The name is actually a lie, as this question type now uses Octave instead, which is much more efficient and easier for the question author to program within the CodeRunner context. However, Octave has many subtle differences from Matlab and some problems are inevitable. Caveat emptor.
-
matlab_script. Like matlab_function, this is a lie as it actually uses Octave. It runs the test code first (which usually sets up a context) and then runs the student's code, which may or may not generate output dependent on the context. Finally the code in Extra Template Data is run (if any). Octave's
dispfunction is replaced with one that emulates Matlab's more closely, but, as above: caveat emptor.
Templates are the key to understanding how a submission is tested. Every question has a template, either imported from the question type or explicitly customised, which defines how the executable program is constructed from the student's answer, the test code and other custom code within the template itself.
A question's template can be either a per-test template or a combinator template. The first one is the simpler; it is applied once for every test in the question to yield an executable program which is sent to the sandbox. Each such execution defines one row of the result table. Combinator templates, as the name implies, are able to combine multiple test cases into a single execution, provided there is no standard input for any of the test cases. We will discuss the easier per-test template first.
A per_test_template is essentially a program with "placeholders" into which are inserted the student's answer and the test code for the test case being run. The expanded template is then sent to the sandbox where it is compiled (if necessary) and run with the standard input defined in the testcase. The output returned from the sandbox is then matched against the expected output for the testcase, where a 'match' is defined by the chosen validator: an exact match, a nearly exact match or a regular-expression match.
Expansion of the template is done by the Twig template engine. The engine is given both the template and a variable called STUDENT_ANSWER, which is the text that the student entered into the answer box, plus another called TEST, which is a record containing the test-case that the question author has specified for the particular test. The TEST attributes most likely to be used within the template are TEST.testcode (the code to execute for the test), TEST.stdin (the standard input for the test -- not normally used within a template, but occasionally useful) and TEST.extra (the extra test data provided in the question authoring form). The template will typically use just the TEST.testcode field, which is the "test" field of the testcase. It is usually a bit of code to be run to test the student's answer.
When Twig processes the template, it replaces any occurrences of
strings of the form {{ TWIG\_VARIABLE }} with the value of the given
TWIG_VARIABLE (e.g. STUDENT_ANSWER). As an example,
the question type c_function, which asks students to write a C function,
might have the following template (if it used a per-test template):
    #include <stdio.h>
    #include <stdlib.h>
    #include <ctype.h>

    {{ STUDENT_ANSWER }}

    int main() {
        {{ TEST.testcode }};
        return 0;
    }
A typical test (i.e. TEST.testcode) for a question asking students to write a
function that
returns the square of its parameter might be:
printf("%d\n", sqr(-9))
with the expected output of 81. The result of substituting both the student code and the test code into the template might then be the following program (depending on the student's answer, of course):
    #include <stdio.h>
    #include <stdlib.h>
    #include <ctype.h>

    int sqr(int n) {
        return n * n;
    }

    int main() {
        printf("%d\n", sqr(-9));
        return 0;
    }
When authoring a question you can inspect the template for your chosen question type by temporarily checking the 'Customise' checkbox. Additionally, if you check the Template debugging checkbox you will get to see in the output web page each of the complete programs that gets run during a question submission.
The template for a question is by default defined by the code runner question type, which itself is defined by a special "prototype" question, to be explained later. You can inspect the template of any question by clicking the customise box in the question authoring form. You'll also find a checkbox labelled Is combinator. If this checkbox is checked the template is a combinator template. Such templates take the STUDENT_ANSWER template variable as shown above, but rather than taking just a single TEST variable, they take a TESTCASES variable, which is is a list of all the individual TEST objects.
The actual template used by the built-in C function question type is not actually a per-test template as suggested above, but is the following combinator template.
#include <stdio.h>
#include <stdlib.h>
#include <ctype.h>
#include <string.h>
#include <stdbool.h>
#include <math.h>
#define SEPARATOR "#<ab@17943918#@>#"

{{ STUDENT_ANSWER }}

int main() {
{% for TEST in TESTCASES %}
   {
    {{ TEST.testcode }};
   }
    {% if not loop.last %}printf("%s\n", SEPARATOR);{% endif %}
{% endfor %}
    return 0;
}
The Twig template language control structures are wrapped in {%
and %}. If a C-function question had two three test cases, the above template
might expand to something like the following:
#include <stdio.h>
#include <stdlib.h>
#include <ctype.h>
#include <string.h>
#include <stdbool.h>
#include <math.h>
#define SEPARATOR "#<ab@17943918#@>#"

int sqr(int n) {
    return n * n;
}

int main() {
    printf("%d\n", sqr(-9));
    printf("%s\n", SEPARATOR);
    printf("%d\n", sqr(11));
    printf("%s\n", SEPARATOR);
    printf("%d\n", sqr(-13));
    return 0;
}
The output from the execution is then the outputs from the three tests separated by a special separator string, which can be customised for each question if desired. On receiving the output back from the sandbox, CodeRunner then splits the output using the separator into three separate test outputs, exactly as if a per-test template had been used on each test case separately.
The use of a combinator template is problematic with questions that require standard input; if each test has its own standard input, and all tests are combined into a single program, what is the standard input for that program? The easiest resolution to this problem is simply to fall back to running each test separately. That is achieved by using the combinator template but feeding it a singleton list of testcases each time, i.e. the list [test[0]] on the first run, [test[1]] on the second and so on. The combinator template is then functioning just like a per-test template.
However, advanced combinator templates can actually manage the multiple runs themselves, e.g. using Python Subprocesses. To enable this, there is a checkbox "Allow multiple stdins" which, if checked, reverts to the usual combinator mode of passing all testcases to the combinator template in a single run.
The use of a combinator also becomes problematic if the student's code causes a premature abort due to a run error, such as a segmentation fault or a CPU time limit exceeded. In such cases, CodeRunner reruns the tests, using the combinator template in a per-test mode, as described above.
As mentioned above, if a question author clicks in the customise checkbox, the question template is made visible and can be edited by the question author to modify the behaviour for that question.
As a simple example, consider the following question:
"What is the missing line in the sqr function shown below, which returns the square of its parameter n?"
int sqr(int n) {
    // What code replaces this line?
}
Suppose further that you wished the test column of the result table to display
just, say, sqr(-11) rather than printf("%d, sqr(-11));
You could set such a question using a template like:
    #include <stdio.h>
    #include <stdlib.h>
    #include <ctype.h>

    int sqr(int n) {
       {{ STUDENT_ANSWER }}
    }

    int main() {
        printf("%d\n", {{ TEST.testcode }});
        return 0;
    }
The authoring interface allows the author to set the size of the student's answer box, and in a case like the above you'd typically set it to just one or two lines in height and perhaps 30 columns in width.
The above example was chosen to illustrate how template editing works, but it's not a very compelling practical example. It would generally be easier for the author and less confusing for the student if the question were posed as a standard built-in write-a-function question, but using the Preload capability in the question authoring form to pre-load the student answer box with something like
// A function to return the square of its parameter n
int sqr(int n) {
    // *** Replace this line with your code
If you're customising templates, or developing your own question type (see later), the combinator template doesn't normally offer sufficient additional benefit to warrant the complexity increase unless you have a large number of testcases or are using a slow-to-launch language like Matlab. It is recommended that you always start with a per-test template, and move to a combinator template only if you have an obvious performance issue.
It may not be obvious from the above that the template mechanism allows for almost any sort of question where the answer can be evaluated by a computer. In all the examples given so far, the student's code is executed as part of the test process but in fact there's no need for this to happen. The student's answer can be treated as data by the template code, which can then execute various tests on that data to determine its correctness. The Python pylint question type mentioned earlier is a simple example: the template code first writes the student's code to a file and runs pylint on that file before proceeding with any tests.
The per-test template for a simple pylint question type might be:
import subprocess
import os
import sys

def code_ok(prog_to_test):
    """Check prog_to_test with pylint. Return True if OK or False if not.
       Any output from the pylint check will be displayed by CodeRunner
    """
    try:
        source = open('source.py', 'w')
        source.write(prog_to_test)
        source.close()
        env = os.environ.copy()
        env['HOME'] = os.getcwd()
        cmd = ['pylint', 'source.py']
        result = subprocess.check_output(cmd,
            universal_newlines=True, stderr=subprocess.STDOUT, env=env)
    except Exception as e:
        result = e.output

    if result.strip():
        print("pylint doesn't approve of your program", file=sys.stderr)
        print(result, file=sys.stderr)
        print("Submission rejected", file=sys.stderr)
        return False
    else:
        return True

if code_ok(__student_answer__):
    __student_answer__ = """{{ STUDENT_ANSWER | e('py') }}"""
    __student_answer__ += '\n' + """{{ TEST.testcode | e('py') }}"""
    exec(__student_answer__)
The Twig syntax {{ STUDENT_ANSWER | e('py') }} results in the student's submission being filtered by an escape function appropriate for the language Python, which escapes all double quote and backslash characters with an added backslash.
Note that any output written to stderr is interpreted by CodeRunner as a runtime error, which aborts the test sequence, so the student sees the error output only on the first test case.
The full Python3_pylint question type is much more complex than the
above, because it includes many extra features, enabled by use of template
parameters (see later).
Some other complex question types that we've used include:
-
A Matlab question in which the template code (also Matlab) breaks down the student's code into functions, checking the length of each to make sure it's not too long, before proceeding with marking.
-
Another advanced Matlab question in which the template code, written in Python runs the student's Matlab code, then runs the sample answer supplied within the question, extracts all the floating point numbers is both, and compares the numbers of equality to some given tolerance.
-
A Python question where the student's code is actually a compiler for a simple language. The template code runs the student's compiler, passes its output through an assembler that generates a JVM class file, then runs that class with the JVM to check its correctness.
-
A Python question where the students submission isn't code at all, but is a textual description of a Finite State Automaton for a given transition diagram; the template code evaluates the correctness of the supplied automaton.
The second example above makes use of two additional CodeRunner features not mentioned so far:
-
the ability to set the Ace code editor, which is used to provide syntax highlighting code-entry fields, to use a different language within the student answer box from that used to run the submission in the sandbox.
-
the use of the QUESTION template variable, which contains all the attributes of the question including its question text, sample answer and template parameters (see below).
As explained above, the Twig syntax {{ STUDENT_ANSWER | e('py') }} results in the student's submission being filtered by a Python escape function that escapes all all double quote and backslash characters with an added backslash. The python escaper e('py') is just one of the available escapers. Others are:
-
e('java'). This prefixes single and double quote characters with a backslash and replaces newlines, returns, formfeeds, backspaces and tabs with their usual escaped form (\n, \r etc).
-
e('c'). This is an alias for e('java').
-
e('matlab'). This escapes single quotes, percents and newline characters. It must be used in the context of Matlab's sprintf, e.g.
student_answer = sprintf('{{ STUDENT_ANSWER | e('matlab')}}'); -
e('js'), e('html') for use in JavaScript and html respectively. These are Twig built-ins. See the Twig documentation for details.
It is sometimes necessary to make quite small changes to a template over many different questions. For example, you might want to use the pylint question type given above but change the maximum allowable length of a function in different questions. Customising the template for each such question has the disadvantage that your derived questions no longer inherit from the original prototype, so that if you wish to alter the prototype you will also need to find and modify all the derived questions, too.
In such cases a better approach is to use template parameters, which can
be defined by the question author in the "Template params" field of the question
editing form. This field must be set to a JSON-encoded record containing
definitions of variables that can be used by the template engine to perform
local per-question customisation of the template. The template parameters
are passed to the template engine as the object QUESTION.parameters.
A more advanced version of the python3_pylint question type, which allows customisation of the pylint options via template parameters and also allows for an optional insertion of a module docstring for "write a function" questions is then:
import subprocess
import os
import sys

def code_ok(prog_to_test):
{% if QUESTION.parameters.isfunction %}
    prog_to_test = "'''Dummy module docstring'''\n" + prog_to_test
{% endif %}
    try:
        source = open('source.py', 'w')
        source.write(prog_to_test)
        source.close()
        env = os.environ.copy()
        env['HOME'] = os.getcwd()
        pylint_opts = []
{% for option in QUESTION.parameters.pylintoptions %}
        pylint_opts.append('{{option}}')
{% endfor %}
        cmd = ['pylint', 'source.py'] + pylint_opts
        result = subprocess.check_output(cmd,
            universal_newlines=True, stderr=subprocess.STDOUT, env=env)
    except Exception as e:
        result = e.output

    if result.strip():
        print("pylint doesn't approve of your program", file=sys.stderr)
        print(result, file=sys.stderr)
        print("Submission rejected", file=sys.stderr)
        return False
    else:
        return True


__student_answer__ = """{{ STUDENT_ANSWER | e('py') }}"""
if code_ok(__student_answer__):
    __student_answer__ += '\n' + """{{ TEST.testcode | e('py') }}"""
    exec(__student_answer__)
The template variable QUESTION is an object containing all the fields of the
PHP question object. Some of the other
QUESTION fields/attributes that might be of interest to authors include the
following.
QUESTION.questionidThe unique internal ID of this question.QUESTION.questiontextThe question text itselfQUESTION.answerThe supplied sample answer (null if not explicitly set).QUESTION.languageThe language being used to run the question in the sandbox, e.g. "Python3".QUESTION.useace'1'/'0' if the ace editor is/is not in use.QUESTION.sandboxThe sandbox being used, e.g. "jobesandbox".QUESTION.graderThe PHP grader class being used, e.g. "EqualityGrader".QUESTION.cputimelimitsecsThe allowed CPU time (null unless explicitly set).QUESTION.memlimitmbThe allowed memory in MB (null unless explicitly set).QUESTION.sandboxparamsThe JSON string used to specify the sandbox parameters in the question authoring form (null unless explicitly set).QUESTION.templateparamsThe JSON string used to specify the template parameters in the question authoring form. (Normally the question author will not use this but will instead access the specific parameters as in the previous section).QUESTION.resultcolumnsThe JSON string used in the question authoring form to select which columns to display, and how to display them (null unless explicitly set).
Most of these are effectively read only - assigning a new value within the
template to the cputimelimitsecs attribute does not alter the actual run time;
the assignment statement is being executed in the sandbox after all resource
limits have been set. The question author can however directly alter all
the above question attributes directly in the question authoring form.
The template variable STUDENT is an object containing a subset of the fields of the
PHP user object. The fields/attributes of STUDENT are:
STUDENT.idThe unique internal id of the current user (an integer).STUDENT.usernameThe unique internal username of the current user.STUDENT.firstnameThe first name of the current user.STUDENT.lastnameThe last name of the current user.STUDENT.emailThe email address of the current user.
Sometimes one wants a question that presents different variations of itself
to each student. As a trivial example, a generalisation of a Hello world
program might ask students to write a program that prints Hello <name>,
where there are many different values for name.
By way of introduction, a Python version of the above example above is easily achieved, albeit with only four different names, as follows:
- Set the template parameters field of the question authoring form to
{ "name": "{{ random(["Bob", "Carol", "Ted", "Alice" }}" } - Turn on the Twig All checkbox, so that all fields of the question will get processed by Twig, once the template parameters have been set up.
- Turn on the Hoist template parameters checkbox if necessary. It's on by default for new questions but off for old questions.
- Set the question text to Write a program that prints
Hello {{ name }} - Set the expected output of the first test case to
Hello {{ name }} - Set the sample answer to
print("Hello {{name}}")
The underlying mechanism will now be explained in more detail. It assumes the reader already understands the basic workings of CodeRunner, in particular how the Twig template engine is used to convert the question's template into an executable program and how that process can be parameterised by use of CodeRunners template parameters
When a student starts a Moodle quiz, an instance of each quiz question is generated. As each quiz question is instantiated, certain variables need to be defined, such as the order in which shuffled options will be presented in a multichoice question. These variables are essentially "frozen" throughout the lifetime of that particular question instance, including when it is subsequently reviewed or regraded.
When a CodeRunner question is instantiated, the template parameters field is processed by the Twig template engine. If there's no embedded Twig within the template, the template parameters field will not change. However, if the template does actually include embedded Twig code, the output from Twig will be different from the input. Usually any embedded Twig code will make at least one call to the Twig random function, resulting in one or more template parameters having randomised values. The above example shows a case in which the template parameter "name" is assigned a randomly-chosen value from a list of options. Another common variant is
{ "number": {{ 5 + random(7) }} }
which will result in the template parameter number having a uniformly distributed integer value in the range 5 to 12 inclusive.
If the Twig All checkbox for the question is checked, all other text fields of the question, except for the template itself, are processed by Twig directly after the template parameters field has been Twigged. This yields new values for the question text, test cases etc, which are used throughout the question's lifetime. The Twig environment used when processing all these other fields is that defined by the Twigged template parameters field.
It is usual to click the Twig All checkbox with randomised questions, as otherwise only the template will be subject to randomisation, which isn't usually appropriate.
CodeRunner adds a new function set_random_seed(seedvalue) to Twig. This is a call through to the underlying PHP mt_srand function to define the state of the pseudo random number generator. The return value is the empty string. If a call to this function is made from within the Twigged template parameters before any calls are made to the random function, the same sequence of randomisations will be performed every time the question is attempted. If the id field of the Twig STUDENT variable is used as the seed value, the effect is then that a particular student only ever sees one variant of the question, no matter how often they attempt a question. A typical use might be to begin the template parameters with the line
{{- set_random_seed(STUDENT.id) -}}
Tip: don't add this line until you've checked out several variants of the question, because once you've added it, you'll only ever see the one variant yourself.
The above description is a slight simplification. It implies that all the Twig-expanded template parameters are recorded within the question instance and frozen throughout the question lifetime. Such an approach, while technically "correct", creates problems for question authors who, after a quiz has gone live, discover they need to make changes to the non-randomised template parameters. For example, a template parameter that sets a limit on the allowed number of lines of code might turn out to be too restrictive. The author might wish to raise the limit and regrade existing submissions with the changed parameters. If the parameters were strictly frozen, this wouldn't be possible. So instead the implementation records only the random number seed, and rebuilds the set of template parameters whenever the question is reloaded from the database.
However, it is vital that question authors do not make any changes that might alter the randomised template parameters once a quiz has gone live. For example, re-ordering the randomised parameters will result in their being given different values when the question is reloaded. The student will then see a different question, to which their answer is no longer correct. Regrading would then result in their getting zero marks for a question they have already passed. Even if they've submitted and closed the quiz, they will find, if they subsequently review it, that their answer doesn't match the question.
To recap: once a quiz has gone live, you must ensure that any editing of the template parameters does not alter the randomisation behaviour.
Caveat Emptor.
Prior to the implementation of randomisation, template parameters were used
only within the template, where it was standard practice to
refer to template parameters with the syntax {{QUESTION.parameters.x}} where
x is a parameter. However, that syntax becomes very clumsy when the same
parameters is being used in lots of different places within the question.
There is now a checkbox Hoist template parameters, which copies the
template parameters into the Twig global name space, where STUDENT_ANSWER,
TEST etc reside. The variable x can then be inserted into the text simply
by writing {{ x }}.
C++ programmers might wish to think of this as similar to the line
using namespace std;
Hoisting was not done automatically because it might have broken existing questions if the Twig code were using similar variables globally. Hence, when upgrading an older version of CodeRunner to one that has randomisation, the Hoist template parameters checkbox is set to false. However, it is set to true on newly created questions.
-
Read the Twig documentation!
-
Check out the sample questions in the question export file
randomisationexamples.xmlin the CodeRunner samples folder. -
Sometimes you need a set of random variables to be "coupled". For example you might want an
animalto be one ofdog,cat,cowand an associated variablesoundto be respectivelywoof,miaow,moo. Three ways of achieving this are:-
Create a single random
indexvariable and use that to index into separate animal and sound lists. For example:{ {% set index = random(2) %} "animal": "{{ ["Dog", "Cat", "Cow"][index] }}", "sound": "{{ ["Woof", "Miaow", "Moo"][index] }}" -
Select an animal at random from a list of Twig 'hash' objects, then plug each of the animal attributes into the JSON record. For example:
{ {% set obj = random([ {'name': 'Dog', 'sound': 'Woof'}, {'name': 'Cat', 'sound': 'Miaow'}, {'name': 'Cow', 'sound': 'Moo'} ]) %} "animal": "{{ obj.name }}", "sound": "{{ obj.sound }}" } -
Select an animal at random from a list of Twig 'hash' objects as above, but then json_encode the entire object as a single template parameter. For example
 {
     {% set animal = random([
         {'name': 'Dog', 'sound': 'Woof'},
         {'name': 'Cat', 'sound': 'Miaow'},
         {'name': 'Cow', 'sound': 'Moo'}
     ]) %}
     "animal": {{ animal | json_encode }}
  }
In the last case, the template parameters will need to be referred to as {{ animal.name }} and {{ animal.sound }} instead of {{ animal }} and {{ sound }}.
-
-
Since the Twig output must be JSON, and newlines aren't allowed in JSON strings, you may find the Twig whitespace control modifiers (
{{-and-}}) useful in more complex Twig programs. As an example, the following Twig code uses a recursive macro plus whitespace control modifiers to generate a JSON structure that defines a valueexpression, which is a random fully-parenthesised infix expression.{% macro randomexpr(depth) %} {% from _self import randomexpr as expr %} {% if depth >= 5 %}{# Leaf nodes are random operands #} {{- random(["a", "b", "c", "d"]) -}} {% else %}{# Internal nodes are of the form ( expr op expr ) #} {{- '(' -}} {{- expr(depth + 1 + random(3)) -}} {{- random(['*', '/', '+', '-']) -}} {{- expr(depth + 1 + random(3)) -}} {{- ')' -}} {% endif %} {% endmacro %} {% import _self as exp %} { "expression": "{{ exp.randomexpr(0) }}"}
This generates expressions like
(((c+b)+d)-(a*((c-a)-d)))
and
(((a/(a-d))-(c/b))+(d+(((d/c)/d)*(c+a))))
-
The TwigFiddle web site is useful for debugging Twig code in your template parameters. You can enter your template parameter field, click Run, and see the resulting JSON. Alternatively, you can set up a trivial question that simply prints the values of the QUESTION.parameters Twig variable. For example (in Python)
print("""{{QUESTION.parameters | json_encode}}""")
Grading of student submissions can be problematic in some situations. For example, you may need to ask a question where many different valid program outputs are possible, and the correctness can only be assessed by a special testing program. Or you may wish to subject a student's code to a very large number of tests and award a mark according to how many of the test cases it can handle. The usual exact-match grader cannot handle these situations. For such cases the TemplateGrader option can be selected in the Grader field of the question authoring form. The template code then has a somewhat different role: the output from running the expanded template program is required to be a JSON string that defines the mark allocated to the student's answer and provides appropriate feedback.
A template grader behaves in two very different ways depending on whether the template is a per-test template or a combinator template.
When the template is a per-test template and a TemplateGrader is selected, the output from the program must be a JSON string that defines one row of the test results table. [Remember that per-test templates are expanded and run once for each test case.] The JSON object must contain at least a 'fraction' field, which is multiplied by TEST.mark to decide how many marks the test case is awarded. It should usually also contain a 'got' field, which is the value displayed in the 'Got' column of the results table. The other columns of the results table (testcode, stdin, expected) can, if desired, also be defined by the template grader and will then be used instead of the values from the test case. As an example, if the output of the program is the string
{"fraction":0.5, "got": "Half the answers were right!"}
half marks would be given for that particular test case and the 'Got' column would display the text "Half the answers were right!".
For even more flexibility the result_columns field in the question editing form can be used to customise the display of the test case in the result table. That field allows the author to define an arbitrary number of arbitrarily named result-table columns and to specify using printf style formatting how the attributes of the grading output object should be formatted into those columns. For more details see the section on result-table customisation.
Writing a grading template that executes the student's code is, however, rather difficult as the generated program needs to be robust against errors in the submitted code. The template-grader should always return a JSON object and should not generate any stderr output.
It is recommended that template graders be written in Python, regardless of the language in which the student answer is written, and that Python's subprocess module be used to execute the student code plus whatever test code is required. This ensures that errors in the syntax or runtime errors in the student code do not break the template program itself, allowing it to output a JSON answer regardless. Some examples of per-test template graders are given in the section Template grader examples.
Sometimes the author of a template grader wishes to abort the testing of the
program after a test case, usually the first, e.g. when pre-checks on the
acceptability of a student submission fail. This can be achieved by defining
in the output JSON object an extra attribute abort, giving it the boolean
value true. If such
an attribute is defined, any supplied fraction value will be ignored, the
test case will be marked wrong (equivalent to fraction = 0) and all further
test cases will be skipped. For example:
{"fraction":0.0, "got":"Invalid submission!", "abort":true}
Note to Python programmers: the Python boolean literals are True and False but the
JSON boolean literals are true and false. The superficial similarity of JSON objects
to Python dictionaries is also confusing. Usually, in Python, you will generate
the JSON objects using the dumps function in the json module, passing it a
Python dictionary, further adding to the confusion!
For example, to generate the above JSON output (with lower case t in true)
you would write
json.dumps({"fraction":0.0, "got":"Invalid submission!", "abort":True})
The ultimate in grading flexibility is achieved by use of a "Combinator
template grader", i.e. a TemplateGrader with the Is combinator checkbox checked.
In this mode, the JSON string output by the template grader
should again contain a 'fraction' field, this time for the total mark,
and may contain zero or more of 'prologuehtml', 'testresults', 'epiloguehtml'
and 'showdifferences'
attributes.
The 'prologuehtml' and 'epiloguehtml' fields are html
that is displayed respectively before and after the (optional) result table. The
'testresults' field, if given, is a list of lists used to display some sort
of result table. The first row is the column-header row and all other rows
define the table body. Two special column header values exist: 'iscorrect'
and 'ishidden'. The 'iscorrect' column(s) are used to display ticks or
crosses for 1 or 0 row values respectively. The 'ishidden' column isn't
actually displayed but 0 or 1 values in the column can be used to turn on and
off row visibility. Students do not see hidden rows but markers and other
staff do.
The 'showdifferences' attribute can be added to the JSON outcome to render the standard 'Show differences' button after the result table; it is displayed only if there is actually a result table present and if full marks were not awarded to the question.
Combinator-template grading gives the user complete control of the feedback to the student as well as of the grading process. The ability to include HTML in the feedback allows for complex output containing SVG or images.
The combinator-template grader has available to it the full list of all test cases and their attributes (testcode, stdin, expected, mark, display etc) for use in any way the question author sees fit. It is highly likely that many of them will be disregarded or alternatively have some meaning completely unlike their normal meaning in a programming environment. It is also possible that a question using a combinator template grader will not make use of test cases at all. For example it might test the students code with thousands of random tests and display just a few of the failing cases using the result table.
In this section we look at two uses of a per-test-case template grader, both implemented in Python3. The first example shows how we can grade a student submission that isn't actually code to be run but is some text to be graded by a program. The second example, which is a bit more complicated, shows how we can test student code in a more complex manner than simply running tests and matching the output against the expected output.
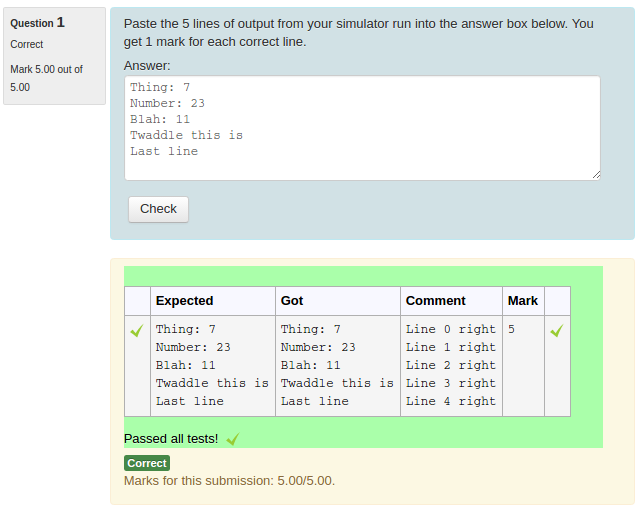
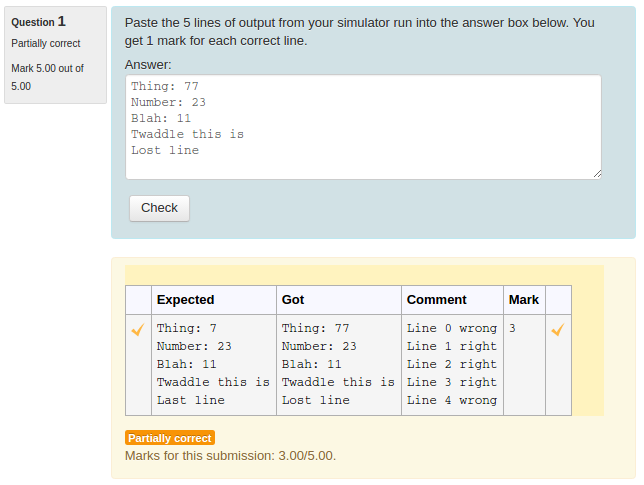
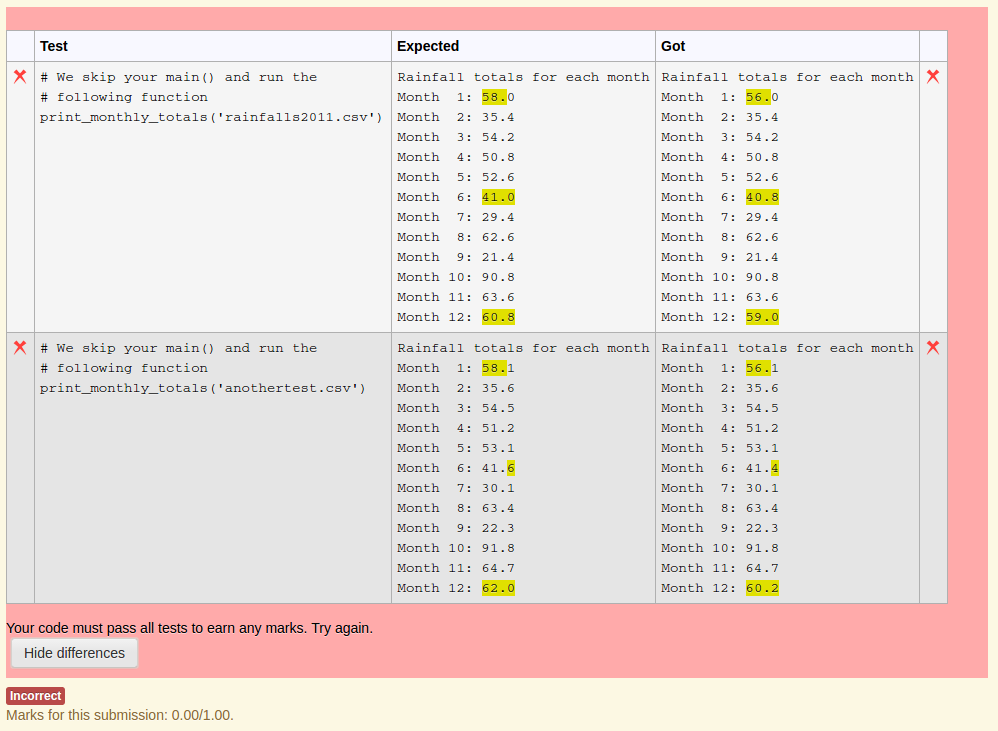
A simple case in which one might use a template grader is where the answer supplied by the student isn't actually code to be run, but is some sort of raw text to be graded by computer. For example, the student's answer might be the output of some simulation the student has run. To simplify further, let's assume that the student's answer is expected to be exactly 5 lines of text, which are to be compared with the expected 5 lines, entered as the 'Expected' field of a single test case. One mark is to be awarded for each correct line, and the displayed output should show how each line has been marked (right or wrong).
A template grader for this situation might be the following
    import json

    got = """{{ STUDENT_ANSWER | e('py') }}"""
    expected = """{{ TEST.expected | e('py') }}"""
    got_lines = got.split('\n')
    expected_lines = expected.split('\n')
    mark = 0
    if len(got_lines) != 5:
        comment = "Expected 5 lines, got {}".format(len(got_lines))
    else:
        comment = ''
        for i in range(5):
            if got_lines[i] == expected_lines[i]:
                mark += 1
                comment += "Line {} right\n".format(i)
            else:
                comment += "Line {} wrong\n".format(i)

    print(json.dumps({'got': got, 'comment': comment, 'fraction': mark / 5}))
In order to display the comment in the output JSON, the the 'Result columns' field of the question (in the 'customisation' part of the question authoring form) should include that field and its column header, e.g.
[["Expected", "expected"], ["Got", "got"], ["Comment", "comment"], ["Mark", "awarded"]]
The following two images show the student's result table after submitting a fully correct answer and a partially correct answer, respectively.
A template-grader can also be used to grade programming questions when the usual graders (e.g. exact or regular-expression matching of the program's output) are inadequate.
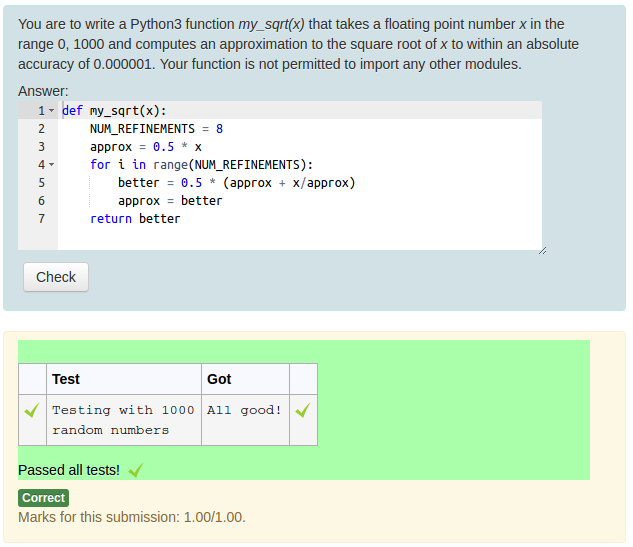
As a simple example, suppose the student has to write their own Python square root function (perhaps as an exercise in Newton-Raphson iteration?), such that their answer, when squared, is within an absolute tolerance of 0.000001 of the correct answer. To prevent them from using the math module, any use of an import statement would need to be disallowed but we'll ignore that aspect in order to focus on the grading aspect.
The simplest way to deal with this issue is to write a series of testcases of the form
    approx = student_sqrt(2)
    right_answer = math.sqrt(2)
    if math.abs(approx - right_answer) < 0.00001:
        print("OK")
    else:
        print("Fail (got {}, expected {})".format(approx, right_answer))
where the expected output is "OK". However, if one wishes to test the student's code with a large number of values - say 100 or more - this approach becomes impracticable. For that, we need to write our own tester, which we can do using a template grade.
Template graders that run student-supplied code are somewhat tricky to write correctly, as they need to output a valid JSON record under all situations, handling problems like extraneous output from the student's code, runtime errors or syntax error. The safest approach is usually to run the student's code in a subprocess and then grade the output.
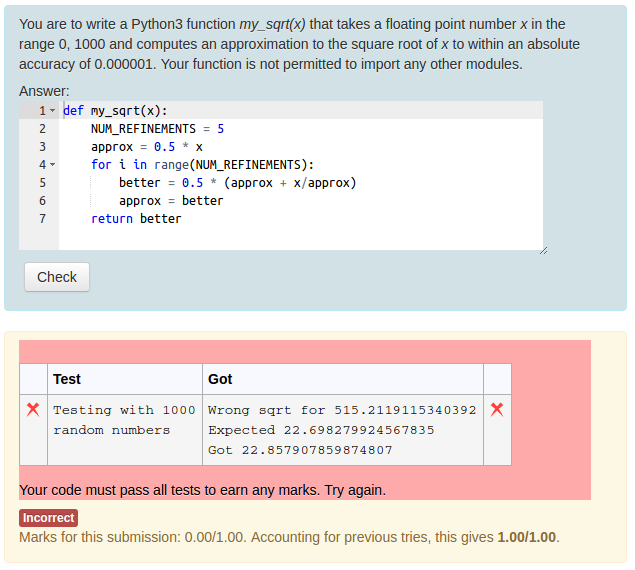
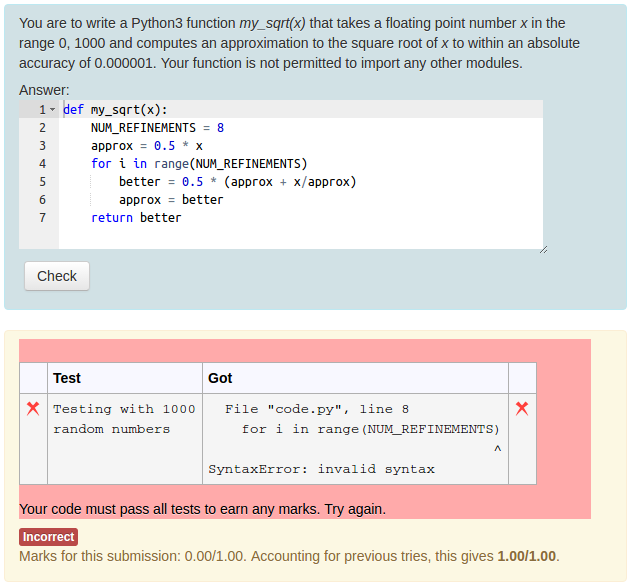
A per-test template grader for the student square root question, which tests the student's student_sqrt function with 1000 random numbers in the range 0 to 1000, might be as follows:
    import subprocess, json, sys
    student_func = """{{ STUDENT_ANSWER | e('py') }}"""

    if 'import' in student_func:
        output = 'The word "import" was found in your code!'
        result = {'got': output, 'fraction': 0}
        print(json.dumps(result))
        sys.exit(0)

    test_program = """import math
    from random import uniform
    TOLERANCE = 0.000001
    NUM_TESTS = 1000
    {{ STUDENT_ANSWER | e('py') }}
    ok = True
    for i in range(NUM_TESTS):
        x = uniform(0, 1000)
        stud_answer = student_sqrt(n)
        right = math.sqrt(x)
        if abs(right - stud_answer) > TOLERANCE:
            print("Wrong sqrt for {}. Expected {}, got {}".format(x, right, stud_answer))
            ok = False
            break

    if ok:
        print("All good!")
    """
    try:
        with open('code.py', 'w') as fout:
            fout.write(test_program)
        output = subprocess.check_output(['python3', 'code.py'],
            stderr=subprocess.STDOUT, universal_newlines=True)
    except subprocess.CalledProcessError as e:
        output = e.output

    mark = 1 if output.strip() == 'All good!' else 0
    result = {'got': output, 'fraction': mark}
    print(json.dumps(result))
The following figures show this question in action.
Obviously, writing questions using template graders is much harder than using the normal built-in equality based grader. It is usually possible to ask the question in a different way that avoids the need for a custom grader. In the above example, you would have to ask yourself if it mightn't have been sufficient to test the function with 10 fixed numbers in the range 0 to 1000 using ten different test cases of the type suggested in the third paragraph of this section.
The output from the standard graders is a list of so-called TestResult objects, each with the following fields (which include the actual test case data):
testcode      // The test that was run (trimmed, snipped)
iscorrect     // True iff test passed fully (100%)
expected      // Expected output (trimmed, snipped)
mark          // The max mark awardable for this test
awarded       // The mark actually awarded.
got           // What the student's code gave (trimmed, snipped)
stdin         // The standard input data (trimmed, snipped)
extra         // Extra data for use by some templates
A field called result_columns in the question authoring form can be used to control which of these fields are used, how the columns are headed and how the data from the field is formatted into the result table.
By default the result table displays the testcode, stdin, expected and got columns, provided the columns are not empty. Empty columns are dropped from the table. You can change the default, and/or the column headers by entering a value for result_columns (leave blank for the default behaviour). If supplied, the result_columns field must be a JSON-encoded list of column specifiers.
Each column specifier is itself a list,
typically with just two or three elements. The first element is the
column header, the second element is usually the field from the TestResult
object being displayed in the column (one of those values listed above) and the optional third
element is an sprintf format string used to display the field.
Per-test template graders can add their
own fields, which can also be selected for display. It is also possible
to combine multiple fields into a column by adding extra fields to the
specifier: these must precede the sprintf format specifier, which then
becomes mandatory. For example, to display a Mark Fraction column in the
form 0.74 out of 1.00, a column format specifier of ["Mark Fraction", "awarded", "mark", "%.2f out of %.2f"] could be used.
As a special case, a format
of %h means that the test result field should be taken as ready-to-output
HTML and should not be subject to further processing; this can be useful
with custom-grader templates that generate HTML output, such as
SVG graphics, and we have also used it in questions where the output from
the student's program was HTML.
NOTE: %h format requires PHP >= 5.4.0 and Libxml >= 2.7.8 in order to
parse and clean the HTML output.
It was stated above that the values to be formatted by the format string (if given) were fields from the TestResult object. This is a slight simplification. The syntax actually allows for expressions of the form:
filter(testResultField [,testResultField]... )
where filter is the name of a built-in filter function that filters the
given testResult field(s) in some way. Currently the only such built-in
filter function is diff. This is (or was) a function
taking two test result fields as parameters and
returning an HTML string that representing the first test field with embedded
HTML <ins> and <del> elements that show the insertions and deletions
necessary
to convert the first field into the second. This was used to provide support
for the Show Differences button, which the user could click in order to
highlight differences between the Expected and Got fields. However that
functionality is now provided by JavaScript; the Show Differences button is
automatically displayed if an answer is being marked wrong and if an
exact-match grader is being used. Hence the diff filter function
is no longer functional but it remains supported syntactically to support
legacy questions that use it.
The default value of result_columns is:
[["Test", "testcode"], ["Input", "stdin"], ["Expected", "expected"], ["Got", "got"]].
For normal programming questions, the Ace editor is used both for author editing of the templates and for the student answer. Ace provides syntax colouring, bracket matching, auto indent and many other programmer-oriented capabilities to make editing of the underlying pure text more user-friendly.
Sometimes question authors ask questions in which the answer is not in fact program code. For example, it might be a textual representation of an FSM (finite state machine). In such questions the Ace editor is often not appropriate. Prior to version 3.3, authors could turn off the Ace editor by unchecking a Use Ace checkbox, but this disabled it both for student answers and for the author's template.
Since version 3.3.0, CodeRunner now supports pluggable user interfaces, although an administrator has to install the plugin. The two user interfaces currently built in to CodeRunner are Ace and Graph. The question author selects the required user interface via a dropdown menu in the customisation section of the question author form. The selection controls editing of the sample answer and answer preload fields of the authoring form and the student's answer in the live quiz. The Ace editor is always used for editing the template itself, unless turned off with the Template uses ace checkbox in the authoring form.
The Graph UI plugin, which should be regarded as experimental at this point, provides simple graph-drawing capabilities to support questions where the student is asked to draw or edit a graph. By default the Graph UI, which was developed for Finite State Machines, draws directed graphs, allows nodes to be marked as Accept states and allows incoming start edges. For example:

Clicking the Help button on the graph canvas displays information on how to draw graphs.
Some limited control of the Graph UI is available to the question author via template parameters as follows:
-
isdirected - defaults to true. Set it to false for a non-directed graph.
-
isfsm - defaults to true. Set it to false to prevent edges that enter the graph from space, i.e., without a start node.
-
noderadius - defaults to 26. The radius of nodes, in pixels.
-
fontsize - defaults to 20. The size of the Arial font, in px.
For example, for a non-directed non-fsm graph set the template parameters field to
{"isdirected": false, "isfsm": false}
or merge those values into any other template parameters required by the question.
Other template parameters may be added as required.
Many thanks to Emily Price for the original implementation of the Graph UI.
All active CodeRunner user interface plugins in both the question authoring form and the student's quiz page can be toggled off and on with a CTRL-ALT-M keypress, alternately exposing and hiding the underlying textarea element.
Warning: This UI plug-in is still experimental, and may change in the future. It was written only to support the new python3_program_testing question type, which is itself only experimental.
The plug-in replaces the usual textarea answer element with an HTML table, into which the student must enter text data. All cells in the table are HTML textarea elements. The question author can enable Add row and Delete row buttons that allow the student to add or delete rows. The configuration of the table is set by the following template parameters:
o table_num_rows sets the (initial) number of table rows, excluding the header
o table_num_columns set the number of table columns
o table_column_headers is a list of strings used for column headers
o table_column_width_percents is a list of numeric percentage widths of the different
columns. For example, if there are two columns, and the first one is to
occupy one-quarter of the available width, the list should be [25, 75].
This parameter is optional; by default all columns have the same width.
o table_dynamic_rows should be set true to enable the addition of Add row
and Delete row buttons through which the student can alter the number of
rows. The number of rows can never be less than the initial table_num_rows value.
For example, the python3\_program\_testing question type uses the following
template parameter setting:
{
    "table_num_rows": 3,
    "table_num_columns": 2,
    "table_column_headers": ["Test", "Result"],
    "table_dynamic_rows": true
}
The table serialisation is simply a JSON array of arrays containing all the table cells excluding the header row.
As a special case of the serialisation, if all values in the serialisation are empty strings, the serialisation is itself the empty string.
An example of the use of this UI type can be seen in the python3_program_testing prototype in the samples folder.
Question authors who have admin access to the Moodle server can write their
own user-interface plugins; a JavaScript
file with a name of the form ui_something.js in the
folder
<moodlehome>/question/type/coderunner/amd/src
is assumed to be a user interface plugin and is automatically added to the drop-down menu of available plugins. Such plugin files must be AMD modules and must implement the interface defined in the file
<moodlehome>/question/type/coderunner/amd/src/userinterfacewrapper.js
Writing UI plugins is, however, not a job for the faint hearted.
NOTE: User-defined question types are very powerful but are not for the faint of heart. There are some known pitfalls, so please read the following very carefully.
As explained earlier, each question type is defined by a prototype question, which is just another question in the database from which new questions can inherit. When customising a question, if you open the Advanced customisation panel you'll find the option to save your current question as a prototype. You will have to enter a name for the new question type you're creating. It is strongly recommended that you also change the name of your question to reflect the fact that it's a prototype, in order to make it easier to find. The convention is to start the question name with the string PROTOTYPE_, followed by the type name. For example, PROTOTYPE_python3_OOP. Having a separate PROTOTYPES category for prototype questions is also strongly recommended. Obviously the question type name you use should be unique, at least within the context of the course in which the prototype question is being used.
The question text of a prototype question is displayed in the 'Question type details' panel in the question authoring form.
CodeRunner searches for prototype questions just in the current course context. The search includes parent contexts, typically visible only to an administrator, such as the system context; the built-in prototypes all reside in that system context. Thus if a teacher in one course creates a new question type, it will immediately appear in the question type list for all authors editing questions within that course but it will not be visible to authors in other courses. If you wish to make a new question type available globally you should ask a Moodle administrator to move the question to the system context, such as a LOCAL_PROTOTYPES category.
When you create a question of a particular type, including user-defined types, all the so-called "customisable" fields are inherited from the prototype. This means changes to the prototype will affect all the "children" questions. However, as soon as you customise a child question you copy all the prototype fields and lose that inheritance.
To reduce the UI confusion, customisable fields are subdivided into the basic ones (per-test-template, grader, result-table column selectors etc) and "advanced" ones. The latter include the language, sandbox, timeout, memory limit and the "make this question a prototype" feature.
The following section on supporting or implementing new languages shows in detail the process for creating a new question type.
WARNING #1: if you define your own question type you'd better make sure when you export your question bank that you include the prototype, or all of its children will die on being imported anywhere else! Similarly, if you delete a prototype question that's actually in use, all the children will break, giving "missing prototype" errors. To recover from such screw ups you will need to create a new prototype of the right name (preferably by importing the original correct prototype). To repeat: user-defined question types are not for the faint of heart. Caveat emptor.
WARNING #2: although you can define test cases in a question prototype, e.g. for validation purposes, they are not inherited by the "children" of the prototype.
Most authors seem to assume that if they wish to write CodeRunner questions that use a language not directly supported by the Jobe sandbox, they must first modify the Jobe code to support the new language. That is not the case, although the required language does of course need to be installed on the Jobe server. A much easier, more convenient and more maintainable approach is to use a Python question type that compiles (if necessary) and runs the student code in a Python subprocess. Indeed, in recent years at the University of Canterbury nearly all new question types have been scripted in Python, even those using languages built into Jobe. For example, the question type we now use for all question in the C programming course is a Python3 question type parses the student's C program and performs lots of checks on things like function length and use of various C constructs before compiling and running the submitted code.
The template code below shows a simple example in which a Python question prototype is used to define a new question type c_via_python that mimics the built-in c_program question type but provides more flexibility. To create the new question type using this template:
- Create a new CodeRunner question.
- Choose the question type python3
- Click Customise
- Replace the contents of the Template text area with the template code below.
- Uncheck the Is combinator checkbox
- Enter DEMO_PROTOTYPE_C_using_python as the question name
- Enter whatever text you wish to use to describe the question type in the Question text area. This text will be displayed to any authors using this new question type if they open the Question type details section of the question authoring form.
- Open Advanced Customisation
- Set Is prototype? to Yes (user defined)
- Set Question type to c_via_python.
- Set Ace language to c, so that the students' code will be edited as C even though the prototype is in Python.
- Save the question.
You should now find the new question type c_via_python appearing in the Question type dropdown of the author edit form for a new CodeRunner question. This new question type should behave like the built-in c_program question type but is more flexible; for example, it can easily be extended to perform checks on the submitted C code prior to compilation.
The full question prototype for the c_via_python question type is included in the samples folder of the CodeRunner distribution.
""" The template for a question type that compiles and runs a student-submitted
    C program.
"""

import subprocess, sys

# Write the student code to a file prog.c
student_answer = """{{ STUDENT_ANSWER | e('py') }}"""
with open("prog.c", "w") as src:
    print(student_answer, file=src)

# Compile
{% if QUESTION.parameters.cflags is defined %}
cflags = """{{ QUESTION.parameters.cflags | e('py') }}"""
{% else %}
cflags = "-std=c99 -Wall -Werror"
{% endif %}
return_code = subprocess.call("gcc {0} -o prog prog.c".format(cflags).split())
if return_code != 0:
    print("** Compilation failed. Testing aborted **", file=sys.stderr)

# If compile succeeded, run the code. Since this is a per-test template,
# stdin is already set up for the stdin text specified in the test case,
# so we can run the compiled program directly.
if return_code == 0:
    try:
        output = subprocess.check_output(["./prog"], universal_newlines=True)
        print(output)
    except subprocess.CalledProcessError as e:
        if e.returncode > 0:
            # Ignore non-zero positive return codes
            if e.output:
                print(e.output)
        else:
            # But negative return codes are signals - abort
            if e.output:
                print(e.output, file=sys.stderr)
            if e.returncode < 0:
                print("Task failed with signal", -e.returncode, file=sys.stderr)
            print("** Further testing aborted **", file=sys.stderr)
By extending the above approach it is possible to write questions that can be answered in multiple languages. Multi-language questions are enabled by setting the Ace-language field within the Advanced Customisation section of a question to a comma-separated list of languages. Students are then presented with a drop-down menu which they use to select the language in which their answer is written. If exactly one of the languages has an asterisk ('*') appended, that language is chosen as the default language, selected as the initial state of the drop-down menu. For example, an Ace-language value of "C,C++,Java*,Python3" would allow student to submit in C, C++, Java or Python3 but the drop-down menu would initially show Java which would be the default. If no default is specified the initial state of the drop-down is empty and the student must choose a language. Multilanguage questions require a special template that uses the {{ANSWER_LANGUAGE}} template variable to control how to execute the student code. The {{ANSWER_LANGUAGE}} variable is defined only for multilanguage questions.
The template for a multilanguage question is a generalisation of the template shown in the previous section. It is essentially a single large case statement of the following form (assuming the sandbox language is Python3):
import subprocess
import re
student_answer = """{{ STUDENT_ANSWER | e('py') }}"""
language = """{{ ANSWER_LANGUAGE | e('py') }}""".lower()
if language == 'c':
    # Code to run a C program, as in the previous section
elif language == 'python3':
    # Code to execute student_answer in Python3 directly
elif language == 'java':
    # Code to run a Java program, modified from that in the previous section

... etc
For a fully working version of such a question type, see the implementation
of the built-in multilanguage question type, BUILT_IN_PROTOTYPE_multilanguage.
If you're a system administrator, you'll find the question prototype in the
System/CR_PROTOTYPES category. If not, create a new question of
type multilanguage, customise it, and examine its template. You can also
inspect the entire question prototype in XML form within the repository
file db/builtin_PROTOTYPES.xml. Note that the prototype is
a non-combinator question, i.e. it does a separate run for each test case, which
isn't efficient for sluggish languages like Java.
If the author wishes to supply a sample answer to a multilanguage question, they must write it in the default language, if specified, or the first of the allowed languages otherwise.
There are currently three CodeRunner-related utility scripts available. While initially intended only for administrator use, they are proving useful to teachers as well, particularly the third one. Teachers are able to run the scripts only within courses they can normally access; they must be logged into such a course before attempting to run the scripts.
The three scripts are:
-
<moodle_home>/question/type/coderunner/bulktestindex.php This script displays a list of all question categories accessible to the user who is currently logged into Moodle on the machine running the script. Each category is displayed as a clickable link that then runs a script that tests the sample answers on all questions in that category, reporting all successes and failures.
-
<moodle_home>/question/type/coderunner/prototypeusageindex.php This scripts displays an index like the one above except that the clickable links now run a script that reports on the question prototype usage within that category.
-
<moodle_home>/question/type/coderunner/downloadquizattempts.php This script, which is still experimental, displays a list of all quizzes available to the logged in user, allowing them to download a spreadsheet of all submissions to a selected quiz by all students. The downloaded spreadsheet is suitable for off-line analysis, and includes information not available in the exported Moodle responses file, such as all intermediate submisssions and prechecks and the time of each such action.
The download can be in either csv or excel format; the latter is recommended for most cases because a long-standing bug in PHP's
fputcsvfunction can cause corrupted csv output files. The exported Excel spreadsheet can then be opened in Excel or Open Office and saved as csv.The download format is complicated and requires a good understanding of Moodle's database scheme. The following query is used, with each row of the result being output as a single spreadsheet row.
SELECT
    concat(quiza.uniqueid, qasd.attemptstepid, qasd.id) as uniquekey,
    quiza.uniqueid as quizattemptid,
    timestart,
    timefinish,
    u.firstname,
    u.lastname,
    u.email,
    qatt.slot,
    qatt.questionid,
    quest.name as qname,
    slot.maxmark as mark,
    qattsteps.timecreated as timestamp,
    FROM_UNIXTIME(qattsteps.timecreated,'%Y/%m/%d %H:%i:%s') as datetime,
    qattsteps.fraction,
    qattsteps.state,
    qasd.attemptstepid,
    qasd.name as qasdname,
    qasd.value as value

FROM {user} u
JOIN {quiz_attempts} quiza ON quiza.userid = u.id AND quiza.quiz = :quizid
JOIN {question_attempts} qatt ON qatt.questionusageid = quiza.uniqueid
JOIN {question_attempt_steps} qattsteps ON qattsteps.questionattemptid = qatt.id
JOIN {question_attempt_step_data} qasd on qasd.attemptstepid = qattsteps.id
JOIN {question} quest ON quest.id = qatt.questionid
JOIN {quiz_slots} slot ON qatt.slot = slot.slot AND slot.quizid = quiza.quiz

WHERE quiza.preview = 0
AND (qasd.name NOT RLIKE '^-_' OR qasd.name = '-_rawfraction')
AND (qasd.name NOT RLIKE '^_' OR qasd.name = '_testoutcome')
AND quest.length > 0
ORDER BY quiza.uniqueid, timestamp;
This query gives rise to multiple near-identical rows for a single student action (e.g. answer submission), with different (qasdname, value) pairs. ['qasdname' is the
namecolumn of the question-attempt-step-data table andvalueis the value associated with that name. The set of such (key, value) pairs depends on the question type and the particular user action being recorded.] Currently, so-called "behaviour variables" - those containing an underscore - are not included in the export, except for the '-_rawfraction' variable. This is to restrict the volume of data, but the decision may change in the future.Processing of the raw spreadsheet is somewhat complicated. The file
quizsubmissions.pyincluded in the git repository defines Python classes to simplify the process. The statementsfrom quizsubmissions import QuizSubmissions submission_data = QuizSubmissions(csvfilename)import the exported spreadsheet and gives easy access to data about any particular student and their activities in the quiz.
For example
submission-data['rjl83'].submissions[2].get_answer()returns the final answer submitted by student
rjl83to question 2.Lots of other information, such as the student's name, all intermediate submissions and prechecks and their times etc is available. See
quizsubmissions.pyfor more information.
To assist the use of screen readers for visually impaired students, text area inputs now have two modes:
-
When keyboard focus first enters them via Tab or Shift+TAb, they are in 'non-capturing' mode, and pressing TAB or Shift+TAB moves to the next or previous form control.
-
After you start typing, or if focus enters by way of a click, they go into Tab-capturing mode, and then pressing Tab indents.
-
CTRL+M switches modes (as recommended by https://www.w3.org/TR/wai-aria-practices/#richtext).
-
Esc always switches to non-capturing mode.
Historical notes and a diatribe on the use of Adaptive Mode questions ...
The original pycode was inspired by CodingBat, a site where students submit Python or Java code that implements a simple function or method, e.g. a function that returns twice the square of its parameter plus 1. The student code is executed with a series of tests cases and results are displayed immediately after submission in a simple tabular form showing each test case, expected answer and actual answer. Rows where the answer computed by the student's code is correct receive a large green tick; incorrect rows receive a large red cross. The code is deemed correct only if all tests are ticked. If code is incorrect, students can simply correct it and resubmit.
CodingBat proves extraordinarily effective as a student training site. Even experienced programmers receive pleasure from the column of green ticks and all students are highly motivated to fix their code and retry if it fails one or more tests. Some key attributes of this success, to be incorporated into pycode, were:
-
Instant feedback. The student pastes their code into the site, clicks submit, and almost immediately receives back their results.
-
All-or-nothing correctness. If the student's code fails any test, it is wrong. Essentially (thinking in a quiz context) it earns zero marks. Code has to pass all tests to be deemed mark-worthy.
-
Simplicity. The question statement should be simple. The solution should also be reasonably simple. The display of results is simple and the student knows immediately what test cases failed. There are no complex regular-expression failures for the students to puzzle over nor uncertainties over what the test data was.
-
Rewarding green ticks. As noted above, the colour and display of a correct results table is highly satisfying and a strong motivation to succeed.
The first two of these requirements are particularly critical. While they can be accommodated within Moodle by using an adaptive quiz behaviour in conjunction with an all-or-nothing marking scheme, they are not how many people view a Moodle quiz. Quizzes are commonly marked only after submission of all questions, and there is usually a perception that part marks will be awarded for "partially correct" answers. However, awarding marks to a piece of code according to how many test cases it passes can give almost meaningless results. For example, a function that always just returns 0, or the empty list or equivalent, will usually pass several of the tests, but surely it shouldn't be given any marks? Seriously flawed code, for example a string tokenizing function that works only with alphabetic data, may get well over half marks if the question-setter was not expecting such flaws.
Accordingly, CodeRunner questions always use Moodle's adaptive behaviour, regardless of the behaviour set for the quiz in which the questions are being run. Students can check their code for correctness as soon as it has been entered and, if their answer is wrong, can resubmit, usually for a small penalty. The mark obtained in a programming-style quiz is thus determined primarily by how many of the problems the student can solve in the given time, and secondarily by how many submissions the student needs to make on each question.