These examples show you quantum algorithm's implementation by Q# code.
For details (mathematical backgroud) about these algorithms, see this series in my blog posts.
- Bernstein-Vazirani algorithm
- Grover's Algorithm (Black-box Search)
- Quantum Phase Estimation (with Fourier Transform)
- Quantum Arithmetic (Adder, Multiplier, and Exponentiation)
- Shor's Algorithm (Quantum Period Finding)
By using Jupyter notebooks on Azure Quantum, you can develop and run Q# code without installing any additional tools.
In this setting, however, we'll install Quantum Development Kit (QDK) on local machine (Ubuntu) to run Q# code on local simulator.
- Create Ubuntu Server 20.04 LTS virtual machine in Azure Portal.
- Login to Ubuntu and check whether Python 3.8 is installed.
python3 -V
- Download Miniconda installer for Python 3.8 and install.
(See here for the list of latest installers.)
wget https://repo.anaconda.com/miniconda/Miniconda3-py38_4.12.0-Linux-x86_64.sh
bash Miniconda3-py38_4.12.0-Linux-x86_64.sh
- Clone this repository as follows.
git clone https://github.com/tsmatz/quantum-algorithms-qsharp
- Logout and login again to make changes take effect.
After logging-in, create conda environment with the following channel (additional packages).
conda create -n qsharp-env -c microsoft qsharp notebook
- Activate this environment. (Everytime you login to this computer, activate this conda environment as follows.)
conda activate qsharp-env
- Run Jupyter notebook in this conda environment.
Copy notebook URL (such as,http://localhost:8888/?token=...) in console output.
jupyter notebook
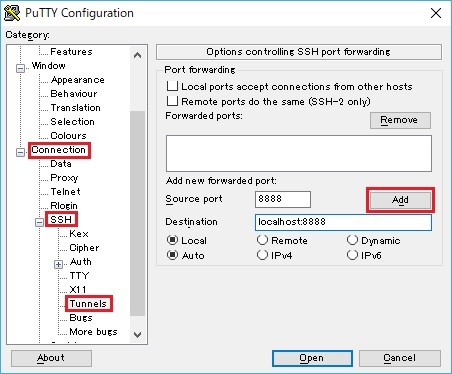
- In your local desktop, connect to Ubuntu server with SSH tunnel (port forwarding) in order for accessing notebook URL.
For instance, the following is the SSH tunnel setting on "PuTTY" terminal client in Windows. (You can usessh -Lcommand in Mac OS.)
- Open notebook with your web browser.
Tsuyoshi Matsuzaki @ Microsoft