To demonstrate the Flux architecture with some example code, let's take on the classic TodoMVC application.
- Dispatcher
- Stores
- Views (React components)
- Additionally, Action creators and Dispatcher helper methods
Controllers do exist in a Flux appln as controller-views. Flux eschews MVC in favor of unidirectional data flow.
- User interacts with the React View.
- The view propogates an action through a central dispatcher to the various stores.
- Stores hold the application data and business logic, which updates all the views that are affected.
React's declarative programming style alows stores to send updates without specifying how to transition viewes between states.
Facebook wanted to show an unread count for message threads while another view showed a list of threads, with the unread ones highlighted. This was difficult to handle with MVC -- marking a single thread as read would update the thread model, and then also need to update count model. These dependencies and cascading updates often occur in a large MVC application leading to tangled weave of data flow and unpredicatable results.
Control is inverted with stores
- The stores accept updates and reconcile them as appropriate, rather than depending on something external to update it's data in a consistent way.
- Stores have no direct setter methods like setAsRead(), but instead have only a single way of getting new data into their self-contained world -- the callback they register with the dispatcher.
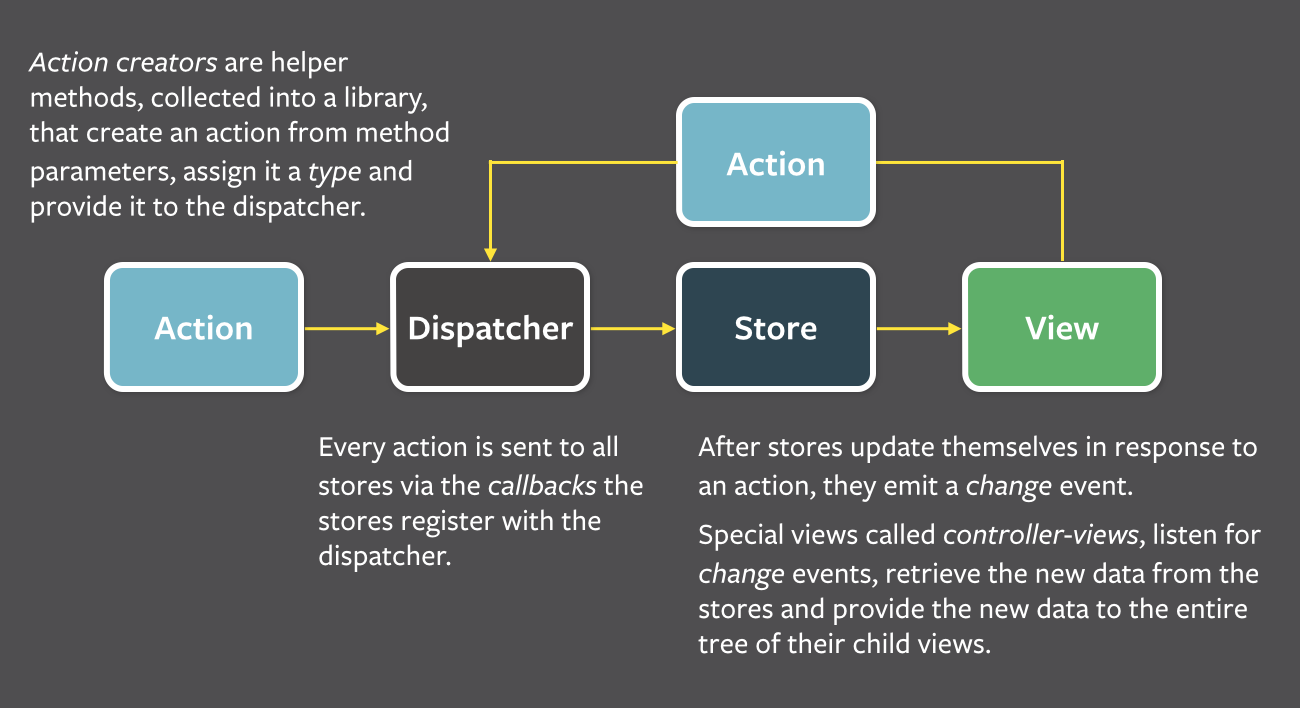
Data in Flux flows in a single direction Action -> Dispatcher -> Store -> View
- Are simple objects containing the new data and an identifying 'type' property. Views may cause a new action to be propogated throught the system in response to user interactions.
- All data flows through the dispatcher as a central hub.
- Actions are provided to the dispatcher in an 'action creator' method, and most often originate from user interactions with views.
- The dispatcher then invokes the callbacks that the stores have registered with it, dispatching actions to all stores.
- Within their registered callbacks, stores respond to whichever actions are relevant to the state they maintain.
- The stores then emit a 'change' event to alert the controller-views that a change to the data layer occurred.
- Controller-views listen for these events and retrieve data from the stores in an event handler.
- Store contains the application state and logic.
- A store registers itself with the dispatcher and provides it with a callback. The callback receives the action as a parameter.
- Within the store's registered callback, a switch statement based on the action's type is used to interpret the action and to provide the proper hooks into the store's internal methods. This allows an action to result in an update to the state of the store, via the dispatcher.
- After the stores are updatd, they broadcast an event decaring that their state has changed, so the views may query the new state and update themselves.
- Close tot he top of the nested view hierarchy, a special kind of view listens for events that are broadcast by the stores that it depends on. This is called the controller-view, as it provides the glue code to get the data from the stores and to pass this data down the chain of descendants.
- When it receives the event from the store, it first requests the new data it needs via the stores' public getter methods. It then calls its own setState() method, causing its render() method and render() method of all its descendants to run.
- The dispatcher exposes a method that allows us to trigger a dispatch to the stores, and to include a payload of data, which we call an action.
- The action's creation may be wrapped into a semantic helper method which sends the action to the dispatcher.
- Actions may also come from other places, such as the server. This happens, for example, during data initialization. It may also happen when the server returns an error code or when the server has updates to provide to the application.
You must have npm installed on your computer. From the root project directory run these commands from the command line:
npm install
This will install all dependencies. To build the project, first run this command:
npm start
This will perform an initial build and start a watcher process that will update bundle.js with any changes you wish to make.
This watcher is based on Browserify and Watchify, and it transforms React's JSX syntax into standard JavaScript with Reactify.
To run the app, simply open the index.html file in a browser or spin up a http server and open your localhost url.