ResNet-50 is a CNN(convolutional neural network) that is 50 layers deep. we can load a pretrained version of the network trained on more than a million images from the ImageNet database. The pretrained network can classify images into 1000 object categories, such as keyboard, mouse, pencil, birds and many animals.
🏠 Homepage
✨ Demo
Everything you need to get started. Google Cloud. Start building right away on our secure, intelligent platform. New customers can use a $300 free credit to get started with any Google Cloud. https://console.cloud.google.com/
genral note (for Qwiklabs users) :- If you use resources that are not related to the lab, you could be locked out of the lab and lose your work. For example, if you start up more VMs than the number called for in the lab instructions, your lab will end, you will be locked out of Qwiklabs, and you will receive the message "Your account has been blocked".torial may block your Qwiklabs account.It is always good to have one personal GCP account. New customers can use a $300 free credit to get started with Google Cloud.
Activate Cloud Shell

In the Cloud Console, in the top right toolbar, click the Activate Cloud Shell button. after that Click Continue.
clone this repo via following command
git clone https://github.com/viveks-codes/resnet50-Deep-Learning-image-classifier.git
Change directory into resnet50-Deep-Learning-image-classifier
cd resnet50-Deep-Learning-image-classifier
Set an environment variable for [YOUR_PROJECT_ID], replacing [YOUR_PROJECT_ID] with your own project ID:
export PROJECT_ID=[YOUR_PROJECT_ID]
if you are using qwiklabs account run following (for qwiklabs)
gcloud iam service-accounts create qwiklab \
  --display-name "My Qwiklab Service Account"
Create a Service Account to access the Google Cloud APIs when testing locally:
gcloud iam service-accounts create resnet50 \
  --display-name "My GCP Account"
if you are using qwiklabs account run following (for qwiklabs)
gcloud iam service-accounts create qwiklab \
  --display-name "My Qwiklab Service Account"
Give your newly created Service Account appropriate permissions:
gcloud projects add-iam-policy-binding ${PROJECT_ID} \
--member serviceAccount:resnet50@${PROJECT_ID}.iam.gserviceaccount.com \
--role roles/owner
if you are using qwiklabs account run following (for qwiklabs)
gcloud projects add-iam-policy-binding ${PROJECT_ID} \
--member serviceAccount:qwiklab@${PROJECT_ID}.iam.gserviceaccount.com \
--role roles/owner
After creating your Service Account, create a Service Account key:
gcloud iam service-accounts keys create ~/key.json \
--iam-account resnet50@${PROJECT_ID}.iam.gserviceaccount.com
if you are using qwiklabs account run following (for qwiklabs)
gcloud iam service-accounts keys create ~/key.json \
--iam-account qwiklab@${PROJECT_ID}.iam.gserviceaccount.com
export GOOGLE_APPLICATION_CREDENTIALS="/home/${USER}/key.json"
virtualenv -p python3 envactivate the environment
source env/bin/activate
pip install -r requirements.txtcreate an App Engine instance by using:
gcloud app create
export CLOUD_STORAGE_BUCKET=${PROJECT_ID}
gsutil mb gs://${PROJECT_ID}
Execute the following command to start your application:
python main.py
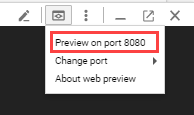
Once the application starts, click on the Web Preview icon in the Cloud Shell toolbar and choose "Preview on port 8080."
gcloud config set app/cloud_build_timeout 1000
gcloud app deploy
If asked, Do you want to continue (Y/n), press Y and then Enter.
After the application is deployed, open the app in your web browser with the following URL:
https://<PROJECT_ID>.appspot.com
Now You are all set!⭐️
👤 vivek patel
- Website: http://viveks.codes/vivek-codes
- Github: @viveks-codes
- LinkedIn: @vivek-patel-0553731a5
Contributions, issues and feature requests are welcome!
Feel free to check issues page. You can also take a look at the contributing guide.
Deploying a Python Flask Web Application to App Engine Flexible
Give a ⭐️ if this project helped you!