/
GlowScriptOverview.md
459 lines (347 loc) · 27.3 KB
/
GlowScriptOverview.md
1
2
3
4
5
6
7
8
9
10
11
12
13
14
15
16
17
18
19
20
21
22
23
24
25
26
27
28
29
30
31
32
33
34
35
36
37
38
39
40
41
42
43
44
45
46
47
48
49
50
51
52
53
54
55
56
57
58
59
60
61
62
63
64
65
66
67
68
69
70
71
72
73
74
75
76
77
78
79
80
81
82
83
84
85
86
87
88
89
90
91
92
93
94
95
96
97
98
99
100
101
102
103
104
105
106
107
108
109
110
111
112
113
114
115
116
117
118
119
120
121
122
123
124
125
126
127
128
129
130
131
132
133
134
135
136
137
138
139
140
141
142
143
144
145
146
147
148
149
150
151
152
153
154
155
156
157
158
159
160
161
162
163
164
165
166
167
168
169
170
171
172
173
174
175
176
177
178
179
180
181
182
183
184
185
186
187
188
189
190
191
192
193
194
195
196
197
198
199
200
201
202
203
204
205
206
207
208
209
210
211
212
213
214
215
216
217
218
219
220
221
222
223
224
225
226
227
228
229
230
231
232
233
234
235
236
237
238
239
240
241
242
243
244
245
246
247
248
249
250
251
252
253
254
255
256
257
258
259
260
261
262
263
264
265
266
267
268
269
270
271
272
273
274
275
276
277
278
279
280
281
282
283
284
285
286
287
288
289
290
291
292
293
294
295
296
297
298
299
300
301
302
303
304
305
306
307
308
309
310
311
312
313
314
315
316
317
318
319
320
321
322
323
324
325
326
327
328
329
330
331
332
333
334
335
336
337
338
339
340
341
342
343
344
345
346
347
348
349
350
351
352
353
354
355
356
357
358
359
360
361
362
363
364
365
366
367
368
369
370
371
372
373
374
375
376
377
378
379
380
381
382
383
384
385
386
387
388
389
390
391
392
393
394
395
396
397
398
399
400
401
402
403
404
405
406
407
408
409
410
411
412
413
414
415
416
417
418
419
420
421
422
423
424
425
426
427
428
429
430
431
432
433
434
435
436
437
438
439
440
441
442
443
444
445
446
447
448
449
450
451
452
453
454
455
456
457
458
459
Jan. 2020 workshop on the architecture of GlowScript VPython:
[](https://www.youtube.com/watch?v=lV_q3UqjsGA)
[A pdf of the slides including the tasks carried out by the participants](https://github.com/vpython/glowscript/blob/master/docs/GlowScriptArchitecture%20.pdf)
[A case study video: adding a new feature to VPython](https://www.youtube.com/watch?v=9igLky5crY8) presented by Bruce Sherwood to his colleagues Aaron Titus and Steve Spicklemire. It should have been mentioned that "attach_light" needed to be included in the exports at the end of the file primitives.js.
[How to install the GlowScript software locally](https://www.glowscript.org/docs/GlowScriptDocs/local.html) so as to be able to experiment with changing the code, as did the participants in the workshop.
## THE ELEMENTS OF THE GLOWSCRIPT LIBRARY
See www.glowscript.org/docs/GlowScriptDocs/local.html for instructions on
how to install software to be able to make and test changes to GlowScript VPython.
When testing locally, you may need to change the port number 8080 in
`ide/api.py` and `untrusted/run.js`.
If you will upload to a site other than glowscript.org, you need to change the name of
the application in `app.yaml`, and at the start of `ide/ide.js`, `ide/api.py`, and `untrusted/run.js`
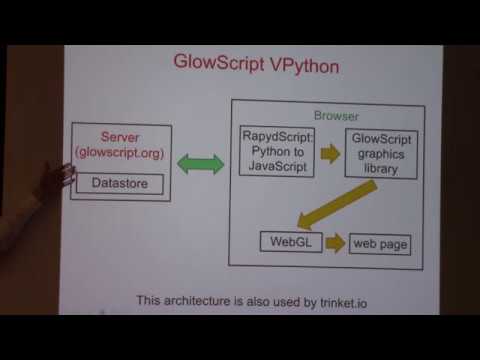
### COMPILATION
The main compilation program is `lib/compiling/GScompiler.js`. Additional comments
on GScompiler.js are included in the file itself. Also, at the start of the file
are instructions on how to obtain others' libraries, such as RapydScript-NG.
Triggered by a "Run" event in `ide/index.html`, the sandboxed `untrusted/run.js` calls
the appropriate compiler and run-time package corresponding to the version number
specified in the first line of the user program (e.g. GlowScript 2.7 VPython).
#### FIRST PASS
- Parse each line into indent plus substance plus inline comment, removing trailing spaces.
- During first pass accumulate a list of functions, fcts.
- Watch for and report location of unbalanced `()`, `[]`, `{}`, `'`, `"`, `'''`, `"""`.
- Replace `delete` with `remove`, as `delete` is a JavaScript reserved word.
- Parse import statements, including making list of objects imported.
- Except for vpython, the Python `random` library is currently the only Python library
that can be imported thanks to a JavaScript implementation by RapydScript-NG.
The `random` library is not complete but contains `seed_state`, `get_random_byte`, `seed`,
`random`, `randrange`, `randint`, `uniform`, `choice`, `shuffle`, and `sample`.
- Look for function declarations and function calls that are outside strings.
- If inside a string, change the name to name+'~!#' so that this mention will
not be found in a later search for "name(".
- Insert original line number as a statement of the form `RS_ls = "line number"\n`.
- Such a statement survives later compile operations, which makes it possible (in Chrome)
to report the original line number of an error.
#### SECOND PASS
- Pass preprocessed Python to RapydScript-NG transpiler, which produces JavaScript.
- Check for 3D text statement, in which case insert code to acquire fonts.
- Replace `.delete` with `.remove`.
- Make various other small adjustments.
- Insert preamble to transpiled JavaScript code.
- Insert statements to deal with various kinds of import statements.
- Insert statements such as `box = vp_box` so that box invokes the VPython version of a box.
- Add some `Array.prototype` functionality to mimic Python lists.
- `papercompile()` calls a library that converts `A+B` to `A['+'](B)`, which makes possible
"operator overloading": that is, `2+3` evaluates to `5`, but `vec(1,2,3)+vec(10,20,30)`
evaluates to `vec(11,22,33)`. In `lib/glow/vectors.js` is a set of `Number` and `vec`
prototype methods that alter the behavior of the arithmetic operators.
- Search program for functions (listed in fcts) and prepend `async `. Change the function
name to name+'~!#' so that this `name()` won't be found in the next step.
- Search program for function calls, prepend `await `, and put `await name()` in parens.
- Finally all occurrences of '~!#' are replaced by ''.
Now the program is ready to run. It is instructive to make a one-line program `box()` at
glowscript.org and then click "Share or export this program" to see the JavaScript program,
which includes references to run-time libraries stored at Amazon S3, which is an https site,
which makes the libraries accessible to https sites containing embedded GlowScript programs.
(Originally, glowscript.org was an http site, which an https site could not access.)
Note the sizable amount of code that comes from RapydScript-NG, as well as the preamble
generated by `GScompiler.js`. It is interesting to see the changes that result in this case:
```GlowScript X.Y VPython
from vpython import box
box()```
Also observe what is generated in these cases:
```GlowScript X.Y VPython
import vpython # or import vpython as vp
vpython.box() # or vp.box()```
If using (say) version 2.7, you can see the generated JavaScript program by choosing
"Share or export this program" from the edit page. However, if using an experimental
version such as 2.8dev, to see the code you need to uncomment console.log(program)
at the end of `GScompiler.js`, and when running use shift-ctrl-j to see console output.
---------------------------------------------
### EXECUTION
- `untrusted/run.js` starts the compiled-to-JavaScript program.
- A timeout of 2 seconds is set to capture a screenshot if one doesn't already exist.
- The resulting thumbnail image is displayed in the user folder display.
- This file also contains the error reporting machinery.
#### The Canvas
At the start of execution, a 3D canvas named "scene" is set up by code in `lib/glow/canvas.js`
but not yet activated, with a transparent 2D canvas superimposed for use by the label object.
The canvas is not immediately activated; activation is triggered by adding an object to the canvas.
When a box or other object is made visible, either in the creation process or by changing
`obj.visible` from `false` to `true`, the handling of the visible attribute in the Primitive object,
which is in `lib/glow/primitives.js`, adds this object to `scene.__changed`, a dictionary
of objects that have been changed.
About 60 times per second, the scene is re-rendered with the current attributes of the
current objects. The main attributes (`pos`, `size`, `axis`, `color`, `up`) are maintained as 64-bit
floats because they may be used in computations. However, WebGL only accepts 32-bit floats,
so every object includes an array `__data` that contains 32-bit versions of the attributes and
which is transmitted to WebGL for every render. When rendering the scene, `scene.__changed`
dictionary is consulted to identify objects whose 32-bit `__data` array needs to be updated
from the 64-bit object data.
#### The 3D Objects
`lib/glow/primitives.js` contains the implementation of almost all of the 3D objects.
(Exceptions are the closely related text and extrusion, mostly in `lib/glow/extrude.js`.)
Search for function `box`. About 35 lines further on you'll see function `vp_box`. When
GlowScript was new, in 2011, the user language was JavaScript, which is still supported
but far less often used than Python. The box and other "JavaScript" objects have no
connection between size and axis, but the VPython definition of a box, implemented as
`vp_box`, links size and axis, in that changing the axis changes the length; there is no
such linkage with the box object. In the VPython compilation process, `box = vp_box` is
inserted at the start of the user program.
`lib/glow/property.js` contains a "property" dictionary (object literal) due to David
Scherer that states the following at the start of the file:
GlowScript uses lots of javascript properties (`Object.defineProperty`) with getters and setters.
This is an attempt to create a more declarative syntax for declaring an object with lots of properties.
In `primitives.js` you will see many examples of `property.declare` followed by a list of attribute
getters and setters.
Consider the (JavaScript) box object. Following `function box(args)`, `subclass(box, Primitive)`
calls a function at the top of the `primitives.js` file, which establishes a new `box` object
as inheriting from the `Primitive` class. Search for `function Primitive()` and you'll see
that it contains a large number of attributes and methods that are common to most 3D objects.
When the user program creates a `box(args)`, the `box` function returns `initObject(this, box, args)`.
The `initObject` function establishes some minimal attributes and calls `init(obj, args)`, which
processes the rest of the attributes. The `vp_box` object inherits from the `box` object. It
overrides the `size` attribute and adds some VPython-specific attributes (e.g `height` and `red`).
#### Rendering the 3D Scene
The file `lib/glow/canvas.js` contains the machinery for creating a 3D canvas in which
the browser-based WebGL graphics library displays the 3D objects.
When a canvas is activated, it calls the function `WebGLRenderer()` in `lib/glow/WebGLRenderer.js`,
which returns an object that includes a `render()` function. The first part of `WebGLRenderer()`
initializes GPU (Graphic Processor Unit) memory to contain "models" of the primitives
(box, sphere, etc.). For example, a model box consists of a 1x1x1 white cube, located with its
center at the origin, rendered as a "mesh" of 12 triangles (2 per side), with normals to these
triangles, which are used in lighting. The creation of the models is in `lib/glow/mesh.js`.
Near the end of `WebGLRenderer.js`, calling `trigger_render()` performs a rendering of the scene.
It also executes `window.requestAnimationFrame(trigger_render)` which asks the browser to call
`trigger_render()` again about 1/60 second from now, to render the scene again, with some
objects in the scene possibly having changed during that interval. The essentially
autonomous, repetitive rendering is what makes it possible for the scene, including
mouse interactions to rotate or zoom or pan, remains active after the end of the user
program has been reached.
The render function itself (search for `this.render`) sets up various WebGL buffers,
deals with extending trails and moving attached arrows, calls `obj.__update()` for any
objects whose attributes have changed, determines whether there any transparent objects
(which requires special treatment), and sets up the camera position and the lighting.
It then transfers to the GPU the attribute data for all the objects. It does all
of the objects of one kind (box, say) before rendering another kind of object, because
there is a lot of setup for each kind of object. In the case of scenes that contain
transparent objects, the render process involves multiple passes, called "depth peeling".
Also in `WebGLRenderer.js` is the mechanism for loading a file to be used as a texture.
At the end of `WebGLRenderer.js` is the `rate()` function that plays an essential role in
animations.
#### Vectors
The file `lib/glow/vectors.js` contains attributes and methods of vectors. Two unusual
features should be mentioned, how changes to a component of a vector are detected,
and how the operator overloading works.
Near the start of the file are defined various kinds of vectors. Attribute vectors
are associated with the vector attributes of 3D objects (their "parent"), and when
an attribute vector is changed, the parent object is marked as changed, which will
trigger at render time calling the object's `__update()` function. `axis`, `size`, and `up`
attribute vectors deal with connections among these attributes, due to the VPython
definition that axis and size affect each other, and under rotation axis and up
must be forced always to be perpendicular to each other. There is also special
treatment of individual vector components, to make sure that changing only one
component of a vector is noticed as a change.
Near the end of the file are modifications to the `Number` class and the `vector` class.
As a result of these prototype changes, `2+3`, which compiles to `2['+'](3)`, yields `5` at
run time, but `vec(1,2,3)+vec(10,20,30)`, which compiles to `vec(1,2,3)['+'](vec(10,20,30)`,
yields `vec(11,22,33)` at run time.
#### The Role of the GPU
In the shaders folder is a large number of GPU programs that are invoked in different
situations. They are of two kinds. The "vertex" shaders have the task of mapping a vertex
in 3D to a point projected onto the 2D screen. A hidden component of the GPU, the "rasterizer",
determines the location of all pixels that are inside a triangle defined by three vertex
locations projected onto the 2D screen. The "fragment" shaders set the color of each pixel, based
on the color of the object and the locations and colors of lights. The key to GPU rendering speed
is that the a large number of vertex shaders can work in parallel, and a large number of
fragment shaders can work in parallel. Also, the non-display of hidden objects is assured
because when the fragment shader stores a color into a pixel location, the "z-depth" of the
pixel is also stored in the memory. When another fragment shader attempts to store a
color into that same pixel location, the hardware ignores the attempt if the associated
z-depth is greater than that of the pixel already stored there. The shader programs are
written in a special language, OpenGL Shading Language or GLSL, somewhat similar to C++.
For the details of how transparency and mouse picking are handled in the GPU, see
www.glowscript.org/docs/GlowScriptDocs/technical.html
### Other Matters
- Basic mouse handling is in `lib/glow/orbital_camera.js`, with additional components
and keyboard handling found in `lib/glow/canvas.js`.
- Autoscaling is implemented in `lib/glow/autoscale.js`, which includes a function to
determine the bounding box ("extent") of an object.
- `lib/glow/api_misc.js` contains `get_library()`, `read_local_file()`, `sleep()`,
string/print functions, and `fontloading()` (for the 3D text object).
- `lib/glow/graph.js` supports making 2D graphs with either the Flot library
or the Plotly library. Flot is faster than Plotly (`fast=True`, the default), but
Plotly has more features.
- `ide/ide.html` with `ide/ide.js` provide the initial and user-specific editing displays.
- `untrusted/run.html` is invoked when running a program, which runs in a separate
sandbox.glowscript.org, to prevent possible problems with malicious code.
---------------------------------------------
### THE PYTHON SERVER
glowscript.org is a Google App Engine application. It includes a Python program that
acts as the server, with the responsibility of maintaining and accessing a datastore that
contains user programs. Upon request it sends programs to the user's browser, where they
can be edited and executed. This Python program is `ide/api.py`. Also in the ide folder
is the program `index.html` and associated JavaScript program `ide.js` that constitute the
user interface. Currently Python 2.7 is used, but it will be possible in the future to
use Python 3. There is also Google work going on to permit the use of the same "ndb"
datastore methods that were used with Python 2.7, which is important for preserving
existing user data.
---------------------------------------------
### TESTING CHANGES
Until July 30, 2020, it is possible to run a test program locally by using the
graphical-interface Google App Engine launcher, but after that date it will be
necessary to launch from a terminal (command-line interface or "CLI"). The
following link describes both schemes:
https://www.glowscript.org/docs/GlowScriptDocs/local.html
To test a new version of GlowScript, change a program header from `X.Y` to `X.Ydev` and
run the program, which will use the latest, modified code. Make another change in the code
and reload the web page to run the program with the latest changes.
To build an updated or new version, see `docs/MakingNewVersion.txt`.
Making the change from http to https for glowscript.org was sufficiently difficult that
a "maintenance" period when glowscript.org would be down was announced several days
in advance. Also, in `ide/ide.js` the variable `disable_writes` was set to `true` during
maintenance, which meant that one could still view and run programs but not change
anything. This wasn't a complete block on changes because someone currently editing a
program wasn't blocked (unless they left the editing page and returned to it).
In retrospect, this hole could be blocked in section `pages.edit` of `ide.js` by checking
`disable_writes` on every call to the `save` function instead of just at the start
of the `pages.edit` section.
---------------------------------------------
### TECHNICAL ISSUES
Here are discussions of two technical aspects of VPython, which may be of interest to developers.
---------------------------------------------
### PIXEL-LEVEL TRANSPARENCY BASED ON DEPTH PEELING
Handling transparency correctly in WebGL is challenging. A standard technique is to order the centers of objects according to their z depth from the camera and render back to front. This approach can make serious errors in the case of intersecting or enclosing transparent objects, where some parts of one object are in front of a second object, and other parts are behind the second object.
A better approach is called "depth peeling", in which transparency is dealt with at the pixel level rather than at the object level. Consider for example a transparent sphere enclosing an opaque box, and carry out the following operations:
1) Render the pixels of the opaque box to a texture, which we'll call a color texture. This of course takes into consideration the lights in the scene. Call this color texture C0. Note that all opacity values (the "a" in rgba) are 1.0 for this opaque object.
2) Render the z depths (distance from the camera) to a texture, which we'll call a depth texture. That is, given the depth of a pixel, the fragment shader stores a false color into the texture, a false color whose 4 bytes represents in some form the depth. Call this depth texture D0.
3) Render the transparent object (the sphere) to a texture C1, but using information in the depth texture D0. In the fragment shader, read the (false color) depth from D0, and if the z depth of the transparent sphere pixel is not in front of the opaque box pixel, discard the pixel (using the "discard" statement in the fragment shader). Upon completion of this render step, C1 contains color and opacity information (rgba) for the front-most transparent surface, a hemisphere. This is called a "depth peel".
4) We now have two color textures, C0 and C1, which we can merge to form a scene with an opaque box and a transparent hemisphere in front of the box. Render a simple quad object (two triangles) that fill the canvas. In the fragment shader, read the color information from C0 and C1. Store a pixel color that is determined like this, where (1.0-C1.a) is the transparency of the transparent layer:
vec3 color = C1.rgb*C1.a +
(1.0-C1.a)*C0.rgb;
gl_FragColor = vec4 (color, 1.0);
These four steps illustrate the basic idea. In VPython, four transparent depth peels are performed rather than one, and 10 separate renders are carried out:
C0 -- opaque color texture
D0 -- opaque depth texture
C1 -- frontmost transparent color texture
D1 -- frontmost transparent depth texture, corresponding to C1
C2 -- transparent color texture for the next deeper "peel" after C1; if the pixel does not have a depth between that of D0 and D1, the pixel is discarded
D2 -- transparent depth texture corresponding to C2
C3 -- next deeper transparent color texture; discard a pixel if z not between D0 and D2
D3 -- transparent depth texture corresponding to C3
C4 -- deepest transparent color texture; discard a pixel if z not between D0 and D3
MERGE -- The final render is a merge of C0, C1, C2, C3, and C4:
vec3 color = C1.rgb*C1.a +
(1.0-C1.a)*(C2.rgb*C2.a +
(1.0-C2.a)*(C3.rgb*C3.a +
(1.0-C3.a)*(C4.rgb*C4.a +
(1.0-C4.a)*C0.rgb)));
gl_FragColor = vec4 (color, 1.0);
It may be that C2, C3, and C4 are all empty, but there is no obvious inexpensive way to get the information needed to tell the CPU to avoid scheduling those extra renders, because readPixels is very expensive. If there are more than four transparent layers, this algorithm will not treat them properly. However, note that the fifth and later peels will contribute little to the final pixel color, being partially occluded by four transparent layers in front.
Before starting the many renders the objects are sorted into opaque and transparent lists, and if there are no transparent objects a simple C0 render is all that is needed. Moreover, this simple render can exploit antialiasing, whereas the storage into textures for depth peeling unfortunately turns off antialiasing.
It is remarkable that doing 10 separate renders runs adequately fast for real-time rendering of moderately complicated scenes. For example, displaying 1000 rotating transparent boxes may take only twice the render time needed to display 1000 rotating opaque boxes, depending on the graphics card.
In OpenGL it is possible to create several textures in one render, but WegGL permits attaching just one texture to a framebuffer object, hence a large number of separate renders are needed.
To see this algorithm in action, run this Transparency example program.
Note that the code for this transparency demo is remarkably short. Web VPython is aimed at making it feasible for nonexpert programmers to exploit WebGL to generate navigable real-time 3D animations.
At github.com/vpython/glowscript the key files dealing with depth peeling are lib/glow/WebGLRender.js and the shader programs in the shaders folder.
It is possible to implement "Fast Approximate Anti-Aliasing" (FXAA) to get around the problem that the use of framebuffer objects turns off anti-aliasing:
http://www.codinghorror.com/blog/2011/12/fast-approximate-anti-aliasing-fxaa.html
This has not been tried in VPython.
---------------------------------------------
### MOUSE PICKING
Here is how mouse picking has been implemented in VPython. For an object with id number N, create a false color like this:
function id_to_falsecolor(N) { // convert integer object id to floating RGBA
let R=0, G=0, B=0
if (N >= 16777216) {
R = Math.floor(N/16777216)
N -= R*16777216
}
if (N >= 65536) {
G = Math.floor(N/65536)
N -= G*65536
}
if (N >= 256) {
B = Math.floor(N/256)
N -= B*256
}
return [R/255, G/255, B/255, N/255]
}
We want to render the false colors of the objects to a texture the size of the canvas (need not be powers of 2):
let pick_texture = gl.createTexture()
gl.bindTexture(gl.TEXTURE_2D, pick_texture )
gl.texParameteri(gl.TEXTURE_2D, gl.TEXTURE_MIN_FILTER, gl.LINEAR)
gl.texParameteri(gl.TEXTURE_2D, gl.TEXTURE_WRAP_S, gl.CLAMP_TO_EDGE)
gl.texParameteri(gl.TEXTURE_2D, gl.TEXTURE_WRAP_T, gl.CLAMP_TO_EDGE)
gl.texImage2D(gl.TEXTURE_2D, 0, gl.RGBA, width, height, 0, gl.RGBA, gl.UNSIGNED_BYTE, null)
gl.bindTexture(gl.TEXTURE_2D, null)
Set up a framebuffer to render to:
let pickFramebuffer = gl.createFramebuffer()
gl.bindFramebuffer(gl.FRAMEBUFFER, pickFramebuffer)
// create depth buffer:
let pickRenderbuffer = gl.createRenderbuffer()
gl.bindRenderbuffer(gl.RENDERBUFFER, pickRenderbuffer)
gl.renderbufferStorage(gl.RENDERBUFFER, gl.DEPTH_COMPONENT16, width, height)
gl.framebufferRenderbuffer(gl.FRAMEBUFFER, gl.DEPTH_ATTACHMENT, gl.RENDERBUFFER, pickRenderbuffer)
gl.bindRenderbuffer(gl.RENDERBUFFER, null)
gl.bindFramebuffer(gl.FRAMEBUFFER, null)
At the start of a render cycle execute this:
gl.bindFramebuffer(gl.FRAMEBUFFER, pickFramebuffer)
gl.framebufferTexture2D(gl.FRAMEBUFFER, gl.COLOR_ATTACHMENT0, gl.TEXTURE_2D, pick_texture, 0)
After rendering all the objects, with no lighting calculations (so that all pixels of an object have the same false color), get the id number of the object under the mouse like this:
let pixels = new Uint8Array(4)
gl.readPixels(canvas.mouse.__pickx, canvas.mouse.__picky, 1, 1, gl.RGBA, gl.UNSIGNED_BYTE, pixels)
let id = 16777216*pixels[0] + 65536*pixels[1] + 256*pixels[2] + pixels[3]
A non-power-of-two texture has restrictions; see http://www.khronos.org/webgl/wiki/WebGL_and_OpenGL_Differences.
Important note: This destroys antialiasing, so render to texture is fully useful only for doing some computations, unless we do our own antialiasing.
Note that antialiasing being turned off is actually what one wants for mouse picking because you don't want an object with id of 10 that is next to an object of id 30 to get picked with an id of 20, which could happen with antialiasing turned on, due to the averaging of neighboring colors.
---------------------------------------------
### GLOWSCRIPT.ORG WEBSITE ISSUES
- For historical reasons, although glowscript.org currently runs on Google servers,
the domain authority is godaddy.com. It would be simpler for Google to be the
domain authority, and migrating there is worth looking into.
- The main administration of the glowscript.org Google App Engine application is
provided by Google Cloud Platform (console.cloud.google.com) and Google APIs
(console.developers.google.com). Here among much else are usage reports.
- At console.cloud.google.com, in "App Engine" click "Go to the App Engine
dashboard" to see various kinds of data about glowscript.org operation.
Again at console.cloud.google.com, click the 3 bars at the upper left
and beside "Datastore" are various options to investigate the cloud data.
For example, choose "Entities" and you can examine glowscript.org records.
Choose "User" for the Kind of record, then click `FILTER ENTITIE` and enter
`key(User,'GlowScriptDemos')`, then click `APPLY FILTERS`. You will see information
about the GlowScriptDemos login that is used for maintaining the Example
programs at glowscript.org. Note that some very old logins may contain
`%20`, which displays at glowscript.org as a space but must be entered
as `%20` when specifying a user key.
- Some rarely used aspects of administration are associated with Google Admin
(admin.google.com/glowscript.org), with access by glowscript.org administrators.
In particular, making glowscript.org and www.glowscript.org
be equivalent must be set up here, in the Domains section. Click "Domains",
then click Add/remove domains. Here you will see glowscript.org listed with
the information that glowscript.org is redirected to www.glowscript.org.
- Both Bruce Sherwood (bruce.sherwood@gmail.com) and Aaron Titus (hpuphysics.gmail.com)
are administrators of these Google and GoDaddy entities.
- At GoDaddy clicking on DNS on the main page shows you the Domain Name Server
information for glowscript.org. A screen capture of the settings is included
in the GitHub docs folder. The TXT record resulted from Google asking for that
particular record to be set up, which Google then read to verify our ownership
of glowscript.org.
- There is one more web entity. In Amazon S3 is a glowscript bucket that contains
the libraries, fonts, and textures used by exported GlowScript programs. They are
stored there in part because it wasn't clear how to deal with CORS-enabling these
files within the original http://glowscript.org web site, whereas at Amazon S3 it's a
one-click action (click a file listing in glowscript/package, then click "Make Public").
Also, https://s3.amazonaws.com/glowscript is an https site, whereas glowscript.org
was until Feb. 2019 an http site, so references to S3 from a program exported to an
https site would work, but not to http://glowscript.org.