
Crouton is a dashboard that lets you visualize and control your IOT devices with minimal setup. Essentially, it is the easiest dashboard to setup for any IOT hardware enthusiast using only MQTT and JSON.
- Makes IOT devices easy to use
- No frontend knowledge needed
- Flexible for wide variety of devices
- Compatible with devices that use MQTT
- Easy to use interface
- It is FREE!
  $ git clone https://github.com/edfungus/Crouton.git
  $ npm install
  $ grunt
To start, we will need a device and a MQTT Broker. Don't have either? No worries, because we have several demo options for you!
The device can be anything from hardware (ESP8266) to a Python script. As long as the device can use the MQTT protocol and encode/decode JSON, then it will work as a device. While this guide is not about setting up specific devices, we do have reference links for the ESP8266 and Python MQTT libraries.
If you are using LUA scripting, then the Nodemcu Firmware has MQTT and JSON capabilities already built.
ESP8266 Lua Nodemcu documentation on Github
Sample code for the ESP8266 which included a togglable and dimmable light. Refer to the /client/ directory page for more details.
The package we suggest to use for Python client is paho-mqtt. It has the necessary MQTT libraries to get up and running.
Python MQTT library: Paho-mqtt
Sample code for Python dummy client which includes most of the dashboard elements. Refer to the /client/ directory page for more details.
In addition to the sample code above, we have a always running (we try!) test client under the name "crouton-demo" on the "test.mosquitto.org" public broker. The status of the device can be checked here. And of course, check out the getting started for more details.
Demo page detailing Crouton test clients
MQTT Broker takes care of delivering messages to its clients via a publish and subscribe model. The MQTT Broker required for Crouton must support web sockets. Web sockets allow Crouton to connect to it. While there are free options to download and run your own MQTT Broker, there are also free to use public MQTT Brokers that are already set up. We default to Mosquitto's publicly hosted broker.
Remember, Crouton must connect to the web socket port of the MQTT Broker, while devices will usually connect to the regular port.
In the future, we plan to have Crouton's own MQTT Broker which will have better up time and security in comparison to public brokers.
After getting a device and a broker, we simply need to hook everything up. The beauty of Crouton is that, like the device, Crouton is also a client to the same MQTT Broker. As a result, Crouton does not rely on any additional centralized server than does your MQTT device. In fact, Crouton is purely a frontend application with no backend services.
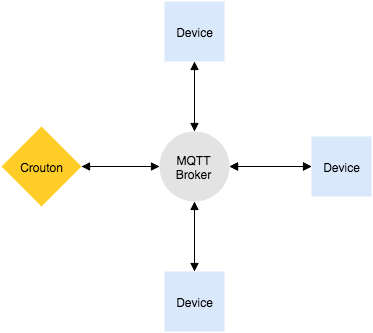
Being a distributed system, like the one shown above, connection between the device and Crouton is only via the MQTT Broker. The communication between Crouton and the device is defined by a protocol that utilizes addresses and MQTT's last will and testament (LWT) feature.
Once Crouton and and the device are connected to the same MQTT Broker, we can use Crouton to initiate the connection to the device. The device will in turn send a JSON describing itself known as the deviceInfo to Crouton.
First, have Crouton and the device connected to the same MQTT Broker. The connection between the device and Crouton will be initiated from Crouton, therefore the device needs to subscribe to its own inbox.
Device should subscribe to the following:
/inbox/[the device name]/deviceInfo
Every time the device successfully connects to the MQTT Broker, it should publish its deviceInfo. This is needed for auto-reconnection. If Crouton is waiting for the device to connect, it will listen for the deviceInfo when the device comes back online.
Device should publish deviceInfo JSON once connected
/outbox/[the device name]/deviceInfo
The deviceInfo is the primary method for Crouton to understand the device. It is the first message the device will send to Crouton to establish connection and also the message that describes the device and values to Crouton. The primary object is deviceInfo. Within deviceInfo there are several keys as follows:
{
  "deviceInfo": {
    "name": "Kroobar",
    "endPoints": {
      "barDoor": {
        "title": "Bar Main Door",
        "card-type": "crouton-simple-text",
        "units": "people entered",
        "values": {
            "value": 34
        }
      }
    },
    "description": "Kroobar's IOT devices",
    "status": "good"
  }
}- *name: A string that is the name for the device. This is same name you would use to add the device
- *endPoints: An object that configures each dashboard element Crouton will show. There can be more than one endPoint which would be key/object pairs within endPoints
- description: A string that describes the device (for display to user only)
- status: A string that describes the status of the device (for display to user only)
Note: Both name and endPoints are required and must be unique to other names or endPoints respectively
Addresses are what Crouton and the device will publish and subscribe to. They are also critical in making the communication between Crouton and the devices accurate therefore there is a structure they should follow.
An address can be broken up into 3 sections.
/[inbox or outbox]/[device name]/[endPoint name]
- inbox or outbox: The box is relative to the device. Inbox is for messages going to the device and outbox is for messages from the device
- device name: The name of the device the are targeting; from name key/value pair of deviceInfo
- endPoint name: The name of the endPoint the are targeting; from the key used in the key/object pair in endPoints
Note: All addresses must be unique to one MQTT Broker. Therefore issues could be encounter when using public brokers where there are naming conflicts.
Updating device values can come from Crouton or the device. The message payload will be a JSON that updates the value. This JSON will be equivalent to the object of the key values within each endPoint. However, only values that are being updated needs to be updated. All other values must be updated by the deviceInfo JSON.
Payload: {"value": 35}

An entry in endPoints:
"barDoor": {
  "title": "Bar Main Door",
  "card-type": "crouton-simple-text",
  "units": "people entered",
  "values": {
      "value": 34
  }
}Crouton has the ability to update the value of the device's endPoints via certain dashboard cards. Therefore the device needs to be subscribe to certain addresses detailed in the Endpoints section below. The payload from Crouton is in the same format as the one coming from the device.
Address: /inbox/Kroobar/barDoor
Payload: {"value": 35}
To update values on Crouton from the device, simply publish messages to the outbox of the endPoint which Crouton is already subscribed to. The payload is just the same as the one coming from Crouton.
Address: /outbox/Kroobar/barDoor
Payload: {"value": 35}
In order for Crouton to know when the device has unexpectedly disconnected, the device must create a LWT with the MQTT Broker. This a predefined broadcast that the broker will publish on the device's behalf when the device disconnects. The payload in this case can be anything as long as the address is correct.
Address: /outbox/Kroobar/lwt
Payload: anything
Note: No endPoints can be named lwt; they will conflict in the name space.
A device can have multiple endPoints. Each endPoint represents a dashboard card that will be displayed on the dashboard.
The device must subscribe to the inbox of each endPoint which may receive values from Crouton. For example, a toggle switch on Crouton may change a value on the device therefore a subscription is necessary; however, an alert button which sends only messages from device to Crouton may not need a subscription because the device does not expect any values from Crouton.
Subscription address for endPoints on device:
/inbox/[device name]/[endpoint name]
Upon receiving a new value from Crouton, the device must send back the new value or the appropriate value back to Crouton. This is because Crouton will not reflect the new value change unless it is coming from the device.
Therefore the value shown on Crouton more accurately reflects the value on the device.
Address: /outbox/[device name]/[endpoint name]
Payload: {"value": "some new value here"}
Dashboard cards are visual and control elements which allow interaction with connected devices. By simply adding a new endPoint in the deviceInfo JSON, a new dashboard card will be automatically generated upon connection. They strive to do several things:
- Provide a visual experience for IOT devices
- Modularity allows different combinations of different devices
- Simplicity of define functionality for each type of card
- Reflect the latest real value of the device
The type of dashboard card for each endPoint is specified in the object of the endPoint under the key card-type. The values object is the object that is sent between Crouton and the device to keep values up-to-date. Both of these fields are required for each endPoint.
"barDoor": {
  ...
  "card-type": "crouton-simple-text",
  "values": {
    ...
  }
  ...
}
Any icons used come from Font Awesome and utilizes the same name for the icons.
Also, new cards are always coming so keep the suggestions coming!
Simple cards are basic cards that have only one value. Therefore if they are buttons, inputs, etc, there will only be one button, inputs, etc per card. Their functionality are fairly limited but by using multiple cards together, they can still be powerful. All simple card have the same prefix.
Simple card prefix:
crouton-simple-[card type]
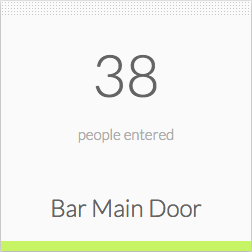
Simple text is used to display a value (text or number) on the dashboard from the device to Crouton.
Device -> Crouton
Name: crouton-simple-text

Example:
"barDoor": {
  "units": "people entered", [optional]
  "values": {
    "value": 34 [required]
  },
  "card-type": "crouton-simple-text", [required]
  "title": "Bar Main Door" [optional]
}
Simple input is similar to simple text except the user can update the value on the device from Crouton. There is no length restriction of the value by Crouton.
Device <-> Crouton
Name: crouton-simple-input

Example:
"customMessage": {
  "values": {
    "value": "Happy Hour is NOW!" [required]
  },
  "card-type": "crouton-simple-input", [required]
  "title": "Billboard Message" [optional]
}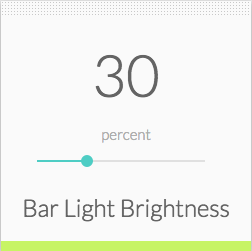
Simple slider allows the user to select continuous values within a given range. Both the large number and the slider will attempt the give the real device value at all times except when the user is sliding.
Device <-> Crouton
Name: crouton-simple-slider

Example:
"barLightLevel": {
  "values": {
    "value": 30 [required]
  },
  "min": 0, [required]
  "max": 100, [required]
  "units": "percent", [optional]
  "card-type": "crouton-simple-slider", [required]
  "title": "Bar Light Brightness" [optional]
}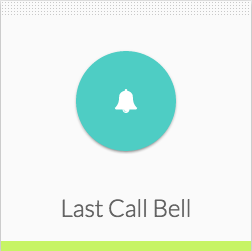
Simple button is one directional, sending a signal (with no meaningful value) from Crouton to the device. However, this is still a bi-directional card because the button is only enable if value is true. If the device updates the value of the card to false, the button will be disabled.
Device <-> Crouton
Name: crouton-simple-button

Example:
"lastCall": {
  "values": {
    "value": true [required]
  },
  "icons": {
    "icon": "bell" [required]
  },
  "card-type": "crouton-simple-button", [required]
  "title": "Last Call Bell" [optional]
}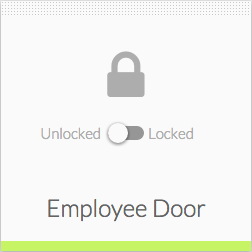
Simple toggle allows a boolean value to be changed by both Crouton and the device. In the larger value display, priority for display is icon, labels, boolean text. If no labels or icons are given, the words true and false will be used. The labels around the toggle is only defined by labels object.
Device <-> Crouton
Name: crouton-simple-toggle

Example:
"backDoorLock": {
  "values": {
    "value": false [required]
  },
  "labels":{ [optional]
    "true": "Locked",
    "false": "Unlocked"
  },
  "icons": { [optional]
    "true": "lock",
    "false": "lock"
  },
  "card-type": "crouton-simple-toggle", [required]
  "title": "Employee Door" [optional]
}These cards are for charts!
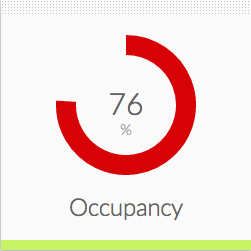
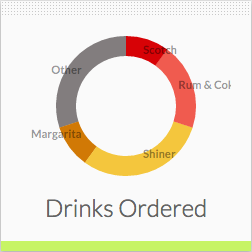
A fairly flexible pie chart. The labels and series (values) are in arrays. The labels are optional (must have at least an empty array) and will not show if empty. message is displayed in the center of the donut. centerSum (defualt is false) sums up all of the values and replaces message. total is the value that will fill up the complete circle. If sum of series is beyond total, the extra parts will be truncated.
Device -> Crouton
Name: crouton-chart-donut

Example:
"drinksOrdered": {
  "values": {
    "labels": ["Scotch","Rum & Coke","Shiner","Margarita", "Other"], [required]
    "series": [10,20,30,10,30], [required]
    "message": "" [optional]
  },
  "total": 100, [required]
  "card-type": "crouton-chart-donut",
  "title": "Drinks Ordered" [optional]
},
"occupancy": {
  "values": {
    "labels": [], [required]
    "series": [76] [required]
  },
  "total": 100, [required]
  "centerSum": true, [optional]
  "units": "%", [optional]
  "card-type": "crouton-chart-donut", [required]
  "title": "Occupancy" [optional]
}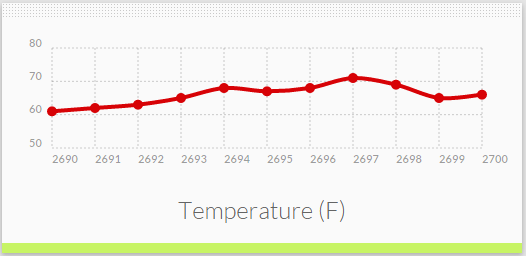
A simple line chart with multiple lines available. The labels corresponds to the x axis values and the series corresponds to the y axis values. Multiple sets of (x,y) values can be passed at once as long as the array length of labels and series are matched. The reason why series is multidimensional is so that multiple lines can be drawn where each array in series corresponds to a line. The update parameter is expected on update and holds a copy of values with the new labels and series within. Max refers to the maximum number of data points based on the x axis is shown. low and high refers to the maximum y values expected.
It is suggested that labels and series be prepopulated with one set of (x,y) value for each line
Device -> Crouton
Name: crouton-chart-line

Example:
"temperature": {
    "values": {
        "labels": [1],  [required]
        "series": [[60]],  [required]
        "update": null  [required]
    },
    "max": 11, [required]
    "low": 58,  [required]
    "high": 73,  [required]
    "card-type": "crouton-chart-line",  [required]
    "title": "Temperature (F)" [optional]
}

3 lines and 1 value:
"values": {
    "labels": [1],
    "series": [[60],[2],[543]],
    "update": null
}

3 lines and 2 values:
"values": {
    "labels": [1,2],
    "series": [[60,62],[2,4],[543,545]],
    "update": null
}

To update temperature:
"values": {
    "labels": null,
    "series": null,
    "update": {
      "labels" : [2],
      "series": [[62]]
    }
}These cards are a little bit more specific to certain applications.
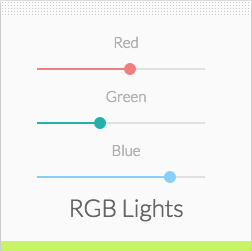
RGB slider is three combined slider for the specific application of controlling a RGB led. Prepopulate the values for red, green and blue by setting in values.
Device <-> Crouton
Name: crouton-rgb-slider

Example:
"discoLights": {
  "values": {
    "red": 0, [required]
    "green": 0, [required]
    "blue": 0 [required]
  },
  "min": 0, [required]
  "max": 255, [required]
  "card-type": "crouton-rgb-slider", [required]
  "title": "RGB Lights" [optional]
}
(Thank you wickwire for this addition)
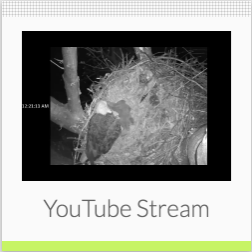
Add a Youtube video or livestream to your dashboard. This is great for having a dashboard of various security cameras.
Device - Crouton
Name: crouton-video-youtube

Example:
"youTubeStream": {
  "values": {
      "youtubeID": "GZnb3jQ2YZo" [required]
  },
  "card-type": "crouton-video-youtube", [required]
  "title": "YouTube Stream" [optional]
}