By following the steps in this section, you can create your first Amazon Kinesis data analytics application using the console. You will create an Amazon Kinesis data analytics application. Your application needs a streaming source. To help you get started, the console can create a demo stream (called kinesis-analytics-demo-stream). The console also runs a script that populates records in the stream. You can write your own SQL queries against the in-application stream, but for the following lab you use one of the templates that provides sample code. Finally if time permits, you will explore how to update the application code.
-
Sign in to the AWS Management Console and open the Kinesis Data Analytics console.
-
Choose Create new application.
-
On the New application page, type an application name, type a description, and then choose Save and continue.

-
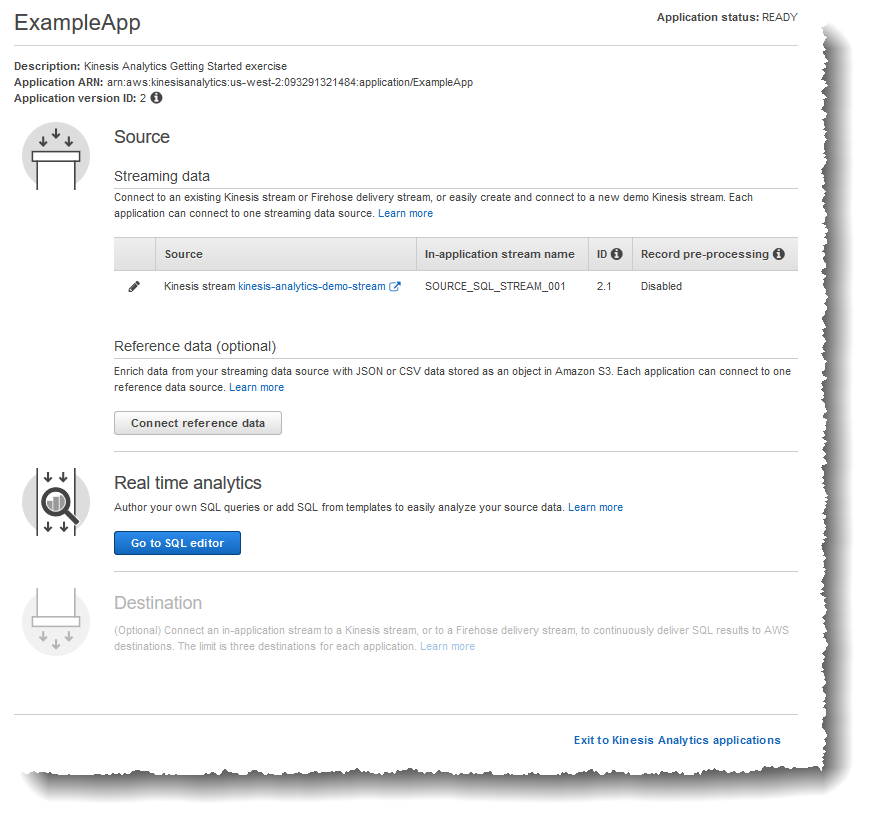
On the application hub page in the console, choose Connect streaming data.
-
On the page that appears, review the following:

-
Source - This is where you specify a streaming source for your application. You can select an existing stream source or create one. In this exercise, you create a new stream, the demo stream. By default the console names the in-application input stream that is created as INPUT_SQL_STREAM_001. For this exercise, keep this name as it appears.
-
Stream reference name – This option shows the name of the in-application input stream that is created, SOURCE_SQL_STREAM_001. You can change the name, but for this exercise, keep this name.
-
Record pre-processing with AWS Lambda - This option is where you specify an AWS Lambda expression that modifies the records in the input stream before your application code executes. In this exercise, leave the Disabled option selected.
After you provide all the information on this page, the console sends an update request (see UpdateApplication) to add the input configuration the application.
-
On the Source page, choose Configure a new stream.
-
Choose Create demo stream. The console configures the application input by doing the following:
-
The console creates a Kinesis data stream called kinesis-analytics-demo-stream.
-
The console populates the stream with sample stock ticker data.
-
Using the DiscoverInputSchema input action, the console infers a schema by reading sample records on the stream. The schema that is inferred is the schema for the in-application input stream that is created. For more information, see Configuring Application Input.
-
The console shows the inferred schema and the sample data it read from the streaming source to infer the schema.
The console displays the sample records on the streaming source.
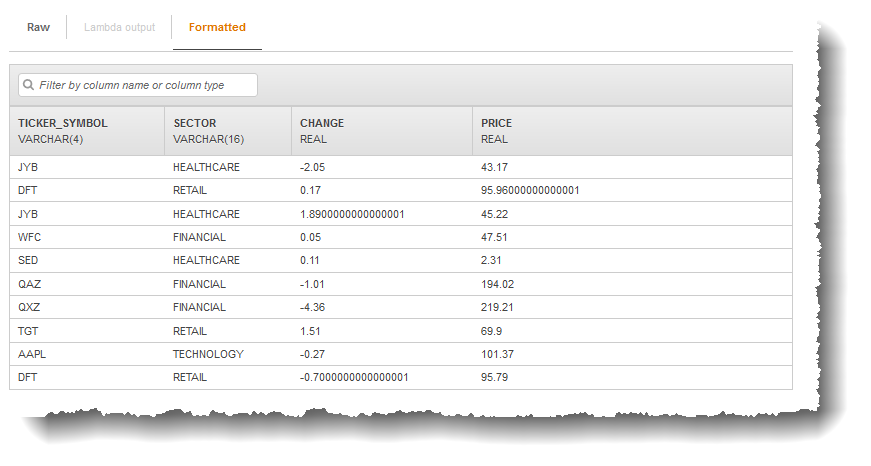
The following appear on the Stream sample console page:
-
The Raw stream sample tab shows the raw stream records sampled by the DiscoverInputSchema API action to infer the schema.
-
The Formatted stream sample tab shows the tabular version of the data in the Raw stream sample tab.
-
If you choose Edit schema, you can edit the inferred schema. For this exercise, don't change the inferred schema. For more information about editing a schema, see Working with the Schema Editor.
-
If you choose Rediscover schema, you can request the console to run DiscoverInputSchema again and infer the schema.
- Choose Save and continue.
-
On the application hub page, choose Go to SQL editor.
-
In the Would you like to start running "GSExample1"? dialog box, choose Yes, start application.
-
The console opens the SQL editor page. Review the page, including the buttons (Add SQL from templates, Save and run SQL) and various tabs.
-
In the SQL editor, choose Add SQL from templates.
-
From the available template list, choose Continuous filter. The sample code reads data from one in-application stream (the WHERE clause filters the rows) and inserts it in another in-application stream as follows:
- It creates the in-application stream DESTINATION_SQL_STREAM.
- It creates a pump STREAM_PUMP, and uses it to select rows from SOURCE_SQL_STREAM_001 and insert them in the DESTINATION_SQL_STREAM.
-
Choose Add this SQL to editor.
-
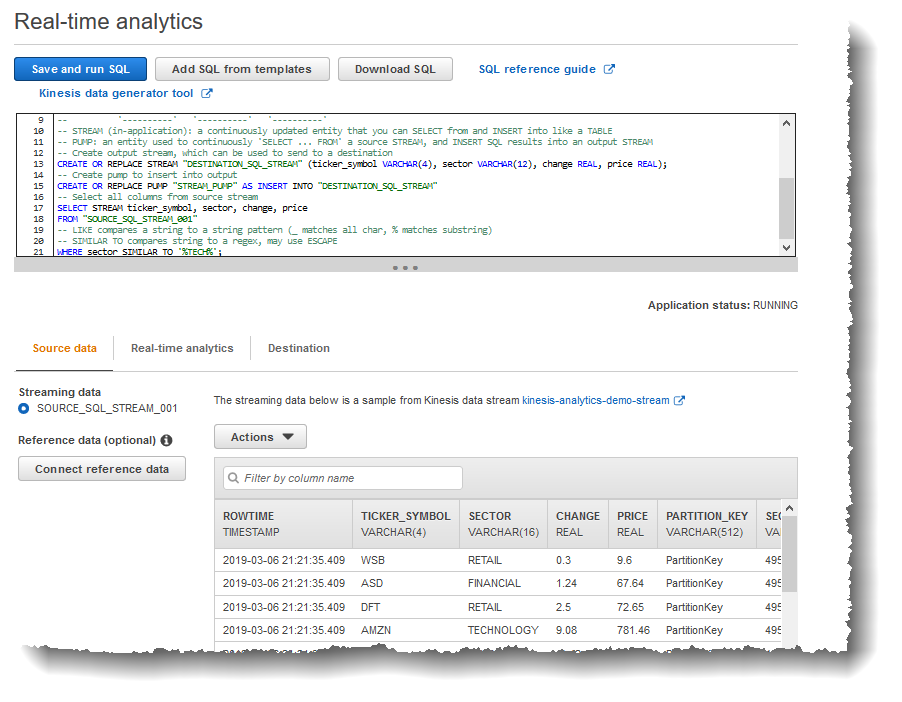
In the SQL Editor, choose Save and run SQL. The console first sends update request to save the application code. Then, the code continuously executes.
You can see the results in the Real-time analytics tab. Screenshot
The SQL editor has the following tabs:
-
The Source data tab shows an in-application input stream that is mapped to the streaming source. Choose the in-application stream, and you can see data coming in. Note the additional columns in the in-application input stream that weren't specified in the input configuration. These include the following time stamp columns:
- ROWTIME – Each row in an in-application stream has a special column called ROWTIME. This column is the time stamp when Amazon Kinesis Data Analytics inserted the row in the first in-application stream (the in-application input stream that is mapped to the streaming source).
- Approximate_Arrival_Time – Each Kinesis Data Analytics record includes a value called Approximate_Arrival_Time. This value is the approximate arrival time stamp that is set when the streaming source successfully receives and stores the record. When Kinesis Data Analytics reads records from a streaming source, it fetches this column into the in-application input stream. These time stamp values are useful in windowed queries that are time-based. For more information, see Windowed Queries.
-
The Real-time analytics tab shows all the other in-application streams created by your application code. It also includes the error stream. Kinesis Data Analytics sends any rows it cannot process to the error stream. For more information, see Error Handling. Choose DESTINATION_SQL_STREAM to view the rows your application code inserted. Note the additional columns that your application code didn't create. These columns include the ROWTIME time stamp column. Kinesis Data Analytics simply copies these values from the source (SOURCE_SQL_STREAM_001).
-
The Destination tab shows the external destination where Kinesis Data Analytics writes the query results. You haven't configured any external destination for your application output yet.