简体中文 | English
Video-subtitle-extractor (vse) is a free, open-source tool which can help you rip the hard-coded subtitles from a video file and automatically generate srt files for each video. It includes the following implementations:
- Detect and extract subtitle frames (using traditional graphic method)
- Detect subtitle areas (i.e., coordinates) (as well as scene text if you want) (using deep learning algorithms)
- Converting graphic text into plain-text (using deep learning algorithms)
- Filter non-subtitle text (e.g., Logo and watermark etc.)
- Remove duplicated subtitle line and generate srt file (by calculating text similarity)
- Batch extraction. You can select multiple video files at one time and this tool can generate subtitles for each video.
- Multiple language support, you can extract the following subtitle languages: Simplified Chinese, English, Japanese, Korean, Arabic, Traditional Chinese, French, German, Russian, Spanish, Portuguese, Italian
- Multiple mode:
- fast: high extraction speed while few subtitle missing (Recommended)
- accurate: no subtitle missing while low extraction speed
Download:
-
Windows executable (might be slow when initial start): vse.exe
-
Windows GPU version:vse_windows_GPU.7z
-
Windows CPU version:vse_windows_CPU.zip
-
MacOS:vse_macOS_CPU.dmg
- You don't need to do any preprocessing (e.g., binarization) and don't need to consider all aspects like subtitle fonts and size etc..
- This is an offline project. There is no online API call and you dont need to connect to the Internet service provider in order to get results.
- For Command Line Interface(CLI) version, you can escape the subtitle area setting. This program will automatically detect the subtitle area for you.
- GPU support is available. You can install CUDA and cuDNN to speed up the detection and recognition process and even get more accurate results.
Provide your suggestions to improve this project in ISSUES
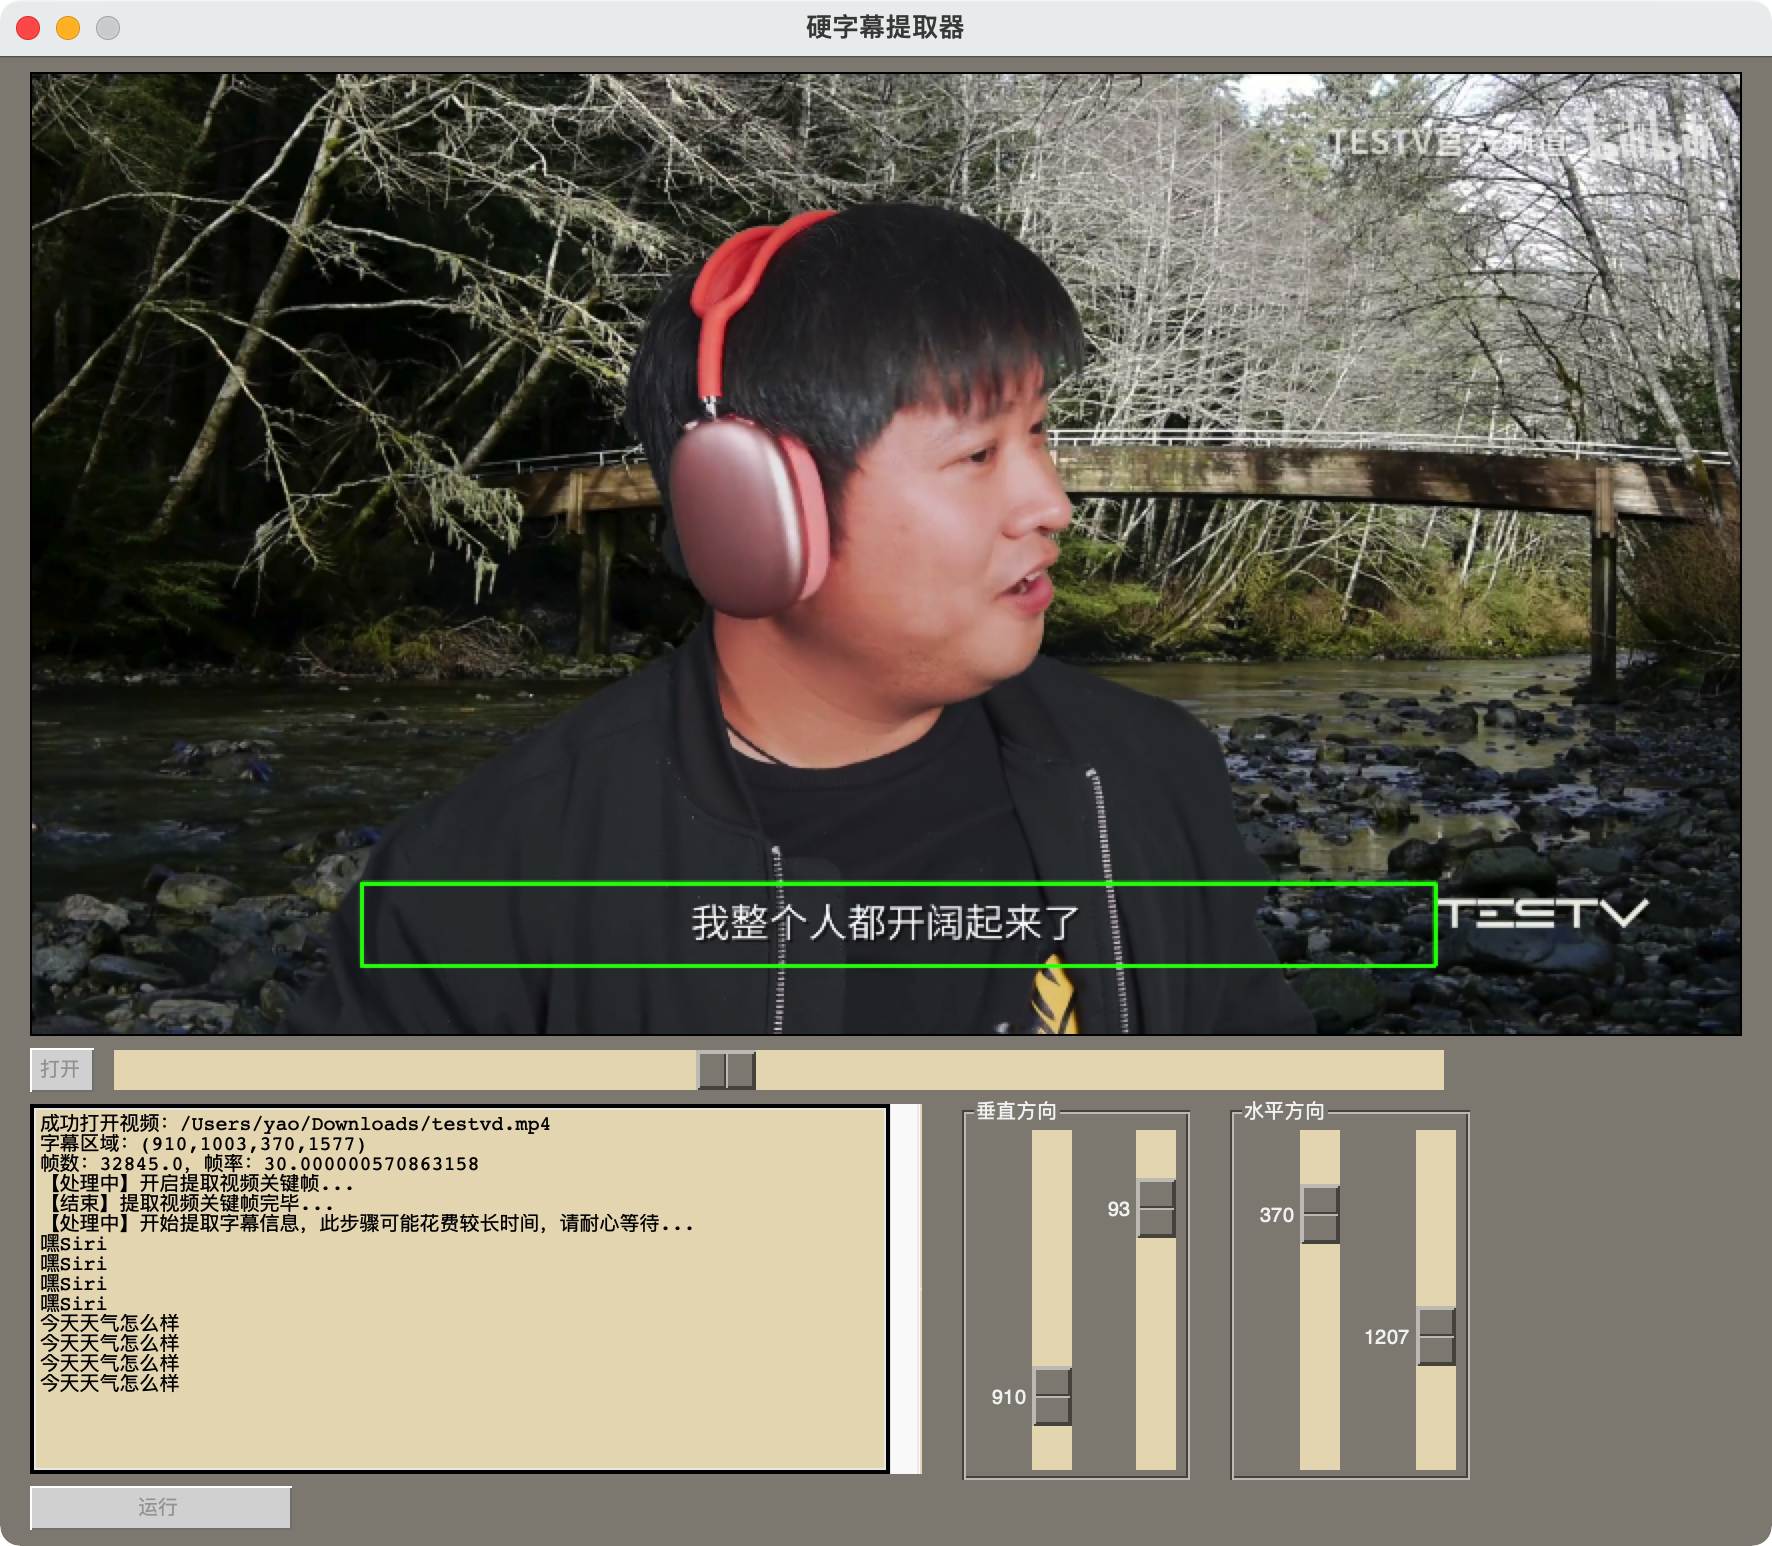
- Graphic User Interface (GUI):

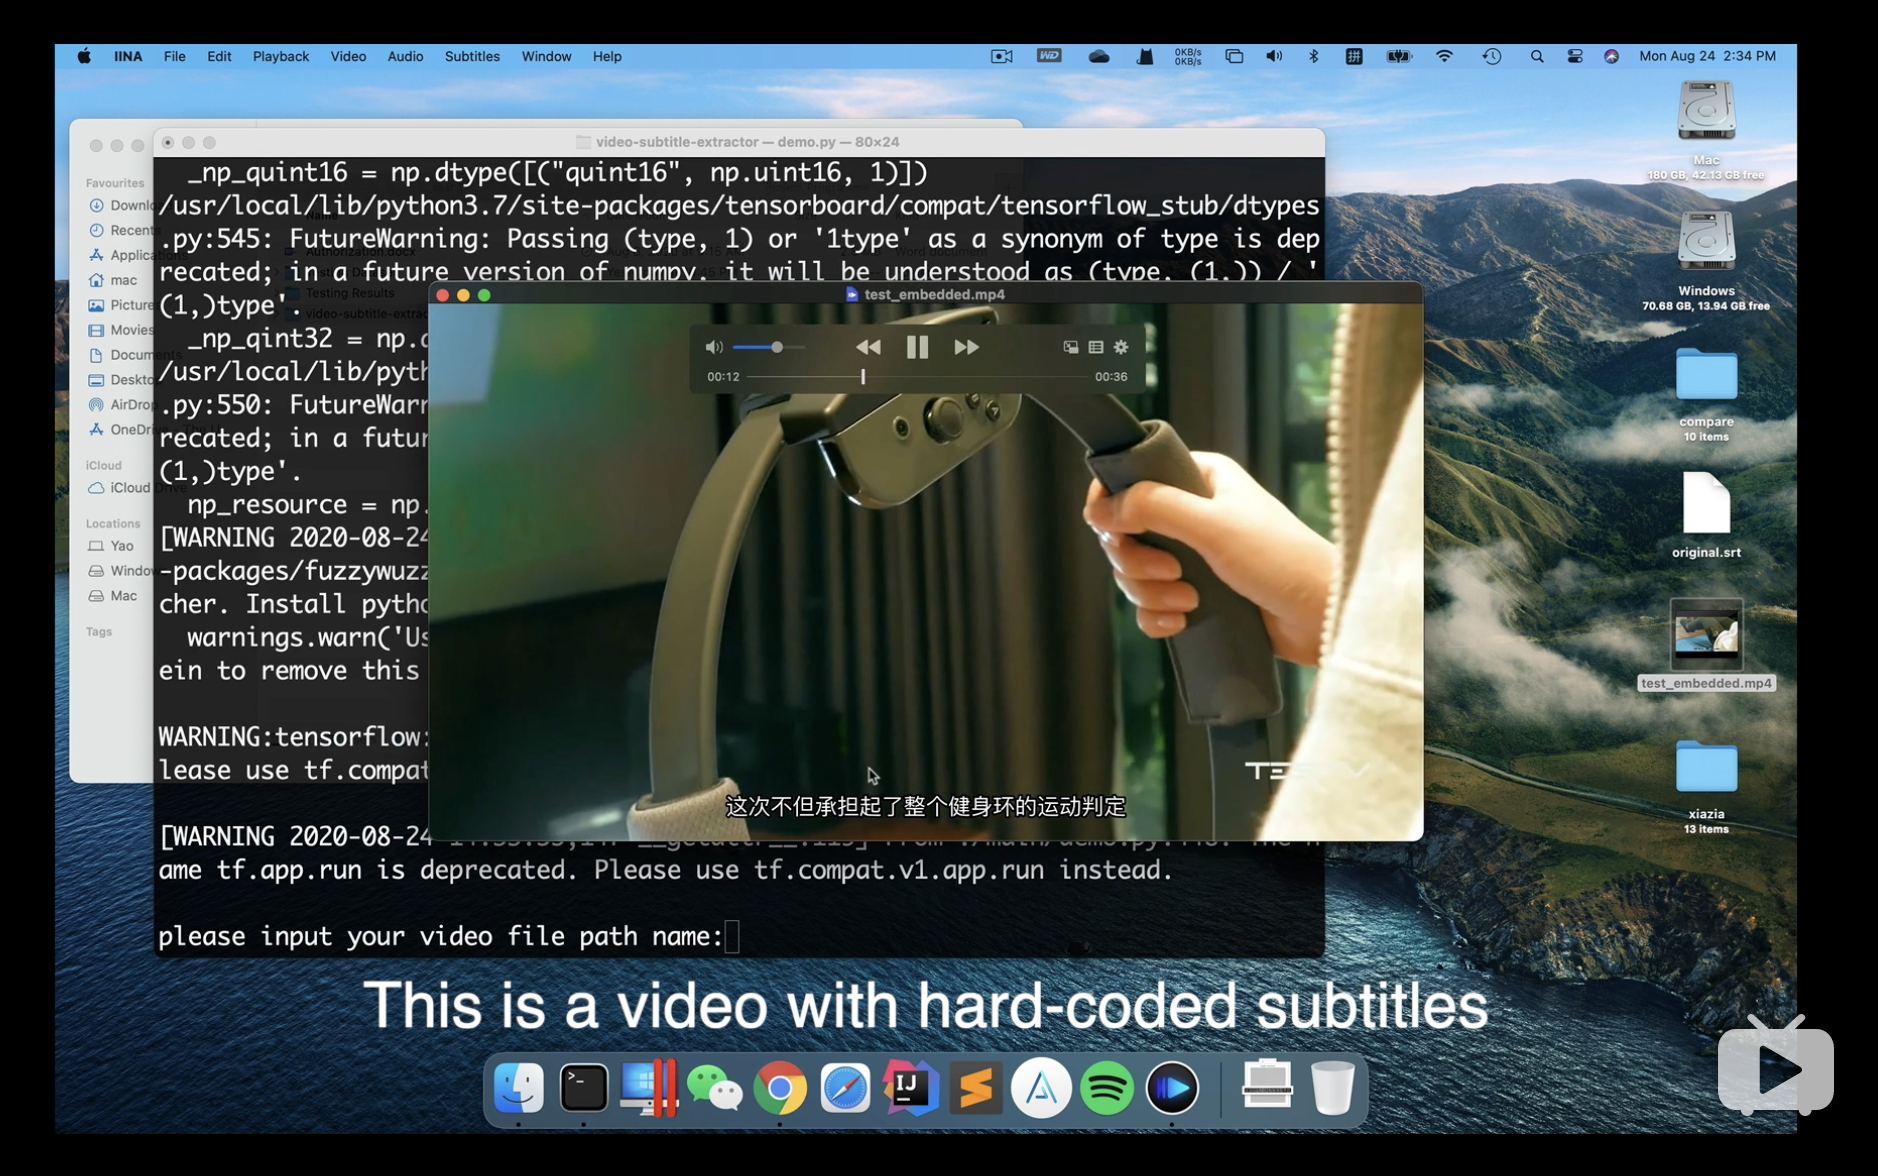
- Command Line Interface (CLI):
- Google Colab Notebook with free GPU:
PS: can only run CLI version on Google Colab
(1) Switch to working directory
cd <your source code path>(2) create and activate conda environment
conda create -n videoEnv python=3.8 pipconda activate videoEnv Before you install dependencies, make sure your python 3.8+ has installed as well as conda virtual environment has created and activated.
-
For users who have CPU only (including Mac users):
-
Install dependencies:
pip install -r requirements.txt
-
-
For users who have NVIDIA graphic card: GPU version can achieve better accuracy
-
Install CUDA and cuDNN
Linux
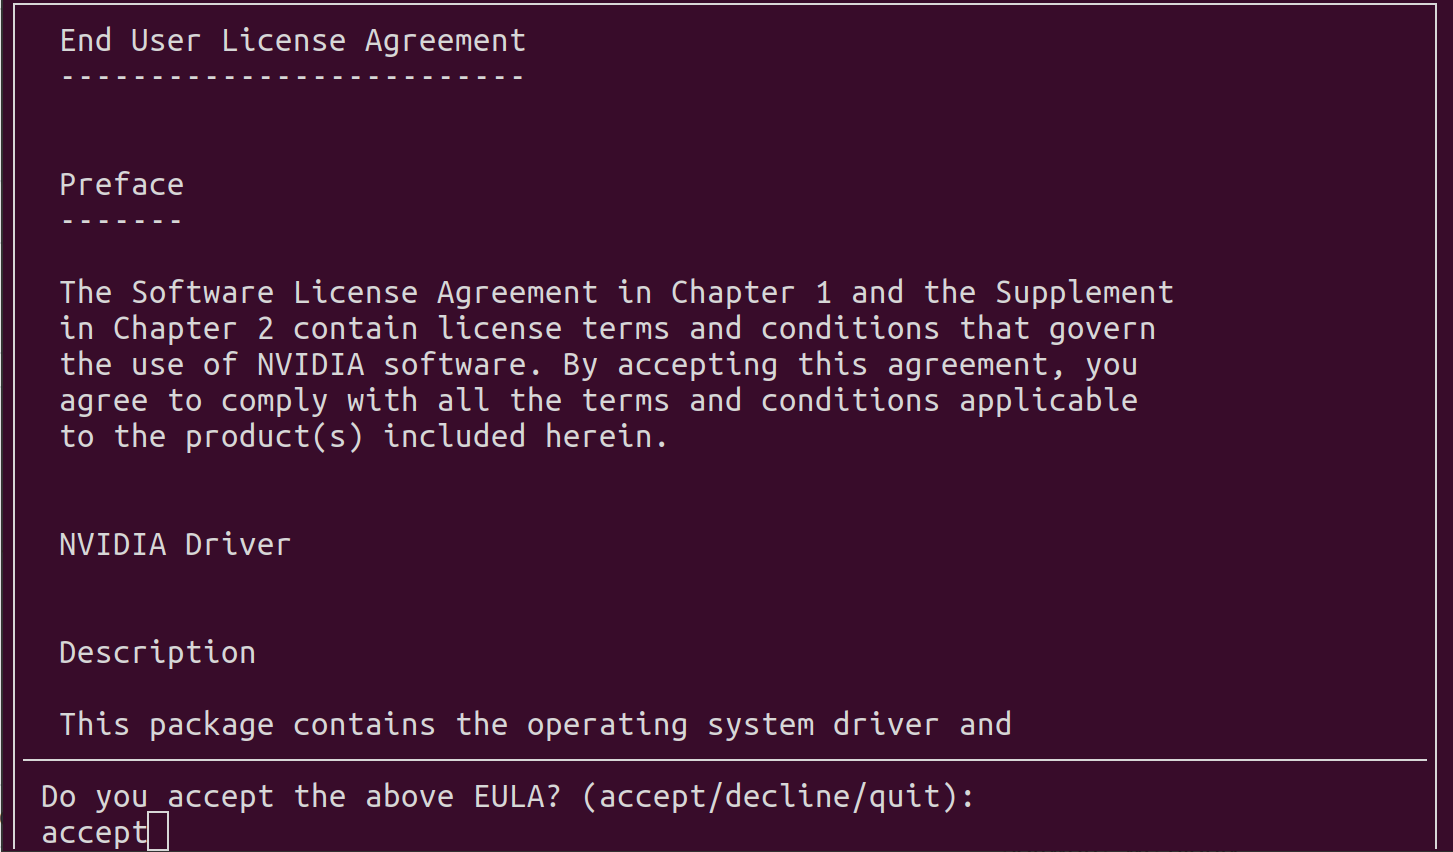
wget https://developer.download.nvidia.com/compute/cuda/11.2.0/local_installers/cuda_11.2.0_460.27.04_linux.runsudo sh cuda_11.2.0_460.27.04_linux.run --override1. Input accept
2. make sure CUDA Toolkit 11.2 is chosen (If you have already installed driver, do not select Driver)
3. Add environment variables
add the following content in ~/.bashrc
# CUDA
  export PATH=/usr/local/cuda-11.2/bin${PATH:+:${PATH}}
  export LD_LIBRARY_PATH=/usr/local/cuda-11.2/lib64${LD_LIBRARY_PATH:+:${LD_LIBRARY_PATH}}
Make sure it works
source ~/.bashrccudnn-11.2-linux-x64-v8.1.1.33.tgz
 tar -zxvf cudnn-11.2-linux-x64-v8.1.1.33.tgz
   sudo cp ./cuda/include/* /usr/local/cuda-11.2/include/
   sudo cp ./cuda/lib64/* /usr/local/cuda-11.2/lib64/
   sudo chmod a+r /usr/local/cuda-11.2/lib64/*
   sudo chmod a+r /usr/local/cuda-11.2/include/*
Windows
cuda_11.6.2_511.65_windows.execudnn-11.3-windows-x64-v8.2.1.32.zip
unzip "cudnn-11.3-windows-x64-v8.2.1.32.zip", then move all files in "bin, include, lib" in cuda directory to C:\Program Files\NVIDIA GPU Computing Toolkit\CUDA\v11.6\
-
Install paddlepaddle:
-
windows:
python -m pip install paddlepaddle-gpu==2.2.2.post112 -f https://www.paddlepaddle.org.cn/whl/windows/mkl/avx/stable.html
-
Linux:
python -m pip install paddlepaddle-gpu==2.2.2.post112 -f https://www.paddlepaddle.org.cn/whl/linux/mkl
If you installed cuda 10.2,please install cuDNN 7.6.5 instead of cuDNN v8.x
If you installed cuda 11.2, please install cuDNN 8.1.1. However, RTX 30xx might be incompatible with cuda 11.2
-
-
Install other dependencies:
pip install -r requirements_gpu.txt
-

- Run GUI version
python gui.py- Run CLI version
python ./backend/main.pySolution: If you are using a nvidia ampere architecture graphic card such as RTX 3050/3060/3070/3080, please use the latest PaddlePaddle version and CUDA 11.6 with cuDNN 8.2.1. Otherwise, check your which cuda and cudnn works with your GPU and then install them.
    _lgeos = CDLL(os.path.join(sys.prefix, 'Library', 'bin', 'geos_c.dll'))
  File "C:\Users\Flavi\anaconda3\envs\subEnv\lib\ctypes\__init__.py", line 364, in __init__
    self._handle = _dlopen(self._name, mode)
OSError: [WinError 126] The specified module could not be found。
Solution:
- Uninstall Shapely
pip uninstall Shapely -y- Reinstall Shapely via conda (make sure you have anaconda or miniconda installed)
conda install Shapely Using Nuitka version 0.6.19, copy all the files of site-packages under the Lib folder of the conda virtual environment to the dependencies folder, and comment all codes relevant to subprocess of image.py under the paddle library dataset, and use the following packaging command:
python -m nuitka --standalone --mingw64 --include-data-dir=D:\vse\backend=backend --include-data-dir=D:\vse\dependencies=dependencies --nofollow-imports --windows-icon-from-ico=D:\vse\design\vse.ico --plugin-enable=tk-inter,multiprocessing --output-dir=out .\gui.pyMake a single .exe file, (pip install zstandard can compress the file):
python -m nuitka --standalone --windows-disable-console --mingw64 --lto no --include-data-dir=D:\vse\backend=backend --include-data-dir=D:\vse\dependencies=dependencies --nofollow-imports --windows-icon-from-ico=D:\vse\design\vse.ico --plugin-enable=tk-inter,multiprocessing --output-dir=out --onefile .\gui.pyThe IDE this project used is supported by Jetbrains