agent的配置说明 #7
Labels
good first issue
Good for newcomers
Comments
Sign up for free
to join this conversation on GitHub.
Already have an account?
Sign in to comment
目前antdeploy一键发布工具针对windows服务器支持以下两种方式一键部署
IIS
Windows服务
由于部署到windows服务器上,要想antdeploy正常工作,首先得确保agent服务在服务器上运行。
什么是agent?
agent是antdeploy部署到windows服务器上使用的配套服务端。它是作为一个windows服务运行的(也可以以控制台的方式运行)。
在发布到linux的docker上是不需要这个agent的。
什么是agent的端口
agent可以理解它是一个webapi,接收antdeploy发过来的指令,比如接收上传数据,部署指令。作为一个webapi所以必须指定它运行的端口。
注意,这个端口号和你实际要发布的项目的端口号是不一样的。
在【AntDeployAgentWindowsService.exe.config】文件里面配置运行的端口
什么是agent的Token
agent部署到windows服务器上之后,不能让它被任何人访问,只有知道Token的人才能通过Antdeploy部署,Token用来保证安全的。
注意,这个Token不是你windows服务器的密码!!!
在【AntDeployAgentWindowsService.exe.config】文件里面配置Token,如果运行中修改Token需要关闭重新运行agent服务
agent安装
下载之后
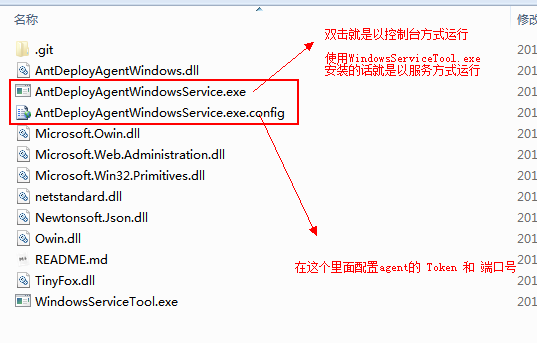
agent文件目录如下
把agent作为服务进部署到服务器
1 打开 AntDeployAgentWindowsService.exe.config 设置 Token 和 端口号
2 以管理员身份运行 WindowsServiceTool.exe
3 点击浏览按钮 选择同目录下的 AntDeployAgentWindowsService.exe
如果是第一次 点击安装按钮
如果非第一次 点击运行按钮 则 启动agent
点击停止按钮 则 停止agent
点击写在按钮 则 卸载agent
【控制台方式运行】如果是本机测试的话可以直接 或者 用上面的方式部署出错的情况下可以
用管理员方式直接双击运行 AntDeployAgentWindowsService.exe
端口号和 token 在 AntDeployAgentWindowsService.exe.config里面配置
如果有报错信息请反馈到qq群或者在下面留言
关于Agent的配置文件的着重说明
这个是配置Token的 就是访问agent的安全参数,默认是aaaa 你请记得修改成安全的!
这个是配置外部访问Agent的端口(也就是agent对外开放的端口),请用一个不常见的,不然很容易端口冲突导致agent启动不了
-是否启用备份 true代表备份 false 代表不备份 不填=true
配置Mac白名单地址列表 多个用半角逗号隔开,如果配置了在发布的时候会校验是否是mac白名单,不是的话 不让发布
每个项目的发布版本历史记录会保底留存10个(写死的),对于超过的会走日期比对(当前服务器时间-版本批次日期)>10(下面配置) 的发布文件夹会被删除,防止磁盘占用过大 10代表10天 不填默认10
也就是说如果你的历史版本没到10个 是不会触发日期比对的也就不会删除啦!
发布使用目录 为空代表当前目录 如果填写D:\test 代表使用D盘下的test文件夹
建议为空那么就是使用agent的默认工作目录(和agent在同一个目录)。
The text was updated successfully, but these errors were encountered: