- 并行、并发区别:
并行是指程序的运行状态,要有两个线程正在执行才能算是Parallelism;并发指程序的逻辑结构,Concurrency则只要有两个以上线程还在执行过程中即可。简单地说,Parallelism要在多核或者多处理器情况下才能做到,而Concurrency则不需要。
请阅读下面这段代码,看看有什么问题?
为什么先从下面这段代码出发,是因为在之前的经验里面我们写了大量类似的代码,之前没有意识到这个问题,并且还因为这种代码出现过短暂的事故
// Week03/blog/01/01.go
package main

import (
	"log"
	"net/http"
	_ "net/http/pprof"
)

func setup() {
	// 这里面有一些初始化的操作
}

func main() {
	setup()

	// 主服务
	server()

	// for debug
	pprof()

	select {}
}

func server() {
	go func() {
		mux := http.NewServeMux()
		mux.HandleFunc("/ping", func(w http.ResponseWriter, r *http.Request) {
			w.Write([]byte("pong"))
		})

		// 主服务
		if err := http.ListenAndServe(":8080", mux); err != nil {
			log.Panicf("http server err: %+v", err)
			return
		}
	}()
}

func pprof() {
	// 辅助服务,监听了其他端口,这里是 pprof 服务,用于 debug
	go http.ListenAndServe(":8081", nil)
}
灵魂拷问来了,请问:
- 如果
server是在其他包里面,如果没有特殊说明,你知道这是一个异步调用么? main函数当中最后在哪里空转干什么?会不会存在浪费?- 如果线上出现事故,debug 服务已经退出,你想要 debug 这时你是否很茫然?
- 如果某一天服务突然重启,你却找不到事故日志,你是否能想起这个
8081端口的服务?
请把是否并发的选择权交给你的调用者,而不是自己就直接悄悄的用上了 goroutine 下面这次改动将两个函数是否并发操作的选择权留给了 main 函数
package main

import (
	"log"
	"net/http"
	_ "net/http/pprof"
)

func setup() {
	// 这里面有一些初始化的操作
}

func main() {
	setup()

	// for debug
	go pprof()

	// 主服务
	go server()

	select {}
}

func server() {
	mux := http.NewServeMux()
	mux.HandleFunc("/ping", func(w http.ResponseWriter, r *http.Request) {
		w.Write([]byte("pong"))
	})

	// 主服务
	if err := http.ListenAndServe(":8080", mux); err != nil {
		log.Panicf("http server err: %+v", err)
		return
	}
}

func pprof() {
	// 辅助服务,监听了其他端口,这里是 pprof 服务,用于 debug
	http.ListenAndServe(":8081", nil)
}一般情况下,不要让主进程成为一个旁观者,明明可以干活,但是最后使用了一个 select 在那儿空跑
感谢上一步将是否异步的选择权交给了我( main ),在旁边看着也怪尴尬的
package main

import (
	"log"
	"net/http"
	_ "net/http/pprof"
)

func setup() {
	// 这里面有一些初始化的操作
}

func main() {
	setup()

	// for debug
	go pprof()

	// 主服务
	server()
}

func server() {
	mux := http.NewServeMux()
	mux.HandleFunc("/ping", func(w http.ResponseWriter, r *http.Request) {
		w.Write([]byte("pong"))
	})

	// 主服务
	if err := http.ListenAndServe(":8080", mux); err != nil {
		log.Panicf("http server err: %+v", err)
		return
	}
}

func pprof() {
	// 辅助服务,监听了其他端口,这里是 pprof 服务,用于 debug
	http.ListenAndServe(":8081", nil)
}我们再做一些改造,使用 channel 来控制,解释都写在代码注释里面了
package main

import (
	"context"
	"fmt"
	"log"
	"net/http"
	_ "net/http/pprof"
	"time"
)

func setup() {
	// 这里面有一些初始化的操作
}

func main() {
	setup()

	// 用于监听服务退出
	done := make(chan error, 2)
	// 用于控制服务退出,传入同一个 stop,做到只要有一个服务退出了那么另外一个服务也会随之退出
	stop := make(chan struct{}, 0)
	// for debug
	go func() {
		done <- pprof(stop)
	}()

	// 主服务
	go func() {
		done <- app(stop)
	}()

	// stoped 用于判断当前 stop 的状态
	var stoped bool
	// 这里循环读取 done 这个 channel
	// 只要有一个退出了,我们就关闭 stop channel
	for i := 0; i < cap(done); i++ {
		if err := <-done; err != nil {
			log.Printf("server exit err: %+v", err)
		}

		if !stoped {
			stoped = true
			close(stop)
		}
	}
}

func app(stop <-chan struct{}) error {
	mux := http.NewServeMux()
	mux.HandleFunc("/ping", func(w http.ResponseWriter, r *http.Request) {
		w.Write([]byte("pong"))
	})

	return server(mux, ":8080", stop)
}

func pprof(stop <-chan struct{}) error {
	// 注意这里主要是为了模拟服务意外退出,用于验证一个服务退出,其他服务同时退出的场景
	go func() {
		server(http.DefaultServeMux, ":8081", stop)
	}()

	time.Sleep(5 * time.Second)
	return fmt.Errorf("mock pprof exit")
}

// 启动一个服务
func server(handler http.Handler, addr string, stop <-chan struct{}) error {
	s := http.Server{
		Handler: handler,
		Addr:    addr,
	}

	// 这个 goroutine 我们可以控制退出,因为只要 stop 这个 channel close 或者是写入数据,这里就会退出
	// 同时因为调用了 s.Shutdown 调用之后,http 这个函数启动的 http server 也会优雅退出
	go func() {
		<-stop
		log.Printf("server will exiting, addr: %s", addr)
		s.Shutdown(context.Background())
	}()

	return s.ListenAndServe()
}
Copy
我们看一下返回结果,这个代码启动 5s 之后就会退出程序
❯ go run ./01_goroutine/04
2020/12/08 21:49:43 server exit err: mock pprof exit
2020/12/08 21:49:43 server will exiting, addr: :8081
2020/12/08 21:49:43 server will exiting, addr: :8080
2020/12/08 21:49:43 server exit err: http: Server closed
再来看下面一个例子,这也是常常会用到的操作
func leak(w http.ResponseWriter, r *http.Request) {
	ch := make(chan bool, 0)
	go func() {
		fmt.Println("异步任务做一些操作")
		<-ch
	}()

	w.Write([]byte("will leak"))
}
复用一下上面的 server 代码,我们经常会写出这种类似的代码
- http 请求来了,我们启动一个 goroutine 去做一些耗时一点的工作
- 然后返回了
- 然后之前创建的那个 goroutine 阻塞了
- 然后就泄漏了
这个其实就是优雅退出的问题,我们可能启动了很多的 goroutine 去处理一些问题,但是服务退出的时候我们并没有考虑到就直接退出了。例如退出前日志没有 flush 到磁盘,我们的请求还没完全关闭,异步 worker 中还有 job 在执行等等。 我们也来看一个例子,假设现在有一个埋点服务,每次请求我们都会上报一些信息到埋点服务上
软件(编译器)或硬件(CPU)系统可以根据其对代码的分析结果,一定程度上打乱代码的执行顺序,以达到其不可告人的目的(提高 CPU 利用率)
所以我们在编写并发程序的时候一定要小心,然后回到我们本次的主题 Go 内存模型,就是要解决两个问题,一个是要了解谁先谁后,有个专有名词叫 Happens Before ,另外一个就是了解可见性的问题,我这次读取能不能看到另外一个线程的写入
接下来我们官方的文档《The Go Memory Model》的思路一步一步的了解这些问题,因为官方的文档写的相对比较精炼,所以会比较难懂,我会尝试加入一些我的理解补充说明。
Programs that modify data being simultaneously accessed by multiple goroutines must serialize such access. To serialize access, protect the data with channel operations or other synchronization primitives such as those in the
syncandsync/atomicpackages.
这个是说如果你的程序存在多个 goroutine 去访问数据的时候,**必须序列化的访问,**如何保证序列化呢?我们可以采用 channel 或者是 sync 以及 sync/atomic 下面提供的同步语义来保证
Within a single goroutine, reads and writes must behave as if they executed in the order specified by the program. That is, compilers and processors may reorder the reads and writes executed within a single goroutine only when the reordering does not change the behavior within that goroutine as defined by the language specification. Because of this reordering, the execution order observed by one goroutine may differ from the order perceived by another. For example, if one goroutine executes a = 1; b = 2;, another might observe the updated value of b before the updated value of a.
这段话就解释了上面我们示例当中为什么会出现 2 0 这种情况。
这段话就是说我们在单个 goroutine 当中的编写的代码会总是按照我们编写代码的顺序来执行
- 当然这个也是符合我们的习惯的
- 当然这并不表示编译器在编译的时候不会对我们的程序进行指令重排
- 而是说只会在不影响语言规范对 goroutine 的行为定义的时候,编译器和 CPU 才会对读取和写入的顺序进行重新排序。
但是正是因为存在这种重排的情况,所以一个 goroutine 监测到的执行顺序和另外一个 goroutine 监测到的有可能不一样。就像我们最上面的这个例子一样,可能我们在 f 执行的顺序是先执行 a = 1 后执行 b = 2 但是在 g 中我们只看到了 b = 2 具体什么情况可能会导致这个呢?不要着急,我们后面还会说到
我们来看参考文章中的一个编译器重排例子
X = 0
for i in range(100):
    X = 1
    print X
Copy
在这段代码中,X = 1 在 for 循环内部被重复赋值了 100 次,这完全没有必要,于是聪明的编译器就会帮助我们优化成下面的样子
X = 1
for i in range(100):
    print X
Copy
完美,在单个 goroutine 中并不会改变程序的执行,这时候同样会输出 100 次 1 ,并且减少了 100 次赋值操作。 但是,如果与此同时我们存在一个另外一个 goroutine 干了另外一个事情 X = 0 那么,这个输出就变的不可预知了,就有可能是 1001111101… 这种,所以回到刚开始的忠告:这个是说如果你的程序存在多个 goroutine 去访问数据的时候,必须序列化的访问
To specify the requirements of reads and writes, we define happens before, a partial order on the execution of memory operations in a Go program. If event
e1happens before evente2, then we say thate2happens aftere1. Also, ife1does not happen beforee2and does not happen aftere2, then we say thate1ande2happen concurrently.
这是 Happens Before 的定义,如果 e1 发生在 e2 之前,那么我们就说 e2 发生在 e1 之后,如果 e1 既不在 e2 前,也不在 e2 之后,那我们就说这俩是并发的
Within a single goroutine, the happens-before order is the order expressed by the program.
这就是我们前面提到的,在单个 goroutine 当中,事件发生的顺序,就是程序所表达的顺序
A read r of a variable
vis allowed to observe a writewtovif both of the following hold:
- r does not happen before
w.- There is no other write
w'tovthat happens after w but beforer.
假设我们现在有一个变量 v,然后只要满足下面的两个条件,那么读取操作 r 就可以对这个变量 v 的写入操作 w 进行监测
- 读取操作
r发生在写入操作w之后 - 并且在
w之后,r之前没有其他对v的写入操作w'
注意这里说的只是读取操作 r 可以对 w 进行监测,但是能不能读到呢,可能可以也可能不行
To guarantee that a read
rof a variablevobserves a particular writewtov, ensure thatwis the only writeris allowed to observe. That is,ris guaranteed to observewif both of the following hold:
whappens beforer.- Any other write to the shared variable
veither happens beforewor afterr.
为确保对变量 v 的读取操作 r 能够监测到特定的对 v 进行写入的操作 w,需确保 w 是唯一允许被 r 监测的写入操作。也就是说,若以下条件均成立,则 r 能保证监测到 w:
w发生在r之前。- 对共享变量
v的其它任何写入操作都只能发生在w之前或r之后。
这对条件的要求比第一个条件更强,它需要确保没有其它写入操作与 w 或 r 并发。
在单个 goroutine 当中这两个条件是等价的,因为单个 goroutine 中不存在并发,在多个 goroutine 中就必须使用同步语义来确保顺序,这样才能到保证能够监测到预期的写入
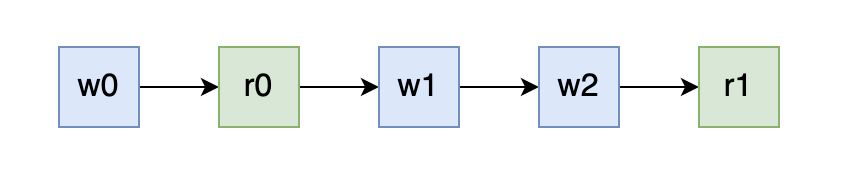
单个 goroutine 的情况:
我们可以发现在单个 goroutine 当中,读取操作 r 总是可以读取到上一次 w 写入的值的
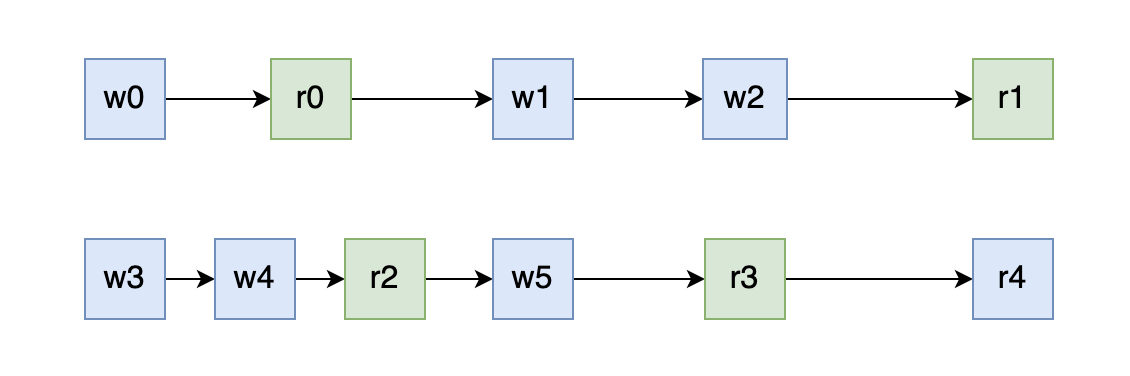
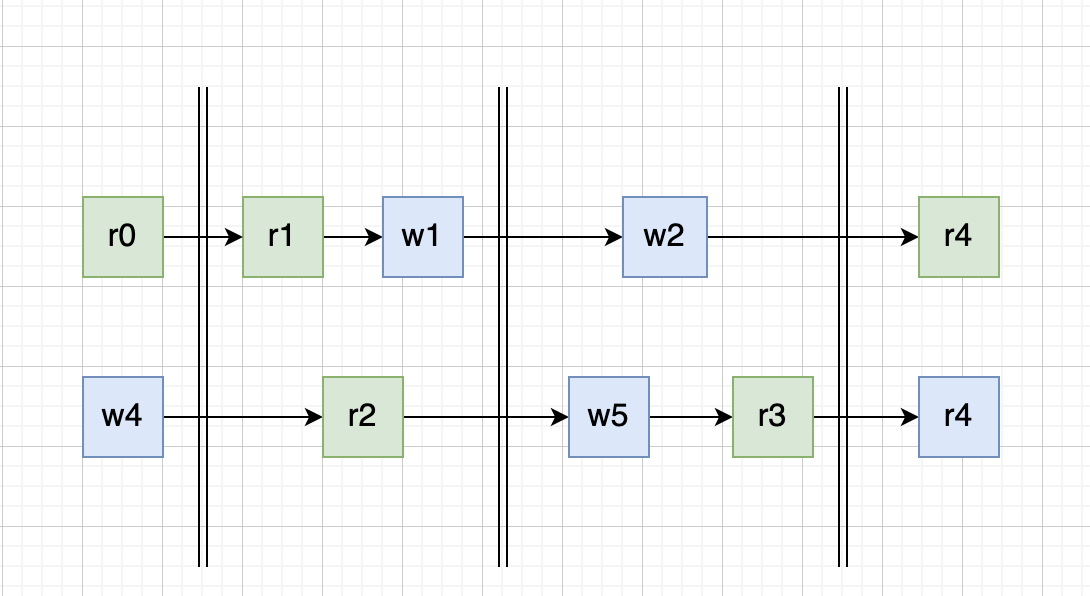
多个 goroutine 的情况:
但是存在多个 goroutine 的时候这个就不一定了,r0 读到的是 哪一次写入的值呢?如果看图的话像是 w4 的,但其实不一定,因为图中的两个 goroutine 所表达的时间维度可能是不一致的,所以 r0 可能读到的是 w0 w3 w4 甚至是 w5 的结果,当然按照我们前面说的理论,读到的不可能是 w1 的结果的
The initialization of variable
vwith the zero value forv‘s type behaves as a write in the memory model.
以变量 v 所属类型的零值来对 v 进行初始化,其表现如同在内存模型中进行的写入操作。
Reads and writes of values larger than a single machine word behave as multiple machine-word-sized operations in an unspecified order.
对大于单个机器字的值进行读取和写入,其表现如同以不确定的顺序对多个机器字大小的值进行操作。要理解这个我们首先要理解什么是机器字。 我们现在常见的还有 32 位系统和 64 位的系统,cpu 在执行一条指令的时候对于单个机器字长的的数据的写入可以保证是原子的,对于 32 位的就是 4 个字节,对于 64 位的就是 8 个字节,对于在 32 位情况下去写入一个 8 字节的数据时就需要执行两次写入操作,这两次操作之间就没有原子性,那就可能出现先写入后半部分的数据再写入前半部分,或者是写入了一半数据然后写入失败的情况。 也就是说虽然有时候我们看着仅仅只做了一次写入但是还是会有并发问题,因为它本身不是原子的
Program initialization runs in a single goroutine, but that goroutine may create other goroutines, which run concurrently. If a package
pimports packageq, the completion ofq‘sinitfunctions happens before the start of any ofp‘s. The start of the functionmain.mainhappens after allinitfunctions have finished.
-
程序的初始化运行在单个 goroutine 中,但该 goroutine 可能会创建其它并发运行的 goroutine
-
若包 p 导入了包 q,则 q 的 init 函数会在 p 的任何函数启动前完成。
-
函数 main.main 会在所有的 init 函数结束后启动。
注意: 在实际的应用代码中不要隐式的依赖这个启动顺序
The
gostatement that starts a new goroutine happens before the goroutine’s execution begins.
go 语句会在 goroutine 开始执行前启动它
The exit of a goroutine is not guaranteed to happen before any event in the program。
goroutine 无法确保在程序中的任何事件发生之前退出
注意 《The Go Memory Model》原文中还有关于 channel, 锁相关的阐述,因为篇幅原因在本文中就不多讲了,后面我们还有单独的文章详细讲 channel 和 锁 相关的使用,在强调一遍,原文一定要多看几遍
之前我们提到了很多次在多个 goroutine 对同一个变量的数据进行修改的时候会出现很多奇奇怪怪的问题,那我们有没有什么办法检测它呢,除了通过我们聪明的脑袋?
答案就是 data race tag,go 官方早在 1.1 版本就引入了数据竞争的检测工具,我们只需要在执行测试或者是编译的时候加上 -race 的 flag 就可以开启数据竞争的检测
go test -race ./...
go build -race
不建议在生产环境 build 的时候开启数据竞争检测,因为这会带来一定的性能损失(一般内存5-10倍,执行时间2-20倍),当然 必须要 debug 的时候除外。 建议在执行单元测试时始终开启数据竞争的检测。
我们来直接看一下下面的这个例子,这是来自课上的一个例子,但是我稍稍做了一些改造,源代码没有跑 10w 次这个操作,会导致看起来每次跑的结果都是差不多的,我们只需要把这个次数放大就可以发现每次结果都会不一样
package main

import (
	"fmt"
	"sync"
)

var wg sync.WaitGroup
var counter int

func main() {
	// 多跑几次来看结果
	for i := 0; i < 100000; i++ {
		run()
	}
}

func run() {
	for i := 1; i <= 2; i++ {
		wg.Add(1)
		go routine(i)
	}
	wg.Wait()
	fmt.Printf("Final Counter: %d\n", counter)
}

func routine(id int) {
	for i := 0; i < 2; i++ {
		value := counter
		value++
		counter = value
	}
	wg.Done()
}
我执行了三次每次的结果都不一致,分别是:
Final Counter: 399996
Final Counter: 399989
Final Counter: 399988
Copy
为什么会导致这样的结果呢,是因为每一次执行的时候,我们都使用 go routine(i) 启动了两个 goroutine,但是我们并没有控制它的执行顺序,那就有好几种可能了,我这里描述两种情况
- 执行一次
run(),counter + 4这种情况下,第二个 goroutine 开始执行时,拿到了第一个 goroutine 的执行结果,也就是value := counter这一步时,value = 2 - 执行一次
run(),counter + 2这种情况下,第二个 goroutine 开始执行时,没有拿到了第一个 goroutine 的执行结果,也就是value := counter这一步时,counter 还是零值,这时候 value = 0
当然由于种种不确定性,所有肯定不止这两种情况,但是这个不是本文讨论的重点,具体的原因可以结合上一篇文章 Week03: Go 并发编程(二) Go 内存模型 进行思考
可以发现,写出这种代码时上线后如果出现 bug 会非常难定位,因为你不知道到底是哪里出现了问题,所以我们就要在测试阶段就结合 data race 工具提前发现问题。 我们执行以下命令
go run -race ./main.go会发现结果会所有的都输出, data race 的报错信息,我们已经看不到了,因为终端的打印的太长了,可以发现的是,最后打印出发现了一处 data race 并且推出码为 66
Final Counter: 399956
Final Counter: 399960
Found 1 data race(s)
exit status 66问题来了,我们有没有什么办法可以立即知道 data race 的报错呢?
答案就在官方的文档当中,我们可以通过设置 GORACE 环境变量,来控制 data race 的行为, 格式如下:
GORACE="option1=val1 option2=val2"可选配置:
| 配置 | 默认值 | 说明 |
|---|---|---|
| log_path | stderr | 日志文件的路径,除了文件路径外支持 stderr, stdout 这两个特殊值 |
| exitcode | 66 | 退出码 |
| strip_path_prefix | “” | 从日志中的文件信息里面去除相关的前缀,可以去除本地信息,同时会更好看 |
| history_size | 1 | per-goroutine 内存访问历史记录为 32K * 2 ** history_size,增加这个可以避免出现堆栈还原失败的错误,但是增加这个会导致使用的内存也跟着增加 |
| halt_on_error | 0 | 用来控制第一个数据竞争错误出现后是否立即退出 |
| atexit_sleep_ms | 100 | 用来控制 main 退出之前 sleep 的时间 |
有了这个背景知识后就很简单了,在我们这个场景我们可以控制发现数据竞争后直接退出
GORACE="halt_on_error=1 strip_path_prefix=/home/ll/project/Go-000/Week03/blog/03_sync/01_data_race" go run -race ./main.go重新执行后我们的结果
==================
WARNING: DATA RACE
Read at 0x00000064a9c0 by goroutine 7:
  main.routine()
      /main.go:29 +0x47

Previous write at 0x00000064a9c0 by goroutine 8:
  main.routine()
      /main.go:31 +0x64

Goroutine 7 (running) created at:
  main.run()
      /main.go:21 +0x75
  main.main()
      /main.go:14 +0x38

Goroutine 8 (finished) created at:
  main.run()
      /main.go:21 +0x75
  main.main()
      /main.go:14 +0x38
==================
exit status 66
这个结果非常清晰的告诉了我们在 29 行这个地方我们有一个 goroutine 在读取数据,但是呢,在 31 行这个地方又有一个 goroutine 在写入,所以产生了数据竞争。 然后下面分别说明这两个 goroutine 是什么时候创建的,已经当前是否在运行当中。
接来下我们再来看一些典型案例,这些案例都来自 go 官方的文档 Data Race Detector,这些也是初学者很容易犯的错误
func main() {
	var wg sync.WaitGroup
	wg.Add(5)
	for i := 0; i < 5; i++ {
		go func() {
			fmt.Println(i) // Not the 'i' you are looking for.
			wg.Done()
		}()
	}
	wg.Wait()
}
如果你去找一些 go 的面试题,肯定能找到类似的例子,然后会问你这里会输出什么? 常见的答案就是会输出 5 个 5,因为在 for 循环的 i++ 会执行的快一些,所以在最后打印的结果都是 5 这个答案不能说不对,因为真的执行的话大概率也是这个结果,但是不全 因为这里本质上是有数据竞争,在新启动的 goroutine 当中读取 i 的值,在 main 中写入,导致出现了 data race,这个结果应该是不可预知的,因为我们不能假定 goroutine 中 print 就一定比外面的 i++ 慢,习惯性的做这种假设在并发编程中是很有可能会出问题的
func main() {
	var wg sync.WaitGroup
	wg.Add(5)
	for i := 0; i < 5; i++ {
		go func(i int) {
			fmt.Println(i)
			wg.Done()
		}(i)
	}
	wg.Wait()
}
这个要修改也很简单,只需要将 i 作为参数传入即可,这样每个 goroutine 拿到的都是拷贝后的数据
package main

import "os"

func main() {
	ParallelWrite([]byte("xxx"))
}

// ParallelWrite writes data to file1 and file2, returns the errors.
func ParallelWrite(data []byte) chan error {
	res := make(chan error, 2)
	f1, err := os.Create("/tmp/file1")
	if err != nil {
		res <- err
	} else {
		go func() {
			// This err is shared with the main goroutine,
			// so the write races with the write below.
			_, err = f1.Write(data)
			res <- err
			f1.Close()
		}()
	}
	f2, err := os.Create("/tmp/file2") // The second conflicting write to err.
	if err != nil {
		res <- err
	} else {
		go func() {
			_, err = f2.Write(data)
			res <- err
			f2.Close()
		}()
	}
	return res
}
我们使用 go run -race main.go 执行,可以发现这里报错的地方是,19 行和 24 行,有 data race,这里主要是因为共享了 err 这个变量
==================
WARNING: DATA RACE
Write at 0x00c0000a01a0 by goroutine 7:
  main.ParallelWrite.func1()
      /home/ll/project/Go-000/Week03/blog/03_data_race/03/main.go:19 +0x94

Previous write at 0x00c0000a01a0 by main goroutine:
  main.ParallelWrite()
      /home/ll/project/Go-000/Week03/blog/03_data_race/03/main.go:24 +0x1dd
  main.main()
      /home/ll/project/Go-000/Week03/blog/03_data_race/03/main.go:6 +0x84

Goroutine 7 (running) created at:
  main.ParallelWrite()
      /home/ll/project/Go-000/Week03/blog/03_data_race/03/main.go:16 +0x336
  main.main()
      /home/ll/project/Go-000/Week03/blog/03_data_race/03/main.go:6 +0x84
==================
Found 1 data race(s)
exit status 66
修改的话只需要在两个 goroutine 中使用新的临时变量就行了
...
_, err := f1.Write(data)
...
_, err := f2.Write(data)
...
细心的同学可能会有这个疑问,在 24 行不也是重新赋值了么,为什么在这里会和 19 行产生 data race 呢? 这是由于 go 的语法规则导致的,我们在初始化变量的时候如果在同一个作用域下,如下方代码,这里使用的 err 其实是同一个变量,只是 f1 f2 不同,具体可以看 effective go 当中 Redeclaration and reassignment 的内容
f1, err := os.Create("a")
f2, err := os.Create("b")var service = map[string]string{}
// RegisterService RegisterService
func RegisterService(name, addr string) {
service[name] = addr
}
// LookupService LookupService
func LookupService(name string) string {
return service[name]
}这个也是很容易犯的一个错,在之前写 Go 设计模式这个系列文章的时候,应该有提到过我们要写出可测性比较高的代码就要少用或者是尽量避免用全局变量,使用 map 作为全局变量比较常见的一种情况就是配置信息。关于全局变量的话一般的做法就是加锁,就本文这个问题也可以使用 sync.Map 这个下一篇文章会讲,这里篇幅有限就不多讲了
var (
	service   map[string]string
	serviceMu sync.Mutex
)

func RegisterService(name, addr string) {
	serviceMu.Lock()
	defer serviceMu.Unlock()
	service[name] = addr
}

func LookupService(name string) string {
	serviceMu.Lock()
	defer serviceMu.Unlock()
	return service[name]
}type Watchdog struct{ last int64 }
func (w *Watchdog) KeepAlive() {
w.last = time.Now().UnixNano() // First conflicting access.
}
func (w *Watchdog) Start() {
go func() {
for {
time.Sleep(time.Second)
// Second conflicting access.
if w.last < time.Now().Add(-10*time.Second).UnixNano() {
fmt.Println("No keepalives for 10 seconds. Dying.")
os.Exit(1)
}
}
}()
}同样成员变量也会有这个问题,这里可以用 atomic 包来解决,同样这个我们下篇文章会细讲
type Watchdog struct{ last int64 }

func (w *Watchdog) KeepAlive() {
	atomic.StoreInt64(&w.last, time.Now().UnixNano())
}

func (w *Watchdog) Start() {
	go func() {
		for {
			time.Sleep(time.Second)
			if atomic.LoadInt64(&w.last) < time.Now().Add(-10*time.Second).UnixNano() {
				fmt.Println("No keepalives for 10 seconds. Dying.")
				os.Exit(1)
			}
		}
	}()
}dava 在博客中提到过一个很有趣的例子的 Ice cream makers and data races
package main

import "fmt"

type IceCreamMaker interface {
	// Great a customer.
	Hello()
}

type Ben struct {
	name string
}

func (b *Ben) Hello() {
	fmt.Printf("Ben says, \"Hello my name is %s\"\n", b.name)
}

type Jerry struct {
	name string
}

func (j *Jerry) Hello() {
	fmt.Printf("Jerry says, \"Hello my name is %s\"\n", j.name)
}

func main() {
	var ben = &Ben{name: "Ben"}
	var jerry = &Jerry{"Jerry"}
	var maker IceCreamMaker = ben

	var loop0, loop1 func()

	loop0 = func() {
		maker = ben
		go loop1()
	}

	loop1 = func() {
		maker = jerry
		go loop0()
	}

	go loop0()

	for {
		maker.Hello()
	}
}
这个例子有趣的点在于,最后输出的结果会有这种例子
Ben says, "Hello my name is Jerry"
Ben says, "Hello my name is Jerry"
这是因为我们在 maker = jerry 这种赋值操作的时候并不是原子的,在上一篇文章中我们讲到过,只有对 single machine word 进行赋值的时候才是原子的,虽然这个看上去只有一行,但是 interface 在 go 中其实是一个结构体,它包含了 type 和 data 两个部分,所以它的复制也不是原子的,会出现问题
type interface struct {
       Type uintptr     // points to the type of the interface implementation
       Data uintptr     // holds the data for the interface's receiver
}
这个案例有趣的点还在于,这个案例的两个结构体的内存布局一模一样所以出现错误也不会 panic 退出,如果在里面再加入一个 string 的字段,去读取就会导致 panic,但是这也恰恰说明这个案例很可怕,这种错误在线上实在太难发现了,而且很有可能会很致命。 这个案例还有一个衍生案例,大家有兴趣可以点开查看一下,并不是说要看起来一样才不会 panic https://www.ardanlabs.com/blog/2014/06/ice-cream-makers-and-data-races-part-ii.html
我们先来看一下上一篇文章说到的例子应该怎么改
var mu sync.Mutex

func main() {
	for i := 1; i <= 2; i++ {
		wg.Add(1)
		go routine(i)
	}
	wg.Wait()
	fmt.Printf("Final Counter: %d\n", counter)
}

func routine(id int) {
	for i := 0; i < 2; i++ {
		mu.Lock()
		counter++
		mu.Unlock()
	}
	wg.Done()
}
这里主要的目的就是为了保护我们临界区的数据,通过锁来进行保证。锁的使用非常的简单,但是还是有几个需要注意的点
- 锁的范围要尽量的小,不要搞很多大锁
- 用锁一定要解锁,小心产生死锁
读写锁相对于互斥锁来说粒度更细,使用读写锁可以并发读,但是不能并发读写,或者并发写写
| 读 | 写 | |
|---|---|---|
| 读 | Y | N |
| 写 | N | N |
其实大部分的业务应用都是读多写少的场景,这个时候使用读写锁的性能就会比互斥锁要好一些,例如下面的这个例子,是一个配置读写的例子,我们分别使用读写锁和互斥锁实现
// RWMutexConfig 读写锁实现
type RWMutexConfig struct {
	rw   sync.RWMutex
	data []int
}

// Get get config data
func (c *RWMutexConfig) Get() []int {
	c.rw.RLock()
	defer c.rw.RUnlock()
	return c.data
}

// Set set config data
func (c *RWMutexConfig) Set(n []int) {
	c.rw.Lock()
	defer c.rw.Unlock()
	c.data = n
}
互斥锁实现
// MutexConfig 互斥锁实现
type MutexConfig struct {
	data []int
	mu   sync.Mutex
}

// Get get config data
func (c *MutexConfig) Get() []int {
	c.mu.Lock()
	defer c.mu.Unlock()
	return c.data
}

// Set set config data
func (c *MutexConfig) Set(n []int) {
	c.mu.Lock()
	defer c.mu.Unlock()
	c.data = n
}
并发基准测试
type iConfig interface {
	Get() []int
	Set([]int)
}

func bench(b *testing.B, c iConfig) {
	b.RunParallel(func(p *testing.PB) {
		for p.Next() {
			c.Set([]int{100})
			c.Get()
			c.Get()
			c.Get()
			c.Set([]int{100})
			c.Get()
			c.Get()
		}
	})
}

func BenchmarkMutexConfig(b *testing.B) {
	conf := &MutexConfig{data: []int{1, 2, 3}}
	bench(b, conf)
}

func BenchmarkRWMutexConfig(b *testing.B) {
	conf := &RWMutexConfig{data: []int{1, 2, 3}}
	bench(b, conf)
}
执行结果
❯ go test -race -bench=.
goos: linux
goarch: amd64
pkg: github.com/mohuishou/go-training/Week03/blog/04_sync/02_rwmutex
BenchmarkMutexConfig-4            179577              6912 ns/op
BenchmarkRWMutexConfig-4          341620              3425 ns/op
PASS
ok      github.com/mohuishou/go-training/Week03/blog/04_sync/02_rwmutex 3.565s
可以看到首先是没有 data race 问题,其次读写锁的性能几乎是互斥锁的一倍
上一篇文章我们在讲读写锁的时候讲到了一个配置读取的例子,这里我们使用 atomic 实现看一下
// Config atomic 实现
type Config struct {
	v atomic.Value // 假设 data 就是整个 config 了
}

// Get get config data
func (c *Config) Get() []int {
	// 这里偷个懒,不要学
	return (*c.v.Load().(*[]int))
}

// Set set config data
func (c *Config) Set(n []int) {
	c.v.Store(&n)
}
跑一个一样的测试,可以发现 atomic 的性能又好上了许多
❯ go test -race -bench=.
goos: linux
goarch: amd64
pkg: github.com/mohuishou/go-training/Week03/blog/05_atomic
BenchmarkMutexConfig-4           1021684              1121 ns/op
BenchmarkRWMutexConfig-4         2604524               433 ns/op
BenchmarkConfig-4                6941658               170 ns/op
PASS
atomic.Value 这种适合配置文件这种读特别多,写特别少的场景,因为他是 COW(Copy On Write)写时复制的一种思想,COW 就是指我需要写入的时候我先把老的数据复制一份到一个新的对象,然后再写入新的值。
我们看看维基百科的描述,我觉得已经说得很清楚了
写入时复制(英语:Copy-on-write,简称 COW)是一种计算机程序设计领域的优化策略。其核心思想是,如果有多个调用者(callers)同时请求相同资源(如内存或磁盘上的数据存储),他们会共同获取相同的指针指向相同的资源,直到某个调用者试图修改资源的内容时,系统才会真正复制一份专用副本(private copy)给该调用者,而其他调用者所见到的最初的资源仍然保持不变。这过程对其他的调用者都是透明的。此作法主要的优点是如果调用者没有修改该资源,就不会有副本(private copy)被创建,因此多个调用者只是读取操作时可以共享同一份资源。
这种思路会有一个问题,就是可能有部分 goroutine 在使用老的对象,所以老的对象不会立即被回收,如果存在大量写入的话,会导致产生大量的副本,性能反而不一定好 。 这种方式的好处就是不用加锁,所以也不会有 goroutine 的上下文切换,并且在读取的时候大家都读取的相同的副本所以性能上回好一些。 COW 策略在 linux, redis 当中都用的很多,具体可以看一下我后面的参考文献,本文就不展开讲了。
WaitGroup 可以解决一个 goroutine 等待多个 goroutine 同时结束的场景,这个比较常见的场景就是例如 后端 worker 启动了多个消费者干活,还有爬虫并发爬取数据,多线程下载等等。
我们这里模拟一个 worker 的例子
package main

import (
	"fmt"
	"sync"
)

func worker(i int) {
	fmt.Println("worker: ", i)
}

func main() {
	var wg sync.WaitGroup
	for i := 0; i < 10; i++ {
		wg.Add(1)
		go func(i int) {
			defer wg.Done()
			worker(i)
		}(i)
	}
	wg.Wait()
}- 计数器不能为负值
我们不能使用Add() 给wg 设置一个负值,否则代码将会报错;同样使用Done() 也要特别注意不要把计数器设置成负数了。
- WaitGroup对象不是一个引用类型
WaitGroup对象不是一个引用类型,在通过函数传值的时候需要使用地址:
func main() {
    wg := sync.WaitGroup{}
    wg.Add(100)
    for i := 0; i < 100; i++ {
        go f(i, &wg)
    }
    wg.Wait()
}

// 一定要通过指针传值,不然进程会进入死锁状态
func f(i int, wg *sync.WaitGroup) {
    fmt.Println(i)
    wg.Done()
}- WaitGroup可以用于一个 goroutine 等待多个 goroutine 干活完成,也可以多个 goroutine 等待一个 goroutine 干活完成,是一个多对多的关系
- 多个等待一个的典型案例是 singleflight,这个在后面将微服务可用性的时候还会再讲到,感兴趣可以看看源码
Add(n>0)方法应该在启动 goroutine 之前调用,然后在 goroution 内部调用Done方法WaitGroup必须在Wait方法返回之后才能再次使用Done只是Add的简单封装,所以实际上是可以通过一次加一个比较大的值减少调用,或者达到快速唤醒的目的。
虽然 WaitGroup 已经帮我们做了很好的封装,但是仍然存在一些问题,例如如果需要返回错误,或者只要一个 goroutine 出错我们就不再等其他 goroutine 了,减少资源浪费,这些 WaitGroup 都不能很好的解决,这时候就派出本文的选手 errgroup 出场了。
这个其实是 week03 的作业
基于 errgroup 实现一个 http server 的启动和关闭 ,以及 linux signal 信号的注册和处理,要保证能够 一个退出,全部注销退出。
func main() {
	g, ctx := errgroup.WithContext(context.Background())

	mux := http.NewServeMux()
	mux.HandleFunc("/ping", func(w http.ResponseWriter, r *http.Request) {
		w.Write([]byte("pong"))
	})

	// 模拟单个服务错误退出
	serverOut := make(chan struct{})
	mux.HandleFunc("/shutdown", func(w http.ResponseWriter, r *http.Request) {
		serverOut <- struct{}{}
	})

	server := http.Server{
		Handler: mux,
		Addr:    ":8080",
	}

	// g1
	// g1 退出了所有的协程都能退出么?
	// g1 退出后, context 将不再阻塞,g2, g3 都会随之退出
	// 然后 main 函数中的 g.Wait() 退出,所有协程都会退出
	g.Go(func() error {
		return server.ListenAndServe()
	})

	// g2
	// g2 退出了所有的协程都能退出么?
	// g2 退出时,调用了 shutdown,g1 会退出
	// g2 退出后, context 将不再阻塞,g3 会随之退出
	// 然后 main 函数中的 g.Wait() 退出,所有协程都会退出
	g.Go(func() error {
		select {
		case <-ctx.Done():
			log.Println("errgroup exit...")
		case <-serverOut:
			log.Println("server will out...")
		}

		timeoutCtx, cancel := context.WithTimeout(context.Background(), 3*time.Second)
		// 这里不是必须的,但是如果使用 _ 的话静态扫描工具会报错,加上也无伤大雅
		defer cancel()

		log.Println("shutting down server...")
		return server.Shutdown(timeoutCtx)
	})

	// g3
	// g3 捕获到 os 退出信号将会退出
	// g3 退出了所有的协程都能退出么?
	// g3 退出后, context 将不再阻塞,g2 会随之退出
	// g2 退出时,调用了 shutdown,g1 会退出
	// 然后 main 函数中的 g.Wait() 退出,所有协程都会退出
	g.Go(func() error {
		quit := make(chan os.Signal, 0)
		signal.Notify(quit, syscall.SIGINT, syscall.SIGTERM)

		select {
		case <-ctx.Done():
			return ctx.Err()
		case sig := <-quit:
			return errors.Errorf("get os signal: %v", sig)
		}
	})

	fmt.Printf("errgroup exiting: %+v\n", g.Wait())
}
这里主要用到了 errgroup 一个出错,其余取消的能力
once 的使用很简单
func main() {
	var (
		o  sync.Once
		wg sync.WaitGroup
	)

	for i := 0; i < 10; i++ {
		wg.Add(1)

		go func(i int) {
			defer wg.Done()
			o.Do(func() {
				fmt.Println("once", i)
			})
		}(i)
	}

	wg.Wait()
}
输出
❯ go run ./main.go
once 9- Once 保证了传入的函数只会执行一次,这常用在单例模式,配置文件加载,初始化这些场景下
- 但是需要注意。Once 是不能复用的,只要执行过了,再传入其他的方法也不会再执行了
- 并且 Once.Do 在执行的过程中如果 f 出现 panic,后面也不会再执行了
现在想一下这么一个常见的场景,现在有一个 Server 服务在执行,当请求来的时候我们启动一个 goroutine 去处理,然后在这个 goroutine 当中有对下游服务的 rpc 调用,也会去请求数据库获取一些数据,这时候如果下游依赖的服务比较慢,但是又没挂,只是很慢,可能一次调用要 1min 才能返回结果,这个时候我们该如何处理?
如下图所示,首先假设我们使用 WaitGroup 进行控制,等待所有的 goroutine 处理完成之后返回,可以看到我们实际的耗时远远大于了用户可以容忍的时间。

如下图所示,再考虑一个常见的场景,万一上面的 rpc goroutine 很早就报错了,但是 下面的 db goroutine 又执行了很久,我们最后要返回错误信息,很明显后面 db goroutine 执行的这段时间都是在白白的浪费用户的时间。

这时候就应该请出 context 包了,context 主要就是用来在多个 goroutine 中设置截止日期、同步信号,传递请求相关值。 每一次 context 都会从顶层一层一层的传递到下面一层的 goroutine 当上面的 context 取消的时候,下面所有的 context 也会随之取消。
上面的例子当中,如果引入 context 后就会是这样,如下图所示,context 会类似一个树状结构一样依附在每个 goroutine 上,当上层的 req goroutine 的 context 超时之后就会将取消信号同步到下面的所有 goroutine 上一起返回,从而达到超时控制的作用

如下图所示,当 rpc 调用失败之后,会出发 context 取消,然后这个取消信号就会同步到其他的 goroutine 当中

这就是文章开始时候第一个场景下的一个例子
package main

import (
	"context"
	"fmt"
	"time"
)

// 模拟一个耗时的操作
func rpc() (string, error) {
	time.Sleep(100 * time.Millisecond)
	return "rpc done", nil
}

type result struct {
	data string
	err  error
}

func handle(ctx context.Context, ms int) {
	ctx, cancel := context.WithTimeout(ctx, time.Duration(ms)*time.Millisecond)
	defer cancel()

	r := make(chan result)
	go func() {
		data, err := rpc()
		r <- result{data: data, err: err}
	}()

	select {
	case <-ctx.Done():
		fmt.Printf("timeout: %d ms, context exit: %+v\n", ms, ctx.Err())
	case res := <-r:
		fmt.Printf("result: %s, err: %+v\n", res.data, res.err)
	}
}

func main() {
	// 这里模拟接受请求,启动一个协程去发起请求
	for i := 1; i < 5; i++ {
		time.Sleep(1 * time.Second)
		go handle(context.Background(), i*50)
	}

	// for test, hang
	time.Sleep(time.Second)
}
执行结果
▶ go run *.go
timeout: 50 ms, context exit: context deadline exceeded
result: rpc done, err: <nil>
result: rpc done, err: <nil>
result: rpc done, err: <nil>
我们可以发现在第一次执行的时候传入的超时时间 50ms 程序超时直接退出了,但是后面超过 50ms 的时候均返回了结果。
这是第二个场景的一个例子,假设我们在 main 中并发调用了 f1 f2 两个函数,但是 f1 很快就返回了,但是 f2 还在阻塞
package main

import (
	"context"
	"fmt"
	"sync"
	"time"
)

func f1(ctx context.Context) error {
	select {
	case <-ctx.Done():
		return fmt.Errorf("f1: %w", ctx.Err())
	case <-time.After(time.Millisecond): // 模拟短时间报错
		return fmt.Errorf("f1 err in 1ms")
	}
}

func f2(ctx context.Context) error {
	select {
	case <-ctx.Done():
		return fmt.Errorf("f2: %w", ctx.Err())
	case <-time.After(time.Hour): // 模拟一个耗时操作
		return nil
	}
}

func main() {
	ctx, cancel := context.WithTimeout(context.Background(), time.Second)
	defer cancel()

	var wg sync.WaitGroup
	wg.Add(2)
	go func() {
		defer wg.Done()
		if err := f1(ctx); err != nil {
			fmt.Println(err)
			cancel()
		}
	}()

	go func() {
		defer wg.Done()
		if err := f2(ctx); err != nil {
			fmt.Println(err)
			cancel()
		}
	}()

	wg.Wait()
}
执行结果,可以看到 f1 返回之后 f2 立即就返回了,并且报错 context 被取消
▶ go run *.go
f1 err in 1ms
f2: context canceled
Copy
细心的同学可能发现了,这个例子不就是 errgroup 的逻辑么,是的它就是类似 errgroup 的简单逻辑,这时候再反过来去看一下 《Week03: Go 并发编程(七) 深入理解 errgroup - Mohuishou》这篇文章可能会有不一样的体会
一般会用来传递 tracing id, request id 这种数据,不要用来传递可选参数,这里借用一下饶大的一个例子,在实际的生产案例中我们代码也是这样大同小异
const requestIDKey int = 0

func WithRequestID(next http.Handler) http.Handler {
	return http.HandlerFunc(
		func(rw http.ResponseWriter, req *http.Request) {
			// 从 header 中提取 request-id
			reqID := req.Header.Get("X-Request-ID")
			// 创建 valueCtx。使用自定义的类型,不容易冲突
			ctx := context.WithValue(
				req.Context(), requestIDKey, reqID)

			// 创建新的请求
			req = req.WithContext(ctx)

			// 调用 HTTP 处理函数
			next.ServeHTTP(rw, req)
		}
	)
}

// 获取 request-id
func GetRequestID(ctx context.Context) string {
	ctx.Value(requestIDKey).(string)
}

func Handle(rw http.ResponseWriter, req *http.Request) {
	// 拿到 reqId,后面可以记录日志等等
	reqID := GetRequestID(req.Context())
	...
}

func main() {
	handler := WithRequestID(http.HandlerFunc(Handle))
	http.ListenAndServe("/", handler)
}我们看一下官方文档的这个例子, 这里面 gen 这个函数中如果不使用 context done 来控制的话就会导致 goroutine 泄漏,因为这里面的 for 是一个死循环,没有 ctx 就没有相关的退出机制
func main() {
	// gen generates integers in a separate goroutine and
	// sends them to the returned channel.
	// The callers of gen need to cancel the context once
	// they are done consuming generated integers not to leak
	// the internal goroutine started by gen.
	gen := func(ctx context.Context) <-chan int {
		dst := make(chan int)
		n := 1
		go func() {
			for {
				select {
				case <-ctx.Done():
					return // returning not to leak the goroutine
				case dst <- n:
					n++
				}
			}
		}()
		return dst
	}

	ctx, cancel := context.WithCancel(context.Background())
	defer cancel() // cancel when we are finished consuming integers

	for n := range gen(ctx) {
		fmt.Println(n)
		if n == 5 {
			break
		}
	}
}Context is a concurrency pattern that available in Go. Context is usually used in backend development such as accessing database.
func main() {
    //initiate context called ctx and cancel function called "cancel"
    ctx, cancel := context.WithCancel(context.Background())

    go func() {
        n := 0
        for {
            select {
                //if the context is done, then finish the operation
            case <-ctx.Done():
                return
            default:
                n++
                fmt.Println("Result:", square(n))
            }
        }
    }()

    time.Sleep(time.Second * 3)

    fmt.Println("cancelling context..")
    cancel() //cancel the context
    fmt.Println("context cancelled!")

    time.Sleep(time.Second * 3)
}

//function to calculate the square of certain number
func square(n int) int {
    //time.Sleep is for demonstration purpose
    time.Sleep(time.Millisecond * 200)
    return n * n
}context 包一开始就告诉了我们应该怎么用,不应该怎么用,这是应该被共同遵守的约定。
- 对 server 应用而言,传入的请求应该创建一个 context,接受
- 通过
WithCancel,WithDeadline,WithTimeout创建的 Context 会同时返回一个 cancel 方法,这个方法必须要被执行,不然会导致 context 泄漏,这个可以通过执行go vet命令进行检查 - 应该将
context.Context作为函数的第一个参数进行传递,参数命名一般为ctx不应该将 Context 作为字段放在结构体中。 - 不要给 context 传递 nil,如果你不知道应该传什么的时候就传递
context.TODO() - 不要将函数的可选参数放在 context 当中,context 中一般只放一些全局通用的 metadata 数据,例如 tracing id 等等
- context 是并发安全的可以在多个 goroutine 中并发调用
- 超时控制
- 错误取消
- 跨 goroutine 数据同步
- 防止 goroutine 泄漏
- 最显著的一个就是 context 引入需要修改函数签名,并且会病毒的式的扩散到每个函数上面,不过这个见仁见智,我看着其实还好
- 某些情况下虽然是可以做到超时返回提高用户体验,但是实际上是不会退出相关 goroutine 的,这时候可能会导致 goroutine 的泄漏,针对这个我们来看一个例子
我们使用标准库的 timeout handler 来实现超时控制,底层是通过 context 来实现的。我们设置了超时时间为 1ms 并且在 handler 中模拟阻塞 1000s 不断的请求,然后看 pprof 的 goroutine 数据
package main

import (
	"net/http"
	_ "net/http/pprof"
	"time"
)

func main() {
	mux := http.NewServeMux()
	mux.HandleFunc("/", func(rw http.ResponseWriter, r *http.Request) {
		// 这里阻塞住,goroutine 不会释放的
		time.Sleep(1000 * time.Second)
		rw.Write([]byte("hello"))
	})
	handler := http.TimeoutHandler(mux, time.Millisecond, "xxx")
	go func() {
		if err := http.ListenAndServe("0.0.0.0:8066", nil); err != nil {
			panic(err)
		}
	}()
	http.ListenAndServe(":8080", handler)
}
查看数据我们可以发现请求返回后, goroutine 其实并未回收,但是如果不阻塞的话是会立即回收的
goroutine profile: total 29
24 @ 0x103b125 0x106cc9f 0x1374110 0x12b9584 0x12bb4ad 0x12c7fbf 0x106fd01
Copy
我们来看看它的源码,超时控制主要在 ServeHTTP 中实现,我删掉了部分不关键的数据, 我们可以看到函数内部启动了一个 goroutine 去处理请求逻辑,然后再外面等待,但是这里的问题是,当 context 超时之后 ServeHTTP 这个函数就直接返回了,在这里面启动的这个 goroutine 就没人管了
func (h *timeoutHandler) ServeHTTP(w ResponseWriter, r *Request) {
	ctx := h.testContext
	if ctx == nil {
		var cancelCtx context.CancelFunc
		ctx, cancelCtx = context.WithTimeout(r.Context(), h.dt)
		defer cancelCtx()
	}
	r = r.WithContext(ctx)
	done := make(chan struct{})
	tw := &timeoutWriter{
		w:   w,
		h:   make(Header),
		req: r,
	}
	panicChan := make(chan interface{}, 1)
	go func() {
		defer func() {
			if p := recover(); p != nil {
				panicChan <- p
			}
		}()
		h.handler.ServeHTTP(tw, r)
		close(done)
	}()
	select {
	case p := <-panicChan:
		panic(p)
	case <-done:
		// ...
	case <-ctx.Done():
		// ...
	}
}context 是一个优缺点都十分明显的包,这个包目前基本上已经成为了在 go 中做超时控制错误取消的标准做法,但是为了添加超时取消我们需要去修改所有的函数签名,对代码的侵入性比较大,如果之前一直都没有使用后续再添加的话还是会有一些改造成本
刚刚讲到了关闭 channel 时会释放所有阻塞的 Goroutine,所以我们就可以利用这个特性来做一对多的通知,除了一对多之外我们还用了 done 做了多对一的通知,当然多对一这种情况还是建议直接使用 WaitGroup 即可
package main

import (
	"fmt"
	"time"
)

func run(stop <-chan struct{}, done chan<- struct{}) {
	// 每一秒打印一次 hello
	for {
		select {
		case <-stop:
			fmt.Println("stop...")
			done <- struct{}{}
			return
		case <-time.After(time.Second):
			fmt.Println("hello")
		}
	}
}

func main() {
	// 一对多
	stop := make(chan struct{})
	// 多对一
	done := make(chan struct{}, 10)
	for i := 0; i < 10; i++ {
		go run(stop, done)
	}

	// 5s 后退出
	time.Sleep(5 * time.Second)
	close(stop)

	for i := 0; i < 10; i++ {
		<-done
	}
}其实最开始的例子就是这种情况
package main

import (
	"fmt"
)

// 这里只能读
func read(c <-chan int) {
	fmt.Println("read:", <-c)
}

// 这里只能写
func write(c chan<- int) {
	c <- 0
}

func main() {
	c := make(chan int)
	go read(c)
	write(c)
}具体可以看案例一里面的 run 方法, 不过超时控制还是建议使用 context
func run(stop <-chan struct{}, done chan<- struct{}) {
	// 每一秒打印一次 hello
	for {
		select {
		case <-stop:
			fmt.Println("stop...")
			done <- struct{}{}
			return
		case <-time.After(time.Second):
			fmt.Println("hello")
		}
	}
}一般情况下我们在写一写对外的服务的时候都会有一层 cache 作为缓存,用来减少底层数据库的压力,但是在遇到例如 redis 抖动或者其他情况可能会导致大量的 cache miss 出现。
如下图所示,可能存在来自桌面端和移动端的用户有 1000 的并发请求,他们都访问的获取文章列表的接口,获取前 20 条信息,如果这个时候我们服务直接去访问 redis 出现 cache miss 那么我们就会去请求 1000 次数据库,这时可能会给数据库带来较大的压力(这里的 1000 只是一个例子,实际上可能远大于这个值)导致我们的服务异常或者超时。
这时候就可以使用 singleflight 库了,直译过来就是单飞,这个库的主要作用就是将一组相同的请求合并成一个请求,实际上只会去请求一次,然后对所有的请求返回相同的结果。 使用 singleflight 之后,我们在一个请求的时间周期内实际上只会向底层的数据库发起一次请求大大减少对数据库的压力。
接下来我们看看实际上我们是怎么使用的,先使用一个普通的例子,这时一个获取文章详情的函数,我们在函数里面使用一个 count 模拟不同并发下的耗时的不同,并发越多请求耗时越多
func getArticle(id int) (article string, err error) {
	// 假设这里会对数据库进行调用, 模拟不同并发下耗时不同
	atomic.AddInt32(&count, 1)
	time.Sleep(time.Duration(count) * time.Millisecond)

	return fmt.Sprintf("article: %d", id), nil
}
我们使用 singleflight 的时候就只需要 new(singleflight.Group) 然后调用一下相对应的 Do 方法就可了,是不是很简单
func singleflightGetArticle(sg *singleflight.Group, id int) (string, error) {
	v, err, _ := sg.Do(fmt.Sprintf("%d", id), func() (interface{}, error) {
		return getArticle(id)
	})

	return v.(string), err
}光说不练假把式,写一个简单的测试代码,下面我们启动 1000 个 Goroutine 去并发调用这两个方法
var count int32

func main() {
	time.AfterFunc(1*time.Second, func() {
		atomic.AddInt32(&count, -count)
	})

	var (
		wg  sync.WaitGroup
		now = time.Now()
		n   = 1000
		sg  = &singleflight.Group{}
	)

	for i := 0; i < n; i++ {
		wg.Add(1)
		go func() {
			// res, _ := singleflightGetArticle(sg, 1)
			res, _ := getArticle(1)
			if res != "article: 1" {
				panic("err")
			}
			wg.Done()
		}()
	}

	wg.Wait()
	fmt.Printf("同时发起 %d 次请求,耗时: %s", n, time.Since(now))
}
可以看到这个是调用 getArticle 方法的耗时,花费了 1s 多
# 直接调用的请求耗时
❯ go run ./1.go
同时发起 1000 次请求,耗时: 1.0022831s
而使用 singleflight 的方法,花费了不到 3ms
# 使用 singleflight 的请求耗时
❯ go run ./1.go
同时发起 1000 次请求,耗时: 2.5119ms
当然每个库都有自己的使用场景,软件领域里面没有银弹,如果我们用的不太好的话甚至可能会得到适得其反的效果,而多看源码不仅能够帮助我们进行学习,也可以尽量少踩坑