Skip to content
New issue

Have a question about this project? Sign up for a free GitHub account to open an issue and contact its maintainers and the community.

By clicking “Sign up for GitHub”, you agree to our terms of service and privacy statement. We’ll occasionally send you account related emails.

Already on GitHub? Sign in to your account

how to interpret output #9

Closed
natxopedreira opened this issue Aug 30, 2021 · 40 comments
Closed

how to interpret output #9

natxopedreira opened this issue Aug 30, 2021 · 40 comments

Comments

@natxopedreira
Copy link
Contributor

Hello!!

Im playing with this to help me to understand how tensorflow c pi works.

I have a centernet model that has one input and 4 outputs

The given SavedModel SignatureDef contains the following input(s):
  inputs['input_tensor'] tensor_info:
      dtype: DT_UINT8
      shape: (1, -1, -1, 3)
      name: serving_default_input_tensor:0
The given SavedModel SignatureDef contains the following output(s):
  outputs['detection_boxes'] tensor_info:
      dtype: DT_FLOAT
      shape: (1, 100, 4)
      name: StatefulPartitionedCall:0
  outputs['detection_classes'] tensor_info:
      dtype: DT_FLOAT
      shape: (1, 100)
      name: StatefulPartitionedCall:1
  outputs['detection_scores'] tensor_info:
      dtype: DT_FLOAT
      shape: (1, 100)
      name: StatefulPartitionedCall:2
  outputs['num_detections'] tensor_info:
      dtype: DT_FLOAT
      shape: (1)
      name: StatefulPartitionedCall:3
Method name is: tensorflow/serving/predict

I load the model and set input and output names

    model.load("model");


    vector<string> inputs{"serving_default_input_tensor:0"};
    vector<string> outputs{"StatefulPartitionedCall:0",
                            "StatefulPartitionedCall:1",
                            "StatefulPartitionedCall:2",
                            "StatefulPartitionedCall:3"};

    model.setup(inputs,outputs);

Add one dimension to input to follow model requeriments

    input = cppflow::expand_dims(input, 0);
    auto output = model.runModel(input);

And now how i acces to the output data? I tried this but dont work, i expected that the return of runModel was a vector of vectors.... i tried reading the cppflow doc but no luck

    auto detection_boxes = output[0];
    auto detection_classes = output[1];
    auto detection_scores = output[2];
    auto num_detections = output[3];

Thanks!

@natxopedreira
Copy link
Contributor Author

natxopedreira commented Aug 30, 2021

Ok i think i got it

    auto output = model.runMultiModel({input});
    auto detection_boxes = output[0];
    auto detection_classes = output[1];
    auto detection_scores = output[2];
    auto num_detections = output[3];

And now to use it

    ofxTF2::tensorToVector(output[0], detection_boxes_vector);
    ofxTF2::tensorToVector(output[1], detection_classes_vector);
    ofxTF2::tensorToVector(output[2], detection_scores_vector);
    ofxTF2::tensorToVector(output[3], num_detections_vector);

But for example the bounding boxes is 2d level data, first one is box index and second one are the 4 coords (tensor: shape=[1 100 4]), and tensorToVector flatterns it to 1D vector of 400 size, so i think it has to be

        if(detection_scores_vector[i]>0.5){
            //[ymin, xmin, ymax, xmax]

            int py = detection_boxes_vector[i*4] * img_dog.getHeight();
            int px = detection_boxes_vector[i*4+1] * img_dog.getWidth();
            int pheight = detection_boxes_vector[i*4+2] * img_dog.getHeight();
            int pwidth = detection_boxes_vector[i*4+3] * img_dog.getWidth();
        
            ofDrawRectangle(px, py, pwidth, pheight);
        }

But the boxes are not correctly positioned.... im doing this last step wrong?

dog

Note i tried 2 differents models and output is the same so obviously im doing something wrong, just can find what

Thanks
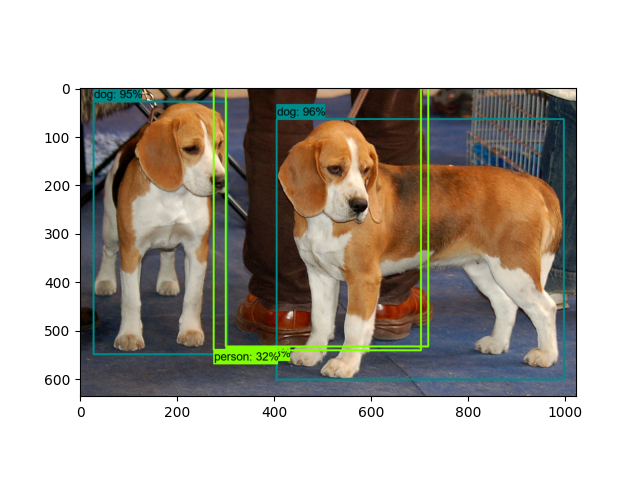
@natxopedreira
Copy link
Contributor Author

Seems like is

        if(detection_scores_vector[i]>0.5){
            
            int py = detection_boxes_vector[i*4] * img_dog.getHeight();
            int px = detection_boxes_vector[i*4+1] * img_dog.getWidth();
            int pheight = detection_boxes_vector[i*4+2] * img_dog.getHeight() - py;
            int pwidth = detection_boxes_vector[i*4+3] * img_dog.getWidth() - px;
        
            ofDrawRectangle(px, py, pwidth, pheight);
        }

Curious that bounding boxes for the dogs are not exact the same as tf example
https://tensorflow-object-detection-api-tutorial.readthedocs.io/en/latest/auto_examples/plot_object_detection_saved_model.html

My ouput
dog

Tf example
dog

But with other image seems spot on so assume code is now ok
kite

Would you accept a PR with a sample to use an object detection model?¿ I will be glad to contribute

@danomatika
Copy link
Member

Ping @bytosaur

@natxopedreira
Copy link
Contributor Author

Just to note box difference was fixed replacing tensorflow lib, can also contribute providing a updated tf lib for linux to use with cuda 11.1 as i need to recompile it to use on my machine.

@danomatika
Copy link
Member

To which version?

@natxopedreira
Copy link
Contributor Author

tf 2.5.1
cuda 11.1

@danomatika
Copy link
Member

We have td 2.4.2 in the develop branch but I think the next release could use the latest 2.5.

@bytosaur
Copy link
Member

bytosaur commented Sep 1, 2021

hey @natxopedreira!

Your workflow seems to be inline with our expertise and recommendations. Thanks for tying out and reading it so carefully :)
I dont know exactly why there were issues with the bounding boxes. Are you sure you handled the input as expected by the SavedModel? That is, correct data type, value range or preprocessing?

As for the TF version, I will look into using the latest CUDA (11.4) and TF (2.6.0) today. Unfortunately, we don't have a Docker Image for OpenFrameworks so I ll need to modify my current setup which may take some time. I ll to come back to you when I fixed all warnings.

@natxopedreira
Copy link
Contributor Author

Hello

No problem at all, bounding boxes differences where fixed when replaced the lib.... i know....no much sense at all. In fact the second image of beach boxes where correct so not sure what happened here but is fixed.

I did a docker image to build the library so if need to build any version and want help, ping me!

@bytosaur
Copy link
Member

bytosaur commented Sep 1, 2021

Cool! Do you have the Dockerfile somewhere on GitHub? This might be very cool for testing new TF or Cuda releases.
And yes PRs are very welcome for both examples or src contributions :)

@natxopedreira
Copy link
Contributor Author

Sorry i dont have a Dockerfile but i can publish the docker if you want to quay or similar.

I will try to add more examples and will do a PR

@bytosaur
Copy link
Member

bytosaur commented Sep 2, 2021

I just updated the downlaodscript for libtensorflow to 2.6. I didnt encounter any problems using CUDA 11.4

@natxopedreira
Copy link
Contributor Author

Nice, thanks!

I will try to prepare some samples: object detection, face detection, something like posenet.... and make a pr.

I think that do a small one training your own model will be also useful for people, i know your examples are more "art" oriented and what i'm doing is more "tools" oriented so if those do not fit in your concept please let me know

@bytosaur
Copy link
Member

bytosaur commented Sep 2, 2021

Human Pose Estimation would be a huge contribution! Unfortunately, I couldn't find a single model that does the job in a pleasing way.
I converted Mediapipe Models for landmarks and body or hand positions but there is a lot of math between the models which I didn't want to rewrite in C++.
For dealing with objects we could think about extending or changing the efficient net example.
I think it's good to have some examples that show the basics like how to input an image or use multiple output and then some more advanced stuff like the liveGan example (for which I still need to upload a model)

@natxopedreira
Copy link
Contributor Author

natxopedreira commented Sep 2, 2021

I'm still on basics :) But i will help on what i can

I think it's good to have some examples that show the basics like how to input an image or use multiple output
imo object detection fit those, you input an image an deal multiple outputs, and you can find ready models on tf hub

What about this one for pose estimation?
https://www.tensorflow.org/hub/tutorials/movenet

@natxopedreira
Copy link
Contributor Author

natxopedreira commented Sep 2, 2021

Movenet is working !!!

And seems to work fast/great

movenet

dance.gif

Q2Xb5r.gif

@bytosaur
Copy link
Member

bytosaur commented Sep 3, 2021

Hey @natxopedreira!
Awesome! This model must be pretty new. I am glad you found it :)
I am looking forward to a PR.

@natxopedreira
Copy link
Contributor Author

@bytosaur model is from february i think, inference is ver fast, multiple users 40fps on cpu i7 and more than 60 on my 1060gpu. And i read somewhere in octuber tf will release next iteration of the model with a depth estimation

i have to clean the code, make a readme and will do the pr.

Model is very nice!

@danomatika
Copy link
Member

Also, don't commit the model to the repo. If you can send us the model as a zip, we can add it to the models share folder and the download script.

@bytosaur
Copy link
Member

bytosaur commented Sep 3, 2021

No need to send it. I ll grab it from tf hub and upload it to our cloud storage :)
Yes a minimal solution will be best! Thanks for contributing

@natxopedreira
Copy link
Contributor Author

Ok, code is ready, only need to to readme.

I use a video from pexels so no copyright, is ok to upload?

@natxopedreira
Copy link
Contributor Author

@bytosaur @danomatika Please take a look here https://github.com/natxopedreira/ofxTensorFlow2/tree/main/example_Movenet to see if is ok for you, i can also add the object detection sample if you want

@bytosaur
Copy link
Member

bytosaur commented Sep 3, 2021

hey @natxopedreira,

Thanks for the upload!
I wont find time today to go over it thoroughly but I saw a few things that could be different:

is it useful when i make a PR first too your repo and then merge it afterwards in ours?

@natxopedreira
Copy link
Contributor Author

  • No problem, will move to ofApp, is a personal taste i preffer to have it all in a class so i can move that class to any project, looks more clean to me but i understand your point
  • will change makefile and remove vs-code workspace file

I will do that in another branch if you dont mind as i prefer to have a separated class.... just for my use

Dont understand what you want to say here :)
is it useful when i make a PR first too your repo and then merge it afterwards in ours?

@danomatika
Copy link
Member

The MP4 is tiny, so not a problem. I would just make sure proper attribution for it is included in the readme.

@danomatika
Copy link
Member

danomatika commented Sep 3, 2021

Personally, I'm fine with the separate class. We already have subclasses of the Model anyway.

Additionally, we can further modularize it by passing in a pixels or ofBaseVideo reference etc to the update() function.

@natxopedreira
Copy link
Contributor Author

natxopedreira commented Sep 3, 2021

Just upload all changes except to move all back to main....

It just receive a ofPixels reference
movenet.update(video.getPixels());

void update(ofPixels & pxs)

@danomatika
Copy link
Member

Nice. As long as the design is easy for a beginner to follow, I don't think it's bad to have a simple class wrapper for some (complicated) examples.

@danomatika
Copy link
Member

@natxopedreira Can you rename the folder with lowercase? ie. example_movenet

@natxopedreira
Copy link
Contributor Author

Done

I tried to code it clean to easy understand and comment code, so people can take this as a reference and extend it adding a tracker... etc etc

@danomatika
Copy link
Member

I would also suggest adding your own attribution to the readme and as a header in the source files. At a minimum something like "Example by Natxopedreira 2021" with a URL etc. We will probably edit a bit here and there but the core of the contribution is yours. (Thanks by the way!)

@natxopedreira
Copy link
Contributor Author

Thanks :) I added a small footer with a comment a link to my github

Note im open to make changes if you want, not a problem.

I'm happy to contribute and i hope people will like this one!!!!

@danomatika
Copy link
Member

As a follow up, we refactored and threaded the ofxMovenet class: https://github.com/zkmkarlsruhe/ofxTensorFlow2/blob/develop/example_movenet/src/ofxMovenet.h

@natxopedreira
Copy link
Contributor Author

Thanks for let me know

Now looks better, with comments on each method.... and the thread

@danomatika
Copy link
Member

danomatika commented Sep 7, 2021

I only tested on my macOS system with TF CPU, no GPU. Please test on your setup and let me know if toggling the threading with the t key works and if there is no major loss in FPS. On this Intel Macbook Pro 16 inch, the non-threaded processing slows the app down to about 10 fps. If I turn threading on, the app runs at 60 but the tracking lags a bit as it's still slow in the background thread. In any case, your system should be able to run it fast with or without the thread.

UPDATE: The current work is in the develop branch.

@natxopedreira
Copy link
Contributor Author

i will test and let you know, give me some hours. Note that here "old version" i get 40fps on CPU i7... 10fps sounds really low

@danomatika
Copy link
Member

10fps sounds really low

Laptop CPU :P

@natxopedreira
Copy link
Contributor Author

no lag here on CPU and solid 60fps, need more tests? im going to start training so computer will be used but can wait to test anything

@danomatika
Copy link
Member

No, sounds good. I just wanted to be sure I didn't break anything.

@natxopedreira
Copy link
Contributor Author

Oook!

If you have more ideas about other doing others examples, please let me know, those are good exercises to learn tf

Sign up for free to join this conversation on GitHub. Already have an account? Sign in to comment
Labels
None yet
Projects
None yet
Development

No branches or pull requests

3 participants