==查看AST的解析结果== https://astexplorer.net/
https://juejin.cn/post/7032867040582959112
Parse → Transform → Generate(机器码/新的js)
babel相关的AST插件
- @babel/core:核心文件;
- @babel/parser:将源码string转成AST;
- @babe/traverse: 深度优先遍历AST; 对节点进行添加、更新及移除等操作,enter(path)进入和exit(path)退出等钩子;
- @babel/types:
- 修改,添加,删除等,操作AST;
- 用于 AST 的类 lodash 库,其封装了大量与 AST 有关的方法,大大降低了转换 AST 的成本;
- babelTypes.stringLiteral(modulePath)。
- @bebe/generator:将修改后的AST转换成源码string
第一步,词法分析,也叫做扫描scanner。它读取我们的代码,然后把它们按照预定的规则合并成一个个的标识tokens。同时,它会移除空白符,注释等。最后整个代码将被分割进一个tokens列表(或者说一维数组)
第二步,语法分析,也解析器。它会将词法分析出来的数组转化成树形的表达形式。同时,验证语法,语法如果有错的话,抛出语法错误。
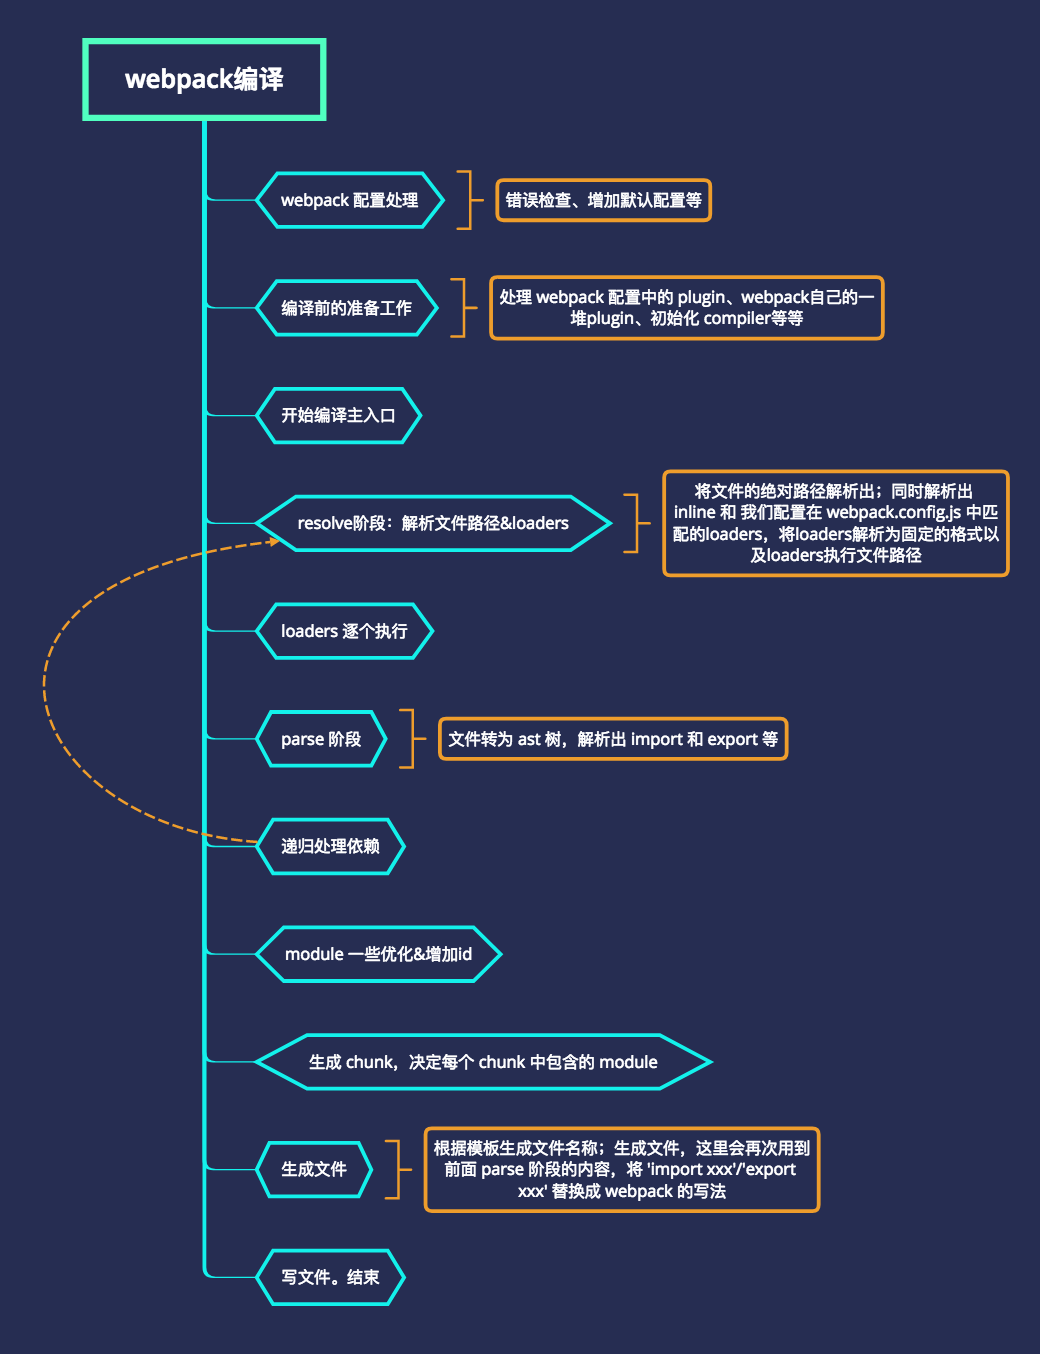
entryOption:在 webpack 选项中的 entry 配置项 处理过之后,执行插件
afterPlugins:设置完初始插件之后,执行插件
run:compiler.run() 方法执行时触发 - 开始读取 records 之前,钩入(hook into) compiler
compile:buildMoudle()执行前触发 - 一个新的编译(compilation)创建之后触发
afterCompile:buildMoudle()执行后触发
emit:emitFile() 执行时触发 - 生成资源到 output 目录之前。
done:编译完成时触发
compiler对象包含了 Webpack 环境所有的的配置信息。这个对象在启动 webpack 时被一次性建立,并配置好所有可操作的设置,包括 options,loader 和 plugin。当在 webpack 环境中应用一个插件时,插件将收到此 compiler 对象的引用。可以使用它来访问 webpack 的主环境
compilation对象包含了当前的模块资源、编译生成资源、变化的文件等。当运行webpack 开发环境中间件时,每当检测到一个文件变化,就会创建一个新的 compilation,从而生成一组新的编译资源。compilation 对象也提供了很多关键时机的回调,以供插件做自定义处理时选择使用
同步写法: 使用this.callback()或者直接return输出; this.callback的好处在于可以传递更多的内容参数
module.exports = function (content, map, meta) {
  const output = someSyncOperation(content);

  // return output;
  this.callback(null, output, map, meta);
  return;
};
异步写法: 通过this.async()获取回调方法
module.exports = function (content, map, meta) {
  const callback = this.async();

  someAsyncOperation(content, function (err, result, sourceMaps, meta) {
    if (err) return callback(err);
    callback(null, result, sourceMaps, meta);
  });
};Webpack要经过一系列处理流程后将源文件转换成输出。 每个流程作用单一,多个流程之间存在依赖关系,只有完成当前处理后才能交给下一个流程去处理。
Webpack 在运行过程中会广播事件,插件只需要监听它所关心的事件,就能加入到这条生产线中,去改变生产线的运作。 Webpack 的事件流机制保证了插件的有序性,使得整个系统扩展性很好。
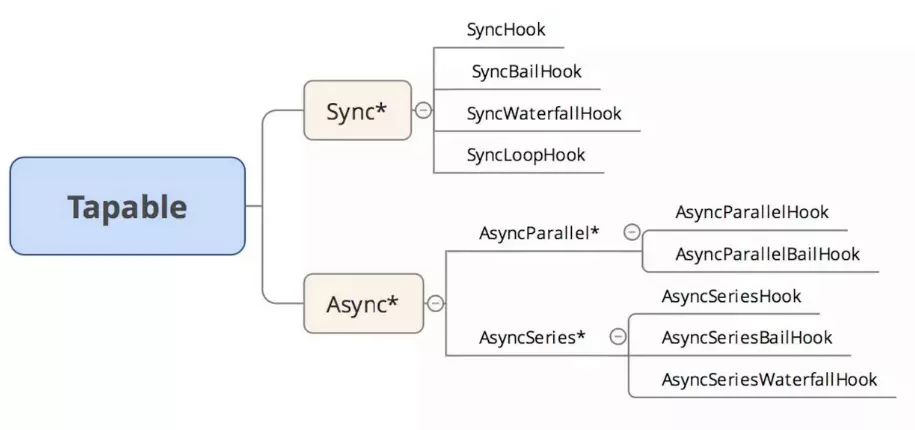
Tapable核心就是发布订阅模式,Tapable提供了很多类型的hook,分为同步和异步两大类(异步中又区分异步并行和异步串行),根据事件执行的终止条件的不同,衍生出 Bail/Waterfall/Loop 类型。
| 名称 | 解释 |
|---|---|
| SyncHook | 同步执行,无需返回值 |
| SyncBailHook | 同步执行,无需返回值,返回undefined终止 |
| SyncWaterfallHook | 同步执行,上一个处理函数的返回值是下一个的输入,返回undefined终止 |
| SyncLoopHook | 同步执行, 订阅的处理函数有一个的返回值不是undefined就一直循环 |
| AsyncSeriesHook | 异步执行,无需返回值 |
| AsyncParallelHook | |
| AsyncSeriesBailHook | 异步执行,无需返回值,返回undefined终止 |
| AsyncSeriesWaterfallHook | 异步执行,上一个处理函数的返回值是下一个的输入,返回undefined终止 |
有一个tap将任务添加的内部的执行队列中。如果调用call方法,将执行同步执行所有tap过的方法
class SyncHook {
	constructor(args){ this.tasks = [];	}
	call(...args){ this.tasks.forEach((task) => task(...args)) }
	tap(name,task){	this.tasks.push(task); }
}

let hook = new SyncHook(['name']);
hook.tap('plugins_0',function(name){	console.log('plugins_0',name) })
hook.tap('plugins_1',function(name){	console.log('plugins_1',name) })
hook.call('hello word');一个tap将任务添加的内部的执行队列中。如果调用call方法,将执行同步执行所有tap过的方法,且需上一个返回值,给下一个函数队列。
class SyncWaterfallHook {
    constructor(args) { this.tasks = [] }
    tap(name, cb) {
        let obj = {}; obj.name = name; obj.cb = cb;
        this.tasks.push(obj)
    }
    call(...arg) {
        let [first, ...others] = this.tasks
        let ret = first.cb(...arg)
        others.reduce((pre, next) => { return next.cb(pre) }, ret)
    }
}
Webpack 的事件流机制应用了发布/订阅模式,和 Node.js 中的 EventEmitter 非常相似。 Compiler 和 Compilation 都继承自 Tapable,可以直接在 Compiler 和 Compilation 对象上广播和监听事件。
需要读到入口文件里面的内容。 分析入口文件,递归的去读取模块所依赖的文件内容,生成AST语法树。 根据AST语法树,生成浏览器能够运行的代码
打包流程:
-
分析一个模块getModuleInfo:得到该模块的路径(file)、依赖(deps)、转化成es5的代码
@babel/parser包(转AST)
对一个模块内容进行处理
- @babel/traverse包(遍历AST收集依赖)
- @babel/core和@babel/preset-env包 (es6转ES5)
-
递归所有模块parseModules:得到所有的【文件路径、当前文件的依赖文件、执行code】
-
生成最终代码bundle:一个可执行的js函数,入参是所有的【文件路径、当前文件的依赖文件、执行code】,该函数的作用把入口文件index.js的内容和它的依赖模块整合起来,递归执行code
-
写入到dist目录下:
fs.mkdirSync('./dist');fs.writeFileSync('./dist/bundle.js',content)
基本架子的搭建
-
新建一个package.json,入口文件bin/index.js:
"start": "node ./bin/index.js" -
定义webpack的基本配置文件 webpack.config.js;
-
引入自己写的webpack包,再引入配置文件webpack.config.js,启动运行;
-
public/index.html,引入打包后的js,测试webpack是否打包成功。
const path = require('path')
const config = require(path.resolve('webpack.config.js'))
const WebpackCompiler = require('../lib/WebpackCompiler.js')
const webpackCompiler = new WebpackCompiler(config)
webpackCompiler.run();
WebpackCompiler是核心编译类
class WebpackCompiler {
    constructor(config) { this.config = config; }
    run(){}   // 编译开始
}
module.exports = WebpackCompiler;
手写webpack过程
- 新建编译模板
首先有一个固定的编译模板,将模板内容先写在一个js中,借用ejs的快速渲染模板。
解析文件路径,一个变量entryPath来标识文件路径。
把每个模块的代码到嵌入文件中,同样要以路径为Key。那我们用modules变量来作为数组。(原文件的require转化为__webpack_require__)
 (function(modules) {
//固定代码
    return __webpack_require__(__webpack_require__.s = "<%- entryPath %>");
})

({
    <% for(let key in modules){ %>
        "<%- key %>": (function (module, exports,__webpack_require__) {
            eval(`<%-modules[key] %>`);
    }),
     <% } %>
});- 获取模板参数
1.将require替换成__webpack_require__ 2.再所有的页面路径,跟页面内容封装一个数组。
const babylon = require('babylon')  // 源码转成ast。Babylon是Babel中使用的JS解析器
const traverse = require('@babel/traverse').default; // 解析遍历语法树,替换删除添加节点
const type = require('@babel/types');
const generator = require('@babel/generator').default  // 结果生成

parse(source, parentPath) {  // 根据路径解析源码
    let ast = babylon.parse(source)  // 源码转成ast
    let dependencies = []   // 用于存取依赖
    traverse(ast, {					//对ast解析遍历语法树 负责替换,删除和添加节点
        CallExpression(p) {
            let node = p.node
            if (node.callee.name === 'require') {
                node.callee.name = '__webpack_require__';//替换成__webpack_require__
                const moduledName = './' + path.join(parentPath, node.arguments[0].value )
                dependencies.push(moduledName);//记录requeir名称,之后遍历替换成源码
                node.arguments = [type.stringLiteral(moduledName)] // 源码替换
            }
        }
    })
    let sourceCode = generator(ast).code
    return { sourceCode, dependencies };
}

// 编译生成完成的main文件,完成递归将所有文件路径、解析完的code存入到modules数组中
buildMoudle(modulePath, isEntry) {
    const source = this.getSourceByPath(modulePath);//根据路径拿到源码
    const moduleName = './' + path.relative(this.root, modulePath);//转换一下路径名称
    const { sourceCode, dependencies } = this.parse(source, path.dirname(moduleName))//根据路径拿到源码,以及源码中已经require的文件名称数组
    this.modules[moduleName] = sourceCode;// 每个模块的代码,路径为Key,存入到modules对象中
    dependencies.forEach(item => {  // 递归需要转换的文件名称
        this.buildMoudle(path.resolve(this.root, item));//对应的文件名称替换成对应的源码
    })
}-
将模板生成js文件输出:拿到模板文件 main.ejs,填充模板数据,输出新的文件
-
嵌入loader
在拿到源文件后,通过rules的规则匹配后缀,多做一层转换
用了闭包,是因为一个后缀可能对应多个loader,递归循环执行
getSourceByPath(modulePath) {
    let content = fs.readFileSync(modulePath, 'utf8')
    const rules = this.config.module.rules  // 事先拿module中的匹配规则与路径进行匹配
    for (let i = 0; i < rules.length; i++) {
        let { test, use } = rules[i]
        let len = use.length
        if (test.test(modulePath)) {
            function changeLoader() {
                let loader = require(use[--len])//先拿最后一个,倒叙执行
                content = loader(content)
                if (len > 0) { changeLoader() }
            }
            changeLoader()
        }
    }
    return content
}- 嵌入webpack的生命周期
SyncHook有一个tap将任务添加的内部的执行队列中,然后最后通过执行call方法,一次执行他们。
给webpack定义五个生命周期,并在run方法适当的时机嵌入钩子函数。
class WebpackCompiler {
        constructor(config) {
            this.config = config;
            this.modules = {}
            this.root = process.cwd() //当前项目地址
            this.entryPath = './' + path.relative(this.root, this.config.entry);
            this.hooks = {
                entryInit: new tapable.SyncHook(),
                beforeCompile: new tapable.SyncHook(),
                afterCompile: new tapable.SyncHook(),
                afterPlugins: new tapable.SyncHook(),
                afteremit: new tapable.SyncWaterfallHook(['hash']),
            }
        }
        run() {
            this.hooks.entryInit.call(); //启动项目
            this.hooks.beforeCompile.call();  //编译前运行
            this.buildMoudle( this.entryPath )
            this.hooks.afterCompile.call( ); //编译后运行
            this.outputFile();
            this.hooks.afterPlugins.call( );//执行完plugins后运行
            this.hooks.afteremit.call( );//结束后运行
        }
}- 嵌入plugins
将每个plugin通过tap任务放置在SyncHook中,等时机到了,调用call方法即可。
输出文件后将生成文件main.js,改名main.${hash}.js,并在index.html正确引入该文件。
// ------------ 插件: 重命名文件 -------------
class JsCopyPlugins {
    run(compiler) {
        compiler.hooks.afterPlugins.tap('JsCopyPlugins', function(res) {
            const ranNum = parseInt( Math.random() * 100000000 );
            fs.copyFile('./dist/main.js',`./dist/main.${ranNum}.js`,function(err){
                if(err) console.log('获取文件失败');
                delFileByName('./dist/main.js');
            })
            console.log("重新生成js成功" );
            return ranNum;
        })
    }
}
// ------------插件:修改html的js引入--需要上一步输出作为该步骤的输入-------------
class HtmlReloadPlugins {
    run(compiler) {
        compiler.hooks.afterPlugins.tap('HtmlReloadPlugins', function(res) {
            let content = fs.readFileSync('./public/index.html', 'utf8')
            content = content.replace('main.js', `main.${res}.js`);
            fs.writeFileSync( './dist/index.html', content)
        })
    }
}
plugins中已经将方法tap到SyncHook中,将plugins注册到编译类中接口,然后一一执行plugins
class WebpackCompiler {
    constructor(config) {
        this.config = config
        //...省略
        const plugins = this.config.plugins
        if (Array.isArray(plugins)) {
            plugins.forEach(item => {
                item.run(this) //每个均是实例,调用实例上的一个方法即可,传入当前Compiler实例
            })
        }
    }
}
简易版: https://mp.weixin.qq.com/s/4yF05CK9aLOekAJgh662Cg