

- Based on ESPHome
- Realtime transmission to Home Assistant
- On-device mapping of raw sensor values to Kg scale (or whatever unit you want to use instead)
- Automatically accounts for sensor shifts due to temperature changes
- Instant tare with a click of a button
- Any standard scale of choice
- An HX711 ADC converter
- An ESP8266, ESP32 or similar board
- A power supply (preferrably USB)
- Create a new ESPHome configuration YAML file
- Copy the contents of esphome_hx711_smart_scale.yaml into it
- Customize the basic device cnfiguration (Board, WiFi, etc.) to your liking
- Flash it onto your ESP based board
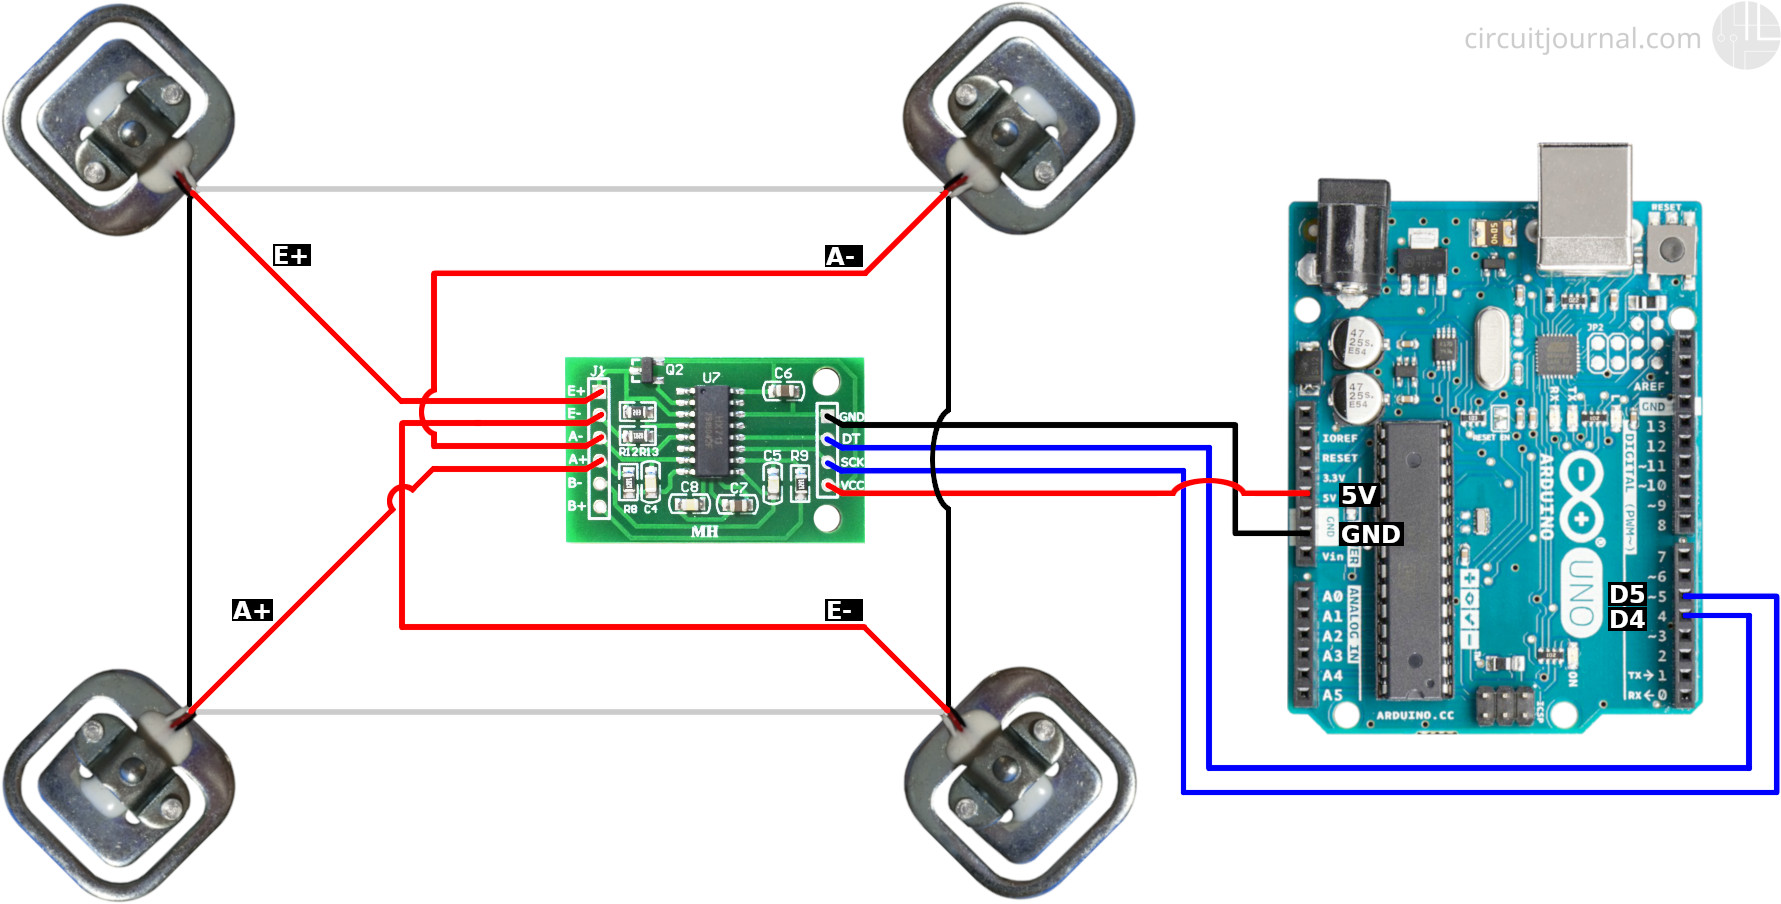
Connect the load cells to the HX711, and the ESP board to the HX711 as shown:
Add the ESPHome device to Home Assistant via the "Integrations" page. The sensors and buttons will automatically appear.
The configuration for the card as seen at the top relies on the multiple-entity-row custom component.
Lovelace Configuration:
title: Devices
type: vertical-stack
cards:
  - type: entities
    show_header_toggle: false
    state_color: false
    entities:
      - entities:
          - entity: switch.smart_scale_continuous_tare_enabled
            name: Auto Tare
            toggle: true
          - entity: button.smart_scale_manual_tare_action
            name: Manual Tare
            type: Button
            icon: mdi:scale-balance
            tap_action:
              action: call-service
              service: button.press
              service_data:
                entity_id: button.smart_scale_manual_tare_action
          - entity: sensor.smart_scale_hx711_value
            name: Current
        entity: input_number.weight_markus
        name: Smart Scale
        icon: mdi:scale-bathroom
        secondary_info: last-changed
        state_header: Markus
type: custom:multiple-entity-rowTo do the initial calibration we need to be able to read the raw sensor values of the HX711 sensor in real time. We can do this a couple of ways, f.ex. by
- Using the diagnostic sensor "HX711 RAW Value" exposed to Home Assistant
- This sensor is only updated once right after the ESP has booted
- To update the value simply press the "Manual Tare" Button
- plugging the ESP in via USB and using a serial monitor
- reading the ESPHome logs
We can then take the baseline measurement by simply letting the scale sit for a couple of seconds and writing down the raw sensor value at this time. Don't worry about the value fluctuating a bit, the measurement doesn't need to be super accurate since it will be automatically adjusted later-on.
In my case the value is -481989 (a negative number). This means a raw sensor value of -481989 correlates
with a 0 Kg load on the scale: -481989 -> 0
To be able to extrapolate the whole curve we need to measure a second point on it. To do this the first thing we need is a weight with a known mass. Again there are multiple options to choose from:
- your own body weight as measured with a "normal" scale
- a water tank filled to 10 or 20 liters
It should be noted though, that the measurement error does increase the closer the two measurements are to each other. So my personal recommendation would be to just measure yourself on a standard scale and use yourself as a "known mass".
In my case the raw sensor value for a known mass of 88.3 Kg (my body weight) is 1339163 (not negative anymore).
This means a raw sensor value of 1339163 correlates with a 88.3 Kg load on the scale:
1339163 -> 88.3
Lastly we need to set those measurements in the YAML configuration:
...

globals:
  - id: initial_zero
    type: float
    restore_value: yes
    # NOTE: make sure to align this value to the one used in "calibrate_linear" below!
    initial_value: '-481989'

...
...
- platform: template
name: "Smart Scale HX711 Value"
...
filters:
...
- calibrate_linear:
- -481989 -> 0
- 1339163 -> 88.3
...After that, upload the firmware again and you should be good to go!
Since the raw values will drift slightly due to room temperature etc., over time the scale might shift up or down a bit. To combat this you can use the "Auto Tare" feature, which will automatically shift the whole curve to keep it at 0 Kg. For this to work the approximate 0 Kg value needs to be set in the YAML config, and the adjustment is only done while no weight is applied to the scale (0 ± 10 Kg).
This process is intentionally very slow, so don't expect it to adjust within a minute. In practice no big differences should occur though, if the scale is powered at all times.
If the Auto Tare is too slow or you want to force a manual tare at any point you can use the "Manual Tare" toggle. This will immediately adjust the weight curve to make the current weight be the 0 Kg value.
CC0 see LICENSE