This is a quick guide to get up to speed using containers. We will walk you through the following:
- Building an ASP.NET Core Web API
- Putting your Web API in a Docker Container
- Running the container locally
- Publishing the container to Docker Hub
- Publishing the container to ACR (Azure Container Registry)
- Deploy the container using a web app in azure
- Setting up Continuous Deployment for your container in a Web App
- Running the container in Azure using ACI (Azure Container Instance)
- Running the container as part of a cluster using AKS (Azure Kubernetes Service)
We will be pulling together a mixture of hands on labs from the docs and HOLs in this document that will walk you through these steps with commentary.
The first thing you will need to do is to get your machine prepped and ready.
You will need the following things installed on your system to walk through these exercises:
- Azure CLI
- Docker for Windows or Mac
- Docker Hub Account - This is usually created when you install Docker for Mac or Windows and you sign in to the app.
- Kubectl Full Directions. -- Easiest way Must have Azure CLI installed
- Postman for testing and making calls to our API
- If you are running on Mac or want to use VS Code:
- VSCode for Windows, Mac, or Linux or other text editor (Vim, Sublime, etc...)
- C# for Visual Studio Code
- .NET Core 6.0 SDK for running our ASP.NET Core projects
The first thing we need to set up is an ASP.NET Core Web API to have something to call when we are testing our containers. For our purposes, this needs to be ASP.NET Core since we will be using kubernetes and running Linux containers. If you need to run Windows containers and classic ASP.NET then you could use Azure Service Fabric (not covered in this training) Service Fabric Quick Start
Using the following tutorial to create a simple todo Web API app using VS Code (or just use the one in the repository TodoApi):
Now that we have created an ASP.NET Core Web API we want to prepare it for Docker.
The first thing we want to do is modify our project to prepare it for containerization. In Program.cs, we need to use UseKestrel() on the builder's WebHost. By default, the app will listen to the localhost, ignoring any incoming requests from outside the container. By listening to any IP at port 5000, the app can listen outside the container. There are many ways you can do this. This by far is the easiest, and later we will also EXPOSE the port in the Dockerfile too to allow it to be accessed in the cloud.
builder.WebHost.UseKestrel(serverOptions =>
{
  if (builder.Environment.IsDevelopment())
  {
    serverOptions.ListenLocalhost(5000);
  }
  else
  {
    serverOptions.ListenAnyIP(5000); // Listen for incoming HTTP connection on port 5000.
  }
});
Next, we want to create a file called Dockerfile (no extension) and place it in the root of your project. Dockerfile best practices.
There are many images to use as a base images for Docker when using ASP.NET Core. We are going to be using two of them. Docker 17.05 and higher allows multi-stage builds:
- One for building - mcr.microsoft.com/dotnet/sdk:6.0
- And one for deployment mcr.microsoft.com/dotnet/aspnet:6.0
The reason for this is we want the smallest possible size for deployment. The SDK image is 1.73GB vs. 255MB for the runtime.
Here are all the possible images:
- mcr.microsoft.com/dotnet/runtime-deps:6.0: Deploy self-contained deployment apps
- mcr.microsoft.com/dotnet/runtime:6.0: Deploy .NET Core console apps
- mcr.microsoft.com/dotnet/aspnet:6.0: Deploy ASP.NET Core apps
- mcr.microsoft.com/dotnet/sdk:6.0: Build .NET Core (or ASP.NET Core apps)
You can find out more information about these different builds here with a great post by Andrew Lock. Or the official documentation here.
Following the guide to Dockerize an ASP.NET Core application, the first thing we need to add to the Dockerfile we create is the base image. As stated previously, we will be using the build image. We name it build-env to reference it later in the file.
The file itself will only have the code sections that you need to type, in between we explain what each section is for. Start by typing the following at the top of the file you just created (Dockerfile):
FROM mcr.microsoft.com/dotnet/sdk:6.0 AS build-envNext we set the working directory and EXPOSE port 5000. This is where we will be building the app:
WORKDIR /app
EXPOSE 5000
After that we copy the project file over and use the .NET CLI to call restore:
# Copy csproj and restore as distinct layers
COPY *.csproj ./
RUN dotnet restore
Then copy everything else and use the .NET CLI on the image to publish a release version of the app:
# Copy everything else and build
COPY . ./
RUN dotnet publish -c Release -o out
Now since everything is published we can use the runtime version to create the image. We set the working directory, copy the files from the out directory we created in the other image, and set the ENTRYPOINT (use the .NET CLI to run TodoApi.dll)
# Build runtime image.
FROM mcr.microsoft.com/dotnet/aspnet:6.0
WORKDIR /app
COPY --from=build-env /app/out .
ENTRYPOINT ["dotnet", "TodoApi.dll"]
In total the Dockerfile will look like:
# syntax=docker/dockerfile:1
FROM mcr.microsoft.com/dotnet/sdk:6.0 AS build-env
WORKDIR /app
EXPOSE 5000

# Copy csproj and restore as distinct layers
COPY *.csproj ./
RUN dotnet restore

# Copy everything else and build
COPY . ./
RUN dotnet publish -c Release -o out

# Build runtime image
FROM mcr.microsoft.com/dotnet/aspnet:6.0
WORKDIR /app
COPY --from=build-env /app/out .
ENTRYPOINT ["dotnet", "TodoApi.dll"]
IMPORTANT You want to make sure that the dll referenced in the last line of your Dockerfile (TodoApi.dll in this case) matches what will be produced by your application. Meaning if you named your application something other than TodoApi then you will need to change this line. If you don't, you will get a strange error like, "Did you mean to run dotnet SDK commands? Please install dotnet SDK," and you won't know what is causing it.
We also want to create a .dockerignore (don't forget the '.' in front of the name) this will make sure we keep the image as fast and as small as possible by ignoring files we don't care about. Place it in the root of your project directory (same as Dockerfile). We are excluding the bin and obj folders, as well as stuff associated with VS Code and Git, but you can add anything you don't need packaged in the container.
.dockerignore
.env
.git
.gitignore
.vs
.vscode
*/bin
*/obj
Now we want to create our images using Docker at the command line. Open up your terminal (Command Window, PowerShell, Terminal) and cd (change directory) into the TodoApi/ folder, and type the following commands.
Don't forget the '.' at the end. This will build our image according to our Dockerfile and give it a name of todoapi. It will be tagged as todoapi:latest. If we want our own tag we just add it in the command like todoapi:testversion or todoapi:version1.0.
docker build -t todoapi .It should produce something similar to this. Docker will create the directories, restore packages, create the dll, copy files, destroy the build image, etc...
#1 [internal] load build definition from Dockerfile
#1 sha256:be300676b517e70ec318ff4e1522160c157e73cbd4eaecc887c18298429cbfeb
#1 transferring dockerfile: 472B done
#1 DONE 0.0s

# [MORE INTERMITTENT STEPS HERE...]

#20 exporting to image
#20 sha256:e8c613e07b0b7ff33893b694f7759a10d42e180f2b4dc349fb57dc6b71dcab00
#20 exporting layers
#20 exporting layers 0.2s done
#20 writing image sha256:7e28663f832381c26e1ee7fc058446d2895aa1fe83c91212010859cf45c1bcf9 0.0s done
#20 naming to docker.io/library/todoapi 0.0s done
#20 DONE 0.3s

Use 'docker scan' to run Snyk tests against images to find vulnerabilities and learn how to fix them
Next we can run the container:
docker run -it --rm -p 5000:5000 -e "ASPNETCORE_URLS=http://+:5000" --name To_Do_App todoapiNOTE: Bash users might get an error like "the input device is not a TTY. If you are using mintty, try prefixing the command with 'winpty'." If this is the case, use a different terminal like PowerShell or use winpty to run the command:
winpty docker run -it --rm -p 5000:5000 -e "ASPNETCORE_URLS=http://+:5000" --name To_Do_App todoapiIf the above command fixes the error, you might want to create a Bash alias to handle this in the future without typing 'winpty':
echo "alias docker='winpty docker'" >> ~/.bashrcNow you should be able to run the original Docker command without any issues.
Let's take a closer look at the arguments in the above command:
- -it runs it interactively at the command prompt, as opposed to detached (i interactive t terminal)
- --rm automatically removes the container at exit (to clean up your local environment)
- -p sets up the port to connect your local port of 5000 to the port 5000 on the container
- -e sets an environment variable (We don't really need this since we set it in Program.cs)
- --name is the name of the container
- and lastly, the name you gave it in the previous step.
To prove to yourself that the container is running the app on your machine, open a browser and navigate to http://localhost:5000/api/todos.
If you want to look around the container you can have it give you a Bash prompt when you run it. Normally you can just add /bin/bash to the end of the command but if you have an entrypoint defined (we do) you have to run the command like this:
docker run -it --rm -p 5000:5000 --name To_Do_App --entrypoint bash todoapiThat will give you a Bash prompt in the working directory we defined in the Dockerfile, the "app" folder. To exit, you will need to type exit at the Bash prompt (as opposed to Ctrl + C)
Once you have your docker container running locally, you will want to put it in a repository so that it can be used. You have many options for this and usually it depends on a couple of things. First, is this an image that will be open source and be used as either a base image or a starter image? Or is this a personal/company image that needs to stay private.
If your container is meant to be consumed (à la base image) Docker Hub is probably the best place to host your container. It allows easy access to it and works seamlessly in the Dockerfile. If your container is a private container then you need to know where they are running. Your containers should be registered in the same cloud you use for hosting them.
- Azure Container Registry (ACR)
- AWS EC2 Container Registry (ECR)
- Google Container Registry
- IBM Cloud Container Registry
- Hosting your own in the cloud or locally with Docker Registry
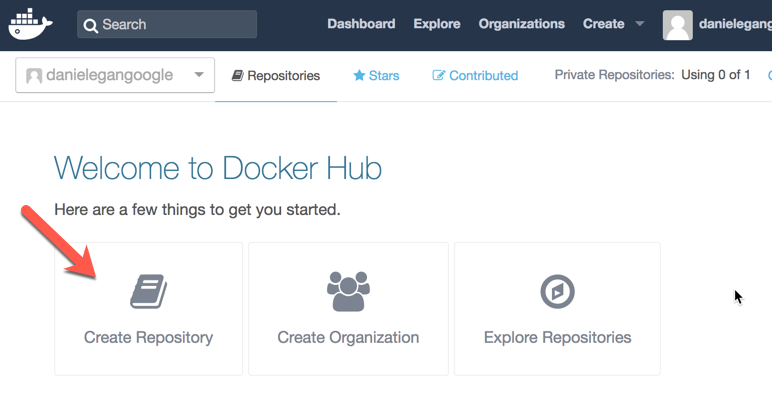
In this section, we are going to assume you want the world to see, and use your container, so we are going to host it in Docker Hub.
The first thing we need to do is to go to Docker Hub and create a repository to store our image:
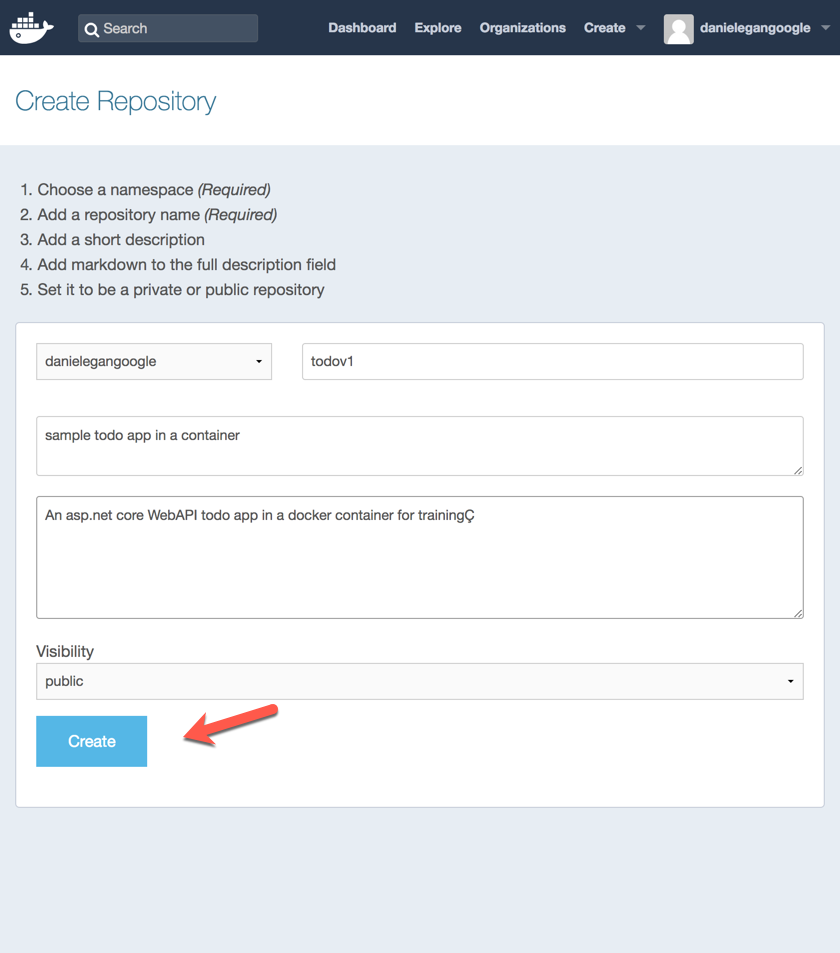
Fill out the form with the desired information:
Now we can tag and push our image from the command line.
You should already be signed in and your username and password should be in keychain (Mac) or credential manager (Windows) from when you signed into Docker for Windows/Mac. For more information on securely signing into Docker see THIS page.
Open up your command line and type the following command (replacing it with your Docker Account Name)
You are using docker to tag the image we created (todoapi) to associate it with your docker account.
docker tag todoapi <_YourDockerAccountName_>/todoapiNext we want to push it to our Docker Hub account. Run the following command at the command line.
docker push <_YourDockerAccountName_>/todoapiWhen it is done you should see something like the following.
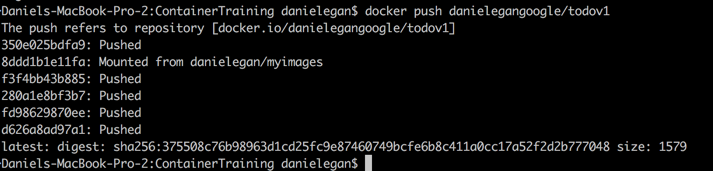
You can check https://hub.docker.com to verify it is there. You now have your Docker Container in Docker Hub for the world to use.
If we want to pull the image from Docker Hub to your local machine, we need to type
docker pull accountname/imagename:tag.If you don’t specify the tag, you are going to pull the image tagged :latest
Before we can upload our container to the Azure Container Registry (ACR) we need to actually create the registry. There are three ways to do this:
- Use the Azure Portal to create the resource group and the registry (Instructions here)
- Use Powershell (Instructions Here)
- User the Azure CLI
We are going to do it using the Azure CLI. One of the prerequisites before starting this tutorial was to have the Azure ClI installed. In addition to this, we need to also make sure that the version of the Azure CLI that we have is version 2.0.27 or higher. Type the following command into your terminal.
az --versionThis will give you not only the version of the az CLI but also all the command line interfaces that the az CLI utilizes.

Make sure the it is above 2.0.27. If not, go to the link in the prereqs and upgrade/install it.
If you have not used the Azure CLI before you will need to log in using the command
az loginThis will print out the following line with a code to authenticate the Azure CLI with your Azure subscription. If you have already done this, you can skip this step.
To sign in, use a web browser to open the page https://microsoft.com/devicelogin and enter the code SOMECODEHERE to authenticate
If you want to test if you are signed in you can run the command to list the resource groups in your subscription.
az group list -o tableThis will give you a list (in table format) of all your resource groups.

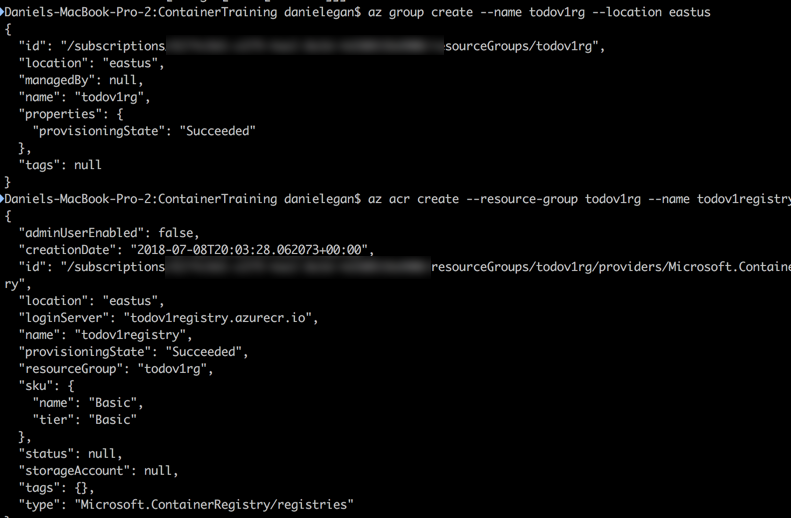
Now that we have confirmed we are logged in to azure from the command line we can very quickly create our resource group and our registry.
To create the resource group type the following command
az group create --name todoapirg --location eastus
Remember this resource group, we will be using it often during this workshop.**
Now we can create our registry. Just type the following command into the terminal.
az acr create --resource-group todoapirg --name <_YourRegistryName_> --sku BasicThe registry name needs to be unique, so use <YourRegistryName>.
We are using the Basic sku for the registry which works well for testing. There is also Standard and Premium skus. You can read about them here.
When it returns you should see the follow output.
The first thing we need to do is to log into the ACR that we just created. You can do that with the following command using the name we created in the last step.
az acr login --name <_YourRegistryName_>You should receive a Login Succeeded when it is complete.
To push an image to ACR you need to have it locally. You could pull it from Docker Hub and tag it but we already have ours local. We just need to tag it close to the same way when we uploaded it to Docker Hub.
We need to issue the following command using docker.
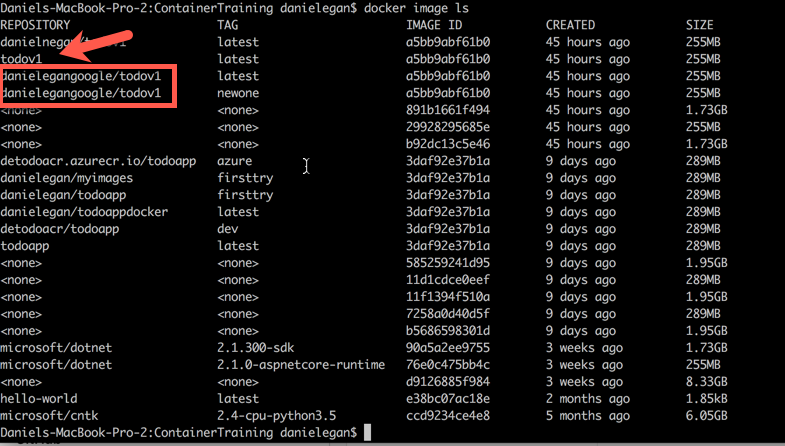
First, just to remind us of the name of the local image, not the one we tagged for Docker Hub, run the following command to see a list of all of our local images.
docker image lsYou want to tag the todoapi. Not the ones that are already tagged for Docker Hub. (Your name will differ)
To tag it for ACR run the following fully qualified command. (which includes the .azurecr.io)
docker tag todoapi <_YourRegistryName_>.azurecr.io/todoapiremember if you don't add a tag (with a colon like this todoapi:beta) to the end of the image name it will be tagged as todoapi:latest
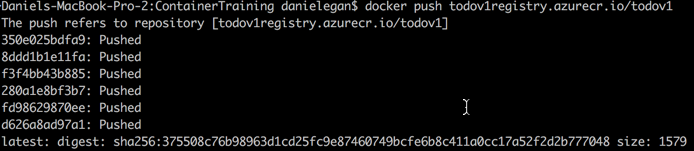
Finally, you can push the images using docker push.
docker push <_YourRegistryName_>.azurecr.io/todoapiWhen it completes, you should see output similar to the following.
If you want to see it in the repository, you can run the following command.
az acr repository list --name <_YourRegistryName_> --output tableOr view it on the Azure portal http://portal.azure.com

Next, we will deploy to Azure Container Instances
Now normally you will be doing your deploying headless. Meaning using some sort of CI/CD Pipeline to deploy your container from ACR to ACI or others. In that case you will want to authenticate using a service principal. You can find a quickstart here, on how to do it or more information on using service principals here.
For our image we will enable the admin user on the registry so we can do it manually from the command line interface. To enable it, you run the following command if we want. (keep in mind we are still logged in to acr).
az acr update --name <_YourRegistryName_> --admin-enabled trueThe rest of the section, we are going to again do it visually in the portal.
First we need to go to the portal and click on Create A Resource as we did before and search for Container Instances. Once the blade opens, click on Create.

From this page, you can see that we can create the instance from either a public image (Like our Docker Hub image) or from a private image (like our ACR image). We will do a private images.
When you click on the Private toggle, you will boxes for :
- Container Image
- Image Registry login server
- Image Registry username
- Image Registry password.
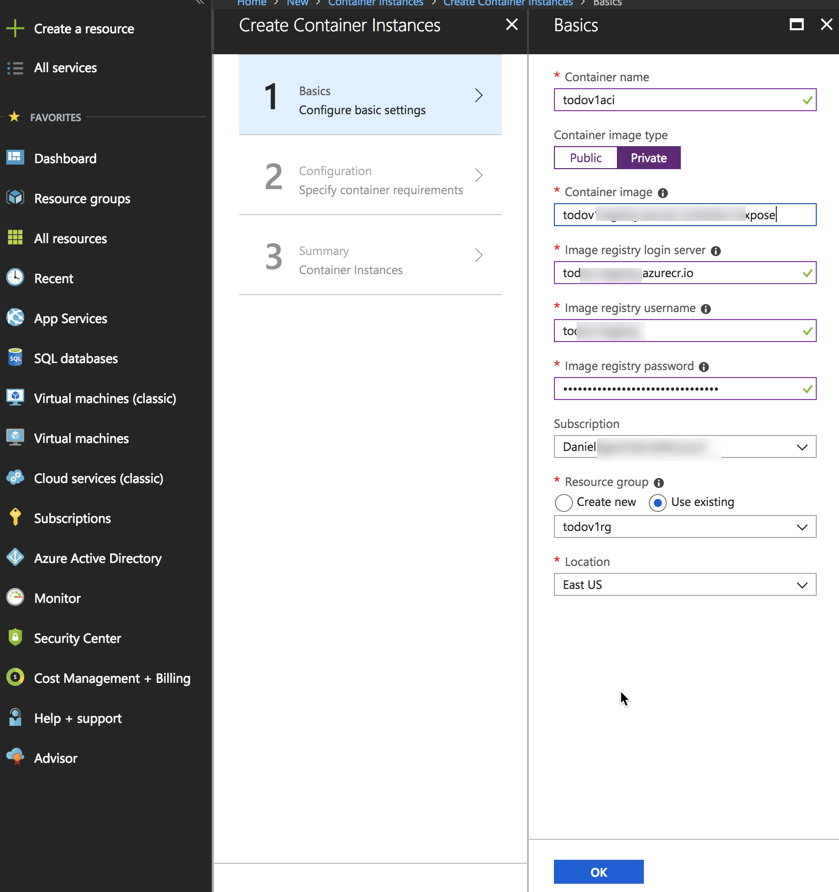
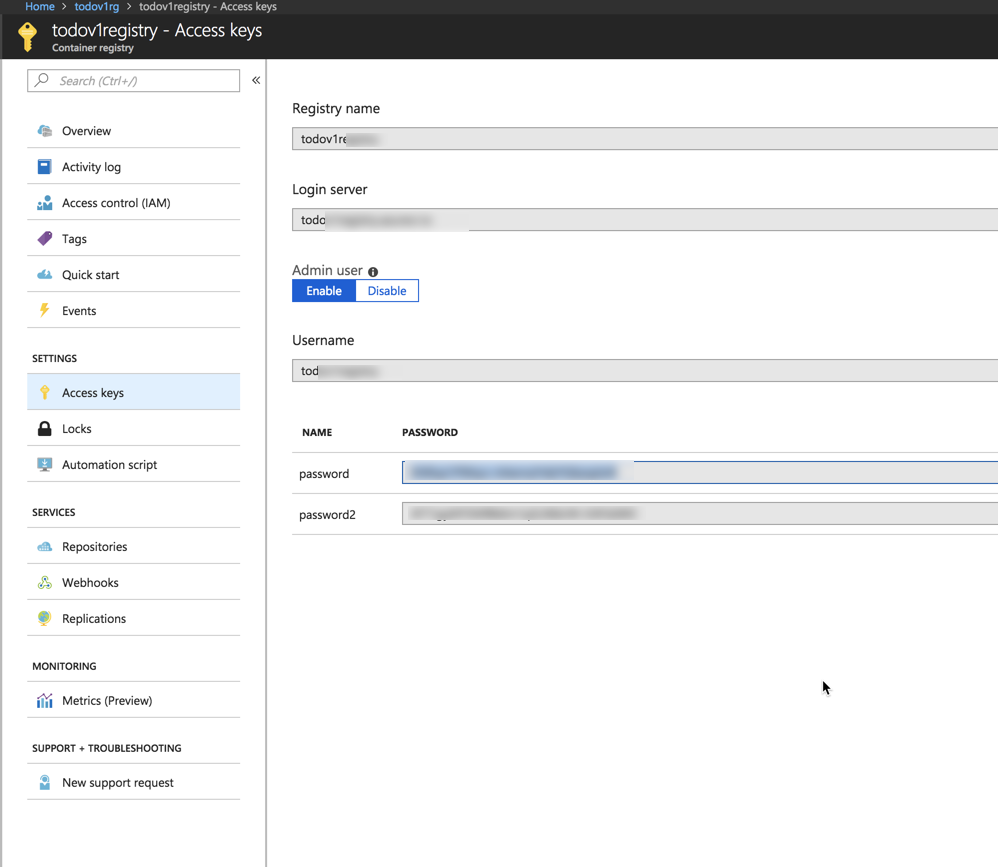
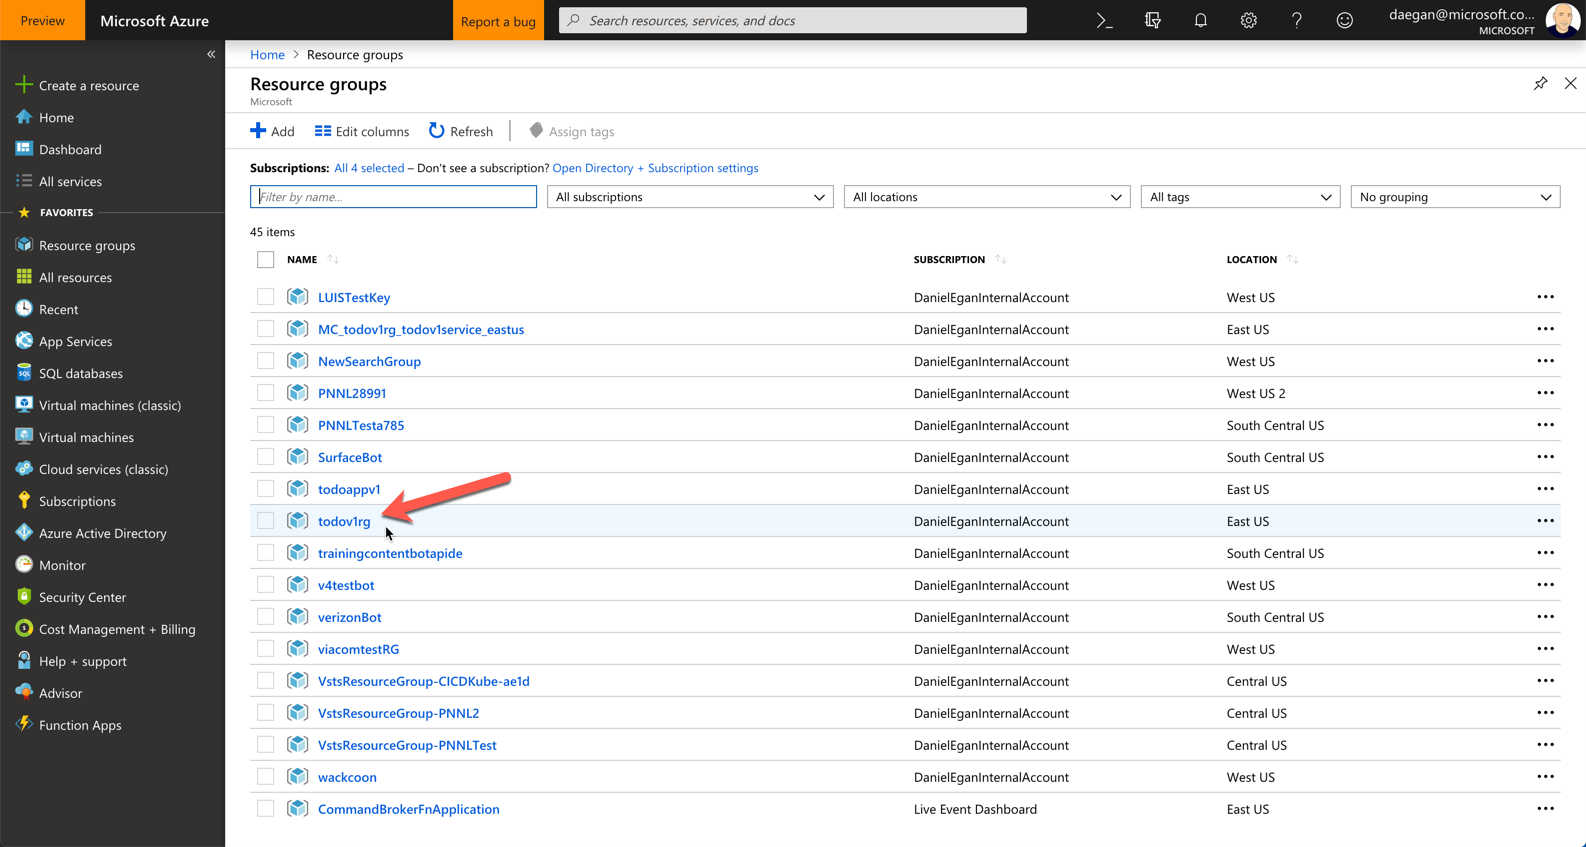
You can get all of these from the registry that you created earlier. To find it, on the left,
- click on Resource Groups
- Click on the resource group you created ( I called it todoapirg )
- Click on the registry you created ( I called it todoapiregistry )
- On the left of this blade click on Access Keys this will give you the information you need for your private registry.
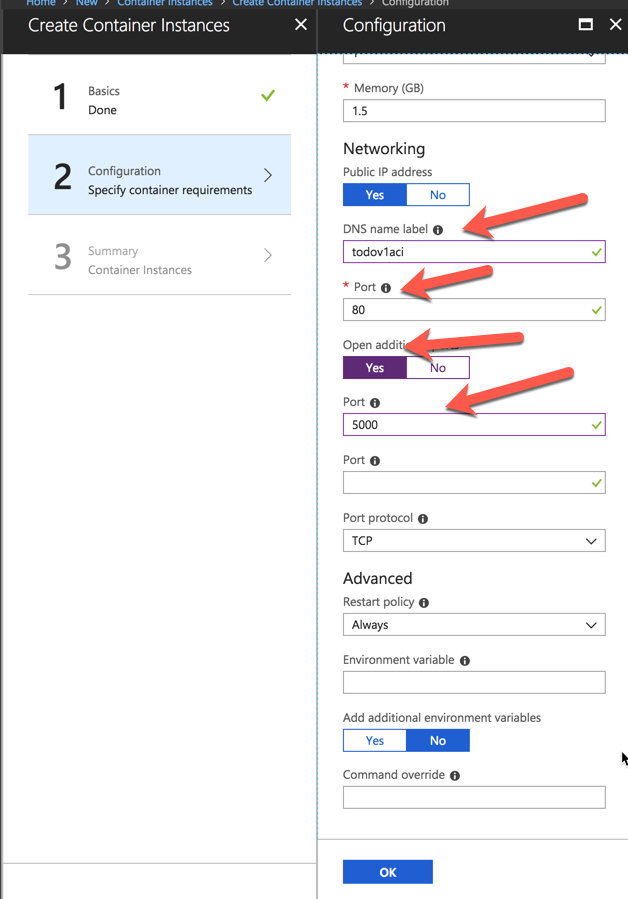
In the Configuration section, you want to set the following:
- DNS name label -- The name that will be used, combined with the region you are in, to access your container instance.
- Port - We are going to leave 80 there even though it is not being used so we can add additional ports
- Click on Open additional ports and add port 5000
We will leave everything else as is but you can see we can add environment variables and command overrides if needed. Click OK when done
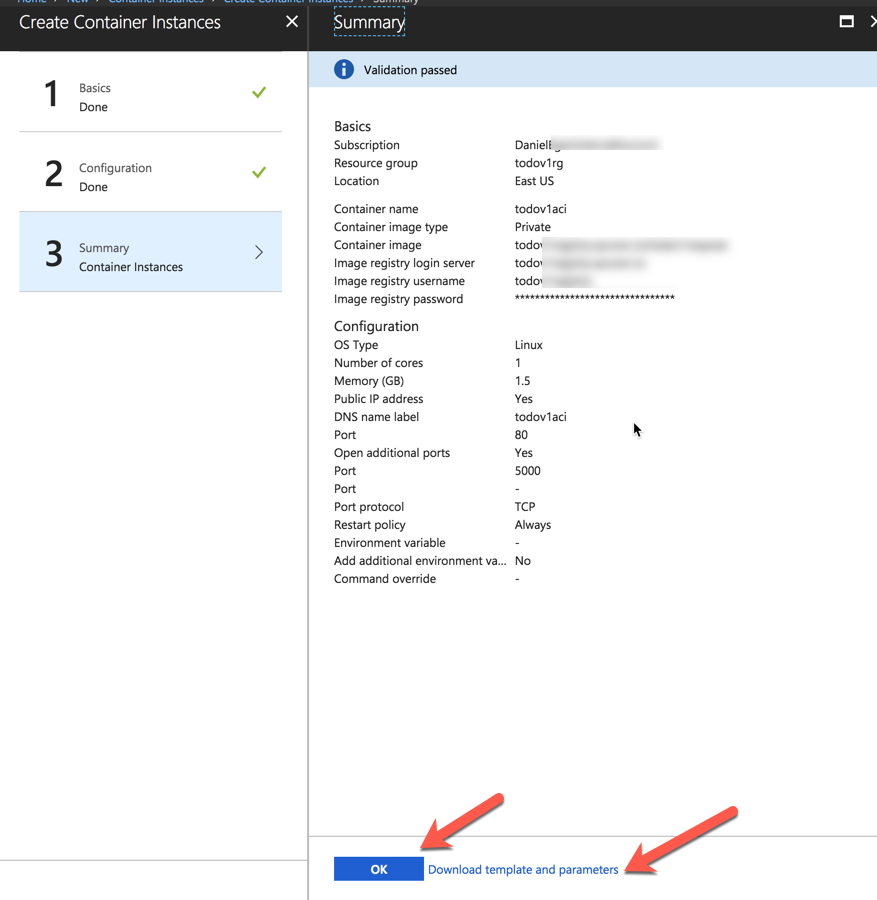
This will bring up a summary for you to review. You can see that you can download a template to do this in an automated fashion at a later date. Click on OK when done.
When it is deployed, you can view the resource. To access your container, you can use the FQDN address. Also notice that you have and IP address which means if you would like you could put a load balancer in front of this (something that Azure Web Does for you )
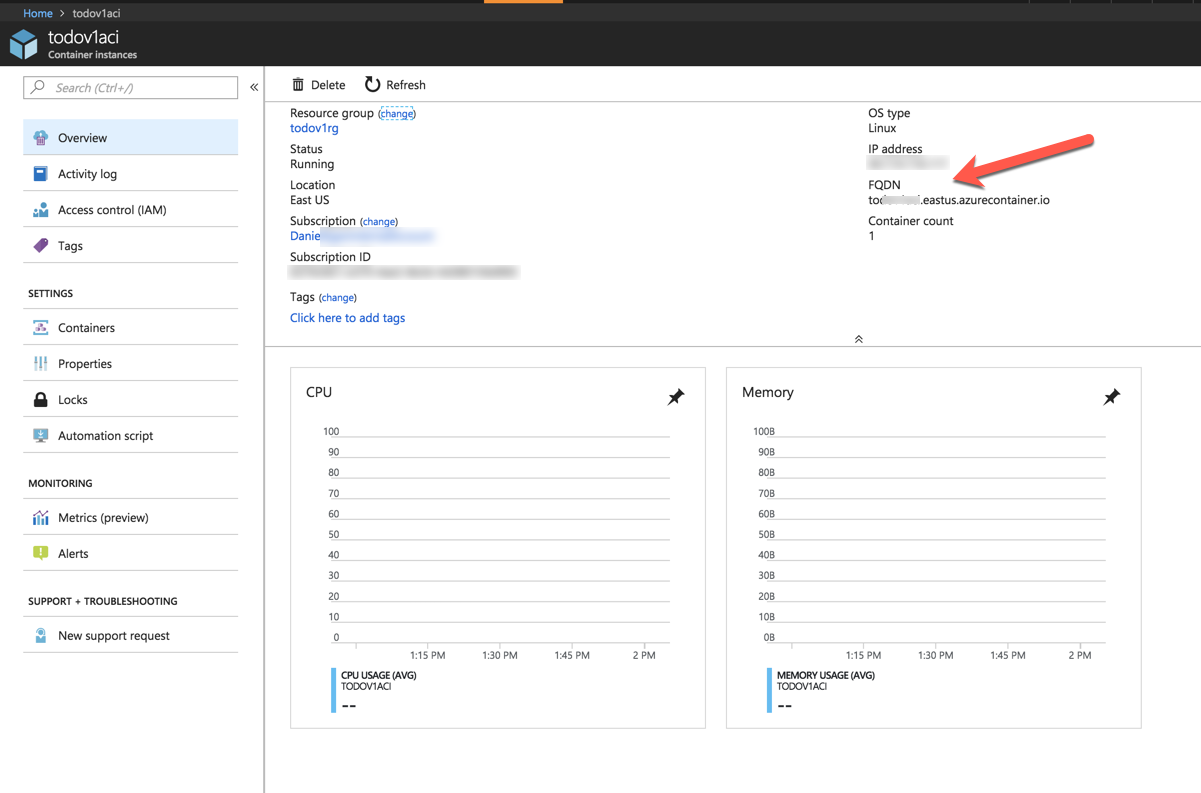
Make sure that you add the port and api route :5000/api/todo

Next we will run it in an Azure Web App.
We are not going to be spending time on what an Azure Web App is other than acknowledging that it is a place in azure that allows you to host websites, apis, and now containers, with the ability to easily scale them, create minor CD/CI, among other things. We are going to use one as one way to host our simple todo API container.
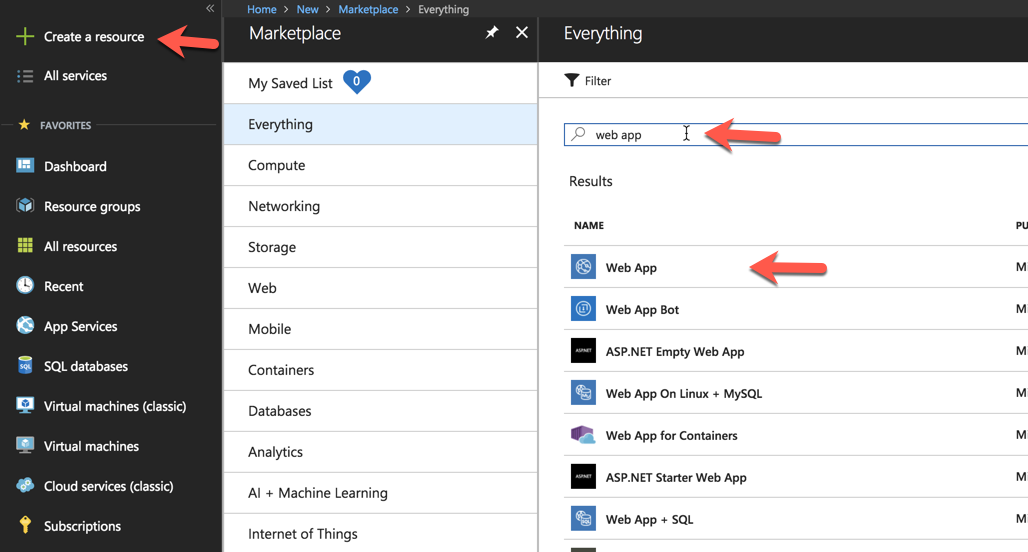
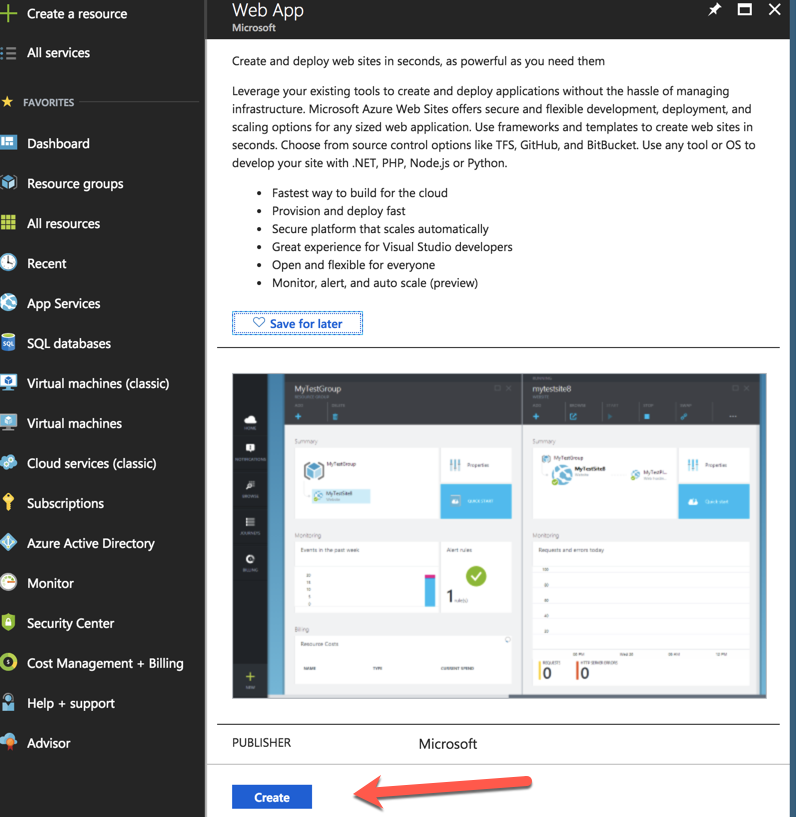
For this section we are going to move from the command line and use the visual tools at http://portal.azure.com. Once you sign on to your account, click on the Create a resource link and search for web app (or just navigate to it). Click on where you see Web App
On the next page, simply click on the Create button.
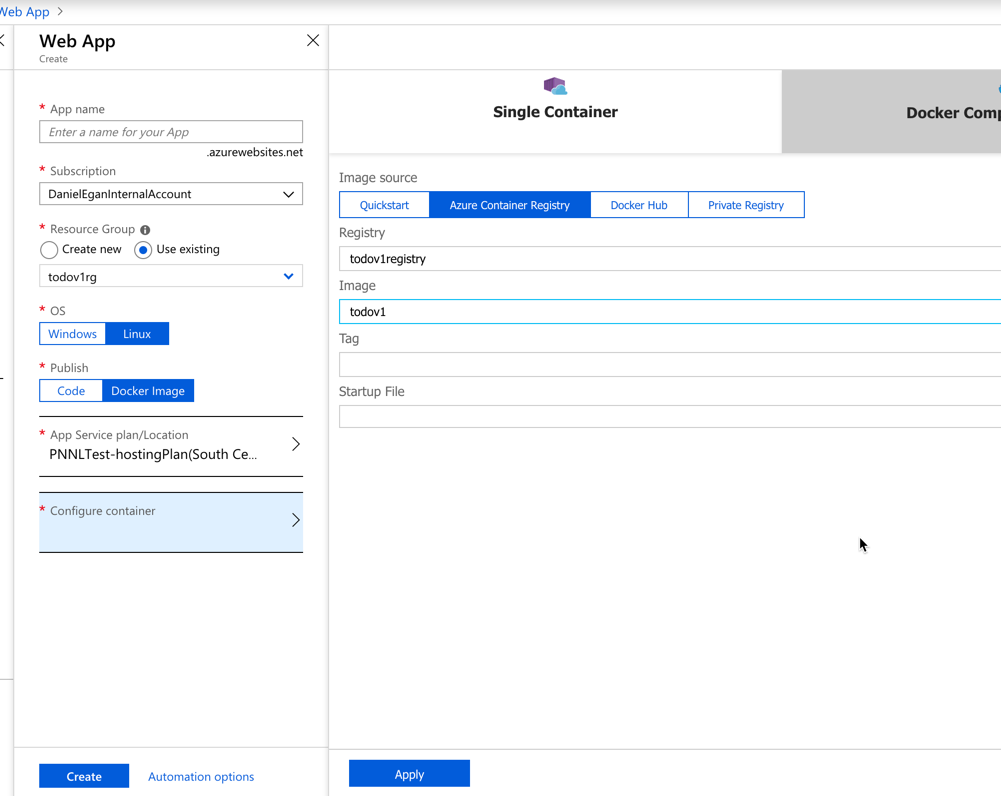
When the WebApp blade comes up you will need to do the following :
- Give it a name (must be unique across azure
- Select your subscription
- Create or use a Resource Group (we created todoapirg in other exercises)
- Select an App Service plan/Location -- Select a region that is in or near your hosted container
- Configure Container
- Select Single Container
- Select Azure Container Registry -- Although as you can see, you can select others
- Fill in all the dropdowns (nothing in Startup File)
- Click OK
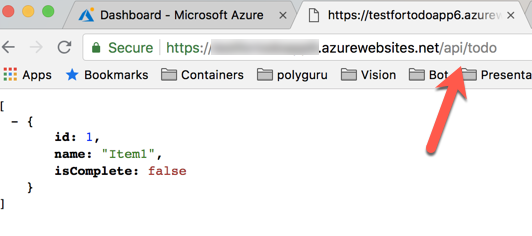
When your resource comes up you should be able to navigate to the url provided. Make sure you add the /api/todo to the end of the url
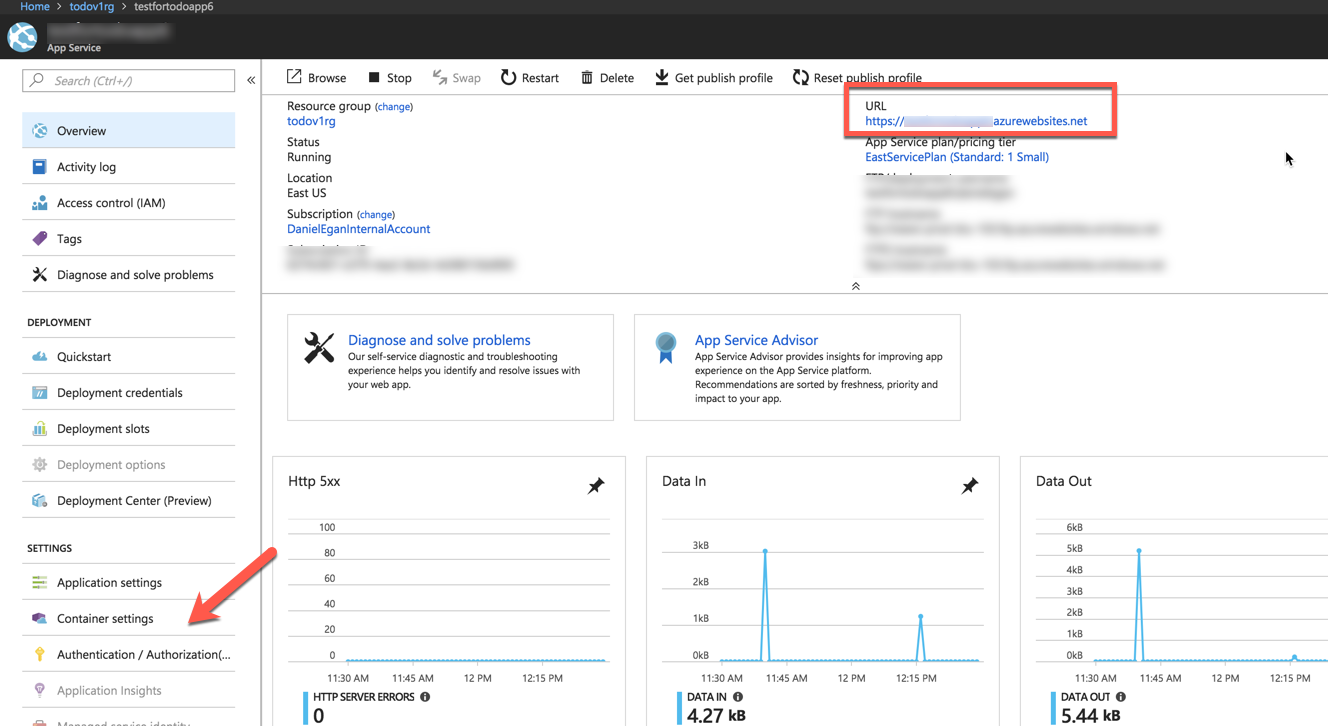
You should see the same json returned that we saw locally.
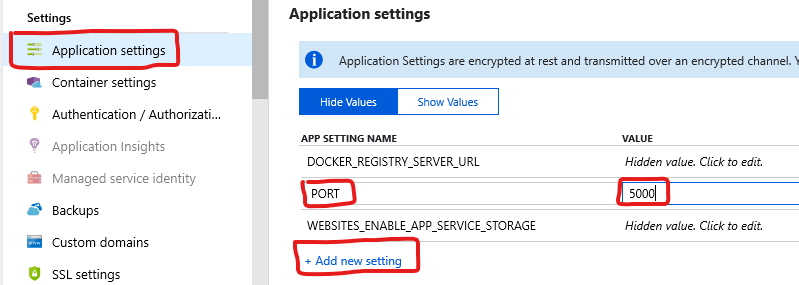
If you do not see the json, you may need to configure Azure to use port 5000. Go to the Application Settings blade. Click Add new setting. Add an App Setting of PORT and set its value to 5000. Then click Save at the top of the page.
Next, we will set up CD for your container in a web app
There are multiple ways to enable CI/CD pipelines for your containers. The most robust would be to use Azure Dev Ops and pipelines to implement gates and checks along the way. For this lab though, we are going to the ACR webhook. Also, we are only setting up CI/CD for the staging slot. In this simple scenario, we want to be able to swap staging and production manually once we are confident that the new container works properly.
So to set up the webhook you will need to do the following:
Sign into the Azure portal if you have not done so already.
Navigate to the webapp we created in the previous lab.
Click on Deployments Slots (Or Deployment Slots Preview) and click on Add Slot 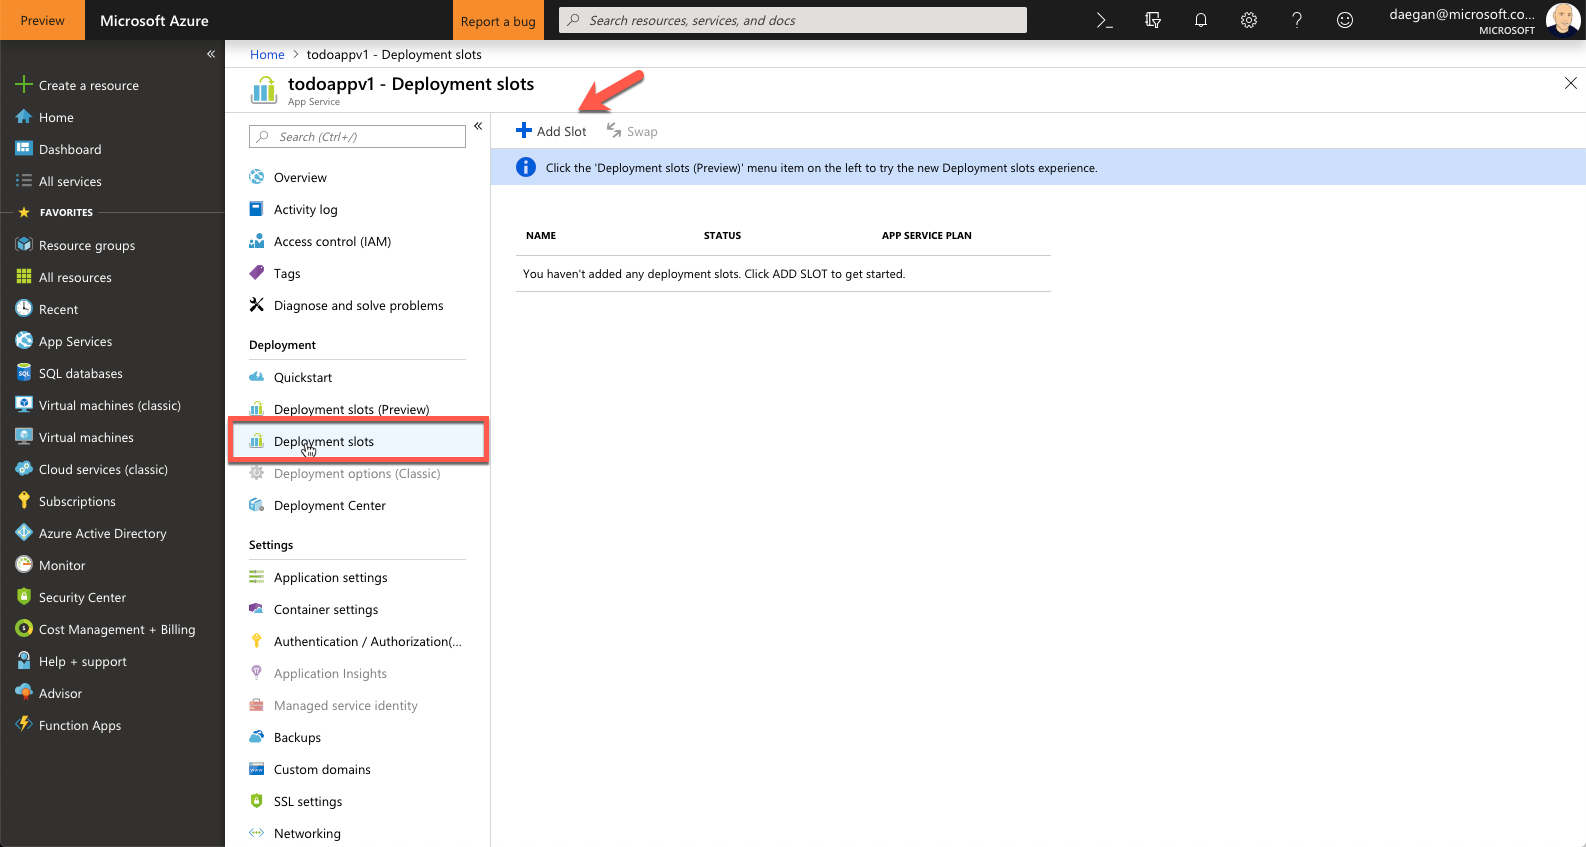
Create a slot called Staging. Under Configuration Source, select your production slot (it should just say the name of the webapp) then click OK.

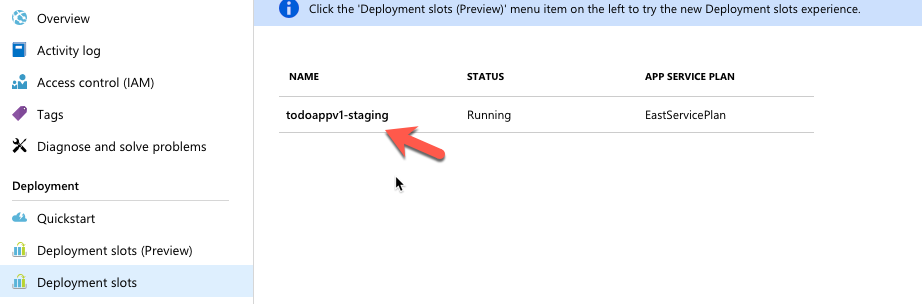
This will clone the existing webapp and add the current container to this slot. Wait for this to complete. When the stage appears, click on the stage to open up the overview.
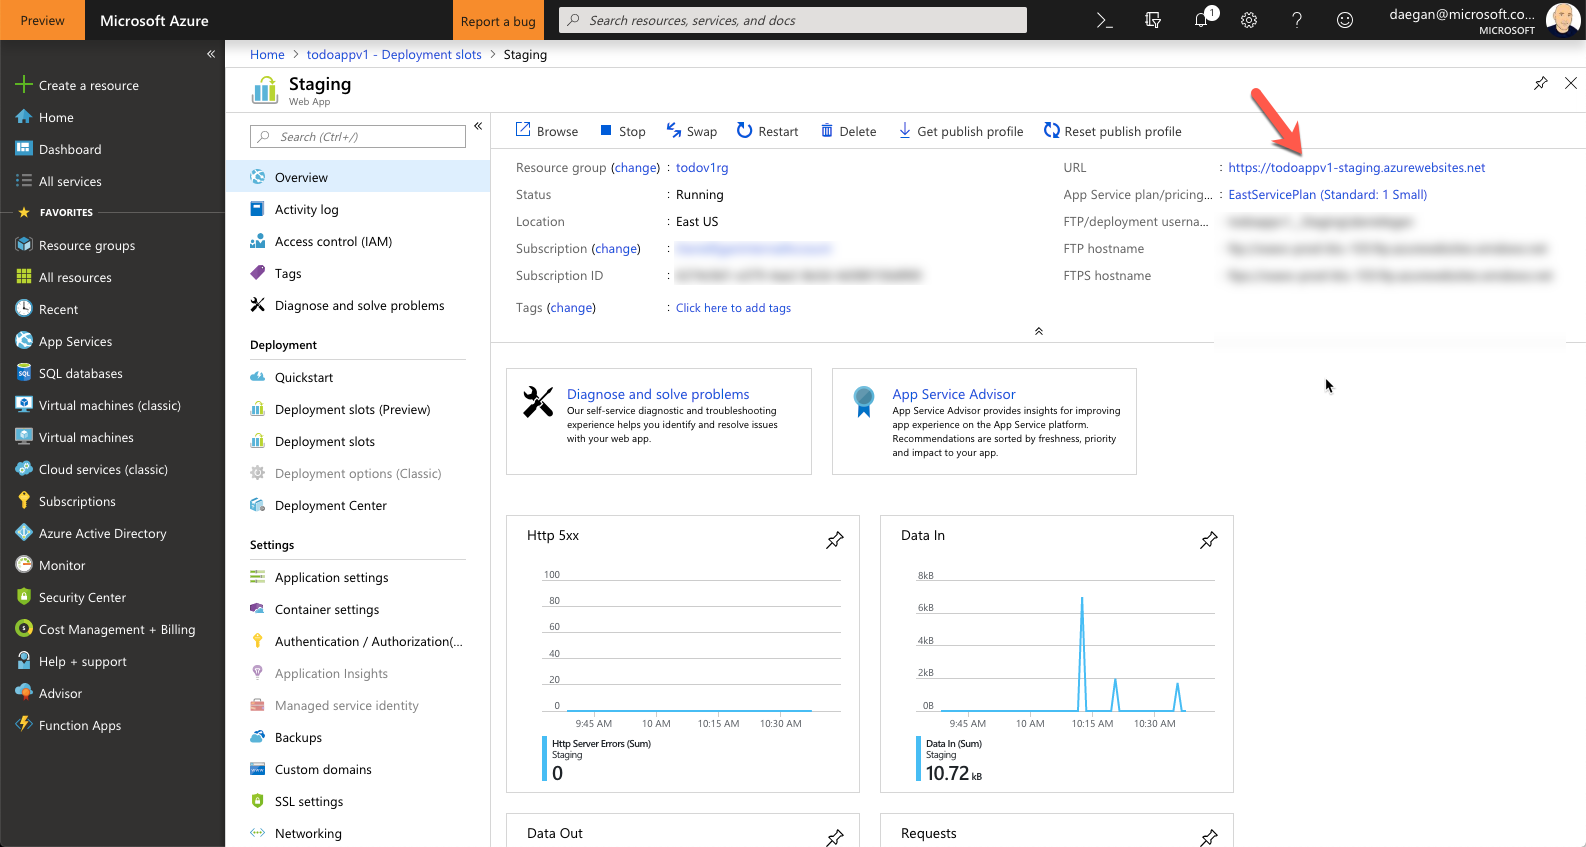
As you can see, the URL for this slot is the same as your production webapp with -staging appended to it. If you would like to verify that it is working correctly, you can click on the URL to open it (don't forget to append it with /api/todo)
Once you are done testing, click on container settings for the staging slot you are on (not the main webapp production slot) Under Continuous Deployment click the ON toggle and select save. This will create a webhook.

Next, navigate to the registry you created (todoapiregistry) and select Webhooks.
Click the ellipses (...) at the end of your webhook.
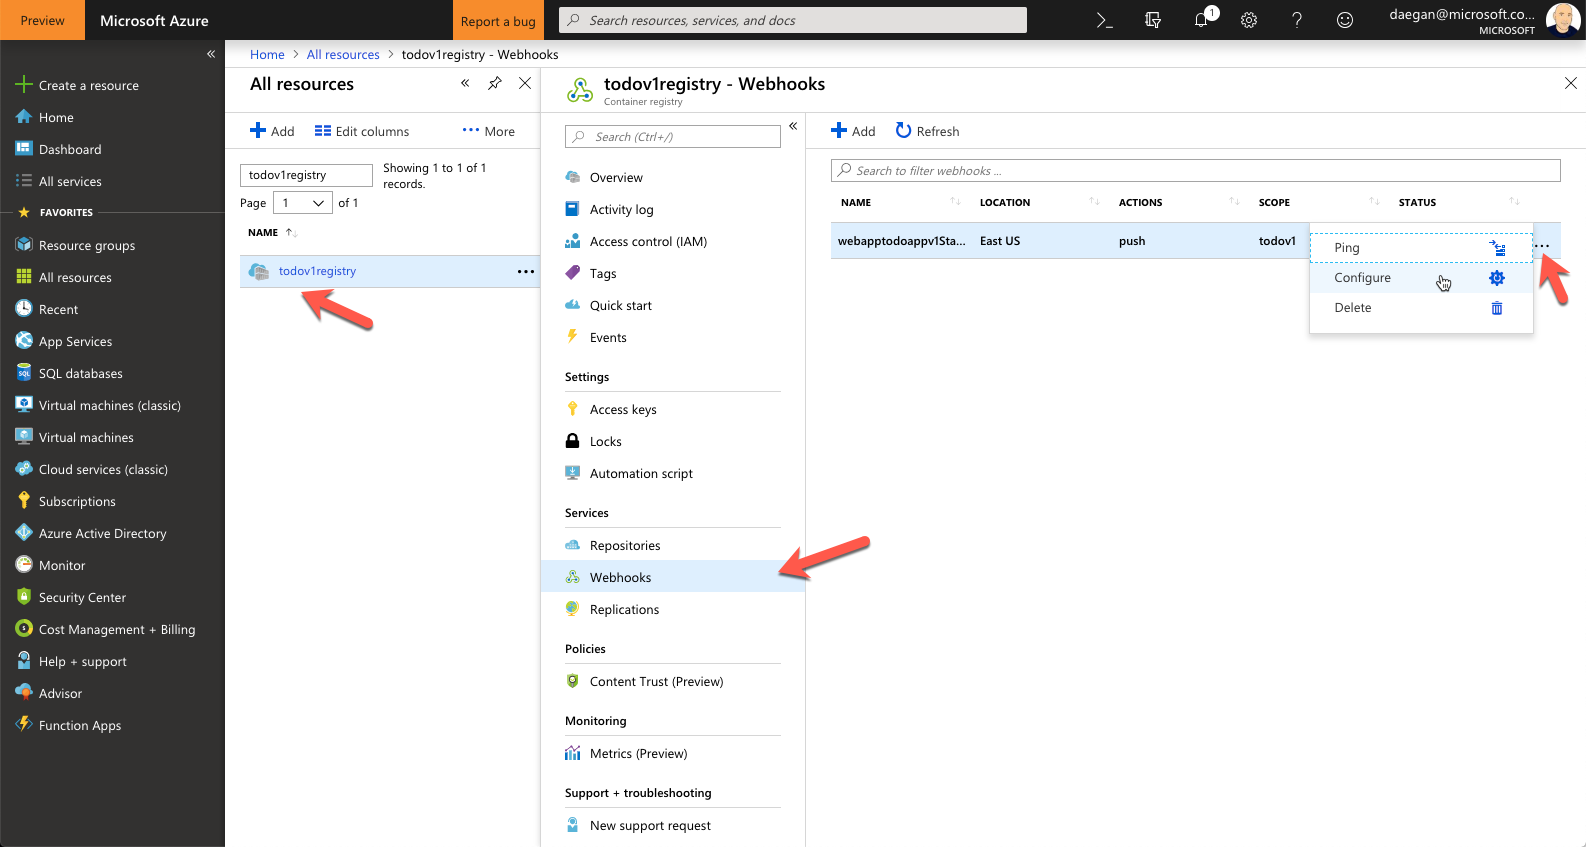
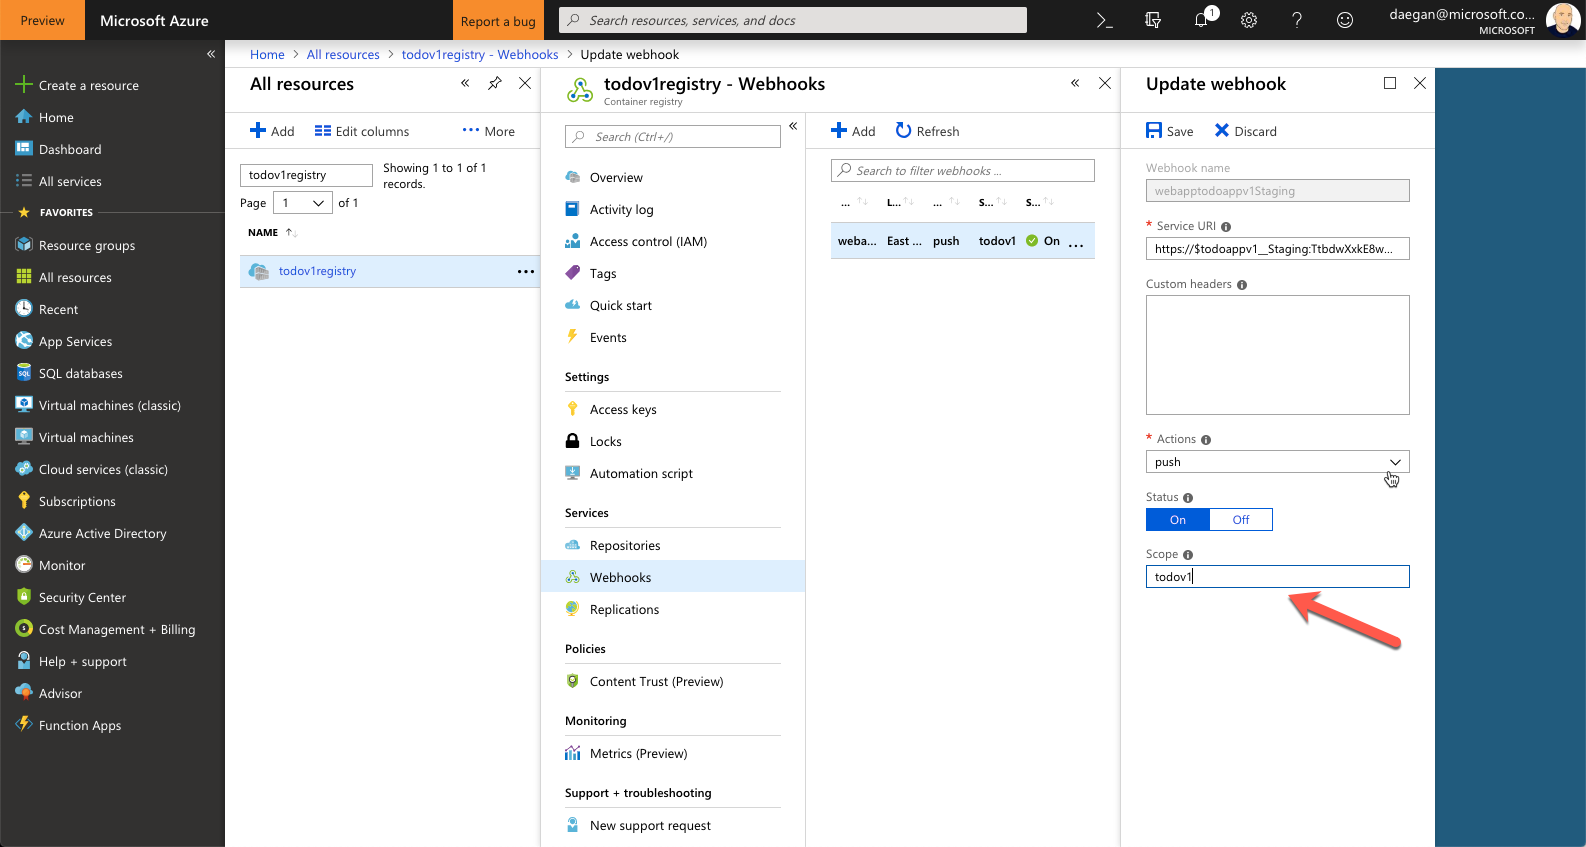
From here you can make configuration changes. For example you can set the scope, which tells the webhook which tagged image to look for. If no tag is specified then :latest will be selected.
If you would like to set up this same thing with Docker Hub you can follow the directions at the bottom of This Page
If you would like to see how to use Azure DevOps to deploy your container you can look Here
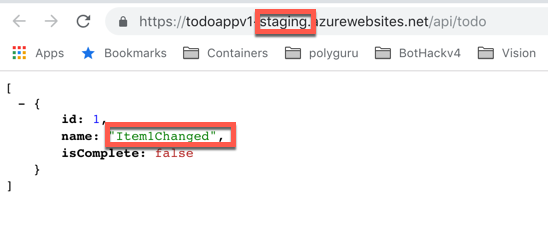
Of course, now we want to test to make sure it works right? The first thing we need to do is make some sort of change. You can make any change you want to the web app but lets make this easy. Go ito the TodoController.cs file and change the word Item1 to Item1Changed (or whatever you would like). This is what we have been looking at when we test our service.
        public TodoController(TodoContext context)
        {
            _context = context;

            if (_context.TodoItems.Count() == 0)
            {
                _context.TodoItems.Add(new TodoItem { Name = "Item1Changed" });
                _context.SaveChanges();
            }
        }
Once we have done this we can use Docker to build the new image and push it to ACR.
Build image(don't forget the '.' at the end) (make sure you are in the directory that your dockerfile is in)
docker build -t todoapi .Tag image for ACR
docker tag todoapi todoapiregistry.azurecr.io/todoapiPush to ACR (You may need to log in again to ACR - az acr login --name )
docker push todoapiregistry.azurecr.io/todoapiWhen done, your command line will look similar to this (look for errors)
➜  TodoV2AddingDocker git:(master) ✗ docker push todoapiregistry.azurecr.io/todoapi
The push refers to repository [todoapiregistry.azurecr.io/todoapi]
ed663896211d: Layer already exists
8ddd1b1e11fa: Layer already exists
f3f4bb43b885: Layer already exists
280a1e8bf3b7: Layer already exists
fd98629870ee: Layer already exists
d626a8ad97a1: Layer already exists
expose: digest: sha256:4be2518323181c8954ac4a22b47ced6e21c1e10da6986332859e152aff5f2e02 size: 1579
f131451deafe: Layer already exists
8ddd1b1e11fa: Layer already exists
f3f4bb43b885: Layer already exists
280a1e8bf3b7: Layer already exists
fd98629870ee: Layer already exists
d626a8ad97a1: Layer already exists
latest: digest: sha256:4ba89a74e3f74fed7e18b88bac053fb070638d4362b8ee96003c57cb89ed8c12 size: 1579
If you go to the Webhooks section of your registry, you can check to make sure it succeeded. (200).

And finally, make a call to the staging URL to confirm that the change you made shows up.
Finally, you can go to the Deployment Slots on your web app and swap images OR go to the Deployment Slots (Preview) and send a percentage of traffic to the new container.

Next, we will deploy our container in a Kubernetes Cluster.
Now we will deploy our container to the fourth of our options, a Kubernetes cluster. To do this we will be using AKS, the Microsoft Managed Kubernetes service. We will use a combination of the Azure CLI and the portal to complete our tasks.
To begin, we first need to make sure that AKS is associated with your Azure subscription. To do that, run the following command.
az provider register -n Microsoft.ContainerServiceWhen that finishes, we can create the AKS cluster inside the resource group that we have been using for this workshop todoapirg to do this, type the following command.
az aks create --resource-group todoapirg --name todoapiservice --node-count 2 --generate-ssh-keysThis will begin to create our cluster with two VMs and generate out ssh-keys for us.
This will take a while to spin up so be prepared to wait 5 or 10 minutes. When it completes you will see something similar to this.

You now have your first kubernetes cluster in Azure.
Before we deploy our application to the cluster, lets take a spin around what was created.
If you go to the portal and look at the resource group you created your cluster in todoapirg
you will notice that there is only one item that relates to the cluster in there, the service itself. This is the pointer to the master node and is managed for you by azure (patching, upgrading, etc...). You don't have access to the master node.
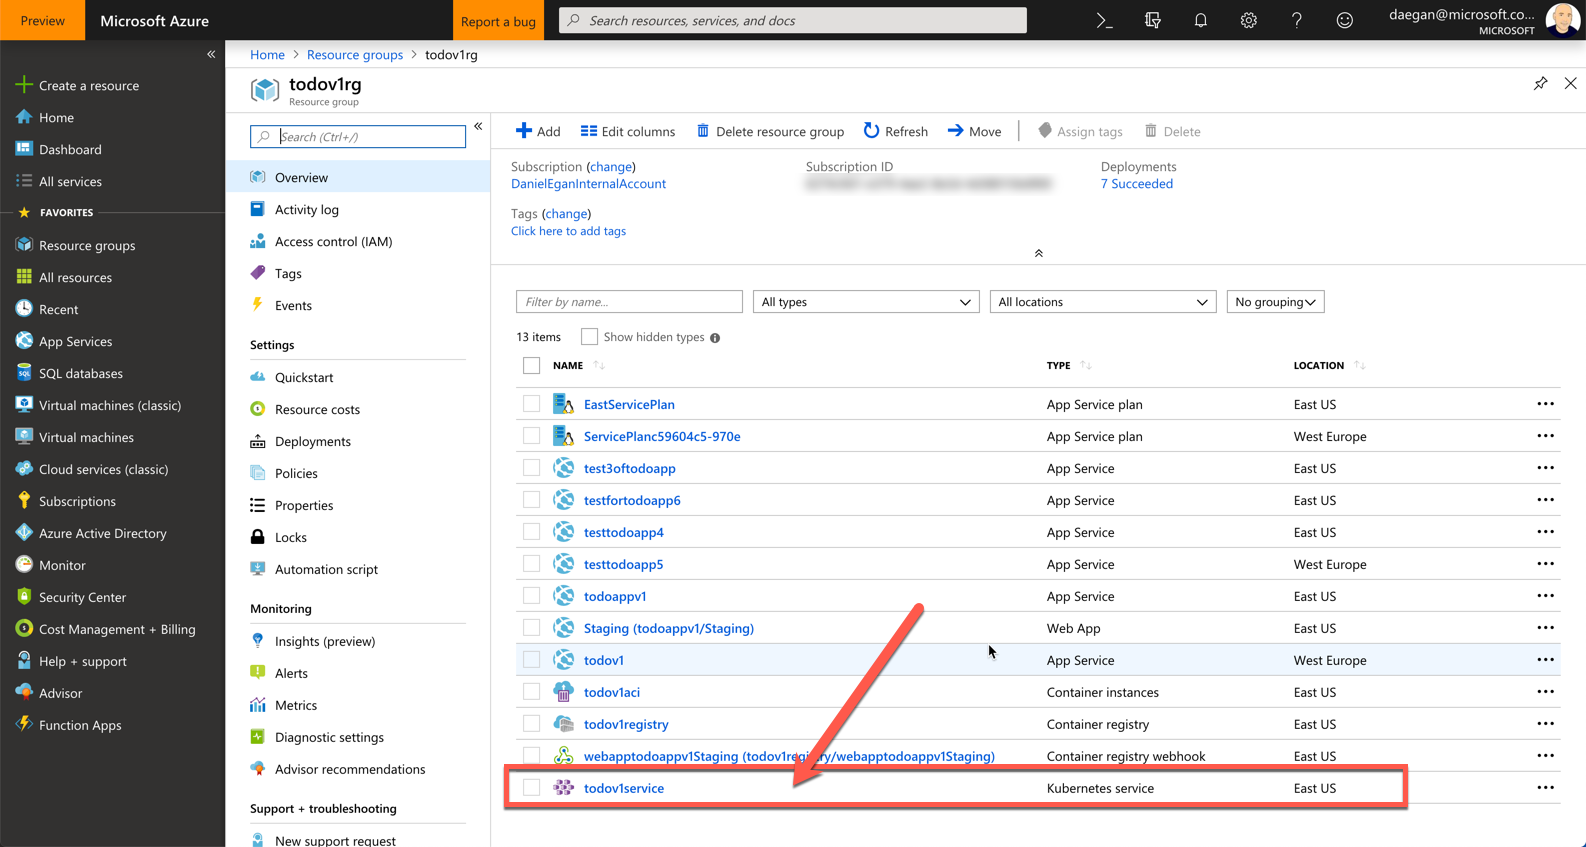
So where is all the other stuff associated with the service? If you go back to your resource groups, you will notice that there is a new resource group called MC_todoapirg_todoapiservice_eastus (MC = Managed Cluster/ original resource group / name of service / region of service)
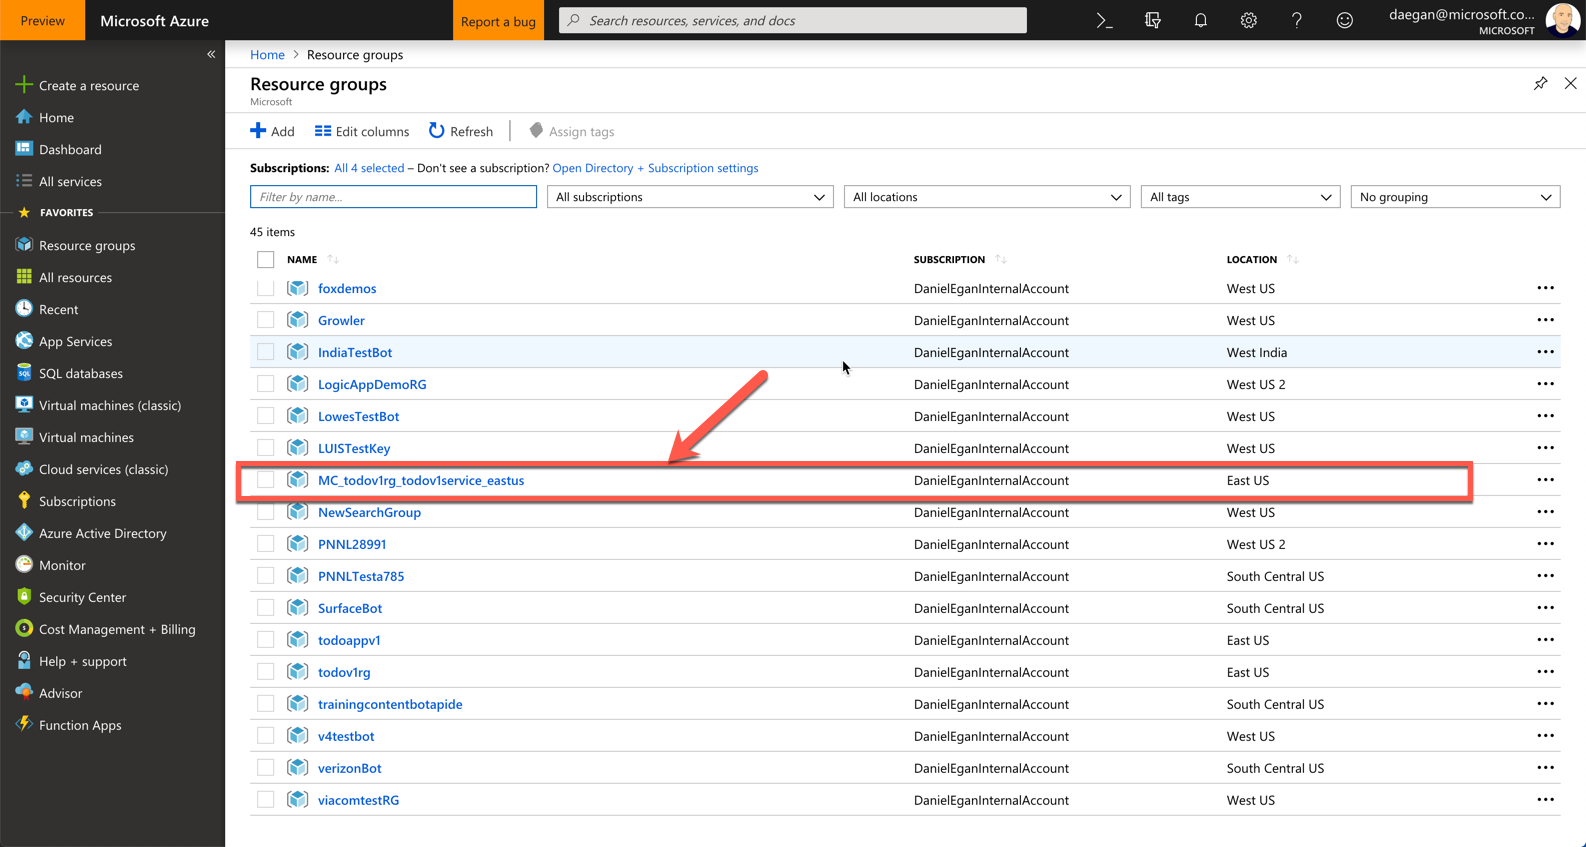
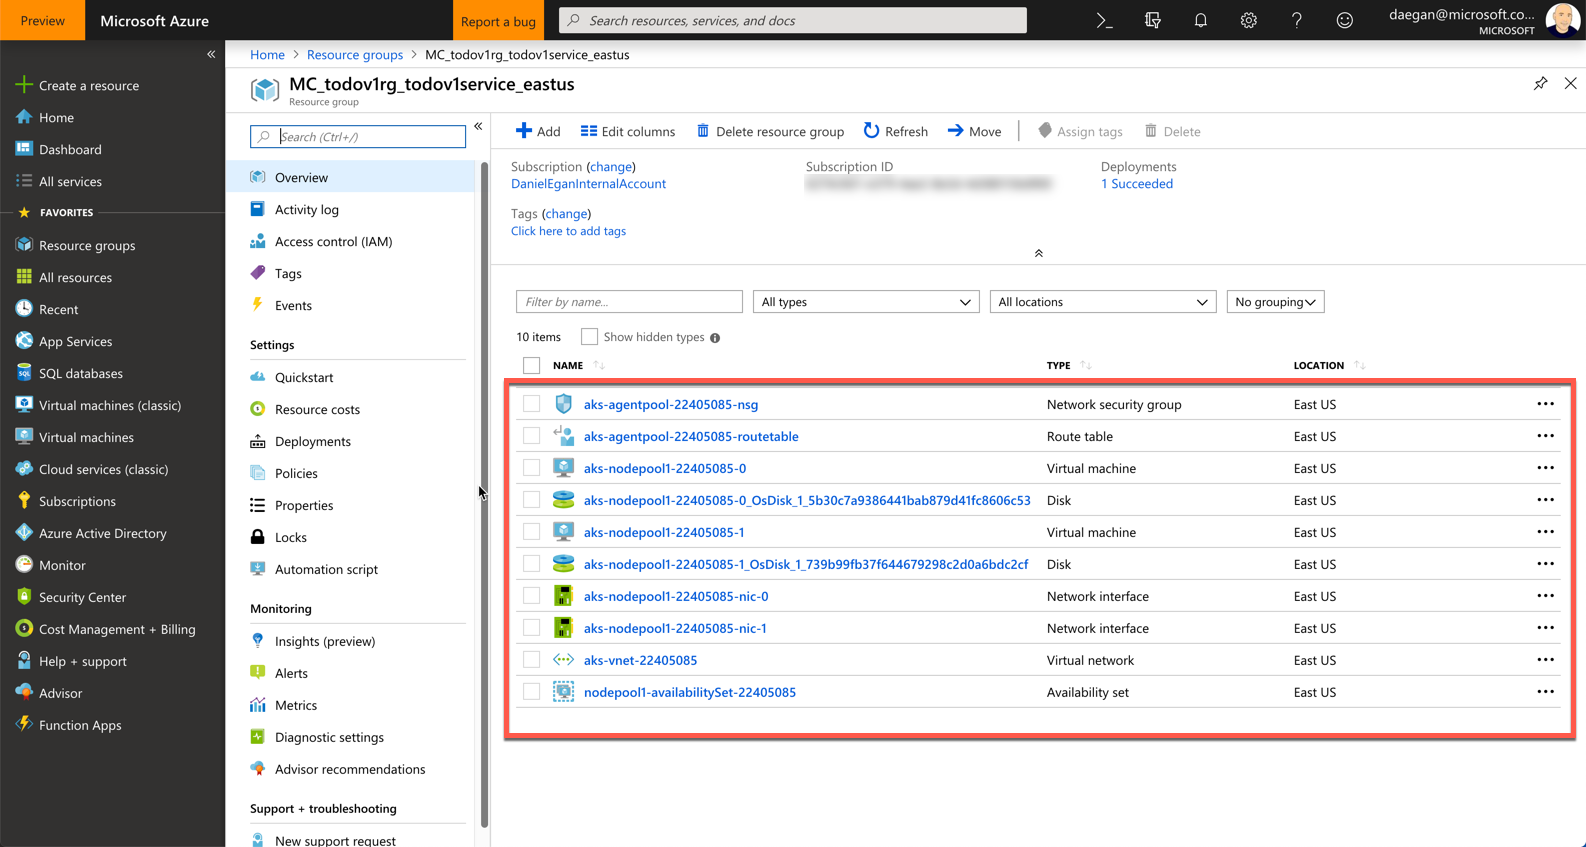
If you click on that resource group you will see all of the other things that were created for your cluster. (The VMs the disks, Virtual Network, etc...)
Kubectl, pronounced "Kube cuttle" or "Kube control" depending on who you ask, is your command line interface to your kubernetes cluster. We installed this as part of the pre-reqs at the beginning of the lab. If you did not, head back up there before continuing. We will be using this tool to deploy and manage our applications and services to the nodes we created. In addition, we are also going to utilizing YAML files to do our deployment. We will not be going deep into YAML files here, they are a text based file that is used to set configurations (pods, deployments, etc...) in our cluster. If you would like to learn more about them just search Yaml files for beginners.
So to communicate with our Azure Kubernetes Cluster we need to connect Kubectl to our cluster. To do that we need to execute the following command.
az aks get-credentials --resource-group todoapirg --name todoapiserviceYou should see a message similar to the one below stating that it Merged as current context

Once you have this done, you can run kubectl commands against the cluster. Try a few of them out, starting with :
Get all the commands you can run
kubectl --helpGet all the nodes in the cluster
kubectl get nodesGet Cluster component statuses
kubectl get csGet all pods(you don't have any yet)
kubectl get podsGet all deployments
kubectl get deploymentsFeel free to try out other commands.
We could of course deploy our image from Docker Hub since there is no authentication needed but in most cases you will not be doing that. So for us to deploy our ACR image to the Kubernetes Cluster we will need to give Kubernetes access to the ACR. They typical way an organization would do this would be to use [AAD and Service Principal] (https://docs.microsoft.com/en-us/azure/container-registry/container-registry-authentication) but for this exercise we will be generating a secret for AKS to use to access ACR.
In the last exercise where we loaded our container to ACI (Azure container instance) we enabled an admin user on our ACR. We will need that for this exercise. If you did not keep it around you can find it by going to your ACR (Azure Container Registry) and click on Access Keys.
Either keep that page open or save them for our next command. The command we need to run is the following:
kubectl create secret docker-registry SECRET_NAME --docker-server=REGISTRY_NAME.azurecr.io --docker-username=USERNAME --docker-password=PASSWORD --docker-email=ANY_VALID_EMAILSECRET_NAME = todoapisecret -- (This is the name you will use in the Yaml file.)
REGISTRY_NAME = todoapiregistry -- (This is what mine is named, yours may be different)
USERNAME = Copy from last step
PASSWORD = Copy form last step
ANY_VALID_EMAIL = ummm any valid email :)
When you have run this command you will then see the following on the command line.
secret "todoapisecret" createdNow we can load our our container into our cluster using the Yaml file. I have created the file for you. You can find it in this repository called aks.yaml. Before we run it, I am going to break it down into pieces and explain what it does.
IMPORTANT ..I DO NOT want you to create your own Yaml file, they are notoriously fickle and easy to mess up by not having the correct amount of spaces. Please use the Yaml file (aks.yaml) that is in this repository when running it. Below is an explanation as to what you will find in the Yaml file.
First we are telling the cluster that we are creating a deployment called todo
apiVersion: apps/v1beta1
kind: Deployment
metadata:
  name: todo
Next, we tell it that we want three replicas of the image. The app is named todo (we need that later for the load balancer)
spec:
  replicas: 3
  template:
    metadata:
      labels:
        app: todo
We point the the container in ACR (I am using one that I had with and EXPOSE tag. If you leave off the tag it will select :latest)
spec:
  containers:
    - name: todo
      image: todoapiregistry.azurecr.io/todoapi
Next, we set the port that we want access to for the app. As you remember we also use expose in the docker file to expose port 5000. We set a few resource limits.
ports:
  - containerPort: 80
resources:
  requests:
    cpu: 250m
  limits:
    cpu: 500m
We add the image pull secret that we created in the last step
imagePullSecrets:
  - name: todoapisecret
Finally, we create a load balancer to spread the load between the 3 replicas that we create. We map port 80 to port 5000 to access the api.
---
apiVersion: v1
kind: Service
metadata:
  name: todo
spec:
  type: LoadBalancer
  ports:
    - port: 80
      targetPort: 5000
  selector:
    app: todo
Finally, we run the yaml file with the following command. (Make sure you are in the same directory as the Yaml file when you run it) -f denotes filename
kubectl create -f aks.yamlThis will start to deploy your containers, pods, replicas, etc.. Try running the commands we played with before.
Get all the nodes in the cluster
kubectl get nodesGet Cluster component statuses
kubectl get csGet all pods(you don't have any yet)
kubectl get podsGet all deployments
kubectl get deploymentsGet all services
kubectl get serviceThat last one is the one we need to test our cluster. Once created, the load balancer will have an external port that we can hit which will then send the call to the container on port 5000.
It will look something like this:
NAME         TYPE           CLUSTER-IP     EXTERNAL-IP     PORT(S)        AGE
kubernetes   ClusterIP      10.0.0.1       <none>          443/TCP        4h
todo         LoadBalancer   10.0.125.123   168.62.168.84   80:31318/TCP   4m
Once you have that External-IP you can test your cluster to see your app working. http://188.62.168.84/api/todo (Yours will be different)
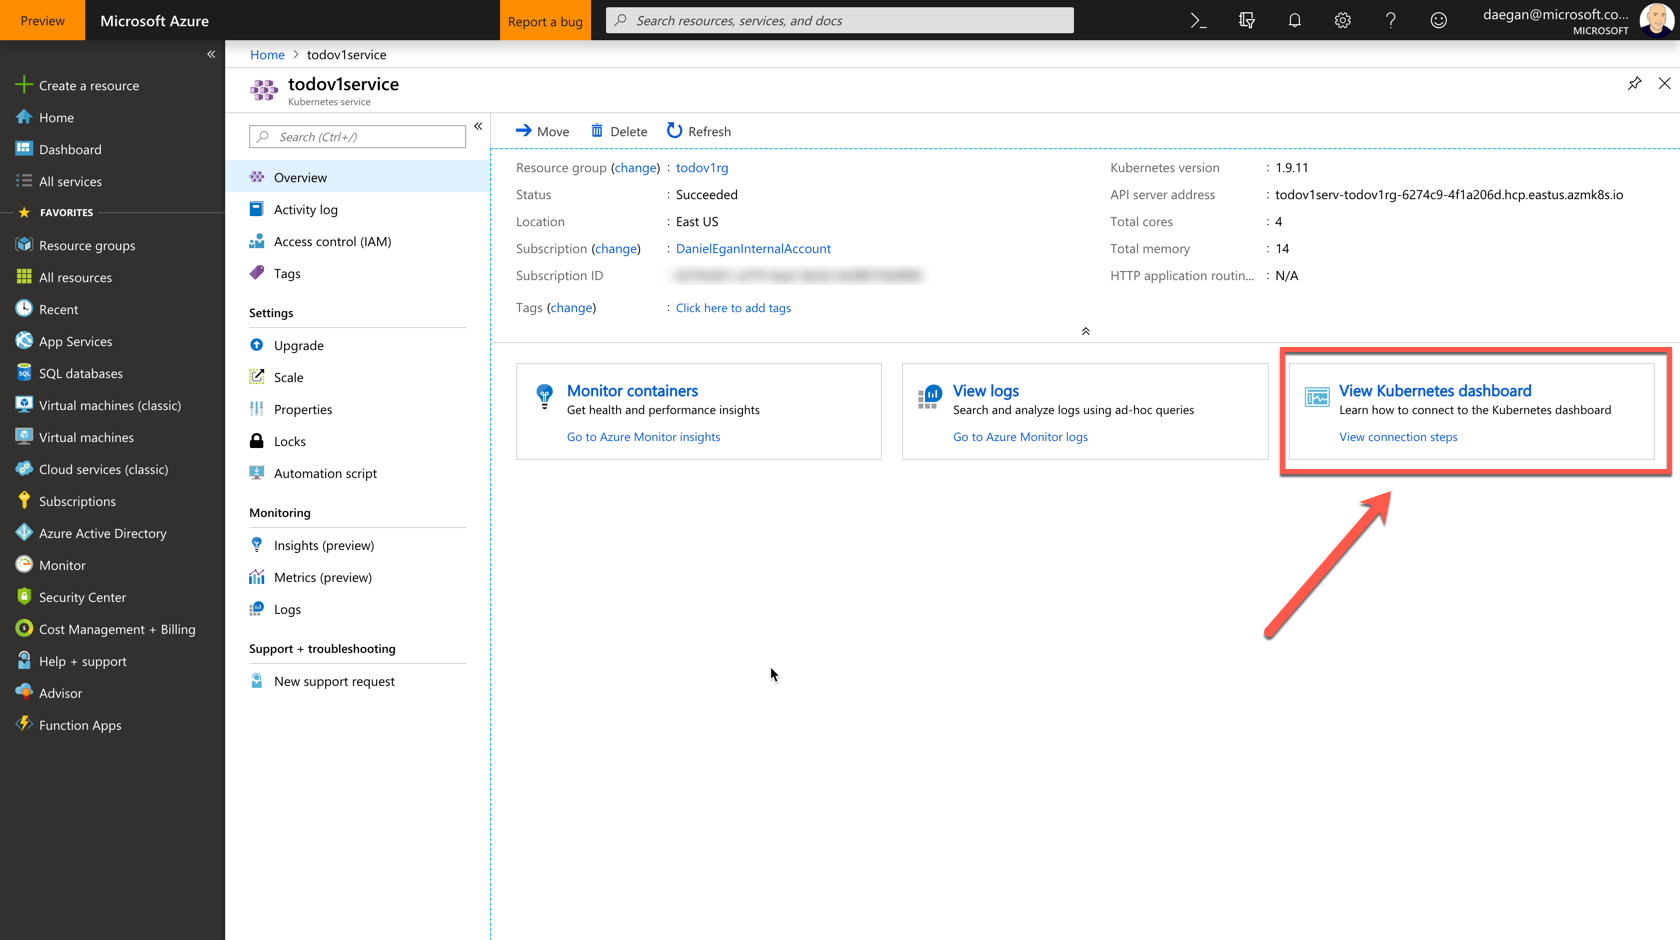
Finally, if you prefer to visually see the condition of your cluster you can do that through the portal (kind of). In the Azure portal navigate to the service you created. Remember, this can be found in the todoapirg resource group called todoapiservice. On the service's overview tab you will see three options :
- Monitor Container
- View Logs
- View Kubernetes dashboard
Select View Kubernetes Dashboard
This will open up a blade that shows you how to view the dashboard. You have already done numbers one through three. Select the copy icon from number four and paste it into your command line to run it.
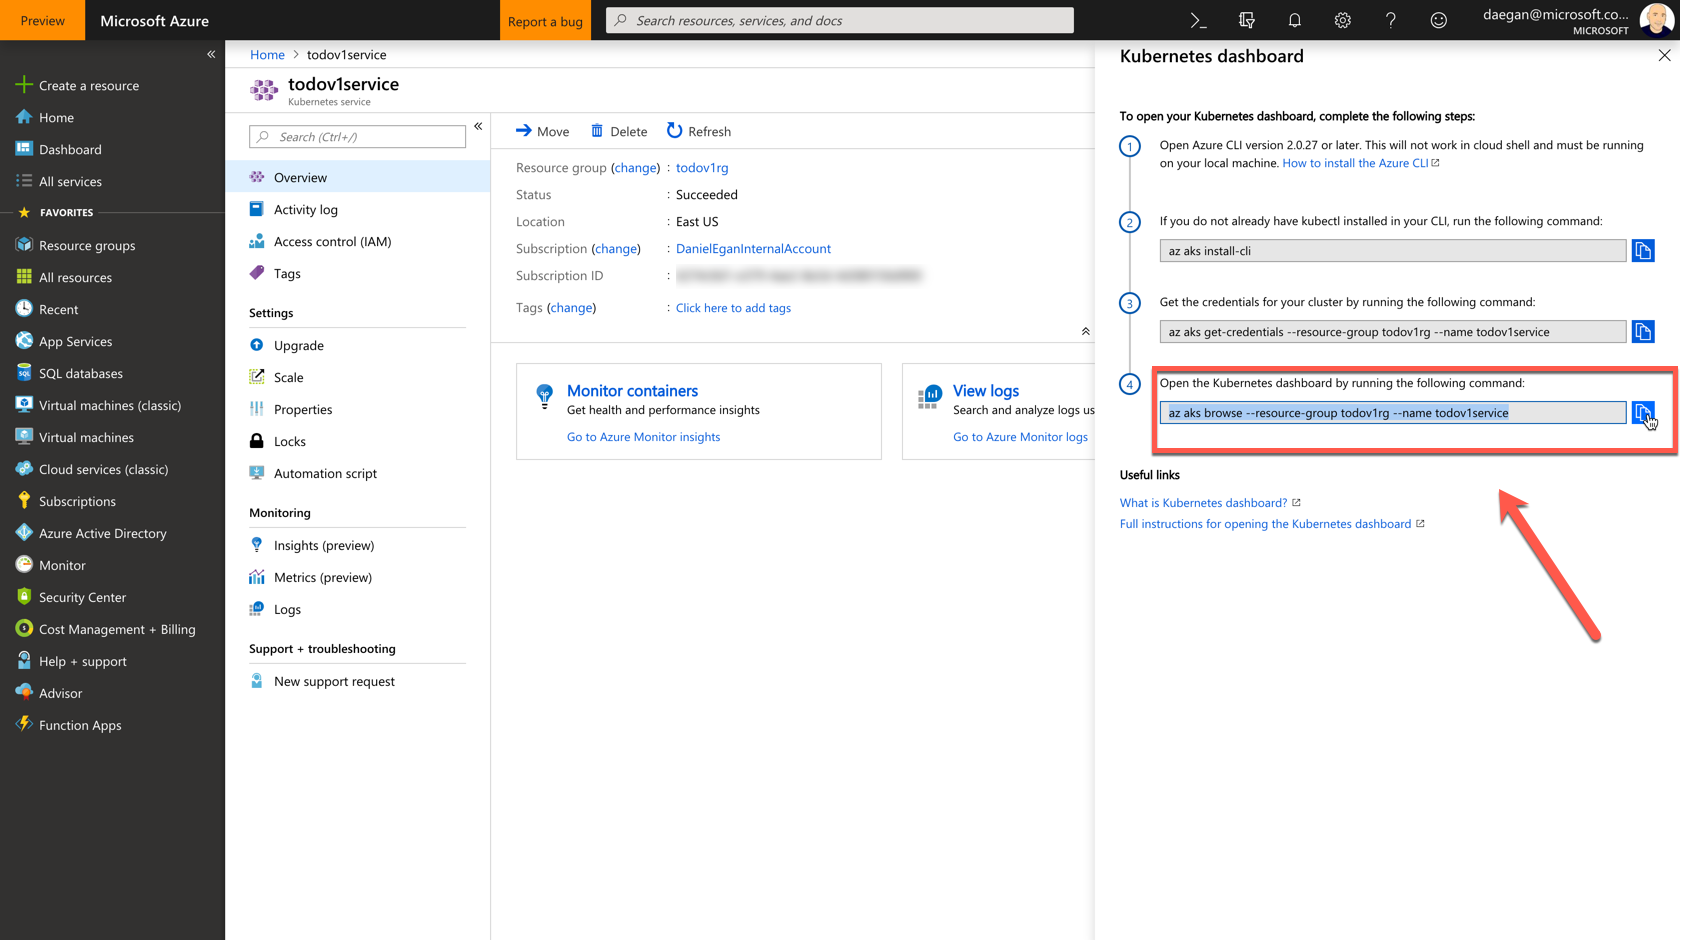
It will produce something like this on the command line.
ContainerTraining git:(master) az aks browse --resource-group todoapirg --name todoapiservice
Merged "todoapiservice" as current context in /var/folders/y1/8kxz0m9n3v9d8hw8p2nlsmhr0000gn/T/tmpuxlphmzg
Proxy running on http://127.0.0.1:8001/
Press CTRL+C to close the tunnel...
Forwarding from 127.0.0.1:8001 -> 9090
Forwarding from [::1]:8001 -> 9090
Handling connection for 8001
Handling connection for 8001
Handling connection for 8001
Handling connection for 8001
It will then launch a browser for you to view your cluster. You should see something like this when it opens. Starting with Kubernetes v1.7 RBAC (Role Binding Access Control) is enabled by default. This prevents the dashboard from accessing your cluster.

To learn about how to fix this you can visit this page. Accessing RBAC enabled Kubernetes Dashboard
As in other parts of this tutorial, there is the way you should do it in production, and the way we are going to do it here. In practice, you should utilize your service account to give access to the dashboard with tokens which has many steps.
We are going to grant admin privileges to the Dashboards Service account which will work but might be a security risk. see here
Since this is just a demo for us, we will grant admin privileges with the follow command:
Run this in your command line.
kubectl create clusterrolebinding kubernetes-dashboard -n kube-system --clusterrole=cluster-admin --serviceaccount=kube-system:kubernetes-dashboardOnce this is done, you can try to bring up the dashboard again by running the following (which you had copied earlier from the portal)
az aks browse --resource-group todoapirg --name todoapiserviceThis will give you access to your dashboard as seen below. You can get all the same information you get from Kubectl but now in an interface.
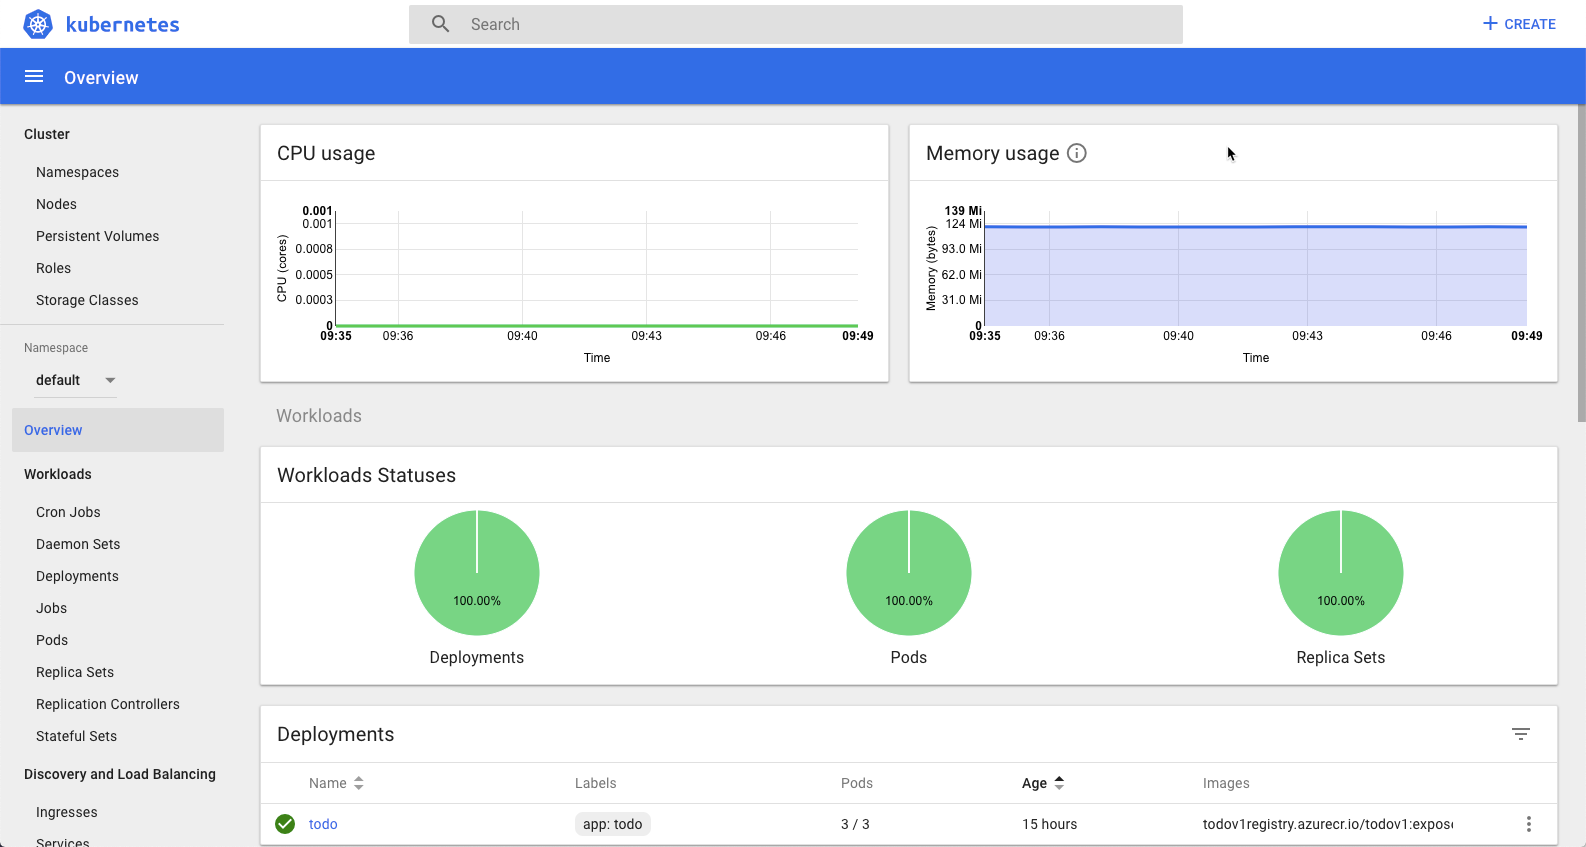
From here feel free to play around with your cluster search the Kubectl commands (Kubectl --help) to remove pods, add pods, check on health, modify your Yaml. Its just a demo so its ok if you break it.
Enjoy!!