- Warning
- Pre-requisitions
- First Steps
- All right, time for backup
- Marlin
- Cura Profile
- Restore stock Tronxy firmware and settings
Use this walkthru at your own risk. No waranty whatsoever that this will work for you. This is a work in progress, things may and will change in the futur.
It seem that newer Tronxy firmware doesn't read the update.cbd file, thanks to RokHed19 for pointing this out. You must use STM32 Flash loader to upload the firmware file (.pio\build\chitu_f103\firmware.bin) directly via USB. The procedure is the same as restoring stock firmware.
- This is only for the Tronxy XY-2 Pro, non-titan.
- A full pot of coffee (or 10 full pots).
- A good caliper.
- Visual studio code with PlatformIO.
- A Laptop or Desktop near your printer.
- At least one 1Kg roll of PLA or wathever material you prefer that you don't mind throwing in the garbage.
- 24V/50W Heater rod, chances are they installed a cheap 12V/50W Heater rod in your machine and it's going to burn itself after a few prints.
- A runout detection sensor that has a brass or other strong material insert at the input side, your filament is going to cut right thru the stock all plastic Tronxy sensor after a while.
- Check every mechanical fastener, make sure all the screw are thight, no slack with the rollers, etc...
- Check every electrical's connections, Everything with a screw or connector should be secure properly, no loose connection. The AC female plug on mine gave up after about 6 month probably because i didn't check when i got my printer.
Try the stock firmware, if it work for you and you can manage to set it up properly and have constant results, stick with that, don't bother with this walkthru. I got tired of always having to adjust/tweak the printer after about 6 month of ownership. Sometime it was producing the best print i've ever seen, other time it wasn't even able to lay a first layer consistently.
Also, if you're running the stock firmware, forget about Octoprint, auto-leveling is not compatible with usb print, so unless your bed isn't perfectly leveled (good luck with that), it will never work.
Well, almost, first, we will back up your current firmware, just in case you regret your next moves.
We have two things we need to backup in case we ever want to go back to the stock firmware. The current printer settings and the actual firmware. Let's start by backing up the settings.
- Download this g-code script and save it to an SD card
- Print this script and wait at least 30 seconds.
- Turn off your printer. You should now have a file call currentconfig.gcode on your SD with all your printer's settings.
- Confirm your board version is CXY-V6-191017. You will need to open the bottom pannel under the printer and take a look at your motherboard. It should look like this and the version written on the board must match.
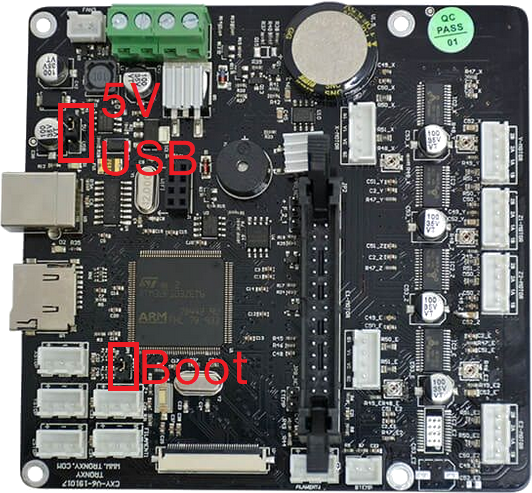
- Unplug your printer.
- Remove the BOOT jumper and move the 5V jumper to the USB position.
- Connect your printer to your computer with an USB cable, a new comm port should appear in the peripheral manager.
- Download the STM32 Flash loader demonstrator, you will need to create an account, but they are nice and if you ask nicely they will even send your engineering sample of some of their chips. Once it's done, unzip it, install the flash loader demo.
- Start the Demonstrator GUI.
- In the first screen, select the comm port of the Tronxy printer, leave all other fields at their default value (115200 baud, 8 bit, even parity, echo disabled, timeout 10) and press Next.
- You should now see a status page saying the target is readeable, if not, check your jumpers and comm ports and start over. Press Next.
- You should now see another status page with the microcontroller version and memory map status, press Next again.
- Select the Upload from device tickbox, then press the ... button next to the Upload to file textbox.
- A dialog box will open where you can select where to save your firmware, give it a name and make sure the file type is Bin file (*.bin) then click Open
- You will probably see a warning saying that the file doesn't exist ans asking if you want to create the faie (which is normal), answer Yes (You may see this warning twice, it's normal, just answer Yes again).
- The memory map selection screen will appear, just make sure that Select all is checked at the bottom left then click Ok.
- Once back to the main screen, click Next and wait for the firmware upload to complete, which will be confirmed by the progress bar turning green and the message Upload operation completed successfully.
- Click Close and exit the Demonstrator GUI.
- Unplug the USB cable.
- Reinstall the BOOT jumper and switch back the other jumper from the USB to 5V position.
- You can now screw the bottom cover back. We should not have to go inside again unless we screw things up. Make sure you don't squeeze the flat cables, there's a cutoff that allow the LCD cable to go thru the case without issue, but for the print head/XY axis, there is not. I've installed two washer between the pannel and the printer to allow some spacing for the cable. It is not mandatory but if you thighten the pannel too tightly, you may damage the flat cable.
If you want a more visual description of all the steps, check Jeff's 3D corner video where he goes thru the whole process.
Now that you have everything backed up, make 3 copies of them, send one to your grandmother, one to your mother and keep one. That way, you will always be able to recover them if you need.
At this point, the first thing to do is to pour yourself a nice warm cup of coffee and take a break while you consider if you still want to go thru the process or stick with the stock firmware. If you're not sure, take another coffee and make up your mind.
- Install Visual Studio Code.
- Install PlatformIO while taking another coffee, it take a while.
- Clone the rhapsodyv/Marlin repository.
- Start Visual Studio Code and open PlatformIO Home (the little alien head in the left side taskbar).
- Click on Open Project and select the directory where you cloned rhapsodyv/Marlin.
- Let PlatformIO rebuild the IntelliSence Indexes while you're finishing your pot of coffee and start another one. It take a while and PlatformIO will be completly unresponsive and behave weirdly until this is done.
- Open the file platformio.ini and change default_envs from chitu_v5_gpio_init to chitu_f103.
- in the Marlin subdirectory open Configuration.h.
- At or around line 44 uncomment #define XY2_V6_255_NO_TITAN_TMC 1.
- At or around line 62 uncomment #define TFT_COLOR_UI.
- At or around line 966 increase #define EXTRUDE_MAXLENGTH from 200 to 500, with the bowden tube you will need more than 200mm of fillament to insert or remove the filament. In my case i need 325mm.
- At or around line 1690 uncomment #define SOFT_ENDSTOPS_MENU_ITEM.
- **Optional** At or around line 1178 you can adjust your steps by changing the value of #define DEFAULT_AXIS_STEPS_PER_UNIT, or leave it default and adjust later via the printer's UI.
- **Optional** At or around line 1874 you can adjust the number of point automatic bed leveling will check with #define GRID_MAX_POINTS_X, or leave it default.
- In the PlatformIO side menu expand Project Tasks then Default then click Build All.
- If everything goes well, after a few minutes you should see the following in the terminal window:
Checking size .pio\build\chitu_f103\firmware.elf
Building .pio\build\chitu_f103\firmware.bin
Advanced Memory Usage is available via "PlatformIO Home > Project Inspect"
RAM:   [========= ]  87.2% (used 52760 bytes from 60536 bytes)
encrypt([".pio\build\chitu_f103\firmware.bin"], [".pio\build\chitu_f103\firmware.elf"])
Flash: [=======   ]  70.2% (used 337220 bytes from 480288 bytes)
Block Count is  166
================================================= [SUCCESS] Took 131.05 seconds =================================================
Environment    Status    Duration
-------------  --------  ------------
chitu_f103     SUCCESS   00:02:11.055
================================================== 1 succeeded in 00:02:11.055 ==================================================
- Open the .pio\build\chitu_f103\ folder.
- Copy update.cbd to the root of an SD card.
- Take a deep breath. Maybe another coffee.
- Turn off your printer, insert the SD card, then turn it back on. You should hear a series of beeps and a message on screen with the status of the update. Don't touch anything and let it do it's magic.
- Congratulation, you're now running Marlin and you can now adjust your Z-Offset (or your printer is bricked and you need to restore the original stock firmware and start over from scratch).
If you want a more visual description of all the steps, Jeff's 3D corner made another video where he goes thru the whole process, the procedure is a little different because the video was made a while ago with an older version of PIO but overall the process is the same.
- Preheat your bed and extruder to the temperature you normally use for your material and go take a coffee or wait at least 10 minutes for everything to settle down.
- Home your printer, touch the Configuration icon, Motion and finally Auto Home.
- Auto Level your printer, touch the Configuration icon, Motion, Bed Leveling and finally Level Bed.
- Move the print head to the center of the bed (X=125, Y=125), touch the Configuration icon, Motion, Move Axis, Move X/Move Y ...
- Touch the Back Arrow until you go back to the Motion menu, then touch Soft Endstops and turn them off. **WARNING** Until you re-enable the Soft Endstops, you can crash your head on the bed or push an axis too far, so be careful.
- Touch Move Z, and adjust the Z-Axis very slowly until it barely grip on a piece of paper, take note of the position, that is your Z-Axis offset.
- Touch the Back Arrow until you go back to the Motion menu, then touch Soft Endstops and turn them on. **WARNING** do not forget to do that, you can crash your head on the bed or push an axis too far if disable, so be careful.
- Touch the Back Arrow until you go back to the Main Menu, then touch Configuration, Probe Z Offset and enter the Z-Axis offset.
- Touch the Back Arrow until you return to the Main Configuration menu then touch the Right Arrow to go to page two and touch Store Settings.
- Download this g-code script.
- Default values are ok for about any types of PLA (60'c for the bed, 205'c for the extruder), if you're using another kind of material, edit the G-Code and change theses values. Keep the Extruder a little bit hotter than you would normally extrude because we will extrude alot of filament in a short time.
M140 S60; set bed temperature
M104 S205 T0; set nozzle temperature- With a caliper or a good ruler, mesure and mark 120mm of filament from the filament runout sensor.
- Print the g-code script. It will print 100mm of filament.
- Mesure what is left between the runout sensor and the mark you made earlier. Let's say 27mm for this example, you now know that you under-extruded 7mm (27mm - (120mm - 100mm) = 7mm) or 93% (100mm - 7mm = 93mm) of what you wanted to extrude.
- Touch the Configuration icon, Configuration, Advance Configuration, Right Arrow to go to page two and touch Steps/mm and take note of your E Steps/mm (186 in the stock configuration).
- Divide your E Steps/mm by the percentage you calculated earlier, this will give your new E Steps/mm. In this example 186mm/0.93 = 200mm.
- Return to the Steps/mm menu, and enter your new E Steps/mm value.
- Touch the Back Arrow until you return to the Main Configuration menu then touch the Right Arrow to go to page two and touch Store Settings.
Once again, Jeff's 3D corner made another video where he goes thru the whole process and need more explanations.
- Touch the Configuration icon, Configuration, Advance Configuration, Right Arrow to go to page two and touch Filament.
- Set Unload mm to 400 and Load mm to 350.
- Touch the Back Arrow until you return to the Main Configuration menu then touch the Right Arrow to go to page two and touch Store Settings.
- Touch the Back Arrow until you return to the Main Configuration menu then touch Change Filament, and follow the on-screen instructions.
- Repeat theses steps, chaning the Unload mm / Load mm values until you are happy with them.
See Teaching Tech 3D Printer Site for additionnal optimization and calibration trick.
The stock Cura profile is ok for a starting point, just need to adjust the start and end g-code.
; XY-2 Start G-Code
G21 ; Set Units to mm
G90 ; Set Positioning to Absolute
M82 ; Set Extruder to Absolute
M107 T0 ; All Fans Off
M140 S{material_bed_temperature_layer_0} ; Heat bed to layer 0 setting
M190 S{material_bed_temperature_layer_0} ; Wait for bed to heat
G28 ; Home all axes
; Uncomment the following line to enable Auto Bed Leveling
G29 ; Perform Auto Bed Leveling
;For best results do not run nozzle heater while performing ABL
M104 S{material_print_temperature_layer_0} T0 ; Heat nozzle to layer 0 setting
G1 Z5.0 F1200.0; Raise nozzle to prevent scratching of heat bed
G1 X0 Y0 F3600.0; Move nozzle to Home before heating
M109 S{material_print_temperature_layer_0} T0 ; Wait for nozzle to heat
G92 E0 ; Set Extruder position to zero
; Uncomment the following lines to enable nozzle purge before printing
G1 Z2.0 F3000 ; Raise Z axis
G1 X1.1 Y20 Z{layer_height} F3600.0 ; Move to purge line start position
G1 X1.1 Y230.0 Z{layer_height} F1500.0 E15 ; Draw first purge line
G1 X1.4 Y230.0 Z{layer_height} F3600.0 ; Move to side
G1 X1.4 Y20 Z{layer_height} F1500.0 E30 ; Draw second purge line
G92 E0 ; Reset Extruder
G1 Z2.0 F3000 ; Move Z Axis up little to prevent scratching of Heat Bed
G1 X5 Y20 Z{layer_height} F3600.0 ; Move over to finish nozzle wipe; XY-2 End G-Code
G91; set positioning to relative
M82; set extrusion to absolute
G92 E0 ; Reset Extruder
G1 E{material_anti_ooze_retracted_position} F600; Retract material
G1 Z10 F1200; Raise printhead 10mm.
G90; set absolute positioning
G1 X0 Y{machine_depth} F3600; Move print area to front
M107; Turn fan Off
M104 S0; Set Hotend Temperature to 0
M140 S0; Set Bed Temperature to 0
; XY-2 End Code End- Unplug your printer from the AC outlet.
- Remove the bottom pannel under the printer.
- Remove the BOOT jumper and move the 5V jumper to the USB position.
- Connect your printer to your computer with an USB cable, a new comm port should appear in the peripheral manager.
- Start the Demonstrator GUI.
- In the first screen, select the comm port of the Tronxy printer, leave all other fields at their default value (115200 baud, 8 bit, even parity, echo disabled, timeout 10) and press Next.
- You should now see a status page saying the target is readeable, if not, check your jumpers and comm ports and start over. Press Next.
- You should now see another status page with the microcontroller version and memory map status, press Next again.
- Select the Download to device tickbox, then click on the ... button next to the Download from file textbox.
- Make sure the file type is Bin file (*.bin) then browse for the firm
- ware backup file you made earlier and clock Open.
- Leave all other options to their default values (Erase necessary pages ticked and @ (h) at 8000000) then click Next.
- Wait for the software download to complete, the progress bar will turn green with the message Download operation finished successfully.
- Unplug the USB cable.
- Reinstall the BOOT jumper and switch back the other jumper from the USB to 5V position.
- You can now screw the bottom cover back.
- Plug your printer to an AC outlet and turn it on, it should boot back to the Tronxy firmware.
- Put the backed up setting file currentconfig.gcode on an SD card (If you use the same SD, don't forget to remove the update.cbd file, else you may flash it back to Marlin).
- Insert the SD card in the printer and print currentconfig.gcode, wait until the printer confirm that the printing is done.
- Turn the printer off for at least 15 seconds.
- Turn the printer back on.