ProGuide Custom Items
Language:      C#
Subject:       Content
Contributor:   ArcGIS Pro SDK Team <arcgisprosdk@esri.com>
Organization:  Esri, http://www.esri.com
Date:          10/02/2023
ArcGIS Pro:    3.2
Visual Studio: 2022
This guide demonstrates how to create a Custom Project Item which is used to 'customize' ArcGIS Pro's Catalog browsing to specific file types. See ProConcepts Custom Items for more information on the Custom Item / Custom Project Item patterns. You can also see a sample implementation of a Custom Project Item in the 'ProjectCustomItemEarthQuake' community sample.
Prerequisites
- Download and install the sample data required for this guide as instructed in ArcGIS Pro SDK Community Samples Releases.
- Create a new ArcGIS Pro Module Add-in, and name the project QuakeItem. If you are not familiar with the ArcGIS Pro SDK, you can follow the steps in the ProGuide Build your first add-in to get started.
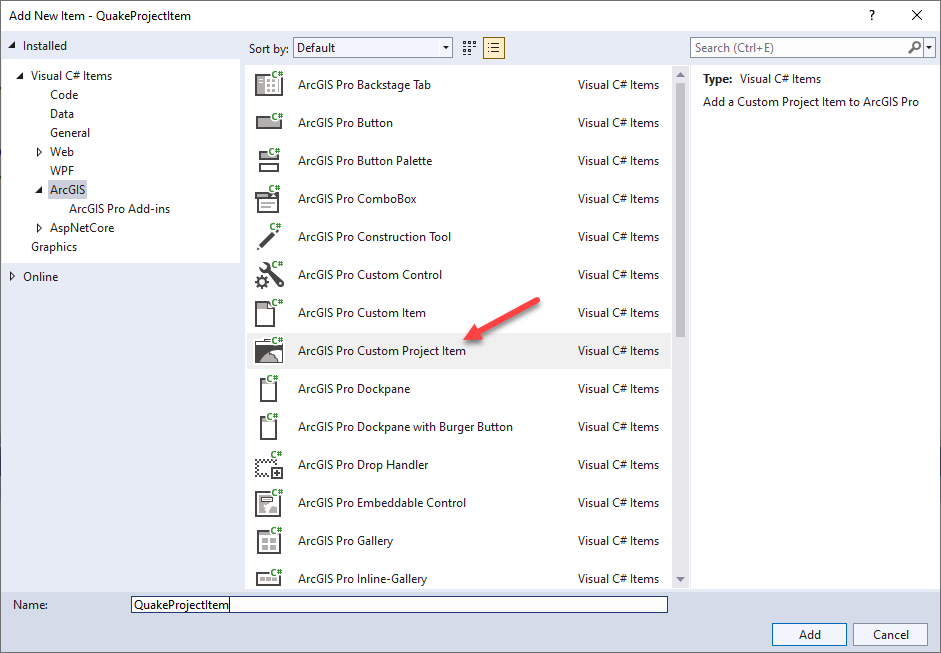
- Once the Solution is open in Visual Studio right click on the project, select Add New Item, drill down to the ArcGIS Pro Add-ins, select ArcGIS Pro Custom Project Item, and name the item QuakeProjectItem.
Note for developers
When working on Custom Items or Project Custom Items be aware that Custom Item classes are also registered for use by the ArcGIS Pro Indexer when ArcGIS Pro starts. This registration is done through an entry in this file:
%AppData%..\Local\ESRI\SearchResources\ItemInfoTypesExt.json
Usually this is of no consequence, but it is advisable to delete this file in-between sessions when you are developing your Custom Item and when you are refactoring your code especially if you decide to change the associated file extension or the component id of the custom item.
Step 1
Modify the fileExtension to customize browsing to a specific file extension
Modify the Config.daml QuakeItem_Module module:
- Delete the <tabs> and <groups> sections inside the <insertModule> tag.
- Find the fileExtension attribute and change the value to quake.
...
<content displayName="Quakes" keywords="quake"
		 fileExtension="quake"
		 isContainer="false"
		 contextMenuID="ProItemEarthQuake_QuakeProjectItem_ContextMenu" />
...
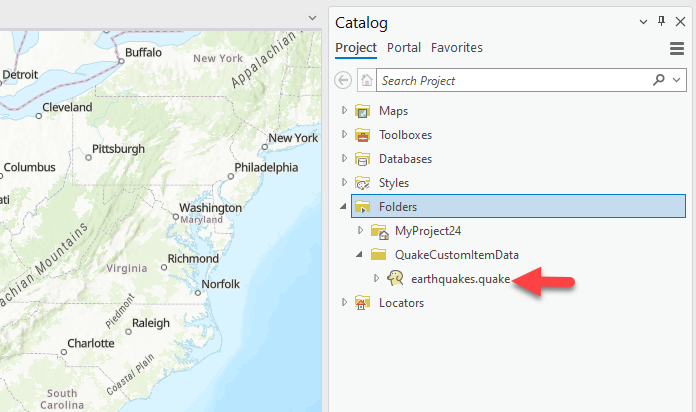
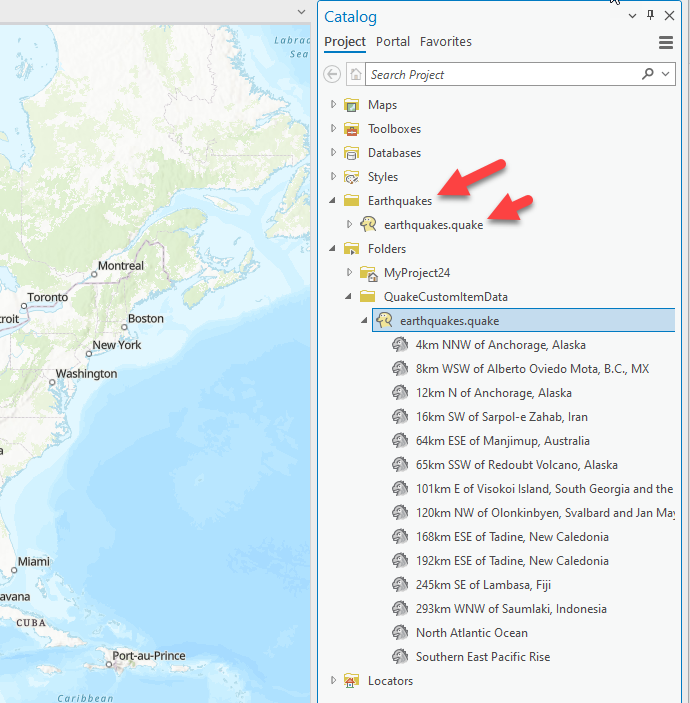
Build the sample and start debugging. Open the ArcGIS Pro. Create a new map with a 2D Map. In the catalog window, under the "Folders" project container, add a new Folder connection to where-ever is the location of the "QuakeCustomItem" data downloaded from the community samples data. In this guide, the data was copied to a folder called "QuakeCustomItemData" but your location may be different. Expand or double-click on the QuakeCustomItemData folder. The earthquakes.quake file should be displayed using the Bex the dog icon:
Step 2
Add Child records (Quake Events) to a Custom Project Item
earthquakes.quake is an XML document containing child <event .../> elements representing QuakeEvents. We will add these QuakeEvents as child items to QuakeProjectItem.
Open the source for QuakeProjectItem. To indicate that QuakeProjectItem has children change IsContainer to true.
public override bool IsContainer => true;Add the following class to the bottom of the QuakeProjectItem source file. This class represent one single earthquake event or a single child of QuakeProjectItem.
/// <summary>
/// Quake event items. These are children of a QuakeProjectItem
/// </summary>
/// <remarks>QuakeEventCustomItem are, themselves, custom items</remarks>
internal class QuakeEventCustomItem : CustomItemBase {
    public MapPoint QuakeLocation;

    public QuakeEventCustomItem(string name, string path, string type, string lastModifiedTime,
           double longitude, double latitude) : base(name, path, type, lastModifiedTime) {
      this.DisplayType = "QuakeEvent";
      QuakeLocation = MapPointBuilderEx.CreateMapPoint(
        longitude, latitude, SpatialReferences.WGS84);
    }

    public void SetNewName(string newName) {
      this.Name = newName;
      NotifyPropertyChanged("Name");
      this.Title = newName;
      NotifyPropertyChanged("Title");
      this._itemInfoValue.name = newName;
      this._itemInfoValue.description = newName;
    }

    public override ImageSource LargeImage {
      get {
        return System.Windows.Application.Current.Resources["T-Rex32"] as ImageSource;
      }
    }

    public override Task<ImageSource> SmallImage {
      get {
        ImageSource img = System.Windows.Application.Current.Resources["T-Rex16"] as ImageSource;
        return Task.FromResult(img);
      }
    }
  }
Next the Fetch method in QuakeProjectItem is getting replaced with a new version that opens the quake file and parses it's XML content to provide the list of QuakeEventProjectItem children for QuakeProjectItem.
/// <summary>
/// Fetch is called if <b>IsContainer</b> = <b>true</b> and the project item is being
/// expanded in the Catalog pane for the first time.
/// </summary>
/// <remarks>The project item should instantiate items for each of its children and
/// add them to its child collection (see <b>AddRangeToChildren</b>)</remarks>
public override void Fetch()
{
  //This is where the quake item is located
  string filePath = this.Path;
  //Quake is an xml document, we parse it's content to provide the list of children
  XDocument doc = XDocument.Load(filePath);

  XNamespace aw = "http://quakeml.org/xmlns/bed/1.2";
  IEnumerable<XElement> earthquakeEvents = from el in
  				doc.Root.Descendants(aw + "event") select el;

  List<QuakeEventProjectItem> events = new List<QuakeEventProjectItem>();
  var existingChildren = this.GetChildren().ToList();
  int event_count = 1;
  //Parse out the child quake events
  foreach (XElement earthquakeElement in earthquakeEvents)
  {
    // the path has to be unique for each QuakeEventProjectItem
    var uniquePath = filePath + $"[{event_count}]";
    XElement desc = earthquakeElement.Element(aw + "description");
    XElement name = desc.Element(aw + "text");
    string fullName = name.Value;
    // prevent duplicate entries
    if (existingChildren.Any(i => i.Path == uniquePath)) continue;

    XElement origin = earthquakeElement.Element(aw + "origin");
    XElement time = origin.Element(aw + "time");
    XElement value = time.Element(aw + "value");
    string date = value.Value;
    DateTime timestamp = Convert.ToDateTime(date);

    //Make a "QuakeEventProjectItem" for each child read from the quake file
    QuakeEventProjectItem item = new QuakeEventProjectItem(
      fullName, uniquePath, "quake_event", timestamp.ToString());

    events.Add(item);
    event_count++;
  }
  //Add the event "child" items to the children collection in QuakeProjectItem
  this.AddRangeToChildren(events);
}
Step 3
Verify that Custom Project Item with child records works
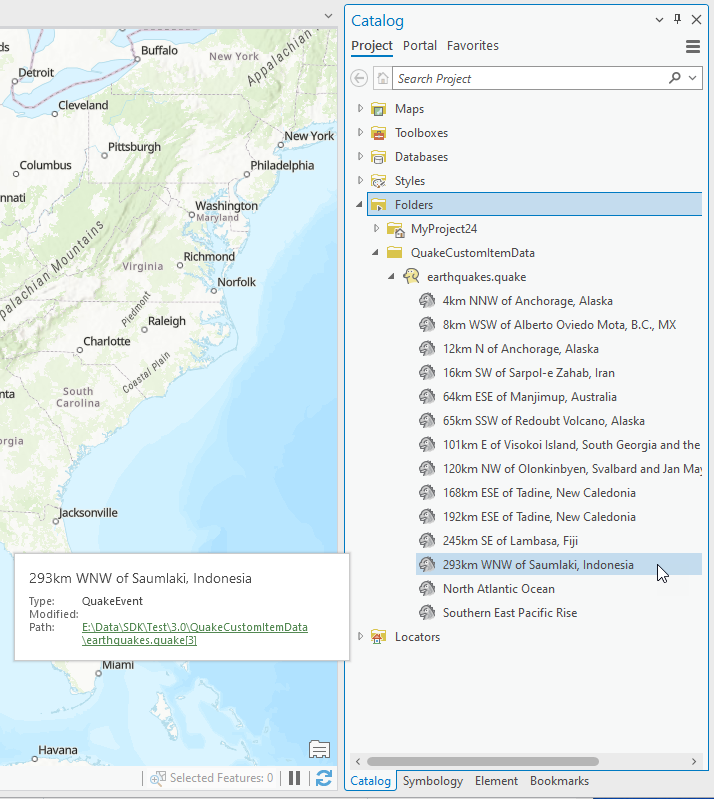
Rebuild the add-in. Fix any compilation errors. Run the Add-in in debug mode. Open your project. After it has been loaded, open the ArcGIS Pro Catalog Dockpane, and drill down to Folders | QuakeCustomItemData | earthquakes.quake. earthquakes.quake should display the Bex the dog icon. Now, when you expand earthquakes.quake, you should now see all the quake event children rendered with the T-Rex icon.
Step 4
Add Custom Project Item to project
In this step we verify that we can add the earthquakes.quake Custom Project Item as a Project Item to the project. The QuakeItems_QuakeProjectItem_ContextMenu context menu which is referenced and defined in config.daml allows you to trigger the AddToProject OnClick method. The AddToProjectQuakeProjectItem code behind is used to add the Custom Project Item to a QuakeProjectItemContainer. The code for this has already been stubbed out by the Custom Project Item Item Template we used early.
internal class AddToProjectQuakeProjectItem : Button
{
  protected override void OnClick()
  {
    var catalog = Project.GetCatalogPane();
    var items = catalog.SelectedItems;
    var item = items.OfType<QuakeProjectItem>().FirstOrDefault();
    if (item == null)
    	return;
    QueuedTask.Run(() => Project.Current.AddItem(item));
  }
}
As can be seen in the code snippet above the current selected QuakeProjectItem is simply added the Project Items of the current project.
In order to support the save/restore operation for QuakeProjectItems you have to uncomment the already stubbed out TODO item for the following QuakeProjectItem constructor:
// Overload for use in your container create item
public QuakeProjectItem(string name, string catalogPath, string typeID, string ontainerTypeID)
					: base(name, catalogPath, typeID, containerTypeID)
{
}
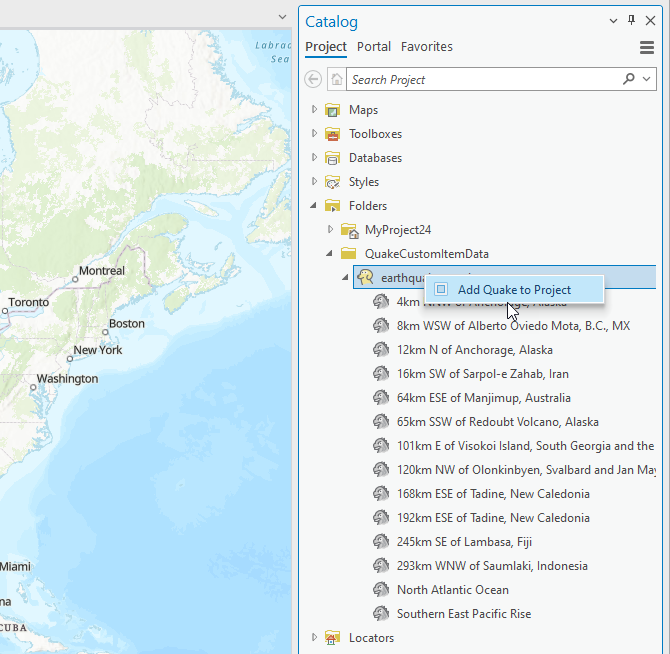
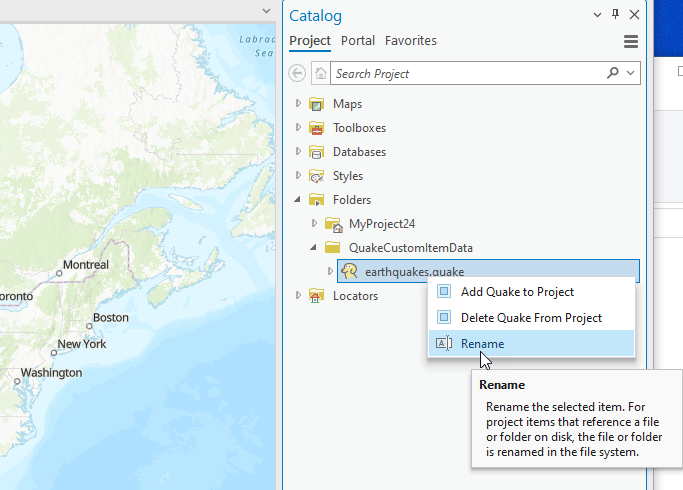
Build the sample and start debugging. Open your Pro project. After the project has been loaded, open the ArcGIS Pro Catalog Dockpane, and drill down to Folders | QuakeCustomItemData | earthquakes.quake. earthquakes.quake should display the Bex the dog icon, right click on this item to bring up the context menu and then click on Add To Project to add the Item to the current project. Note, in this case, the caption for the button has been changed to "Add Quake to Project" but you can leave it with the default caption "Add to Project" if you prefer.
Step 5
Add support for renaming of Custom Project Items
In order to support renaming two overrides in QuakeProjectItem have to be added:
- The CanRename property has to be set to true
- The OnRename method has be overridden to implement any custom actions to support renaming.
Add the following Rename override code to your QuakeProjectItem class:
#region Rename override code

protected override bool CanRename => true;

protected override bool OnRename(string newName)
{
	// have to do some work to actually change the name so if they call refresh it'll be here
	// whether it's a file on disk or node in the xml
	var new_ext = System.IO.Path.GetExtension(newName);
	if (string.IsNullOrEmpty(new_ext))
	{
		new_ext = System.IO.Path.GetExtension(this.Path);
		newName = System.IO.Path.ChangeExtension(newName, new_ext);
	}
	var new_file_path = System.IO.Path.Combine(
	  System.IO.Path.GetDirectoryName(this.Path), newName);
	System.IO.File.Move(this.Path, new_file_path);
	this.Path = new_file_path;
	return base.OnRename(newName);
}

#endregion Rename override code
To rename a Custom Project Item from within the ArcGIS Pro Catalog pane we can simply use the existing out-of-box renaming button esri_core_rename of ArcGIS Pro and add the esri_core_rename button to the Custom Project Item's context menu. This is solely done in DAML, the snippet below shows the addition of the rename button to the MyCustomItem Context Menu:
<menu id="ProItemEarthQuake_QuakeProjectItem_ContextMenu" caption="QuakeProjectItem_Menu">
  <button refID="ProItemEarthQuake_QuakeProjectItem_AddToProject" />
  <button refID="esri_core_rename" />
</menu>
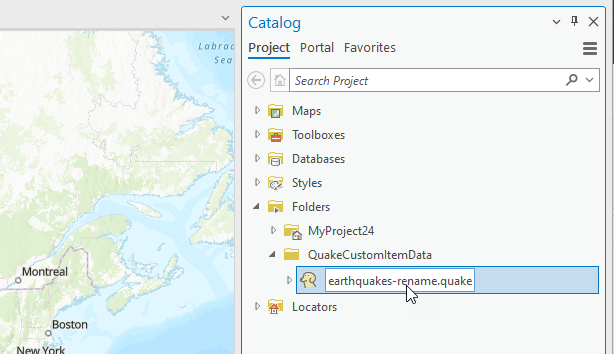
Build the sample and start debugging. Open your Pro project and the QuakeCustomItemData folder. Right-click and rename earthquakes.quake by using the "Rename" Context Menu button or by simply double-clicking on the Custom Project Item name to enable editing of the name.
Step 6
Add support for browsing for custom project items
In this step we will be creating a BrowseProjectFilter to configure the OpenItemDialog to browse to ".quake" custom project items, expand it, and list the child quake event custom items. Refer to Browse dialog filters for more information on creating and configuring item filters. Whenever an event is picked, its location will be added to the active map (as long as its a 2D map).
In the Visual Studio solution explorer, right click on the project node and add an ArcGIS Pro Button item. In the add item dialog, name this button class file as QuakeEventItemDialog. QuakeEventItemDialog.cs file will be created. This button will display Pro's OpenItemDialog and allow you to filter for the ".quake" files. Change the button caption in the Config.daml to "Add Event to Map". Add the following condition to the button definition: esri_mapping_graphicsLayersExistCondition.
The daml for the QuakeEventItemDialog button should look like this: (your button id and classname may be different):
<button id="..." caption="Add Quake Event to Map" ...
   ...
   condition="esri_mapping_graphicsLayersExistCondition">
       <tooltip heading="Tooltip Heading">Tooltip text<disabledText /></tooltip>
</button>
In the OnClick method that is stubbed out, add the following code. We first create the BrowseProjectFilter instance and then set the filter properties for this class using the AddCanBeTypeId method. acme_quake_handler is passed to the AddCanBeTypeId method as the typeID for the "quake" item. Since the quake item is a "container" that holds the individual quake events, we can modify the filter behavior to allow browse into the custom quake project item and display the quake events in the container so we can select them.
First, we use the AddDoBrowseIntoTypeID method on the BrowseProjectFilter instance and pass in the acme_quake_handler typeID of the quake item. This enables browsing into the .quake event. Additionally, to allow us to view the individual events within the "quake" container, we add the acme_quake_event TypeID (for the quake events) using AddCanBeTypeId. We then create the OpenItemDialog and set the BrowseFilter property to the BrowseProjectFilter instance created. The entire OnClick method is shown below:
protected override void OnClick() {
  var bf = new BrowseProjectFilter();
  //This allows us to view the .quake custom item (the "container")
  bf.AddCanBeTypeId("acme_quake_handler"); //TypeID for the ".quake" custom project item
  bf.AddDoBrowseIntoTypeId("acme_quake_handler");
  //This allows us to view the quake events contained in the .quake item
  bf.AddCanBeTypeId("acme_quake_event"); //TypeID for the quake events contained in the .quake item
  bf.Name = "Quake Item";

  var openItemDialog = new OpenItemDialog {
     Title = "Add Quake Event to Map",
     InitialLocation = @"C:\Data\QuakeCustomItemData,//or whatever is the location of your data
     BrowseFilter = bf,
     MultiSelect = false
  };
  bool? ok = openItemDialog.ShowDialog();
  if (ok != null) {
    if (ok.Value) {
      var quake_event = openItemDialog.Items.First() as QuakeEventCustomItem;
      QueuedTask.Run(() => {
        Module1.AddToGraphicsLayer(quake_event);
      });
    }
  }
 }
}
Open the module class. We will add a method to make a point symbol for the quake events as well as the logic to add an event to the map. To add an event to the map we are going to use a GraphicsLayer, topic 29443.
#region Symbol Helper
//use this code to create a default symbol for the events
private static CIMPointSymbol _point2DSymbol = null;

internal static CIMSymbol GetPointSymbol()
{
  if (_point2DSymbol != null) return _point2DSymbol;
  //must be on the QueuedTask
  _point2DSymbol = SymbolFactory.Instance.ConstructPointSymbol(
ColorFactory.Instance.RedRGB, 11, SimpleMarkerStyle.Circle);

  return _point2DSymbol;
}

#endregion Symbol Helper

#region GraphicsLayer
//use this code to add events to the graphics layer
internal static string AddToGraphicsLayer(QuakeEventCustomItem quake_event_item)
{
  //Must be on the QueuedTask
  return AddToGraphicsLayer(new List<QuakeEventCustomItem>() { quake_event_item });
}

internal static string AddToGraphicsLayer(IEnumerable<QuakeEventCustomItem> quake_event_items)
{
  //Must be on the QueuedTask
  var gl = MapView.Active?.Map.GetLayersAsFlattenedList()
                 .OfType<GraphicsLayer>().FirstOrDefault();
  if (gl == null) return "";
  if (quake_event_items.Count() == 0)
    return "";
  var graphics = new List<CIMGraphic>();
  var names = new List<string>();
  foreach(var quake_item in quake_event_items)
  {
     graphics.Add(GraphicFactory.Instance.CreateSimpleGraphic(
     quake_item.QuakeLocation, Module1.GetPointSymbol()));
     names.Add(quake_item.Name);
  }
  gl.AddElements(graphics, names);
  MapView.Active.ZoomTo(gl, false, new TimeSpan(0,0,0,0,500));
  return gl.URI;
}

#endregion GraphicsLayer
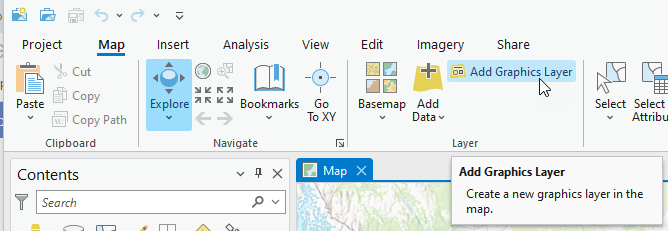
Rebuild the add-in solution. Run the add-in in debug mode. Open your project sample. When the map has completed opening, go to the Map tab and click the "Add Graphics Layer" button to add a graphics layer to your map. Save the project.
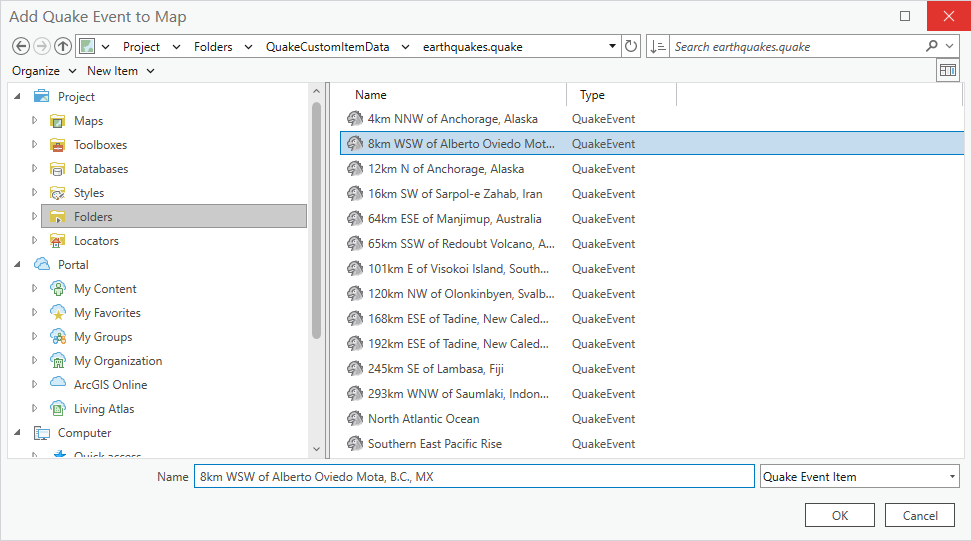
Click the Add-In tab and click the newly added QuakeEventItemDialog "Add Event to Map" button. The OpenItemDialog will display. Browse to your .quake data file. Double click the .quake item to display its contents. You will see the quake event child items displayed in the browse dialog. Select one and click OK.
The selected quake event will be added to the map.
Step 7
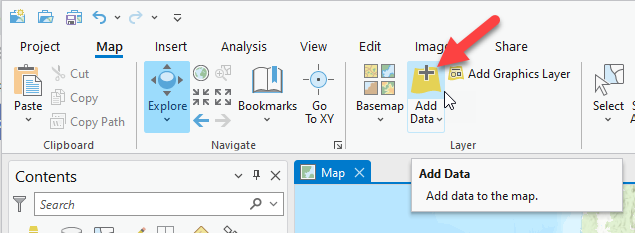
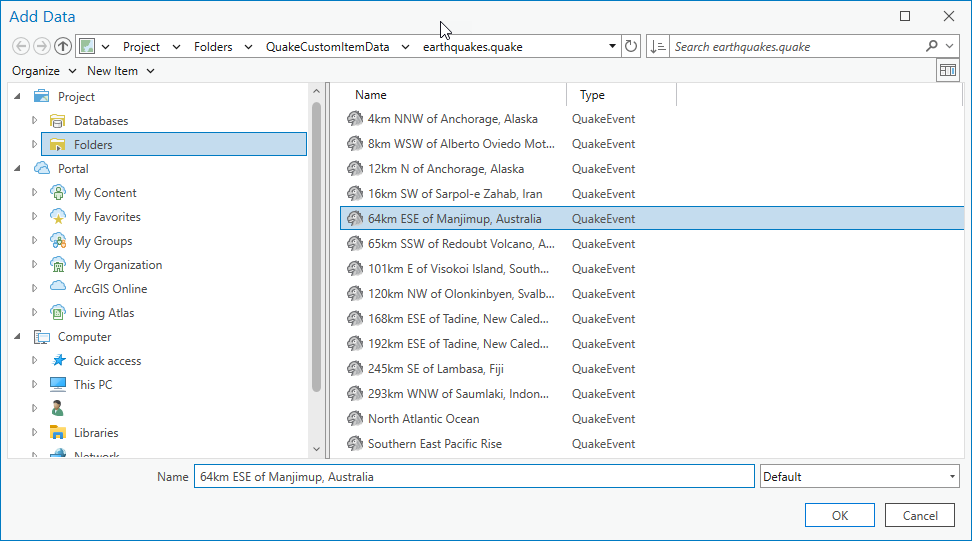
In this step we add the capability to browse to .quake files and .quake events using the built-in 'Add Data' button on the Map tab.
In order to implement browsing / adding data to the map via the "Add Data" the QuakeEventProjectItem class which inherits CustomProjectItemBase has to implement IMappableItem. The AddData dialog uses IMappableItem to determine if an item that has been browsed to can be added to the map. This will allow our items to be selected and added (via the built-in dialog):
Change the following class definition:
internal class QuakeEventProjectItem : CustomProjectItemBase
{
  ...
}
...and add an IMappableItem implementation:
internal class QuakeEventProjectItem : CustomProjectItemBase, IMappableItem
{
  ...
 //Map must be 2D with a Graphics Layer added
 public bool CanAddToMap(MapType? mapType) {
    if (mapType != null) {
      if (mapType != MapType.Map)
        return false;
    }
    return MapView.Active?.Map.GetLayersAsFlattenedList()
        .OfType<GraphicsLayer>().FirstOrDefault() != null;
 }

  public List<string> OnAddToMap(Map map) {
    return OnAddToMap(map, null, -1);
  }

  public List<string> OnAddToMap(Map map, ILayerContainerEdit groupLayer, int index) {
    var uri = Module1.AddToGraphicsLayer(this);
    return new List<string> { uri };
  }
}
Finally an update to the config.daml is also required, you had to add the following filterFlags tag to each content tag, as shown here:
<insertComponent id=....>
<content displayName="QuakeProjectItem" ...>
  <filterFlags>
    <type id="AddToMap" />
  </filterFlags>
</content>

<insertComponent id=....>
<content displayName="QuakeEventItem" ...>
  <filterFlags>
    <type id="AddToMap" />
  </filterFlags>
</content>
...
Rebuild the add-in solution. Run the add-in in debug mode. Open your project sample. Open the AddData dialog from the Map tab. Browse to your .quake event data and add an event to the map.
A sample using the Custom Project Item implementation can be found at Project Item EarthQuake.
Home | API Reference | Requirements | Download | Samples
- Overview of the ArcGIS Pro SDK
- What's New for Developers at 3.2
- Installing ArcGIS Pro SDK for .NET
- Release notes
- Resources
- Pro SDK Videos
- ProSnippets
- ArcGIS Pro API
- ProGuide: ArcGIS Pro Extensions NuGet
Migration
- ProSnippets: Framework
- ProSnippets: DAML
- ProConcepts: Framework
- ProConcepts: Asynchronous Programming in ArcGIS Pro
- ProConcepts: Advanced topics
- ProGuide: Custom settings
- ProGuide: Command line switches for ArcGISPro.exe
- ProGuide: Reusing ArcGIS Pro Commands
- ProGuide: Licensing
- ProGuide: Digital signatures
- ProGuide: Command Search
- ProGuide: Keyboard shortcuts
Add-ins
- ProGuide: Installation and Upgrade
- ProGuide: Your first add-in
- ProConcepts: Localization
- ProGuide: Content and Image Resources
- ProGuide: Embedding Toolboxes
- ProGuide: Diagnosing ArcGIS Pro Add-ins
- ProGuide: Regression Testing
Configurations
Customization
- ProGuide: The Ribbon, Tabs and Groups
- ProGuide: Buttons
- ProGuide: Label Controls
- ProGuide: Checkboxes
- ProGuide: Edit Boxes
- ProGuide: Combo Boxes
- ProGuide: Context Menus
- ProGuide: Palettes and Split Buttons
- ProGuide: Galleries
- ProGuide: Dockpanes
- ProGuide: Code Your Own States and Conditions
Styling
- ProSnippets: Content
- ProSnippets: Browse Dialog Filters
- ProConcepts: Project Content and Items
- ProConcepts: Custom Items
- ProGuide: Custom Items
- ProGuide: Custom browse dialog filters
- ArcGIS Pro TypeID Reference
- ProSnippets: Editing
- ProConcepts: Editing
- ProConcepts: COGO
- ProConcepts: Annotation Editing
- ProConcepts: Dimension Editing
- ProGuide: Editing Tool
- ProGuide: Construction Tools with Options
- ProGuide: Annotation Construction Tools
- ProGuide: Annotation Editing Tools
- ProGuide: Templates
3D Analyst Data
Plugin Datasources
Topology
Object Model Diagram
- ProSnippets: Geometry
- ProSnippets: Geometry Engine
- ProConcepts: Geometry
- ProConcepts: Multipatches
- ProGuide: Building Multipatches
Relational Operations
Reports
- ProSnippets: Map Authoring
- ProSnippets: Annotation
- ProSnippets: Charts
- ProSnippets: Labeling
- ProSnippets: Renderers
- ProSnippets: Symbology
- ProSnippets: Text Symbols
- ProConcepts: Map Authoring
- ProConcepts: Annotation
- ProConcepts: Dimensions
- ProGuide: Tray buttons
- ProGuide: Custom Dictionary Style
- ProGuide: Geocoding
3D Analyst
CIM
Graphics
Scene
Stream
Voxel
- ProSnippets: Map Exploration
- ProSnippets: Custom Pane with Contents
- ProConcepts: Map Exploration
- ProGuide: Map Pane Impersonation
- ProGuide: TableControl
Map Tools
- ProGuide: Feature Selection
- ProGuide: Identify
- ProGuide: MapView Interaction
- ProGuide: Embeddable Controls
- ProGuide: Custom Pop-ups
- ProGuide: Dynamic Pop-up Menu
Network Diagrams
- ArcGIS Pro API Reference Guide
- ArcGIS Pro SDK (pro.arcgis.com)
- arcgis-pro-sdk-community-samples
- ArcGISPro Registry Keys
- ArcGIS Pro DAML ID Reference
- ArcGIS Pro Icon Reference
- ArcGIS Pro TypeID Reference
- ProConcepts: Distributing Add-Ins Online
- ProConcepts: Migrating to ArcGIS Pro
- FAQ
- Archived ArcGIS Pro API Reference Guides
- Dev Summit Tech Sessions
