Pixel reference
There's two main pixel types in the library - the CRGB class and the CHSV class. CHSV objects have to be converted to CRGB objects before they can be written out. You can also write CHSV objects into the CRGB array and have the translation occur as necessary.
<wiki:toc max_depth="3" />
A "CRGB" is an object representing a color in RGB color space. It contains simply:
- a one byte value (0-255) representing the amount of red,
- a one byte value (0-255) representing the amount of green,
- a one byte value (0-255) representing the amount of blue in a given color.
Typically, when using this library, each LED strip is represented as an array of CRGB colors, one color for each LED pixel.
  #define NUM_LEDS 160

  CRGB leds[ NUM_LEDS ];
For more general information on what the RGB color space is, see http://en.wikipedia.org/wiki/RGB_color_model
CRGB has three one-byte data members, each representing one of the three red, green, and blue color channels of the color. There is more than one way to access the RGB data; each of these following examples does exactly the same thing:
  // The three color channel values can be referred to as "red", "green", and "blue"...
  leds[i].red   = 50;
  leds[i].green = 100;
  leds[i].blue  = 150;

  // ...or, using the shorter synonyms "r", "g", and "b"...
  leds[i].r = 50;
  leds[i].g = 100;
  leds[i].b = 150;

  // ...or as members of a three-element array:
  leds[i][0] = 50;  // red
  leds[i][1] = 100; // green
  leds[i][2] = 150; // blue
You are welcome, and invited, to directly access the underlying memory of this object if that suits your needs. That is to say, there is no "CRGB::setRed( myRedValue )" method; instead you just directly store 'myRedValue' into the ".red" data member on the object. All of the methods on the CRGB class expect this, and will continue to operate normally. This is a bit unusual for a C++ class, but in a microcontroller environment this can be critical to maintain performance.
The CRGB object "is trivially copyable", meaning that it can be copied from one place in memory to another and still function normally.
In addition to simply providing data storage for the RGB colors of each LED pixel, the CRGB class also provides several useful methods color-manipulation, some of which are implemented in assembly language for speed and compactness. Often using the class methods described here is faster and smaller than hand-written C/C++ code to achieve the same thing.
CRGB colors can be set by assigning values to the individual red, green, and blue channels. In addition, CRGB colors can be set a number of other ways which are often more convenient and compact. The two pieces of code below perform the exact same function.
  //Example 1: set color from red, green, and blue components individually
  leds[i].red =    50;
  leds[i].green = 100;
  leds[i].blue =  150;

  //Example 2: set color from red, green, and blue components all at once
  leds[i] = CRGB( 50, 100, 150);
Some performance-minded programmers may be concerned that using the 'high level', 'object-oriented' code in the second example comes with a penalty in speed or code size. However, this is simply not the case; the examples above generate literally identical machine code, taking up exactly the same amount of program memory, and executing in exactly the same amount of time. Given that, the choice of which way to write the code, then, is entirely a matter of personal taste and style. All other things being equal, the simpler, higher-level, more object-oriented code is generally recommended.
Here are the other high-level ways to set a CRGB color in one step:
  // Example 3: set color via 'hex color code' (0xRRGGBB)
  leds[i] = 0xFF007F;

  // Example 4: set color via any named HTML web color
  leds[i] = CRGB::HotPink;

  // Example 5: set color via setRGB
  leds[i].setRGB( 50, 100, 150);
Again, for the performance-minded programmer, it's worth noting that all of the examples above compile down into exactly the same number of machine instructions. Choose the method that makes your code the simplest, most clear, and easiest to read and modify.
Colors can also be copied from one CRGB to another:
  // Copy the CRGB color from one pixel to another
  leds[i] = leds[j];
If you are copying a large number of colors from one (part of an) array to another, the standard library function memmove can be used to perform a bulk transfer; the CRGB object "is trivially copyable".
  // Copy ten led colors from leds[src .. src+9] to leds[dest .. dest+9]
  memmove( &leds[dest], &leds[src], 10 * sizeof( CRGB) );
Performance-minded programmers using AVR/ATmega MCUs to move large number of colors in this way may wish to use the alternative "memmove8" library function, as it is measurably faster than the standard libc "memmove".
CRGB color objects use separate red, green, and blue channels internally to represent each composite color, as this is exactly the same way that multicolor LEDs do it: they have one red LED, one green LED, and one blue LED in each 'pixel'. By mixing different amounts of red, green, and blue, thousands or millions of resultant colors can be displayed.
However, working with raw RGB values in your code can be awkward in some cases. For example, it is difficult to work express different tints and shades of a single color using just RGB values, and it can be particular daunting to describe a 'color wash' in RGB that cycles around a rainbow of hues while keeping a constant brightness.
To simplify working with color in these ways, the library provides access to an alternate color model based on three different axes: Hue, Saturation, and Value (or 'Brightness'). For a complete discussion of HSV color, see http://en.wikipedia.org/wiki/HSL_and_HSV , but briefly:
- Hue is the 'angle' around a color wheel
- Saturation is how 'rich' (versus pale) the color is
- Value is how 'bright' (versus dim) the color is
In the library, the "hue" angle is represented as a one-byte value ranging from 0-255. It runs from red to orange, to yellow, to green, to aqua, to blue, to purple, to pink, and back to red. Here are the eight cardinal points of the hue cycle in the library, and their corresponding hue angle.
- Red (0..) "HUE_RED"
- Orange (32..) "HUE_ORANGE"
- Yellow (64..) "HUE_YELLOW"
- Green (96..) "HUE_GREEN"
- Aqua (128..) "HUE_AQUA"
- Blue (160..) "HUE_BLUE"
- Purple (192..) "HUE_PURPLE"
- Pink(224..) "HUE_PINK"
Often in other HSV color spaces, hue is represented as an angle from 0-360 degrees. But for compactness, efficiency, and speed, this library represents hue as a single-byte number from 0-255. There's a full wiki page how FastLED deals with HSV colors here.
"saturation" is a one-byte value ranging from 0-255, where 255 means "completely saturated, pure color", 128 means "half-saturated, a light, pale color", and 0 means "completely de-saturated: plain white".
"value" is a one-byte value ranging from 0-255 representing brightness, where 255 means "completely bright, fully lit", 128 means "somewhat dimmed, only half-lit", and zero means "completely dark: black."
In the library, a CHSV object is used to represent a color in HSV color space. The CHSV object has the three one-byte data members that you might expect:
- hue (or 'h')
- saturation (or 'sat', or just 's')
- value (or 'val', or just 'v') These can be directly manipulated in the same way that red, green, and blue can be on a CRGB object. CHSV objects are also "trivially copyable".
  // Set up a CHSV color
  CHSV paleBlue( 160, 128, 255);

  // Now...
  //   paleBlue.hue == 160
  //   paleBlue.sat == 128
  //   paleBlue.val == 255
The library provides fast, efficient methods for converting a CHSV color into a CRGB color. Many of these are automatic and require no explicit code.
For example, to set an led to a color specified in HSV, you can simply assign a CHSV color to a CRGB color:
  // Set color from Hue, Saturation, and Value.
  // Conversion to RGB is automatic.
  leds[i] = CHSV( 160, 255, 255);

  // alternate syntax
  leds[i].setHSV( 160, 255, 255);

  // set color to a pure, bright, fully saturated, hue
  leds[i].setHue( 160);
There is no conversion back from CRGB to CHSV provided with the library at this point.
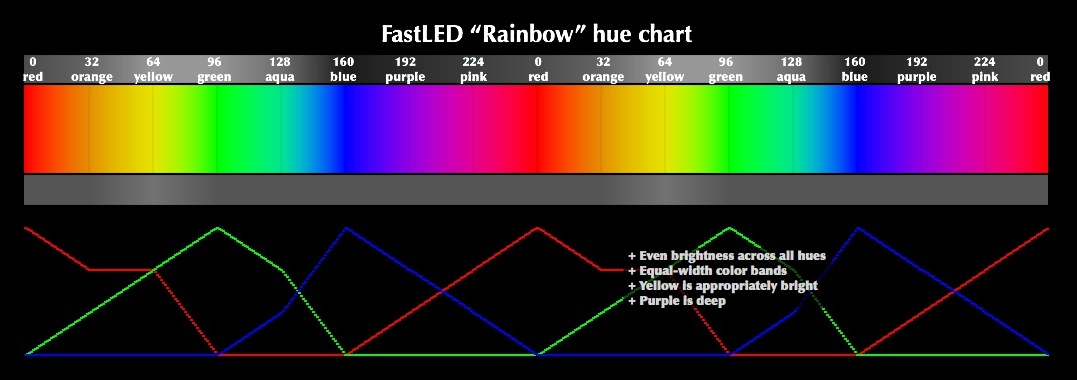
There are two different HSV color spaces: "spectrum" and "rainbow", and they're not exactly the same thing. Wikipedia has a good discussion here http://en.wikipedia.org/wiki/Rainbow#Number_of_colours_in_spectrum_or_rainbow but for purposes of the library, it can be summed up as follows:
- "Spectra" have barely any real yellow in them; the yellow band is incredibly narrow.
- "Rainbows" have a band of yellow approximately as wide as the 'orange' and 'green' bands around it; the yellow range is easy to see.
All of the automatic color conversions in the library use the "HSV Rainbow" color space, but through use of explicit color conversion routines, you can select to use the "HSV Spectrum" color space. There's a full wiki page how FastLED deals with HSV colors here.
The first explicit color conversion function is hsv2rgb_rainbow, which is used in the automatic color conversions:
  // HSV (Rainbow) to RGB color conversion
  CHSV hsv( 160, 255, 255); // pure blue in HSV Rainbow space
  CRGB rgb;
  hsv2rgb_rainbow( hsv, rgb);
  // rgb will now be (0, 0, 255)  -- pure blue as RGB
The HSV Spectrum color space has different cardinal points, and only six of them, which are correspondingly spread out further numerically. Here is the "Spectrum" color map that FastLED provides if you call hsv2rgb_spectrum explicitly:
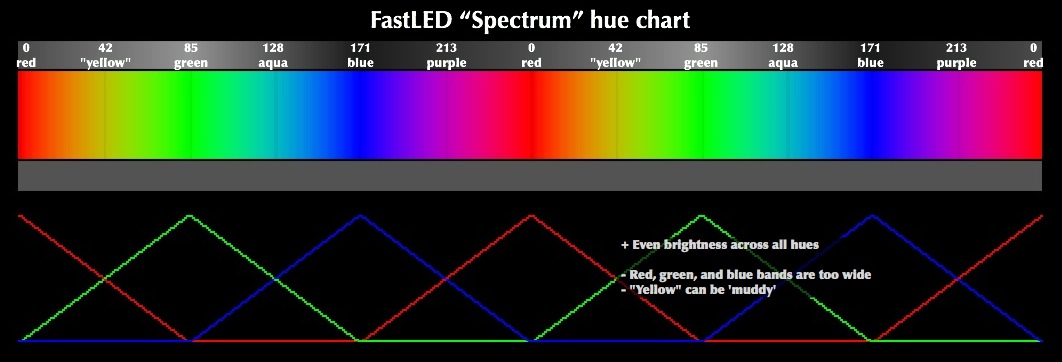
- Red (0..)
- Yellow (42..)
- Green (85..)
- Aqua (128..)
- Blue (171..)
- Purple (213..)
The hsv2rgb_spectrum conversion function's API is identical to hsv2rgb_rainbow:
  // HSV (Spectrum) to RGB color conversion
  CHSV hsv( 171, 255, 255); // pure blue in HSV Spectrum space
  CRGB rgb;
  hsv2rgb_spectrum( hsv, rgb);
  // rgb will now be (0, 0, 255)  -- pure blue as RGB
Why use the Spectrum color space, instead of Rainbow? The HSV Spectrum color space can be converted to RGB a little faster than the HSV Rainbow color space can be -- but the results are not as good visually; what little yellow there is appears dim, and at lower brightnesses, almost brownish. So there is a trade-off between a few clock cycles and visual quality. In general, start with the Rainbow functions (or better yet, the automatic conversions), and drop down to the Spectrum functions only if you completely run out of speed.
Both color space conversion functions can also convert an array of CHSV colors to a corresponding array of CRGB colors:
  // Convert ten CHSV rainbow values to ten CRGB values;
  CHSV hsvs[10];
  CRGB leds[10];
  // (set hsv values here)
  hsv2rgb_rainbow( hsvs, leds, 10); // convert all
The function "hsv2rgb_spectrum" can also be called this way for bulk conversions.
CRGB colors can be compared for exact matches using == and !=.
CRGB colors can be compared for relative light levels using <, >, <=, and =>. Note that this is a simple numeric comparison, and it will not always match the perceived brightness of the colors.
Often it is useful to check if a color is completely 'black', or if it is 'lit' at all. You can do this by testing the color directly with 'if', or using it in any other boolean context.
  // Test if a color is lit at all (versus pure black)
  if( leds[i] ) {
    /* it is somewhat lit (not pure black) */
  } else {
    /* it is completely black */
  }
The library supports a rich set of 'color math' operations that you can perform on one or more colors. For example, if you wanted to add a little bit of red to an existing LED color, you could do this:
  // Here's all that's needed to add "a little red" to an existing LED color:
  leds[i] += CRGB( 20, 0, 0);
That's it.
If you've ever done this sort of thing by hand before, you may notice something missing: the check for the red channel overflowing past 255. Traditionally, you've probably had to do something like this:
  // Add a little red, the old way.
  uint16_t newRed;
  newRed = leds[i].r + 20;
  if( newRed > 255) newRed = 255; // prevent wrap-around
  leds[i].r = newRed;
This kind of add-and-then-check-and-then-adjust-if-needed logic is taken care of for you inside the library code for adding two CRGB colors, inside operator+ and operator+=. Furthermore, much of this logic is implemented directly in assembly language and is substantially smaller and faster than the corresponding C/C++ code. The net result is that you no longer have to do all the checking yourself, and your program runs faster, too.
These 'color math' operations are part of what makes the library fast: it lets you develop your code faster, as well as executing it faster.
All of the math operations defined on the CRGB colors are automatically protected from wrap-around, overflow, and underflow.
  // Add one CRGB color to another.
  leds[i] += CRGB( 20, 0, 0);

  // Add a constant amount of brightness to all three (RGB) channels.
  leds[i].addToRGB(20);

  // Add a constant "1" to the brightness of all three (RGB) channels.
  leds[i]++;


  // Subtract one color from another.
  leds[i] -= CRGB( 20, 0, 0);

  // Subtract a contsant amount of brightness from all three (RGB) channels.
  leds[i].subtractFromRGB(20);

  // Subtract a constant "1" from the brightness of all three (RGB) channels.
  leds[i]--;
There are two different methods for dimming a color: "video" style and "raw math" style. Video style is the default, and is explicitly designed to never accidentally dim any of the RGB channels down from a lit LED (no matter how dim) to an UNlit LED -- because that often comes out looking wrong at low brightness levels. The "raw math" style will eventually fade to black.
Colors are always dimmed down by a fraction. The dimming fraction is expressed in 256ths, so if you wanted to dim a color down by 25% of its current brightness, you first have to express that in 256ths. In this case, 25% = 64/256.
  // Dim a color by 25% (64/256ths)
  // using "video" scaling, meaning: never fading to full black
  leds[i].fadeLightBy( 64 );
You can also express this the other way: that you want to dim the pixel to 75% of its current brightness. 75% = 192/256. There are two ways to write this, both of which will do the same thing. The first uses the %= operator; the rationale here is that you're setting the new color to "a percentage" of its previous value:
  // Reduce color to 75% (192/256ths) of its previous value
  // using "video" scaling, meaning: never fading to full black
  leds[i] %= 192;
The other way is to call the underlying scaling function directly. Note the "video" suffix.
  // Reduce color to 75% (192/256ths) of its previous value
  // using "video" scaling, meaning: never fading to full black
  leds[i].nscale8_video( 192);
If you want the color to eventually fade all the way to black, use one of these functions:
  // Dim a color by 25% (64/256ths)
  // eventually fading to full black
  leds[i].fadeToBlackBy( 64 );

  // Reduce color to 75% (192/256ths) of its previous value
  // eventually fading to full black
  leds[i].nscale8( 192);
A function is also provided to boost a given color to maximum brightness while keeping the same hue:
  // Adjust brightness to maximum possible while keeping the same hue.
  leds[i].maximizeBrightness();
Finally, colors can also be scaled up or down using multiplication and division.
  // Divide each channel by a single value
  leds[i] /= 2;

  // Multiply each channel by a single value
  leds[i] *= 2;
The library provides a function that lets you 'clamp' each of the RGB channels to be within given minimums and maximums. You can force all of the color channels to be at least a given value, or at most a given value. These can then be combined to limit both minimum and maximum.
  // Bring each channel up to at least a minimum value.  If any channel's
  // value is lower than the given minimum for that channel, it is
  // raised to the given minimum.  The minimum can be specified separately
  // for each channel (as a CRGB), or as a single value.
  leds[i] |= CRGB( 32, 48, 64);
  leds[i] |= 96;


  // Clamp each channel down to a maximum value.  If any channel's
  // value is higher than the given maximum for that channel, it is
  // reduced to the given maximum.  The minimum can be specified separately
  // for each channel (as a CRGB), or as a single value.
  leds[i] &= CRGB( 192, 128, 192);
  leds[i] &= 160;
The library provides a function that 'inverts' each RGB channel. Performing this operation twice results in the same color you started with.
  // Invert each channel
  leds[i] = -leds[i];
The library also provides functions for looking up the apparent (or mathematical) brightness of a color.
  // Get brightness, or luma (brightness, adjusted for eye's sensitivity to
  // different light colors.   See http://en.wikipedia.org/wiki/Luma_(video) )
  uint8_t luma = leds[i].getLuma();
  uint8_t avgLight = leds[i].getAverageLight();
Please note - these predefined colors are defined using the W3C RGB definitions. These definitions are designed with RGB monitors in mind, not RGB leds, and so the colors that you get on LED strips may be a bit different than you're expecting. In our experience, the colors are often too pale, or washed out (overly-desaturated).
| Color name | Hex Value | Example |
|---|---|---|
| CRGB::AliceBlue | 0xF0F8FF |  |
| CRGB::Amethyst | 0x9966CC |  |
| CRGB::AntiqueWhite | 0xFAEBD7 |  |
| CRGB::Aqua | 0x00FFFF |  |
| CRGB::Aquamarine | 0x7FFFD4 |  |
| CRGB::Azure | 0xF0FFFF |  |
| CRGB::Beige | 0xF5F5DC |  |
| CRGB::Bisque | 0xFFE4C4 |  |
| CRGB::Black | 0x000000 |  |
| CRGB::BlanchedAlmond | 0xFFEBCD |  |
| CRGB::Blue | 0x0000FF |  |
| CRGB::BlueViolet | 0x8A2BE2 |  |
| CRGB::Brown | 0xA52A2A |  |
| CRGB::BurlyWood | 0xDEB887 |  |
| CRGB::CadetBlue | 0x5F9EA0 |  |
| CRGB::Chartreuse | 0x7FFF00 |  |
| CRGB::Chocolate | 0xD2691E |  |
| CRGB::Coral | 0xFF7F50 |  |
| CRGB::CornflowerBlue | 0x6495ED |  |
| CRGB::Cornsilk | 0xFFF8DC |  |
| CRGB::Crimson | 0xDC143C |  |
| CRGB::Cyan | 0x00FFFF | |
| CRGB::DarkBlue | 0x00008B |  |
| CRGB::DarkCyan | 0x008B8B |  |
| CRGB::DarkGoldenrod | 0xB8860B |  |
| CRGB::DarkGray | 0xA9A9A9 |  |
| CRGB::DarkGreen | 0x006400 |  |
| CRGB::DarkKhaki | 0xBDB76B |  |
| CRGB::DarkMagenta | 0x8B008B |  |
| CRGB::DarkOliveGreen | 0x556B2F |  |
| CRGB::DarkOrange | 0xFF8C00 |  |
| CRGB::DarkOrchid | 0x9932CC |  |
| CRGB::DarkRed | 0x8B0000 |  |
| CRGB::DarkSalmon | 0xE9967A |  |
| CRGB::DarkSeaGreen | 0x8FBC8F |  |
| CRGB::DarkSlateBlue | 0x483D8B |  |
| CRGB::DarkSlateGray | 0x2F4F4F |  |
| CRGB::DarkTurquoise | 0x00CED1 |  |
| CRGB::DarkViolet | 0x9400D3 |  |
| CRGB::DeepPink | 0xFF1493 |  |
| CRGB::DeepSkyBlue | 0x00BFFF |  |
| CRGB::DimGray | 0x696969 |  |
| CRGB::DodgerBlue | 0x1E90FF |  |
| CRGB::FireBrick | 0xB22222 |  |
| CRGB::FloralWhite | 0xFFFAF0 |  |
| CRGB::ForestGreen | 0x228B22 |  |
| CRGB::Fuchsia | 0xFF00FF |  |
| CRGB::Gainsboro | 0xDCDCDC |  |
| CRGB::GhostWhite | 0xF8F8FF |  |
| CRGB::Gold | 0xFFD700 |  |
| CRGB::Goldenrod | 0xDAA520 |  |
| CRGB::Gray | 0x808080 |  |
| CRGB::Green | 0x008000 |  |
| CRGB::GreenYellow | 0xADFF2F |  |
| CRGB::Honeydew | 0xF0FFF0 |  |
| CRGB::HotPink | 0xFF69B4 |  |
| CRGB::IndianRed | 0xCD5C5C |  |
| CRGB::Indigo | 0x4B0082 |  |
| CRGB::Ivory | 0xFFFFF0 |  |
| CRGB::Khaki | 0xF0E68C |  |
| CRGB::Lavender | 0xE6E6FA |  |
| CRGB::LavenderBlush | 0xFFF0F5 |  |
| CRGB::LawnGreen | 0x7CFC00 |  |
| CRGB::LemonChiffon | 0xFFFACD |  |
| CRGB::LightBlue | 0xADD8E6 |  |
| CRGB::LightCoral | 0xF08080 |  |
| CRGB::LightCyan | 0xE0FFFF |  |
| CRGB::LightGoldenrodYellow | 0xFAFAD2 |  |
| CRGB::LightGreen | 0x90EE90 |  |
| CRGB::LightGrey | 0xD3D3D3 |  |
| CRGB::LightPink | 0xFFB6C1 |  |
| CRGB::LightSalmon | 0xFFA07A |  |
| CRGB::LightSeaGreen | 0x20B2AA |  |
| CRGB::LightSkyBlue | 0x87CEFA |  |
| CRGB::LightSlateGray | 0x778899 |  |
| CRGB::LightSteelBlue | 0xB0C4DE |  |
| CRGB::LightYellow | 0xFFFFE0 |  |
| CRGB::Lime | 0x00FF00 |  |
| CRGB::LimeGreen | 0x32CD32 |  |
| CRGB::Linen | 0xFAF0E6 |  |
| CRGB::Magenta | 0xFF00FF | |
| CRGB::Maroon | 0x800000 |  |
| CRGB::MediumAquamarine | 0x66CDAA |  |
| CRGB::MediumBlue | 0x0000CD |  |
| CRGB::MediumOrchid | 0xBA55D3 |  |
| CRGB::MediumPurple | 0x9370DB |  |
| CRGB::MediumSeaGreen | 0x3CB371 |  |
| CRGB::MediumSlateBlue | 0x7B68EE |  |
| CRGB::MediumSpringGreen | 0x00FA9A |  |
| CRGB::MediumTurquoise | 0x48D1CC |  |
| CRGB::MediumVioletRed | 0xC71585 |  |
| CRGB::MidnightBlue | 0x191970 |  |
| CRGB::MintCream | 0xF5FFFA |  |
| CRGB::MistyRose | 0xFFE4E1 |  |
| CRGB::Moccasin | 0xFFE4B5 |  |
| CRGB::NavajoWhite | 0xFFDEAD |  |
| CRGB::Navy | 0x000080 |  |
| CRGB::OldLace | 0xFDF5E6 |  |
| CRGB::Olive | 0x808000 |  |
| CRGB::OliveDrab | 0x6B8E23 |  |
| CRGB::Orange | 0xFFA500 |  |
| CRGB::OrangeRed | 0xFF4500 |  |
| CRGB::Orchid | 0xDA70D6 |  |
| CRGB::PaleGoldenrod | 0xEEE8AA |  |
| CRGB::PaleGreen | 0x98FB98 |  |
| CRGB::PaleTurquoise | 0xAFEEEE |  |
| CRGB::PaleVioletRed | 0xDB7093 |  |
| CRGB::PapayaWhip | 0xFFEFD5 |  |
| CRGB::PeachPuff | 0xFFDAB9 |  |
| CRGB::Peru | 0xCD853F |  |
| CRGB::Pink | 0xFFC0CB |  |
| CRGB::Plaid | 0xCC5533 |  |
| CRGB::Plum | 0xDDA0DD |  |
| CRGB::PowderBlue | 0xB0E0E6 |  |
| CRGB::Purple | 0x800080 |  |
| CRGB::Red | 0xFF0000 |  |
| CRGB::RosyBrown | 0xBC8F8F |  |
| CRGB::RoyalBlue | 0x4169E1 |  |
| CRGB::SaddleBrown | 0x8B4513 |  |
| CRGB::Salmon | 0xFA8072 |  |
| CRGB::SandyBrown | 0xF4A460 |  |
| CRGB::SeaGreen | 0x2E8B57 |  |
| CRGB::Seashell | 0xFFF5EE |  |
| CRGB::Sienna | 0xA0522D |  |
| CRGB::Silver | 0xC0C0C0 |  |
| CRGB::SkyBlue | 0x87CEEB |  |
| CRGB::SlateBlue | 0x6A5ACD |  |
| CRGB::SlateGray | 0x708090 |  |
| CRGB::Snow | 0xFFFAFA |  |
| CRGB::SpringGreen | 0x00FF7F |  |
| CRGB::SteelBlue | 0x4682B4 |  |
| CRGB::Tan | 0xD2B48C |  |
| CRGB::Teal | 0x008080 |  |
| CRGB::Thistle | 0xD8BFD8 |  |
| CRGB::Tomato | 0xFF6347 |  |
| CRGB::Turquoise | 0x40E0D0 |  |
| CRGB::Violet | 0xEE82EE |  |
| CRGB::Wheat | 0xF5DEB3 |  |
| CRGB::White | 0xFFFFFF |  |
| CRGB::WhiteSmoke | 0xF5F5F5 |  |
| CRGB::Yellow | 0xFFFF00 |  |
| CRGB::YellowGreen | 0x9ACD32 |  |