Push a button, do a GET Request. Save battery to last ages. More documentation on Instructables.
- GET Requests
- Trigger Action
- Monitor Battery
- Power Saving
- Reconfigurable
Inspired by Bitluni's Lab. This is a tiny dashbutton. That connects to IFTTT, and saves battery. The code has been extended to make it easy to use and universally configurable without the need for re-programming. Just flash the .bin file from the releases page and the SPIFFS data, enter configuration mode, set it up and you are ready to go.

When the button is pushed a GET request is made to a webpage.
Depending on the webpage, many different actions can be triggered by the button. I suggest hooking it up to the IFTTT Maker WebHooks.
When a request is made, if the setting is set, the button will also pass on the battery voltage with your web request. This way you can monitor the battery's charge. The server will recieve:
yoururl.com/yourrequest/?VCC_Param.=VCC_Voltage
To keep the button down to a small size, a small battery needs to be used. To maintain a decent battery life, the ESP is almost always in deep-sleep mode. Pressing the button resets the ESP. The ESP reboots, makes a GET request and goes back to deep-sleep.
You dont need to take apart your button to re-program the url or action. If you connect GPIO_03[RX] to GND during startup the button will enter configuration mode. Then you can
- Connect to 'ESP_Button' WiFi Access Point, with the password 'wifibutton'
- Visit http://192.168.4.1 to open the configuration page
- After setting your values, click on the 'Save' button then the 'Restart'

- Similliar Projects
- [Bitluni's DashButton] (https://github.com/bitluni/wifiButton)
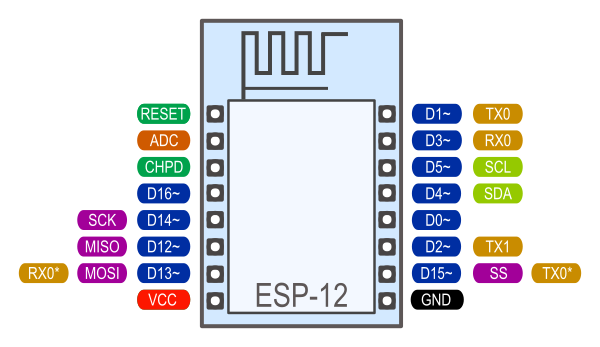
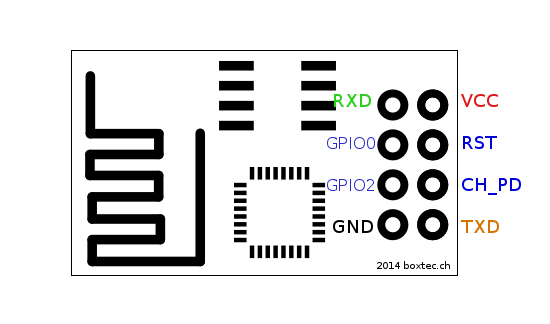
- ESP Info
- Pinouts
- General Guides
- GitHub Markdown Info