Creating Xcode 4.x Project Templates
The default Xcode 4.x project templates are located in the Xcode.app bundle. For Mac apps they are here:
Xcode.app/Contents/Developer/Library/Xcode/Templates/Project Templates/
and for iOS app they are here:
Xcode.app/Contents/Developer/Platforms/iPhoneOS.platform/Developer/Library/Xcode/Templates/Project Templates/
For custom templates, you're best to add them to your local library ~/Library/Developer/Xcode/Templates/ so that when you update Xcode it doesn't delete them all on you.
The only required file in a template is the TemplateInfo.plist file. You can also include additional files alongside your plist that you can then copy into new projects.
A typical file looks something like this (which happens to be a template to include a Cocoapods Podfile in the project):
	<?xml version="1.0" encoding="UTF-8"?>
	<!DOCTYPE plist PUBLIC "-//Apple//DTD PLIST 1.0//EN" "http://www.apple.com/DTDs/PropertyList-1.0.dtd">
	<plist version="1.0">
	<dict>
		<key>Identifier</key>
		<string>com.nsboilerplate.template.project.CocoaPods</string>

		<key>Name</key>
		<string>CocoaPods</string>

		<key>Description</key>
		<string>NSBoilerplate CocoaPods template.</string>

		<key>Kind</key>
		<string>Xcode.Xcode3.ProjectTemplateUnitKind</string>

		<key>Ancestors</key>
		<array>
		</array>

		<key>Definitions</key>
		<dict>
			<key>../Podfile</key>
			<string>
	#Podfile generated by NSBoilerplate (http://nsboilerplate.com)

	platform :ios, '5.0'

	pod 'BlocksKit', '1.8.1'
	pod 'SSToolkit', '1.0.2'
	pod 'CocoaLumberjack', '1.6'
	pod 'Reachability', '3.1.0'
	pod 'SVProgressHUD', '0.9'
	pod 'AFNetworking', '1.1.0'
	pod 'IAPValidation', '0.0.1'
	pod 'IAPManager', '0.2.0'

	</string>

		</dict>

		<key>Nodes</key>
		<array>
			<string>../Podfile</string>
		</array>

		<key>Options</key>
		<array></array>

		<key>SortOrder</key>
		<integer>1</integer>

	</dict>
	</plist>
TemplateInfo.plist can contain a number of keys. Here's what each of them do.
Template need te be identified with a unique id and you can optionally include additional descriptors that will appear in Xcode when the templates are selected.
This is the unique id of the template. Each template needs to have a different id and this id can be used to reference this template from other templates in ancestry and such.
example:
	<key>Identifier</key>
<string>com.nsboilerplate.template.project.CocoaPods</string>The name of the template.
example:
		<key>Name</key>
<string>CocoaPods</string>The description of the template.
example:
	<key>Description</key>
<string>NSBoilerplate CocoaPods template.</string>The kind of template. For projects this is always Xcode.Xcode3.ProjectTemplateUnitKind.
example:
	<key>Kind</key>
<string>Xcode.Xcode3.ProjectTemplateUnitKind</string>Specifies which platforms are allowed to use the templates, for example:
	<key>Platforms</key>
	<array>
		<string>com.apple.platform.iphoneos</string>
</array>This is a boolean used by Xcode to determine if the templates should be shown in the new projects dialog. If false the template is hidden and if true it's visible. This is useful for creating shared templates of common functionality that are not full project templates in themselves.
example:
	<key>Concrete</key>
<true/>Templates can also inherit from one another. This allows multiple templates to be merged into one larger templates, reusing common options and files.
These are a list of the id's of other templates from which this template inherits.
example:
	<key>Ancestors</key>
	<array>
		<string>com.nsboilerplate.template.project.CocoaPods</string>
		<string>com.apple.dt.unit.objectiveCApplication</string>
		<string>com.apple.dt.unit.iPhoneBase</string>
		<string>com.apple.dt.unit.prefixable</string>
</array>Injections targets are similar to categories in Objective-C. A template that include injection targets will become an ancestor of that target template if both are included in the ancestors of another project template.
example:
	<key>InjectionTargets</key>
	<array>
		<string>com.nsboilerplate.template.project.CocoaPods</string>
</array>The purpose of a template is to create and edit a set of files to start a project. These files can be copied from existing files in the template directory or created on the fly based on content of the templates.
Here's where things start to get interesting. Definitions list the variables and files in the templates but they're not actually added to the project yet. This is just a list of the things that could be added.
For example, if you want add a given file called README.md to your project, you need to add a definition such as this:
	<key>Definitions</key>
	<dict>
		<key>README.md</key>
		<dict>
			<key>Path</key>
			<string>README.md</string>
			<key>TargetIndices</key>
			<array/>
		</dict>
	</dict>
The keys in the definition start by specifying the file you're editing or creating. In this particular example the file README.md is created by copy it from the template's folder as defined by the dict's Path. I don't want to add the README file to the Copy Bundle Resources build phase so I've also included the TargetIndices with an empty array to specify no targets.
As I mentioned, the definitions dict keys at the actual files so if I had wanted the README placed in a subfolder, that would need to be part of the key. For example, to place it in a Documentation sub directory you would use:
<key>Docuemtation/README.md</key>or to place it in the project's parent directory you could use:
<key>../README.md</key>Each dict value in the definitions dict has a number of possible keys including:
-
Path— astringto the path of a resource in the template folder that will be copied to the key's location. -
TargetIndices— anarrayof target names to which the file should be added in theCopy Bundle Resourcesbuild phase. -
Group— astringorarrayrepresenting the Group where the files should be included in the Xcode project file browser. If anarrayofstringelements is defined then each string represents a subgroup. For example "Supporting Files > Documentation" would be:
	<key>Definitions</key>
	<dict>
		<key>README.m</key>
		<dict>
			<key>Group</key>
			<array>
				<string>Supporting Files</string>
				<string>Documentation</string>
			</array>
		</dict>
</dict>-
Beginning— astringto add to the beginning of the content. -
End— astringto add to the end of the content. -
Indent— anintegerthat represents the number of indent placeholders the content should be indented.
As well, if the definition dictionary value is a string element, then the content of the element will be used as the content.
	<key>Definitions</key>
	<dict>
		<key>README.md</key>
		<string>This is just an example file.</string>
</dict>Once you have definitions in place you need to create nodes that create or copy files to your project.
The Nodes array is simply a list of the keys in the Definitions dict that are included in the template. Later, we look at the New Project Wizard, you'll see how to optionally include nodes based on user selections.
Nodes take the format:
	<key>Nodes</key>
	<array>
		<string>DEFINITIONS_KEY</string>
		<string>DEFINITIONS_KEY</string>
		<string>DEFINITIONS_KEY</string>
	</array>
where DEFINITIONS_KEYs are replaced with keys defined in the Definitions element.
The trick to building a template is using the ancestry, definitions and nodes to assemble a file.
** IS THIS WHAT IT's CALLED???**
In order to merge multiple templates, definition keys can also identify the content area using a sort of namespace appended to the end of the key with a colon (:), for example:
<key>README.md:installation</key>and
<key>README.md:contributors</key>The content namespaces allow the Xcode template processor to identify multiple segments of a particular file and assemble them together as one. For example, let's look at a few templates that will create a MyClass.m implementation file with a few methods.
First, we'll start in a base template and define an empty method signature and open/close braces for exampleAction:
	<key>Identifier</key>
	<string>com.example.base</string>
	<key>Definitions</key>
	<dict>
		<key>MyClass.m:exampleAction</key>
		<dict>
			<key>Beginning</key>
			<string>- (void)exampleAction
{
	// Just an example.
			</string>
			<key>End</key>
			<string>
}
			</string>
			<key>Indent</key>
			<integer>1</integer>
		</dict>
	</dict>
	<key>Nodes</key>
	<array>
		<string>MyClass.m:exampleAction</string>
	</array>
This com.example.base template includes a definition for MyClass.m:exampleAction. If we created a new project based on this template we would end up with a MyClass.m file with the following exampleAction method:
	- (void)exampleAction
	{
		// Just an example.
	}
So far so good. But let's say that in another template, we want to add some code inside exampleAction's implementation. For that, we would set the template's ancestor to be com.example.base and define an additional suffix on MyClass.m:exampleAction
<key>Identifier</key>
<string>com.example.setup</string>
<key>Ancestors</key>
<array>
<string>com.example.base</string>
</array>
<key>Definitions</key>
<dict>
<key>MyClass.m:exampleAction:setup</key>
<string>self.label.text = @"Hello"</string>
</dict>
<key>Nodes</key>
<array>
<string>MyClass.m:exampleAction:setup</string>
</array>Now, if we were to use the com.example.setup template to create a project, MyClass.m would contain:
	- (void)exampleAction
	{
		// Just an example.
		self.label.text = @"Hello";
	}
You'll notice that XML special characters such as " need to be escaped in the template and the resulting code was indented properly due to the <indent> set in the definition of MyClass.m:exampleAction in com.example.base.
Now, let's extend this further and add another template that will insert code before the self.label line as well as add another method.
	<key>Identifier</key>
	<string>com.example.colours</string>
	<key>Ancestors</key>
	<array>
		<string>com.example.setup</string>
	</array>
	<key>Definitions</key>
	<dict>
		<key>MyClass.m:exampleAction:setup</key>
		<dict>
			<key>Before</key>
			<string>self.label.color = [self color];</string>
		</dict>
		<key>MyClass.m:color</key>
		<string>
	- (UIColor *)color {
		return [UIColor redColor];
	}
		</string>
	</dict>
	<key>Nodes</key>
	<array>
		<string>MyClass.m:exampleAction:setup</string>
		<string>MyClass.m:color</string>
	</array>
Now, the resulting MyClass.m would contain:
	- (void)exampleAction
	{
		// Just an example.
		self.label.color = [self color];
		self.label.text = @"Hello";
	}

	- (UIColor *)color {
		return [UIColor redColor];
	}
Definition keys can also include wildcards, for example:
<key>*:implementation:dealloc</key>or
<key>*:implementation:dealloc:*</key>These definitions are defined using some generic strings and variables.
	<key>Definitions</key>
	<dict>
		<key>*:implementation:dealloc</key>
		<dict>
			<key>Beginning</key>
			<string>- (void)dealloc
	{</string>
			<key>End</key>
			<string>	[super dealloc];
	}
	</string>
			<key>Indent</key>
			<integer>1</integer>
		</dict>
		<key>*:implementation:dealloc:*</key>
		<string>[___*___ release];</string>
	</dict>
By using the special ___*___ wildcard variable in the definition, the Nodes array can then be used to directly insert content based on the path name, for example:
	<key>Nodes</key>
	<array>
		<string>MasterViewController.m:implementation:dealloc:_detailViewController</string>
	</array>
creates:
	- (void)dealloc
	{
		[_detailViewController release];
		[super dealloc];
	}
The wildcard represents the remaining value in the key.
Keys and other parts of the template can use other constants as well.
Constants in TemplateInfo.plist files are identified by a triple underscore (___) on either side of the constant's name, such as:
___PACKAGENAME___Class.m
where ___PACKAGENAME___ contains the actual package name so the resulting implementation file would have the appropriate name.
There are several different pre-defined constants you can use including:
-
___COPYRIGHT___– the copyright message. -
___DATE___— the current date when the new project is created. -
___DIRECTORY___— the full path of directory in which the new file is being created. -
___FILEBASENAME___— the current file name without extension. -
___FILEBASENAMEASIDENTIFIER___— same asFILEBASENAME, but modified to be a legal C-style identifier. -
___FILEEXTENSION___— the extension of the file. -
___FILENAME___— the file name (with extension) as typed by the user. -
___FULLUSERNAME___— the full name of the current Xcode user. -
___ORGANIZATIONNAME___— the organization name as specified in the New Project wizard. -
___PACKAGENAME___— package name entered by the user in the New Project wizard. -
___PARENTPACKAGENAME___– -
___PROJECTNAME___— the name of the project in which file is created, empty if no project. -
___PROJECTNAMEASIDENTIFIER___— same asPROJECTNAME, but modified to be a legal C-style identifier. -
___TIME___– the current time when the file is created. -
___USERNAME___– the account name of the logged-in user.
Along with there there are others I've seen prefixd with IMPORTHEADER but I haven't figured out where they come from yet.
___IMPORTHEADER_categoryClass______IMPORTHEADER_extensionClass______IMPORTHEADER_cocoaTouchSubclass___
Constants can also be created via Macros and from the New Project Wizard Options.
Macros are a way of defining your own constants in templates. For example, here's a macro that's used in the ARC Template
	<key>Macros</key>
	<dict>
		<key>AR</key>
		<string> autorelease]</string>
		<key>RP</key>
		<string>[</string>
		<key>RT</key>
		<string> retain]</string>
	</dict>
These macros define three constants:
-
ARwhich outputsautorelease] -
RPwhich outputs[ -
RTwhich outputsretain]
Using these constants, you could write template output using the following format:
self.window = ___RP___[[UIWindow alloc] initWithFrame:[[UIScreen mainScreen] bounds]]___AR___;
combined with the constants above, the output would be
self.window = [[[UIWindow alloc] initWithFrame:[[UIScreen mainScreen] bounds]] autorelease];However, in the case of the ARC template, if the user opts to use ARC instead, then the macros are defined with empty strings:
	<key>Macros</key>
	<dict>
		<key>AR</key>
		<string></string>
		<key>RP</key>
		<string></string>
		<key>RT</key>
		<string></string>
	</dict>
and the same template content would result in ARC complient code without the autorelease and opening bracket:
self.window = [[UIWindow alloc] initWithFrame:[[UIScreen mainScreen] bounds]];See below for more on the New Project Wizard.
The last group of variables are also directly related to the New Project Wizard and they're the variables that represent the chosen options. For example, if the template asks the user for a class name, the option might use userSubclass as the option name, in which case the template would also include a constant with that variable's value. These constants follow the same format but are also prefixed with VARAIBLE like this:
___VARIABLE_userSubclass___
Common examples in Apple's templates include:
___VARIABLE_classPrefix:identifier______VARIABLE_categoryClass:identifier______VARIABLE_extensionClass:identifier______VARIABLE_extensionName:identifier______VARIABLE_cocoaTouchSubclass___
By combining Definitions, Nodes and Variables you can create powerful templates but to go further you may need to ask the project creator some questions about the project before it's created. For example, Apple's default templates ask for things like the class prefix, company name, projects name and what features you'd like to include in this particular project type.
The Options element is an array of dicts that define each option in the New Project Wizard. Each option can include:
An identifier which is like a variable name that represents the value of the option, for example:
	<key>Identifier</key>
	<string>useARC</string>
As described earlier, a constant with the selected value will be created in the format ___VARIABLE_identifier___, for example ___VARIABLE_userARC___.
A general description of what the option is for, which may be used for additional contextual help, for example:
	<key>Description</key>
<string>Whether the new project should use Automatic Reference Counting</string>The default value for the option, for example:
	<key>Default</key>
<string>true</string>An integer used to sort the options in the New Project Wizard, for example:
	<key>SortOrder</key>
<integer>2</integer>A label
	<key>Name</key>
<string>Category</string> <key>NotPersisted</key>
<true/> <key>Required</key>
<true/> <key>RequiredOptions</key>
<dict>
<key>cocoaTouchSubclass</key>
<string>UITableViewController</string>
</dict>The Type defines what sort of input you're expecting. Type can be one of:
A static option will show the values as static text in the wizard. If the option already has a value (identified by the Identifier) then it will display the current value, otherwise it will display the Default. This is useful for displaying the outcome of a result after selecting different options.
<dict>
<key>Identifier</key>
<string>aStaticString</string>
<key>Name</key>
<string>A static example</string>
<key>Default</key>
<string>Hello World</string>
<key>Type</key>
<string>static</string>
</dict>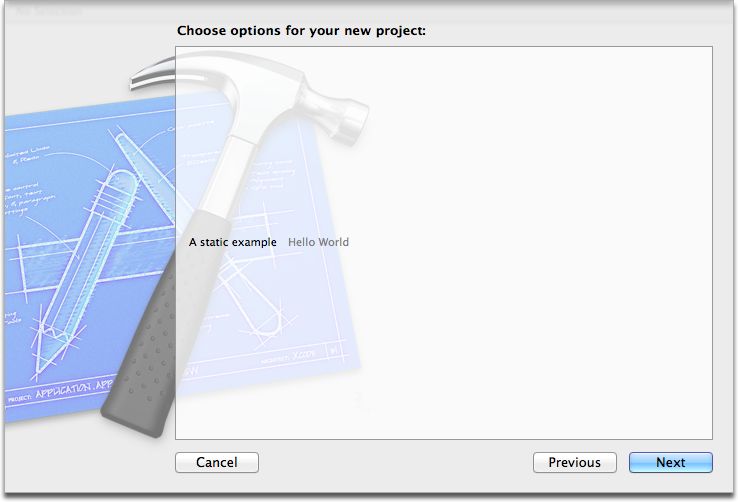
Checkboxes allow you to create boolean options by displaying checkbox. For a checkbox to work properly you also need to include the Units key with a set of Definitions and Nodes that will be applied depending on the boolean selection. For example, here we offer a checkbox to include a README file:
<dict>
<key>Default</key>
<string>true</string>
<key>Description</key>
<string>Whether the new project should include a README file</string>
<key>Identifier</key>
<string>useREADME</string>
<key>Name</key>
<string>Include a README</string>
<key>SortOrder</key>
<integer>1</integer>
<key>Type</key>
<string>checkbox</string>
<key>Units</key>
<dict>
<key>false</key>
<array>
</array>
<key>true</key>
<array>
<dict>
<key>Definitions</key>
<dict>
<key>README</key>
<string>Enter your readme info here....</string>
</dict>
<key>Nodes</key>
<array>
<string>README</string>
</array>
</dict>
</array>
</dict>
</dict>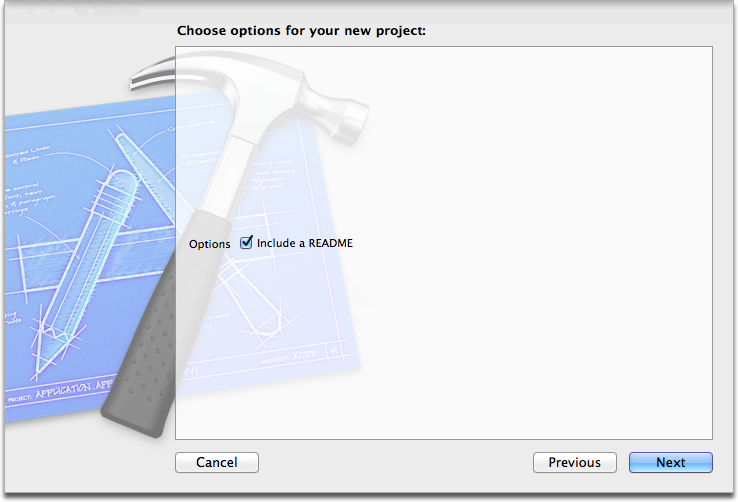
Text allows you to add simple text inputs for things like project / class names or API keys.
<dict>
<key>Description</key>
<string>Your API key</string>
<key>Identifier</key>
<string>apiKey</string>
<key>Name</key>
<string>Service API Key</string>
	<key>Required</key>
	<true/>
<key>Type</key>
<string>text</string>
</dict> 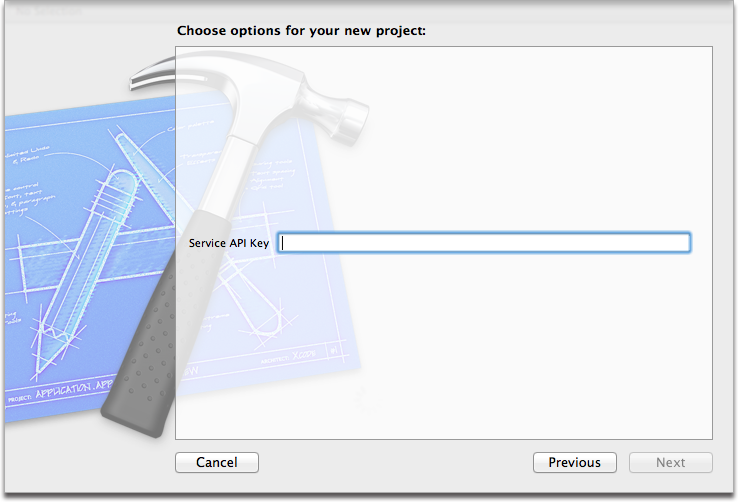
Class is a pre-defined list of the project's available classes.
<dict>
<key>Default</key>
<string>NSObject</string>
<key>Description</key>
<string>Which class to add a category to</string>
<key>Identifier</key>
<string>categoryClass</string>
<key>Name</key>
<string>Category on</string>
<key>Required</key>
<true/>
<key>Type</key>
<string>class</string>
</dict>If you want to show a single choice of multiple items you can use popup with the values specified in Values.
<dict>
<key>Identifier</key>
<string>deviceFamily</string>
<key>Name</key>
<string>Device Family</string>
<key>Description</key>
<string>What device family.</string>
<key>Type</key>
<string>popup</string>
<key>Default</key>
<string>iPhone</string>
<key>Values</key>
<array>
<string>iPhone</string>
<string>iPad</string>
</array>
</dict>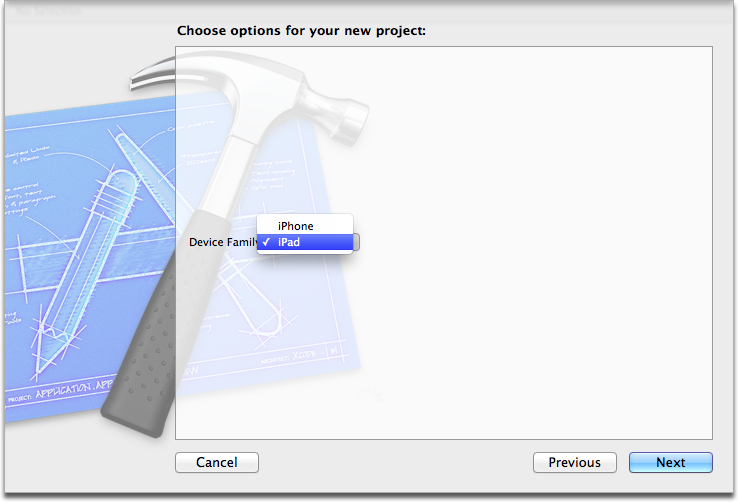
Including a buildSetting options allows you to update the buld settings specified in Name with the values specified in Values. For example:
<dict>
<key>Identifier</key>
<string>usingARC</string>
<key>Name</key>
<string>CLANG_ENABLE_OBJC_ARC</string>
	<key>RequiredOptions</key>
	<dict>
		<key>cocoaTouchSubclass</key>
		<string>UITableViewController</string>
	</dict>
<key>Type</key>
<string>buildSetting</string>
<key>Values</key>
<array>
<string>NO</string>
</array>
</dict>You can use the values of options from one template in another. Using our README example from earlier, another template could include
	<key>Options</key>
	<array>
		<dict>
			<key>Identifier</key>
			<string>useREADME</string>
			<key>Units</key>
			<dict>
				<key>true</key>
				<!-- other things to do if useREADME is true -->
			</dict>
		</dict>
</array> The Project dictionary specifies project level settings in either the Configurations key (allowing you to specify settings for individual configurations) or the SharedSettings key (applies to all configurations). The configureable keys are any of the standard build settings you're familiar with.
	<key>Project</key>
	<dict>
		<key>Configurations</key>
		<dict>
			<key>Release</key>
			<dict>
				<key>VALIDATE_PRODUCT</key>
				<string>YES</string>
				<key>OTHER_CFLAGS</key>
				<string>-DNS_BLOCK_ASSERTIONS=1</string>
			</dict>
		</dict>
		<key>SharedSettings</key>
		<dict>
			<key>TARGETED_DEVICE_FAMILY</key>
			<string>1,2</string>
			<key>CODE_SIGN_IDENTITY[sdk=iphoneos*]</key>
			<string>iPhone Developer</string>
			<key>GCC_WARN_ABOUT_RETURN_TYPE</key>
			<string>YES</string>
			<key>GCC_WARN_UNUSED_VARIABLE</key>
			<string>YES</string>
		</dict>
	</dict>
Targets are very similar to the Project group, however they apply to the target level build's settings. Along with Configurations and SharedSettings you can specify an array of Frameworks to include in the target and a Name for the target.
	<key>Targets</key>
	<array>
		<dict>
			<key>Configurations</key>
			<dict>
				<key>Debug</key>
				<dict/>
				<key>Release</key>
				<dict/>
			</dict>
			<key>Name</key>
			<string>___PACKAGENAME___</string>
			<key>SharedSettings</key>
			<dict>
				<key>ALWAYS_SEARCH_USER_PATHS</key>
				<string>NO</string>
				<key>PRODUCT_NAME</key>
				<string>$(TARGET_NAME)</string>
			</dict>
			<key>Frameworks</key>
			<array>
				<string>UIKit</string>
				<string>Foundation</string>
				<string>CoreGraphics</string>
			</array>
		</dict>
	</array>
end.