WebAPI Installation Guide
This page describes the database setup, maven build configuration and deployment of OHDSI/WebAPI to a Apache Tomcat environment. This application is Java-based, packaged as a WAR, and should be able to be deployed into any Java servlet container.
This guide is intended to provide a basic setup guide on a Windows operating system. There are other efforts in the OHDSI Community that are focused on providing more enterprise-ready setups for the OHDSI Tools. These include the Broadsea project: https://github.com/OHDSI/Broadsea and OHDSI on AWS: https://github.com/OHDSI/OHDSIonAWS.
You will need the following software as part of this setup guide:
-
Text Editor: Notepad++ or your favorite editor for editing configuration files
-
Java 8 Java Development Kit (JDK): Install this to the default location on your computer and note the location. Ensure that the
JAVA_HOMEenvironmental variable is set for Windows by using the following command from a command prompt:
set JAVA_HOME=C:/Program Files/Java/jdk1.8.0_201
👉R Users: The JAVA_HOME environmental variable can cause problems when attempting to use OHDSI R libraries. You may want to remove this after you are done building WebAPI
-
Git: Install this on your computer in order to clone the project repository.
-
Apache Maven - Install maven to build the Java project for installation into your Java servlet container. Note the location of the installation (for this guide we'll use
C:\maven.) Refer to the Maven on Windows guide to set yourMAVEN_HOMEenvironment variable to add the location where you installed Maven (C:\maven) and addC:\maven\binto the PATH environment variable. -
Apache Tomcat 8: Its a good idea to make sure the version of Tomcat matches your Java version. Download the version appropriate for your operating system. Extract it to your computer and note the location (
C:\tomcat). -
Database Query Tool: Use your favorite database query tool (such as SQL Workbench/J). This will be used to verify the database setup.
-
PostgreSQL: WebAPI requires a PostgreSQL database. 🙌 NOTE: WebAPI dropped support for SQL Server/Oracle with the 2.8 release (2.8 release notes).
⭐️ Important: This database platform is for hosting the WebAPI Configuration Database not your patient-level data converted to the Common Data Model.
If you already have a database server you plan to use, please refer to the install guides as they contain information on how to set up the database required by WebAPI.
✅ Note the database name, user names and passwords created as part of this process as they are required for the WebAPI setup.
It is critical to ensure that you have proper database connectivity before attempting to install WebAPI. Here are some high-level steps to follow on the machine that will run WebAPI:
- Use the database query tool to connect to the database server.
- Log into the database using the application user name and password - if you followed the guides above, this will be the
ohdsidatabase and theohdsi_app_user.
Once you have ensure that the connection works, your ready to configure, build and run WebAPI.
Create a folder (for example C:\Git\OHDSI) and navigate to it. From within your project directory, clone the project using git:
C:\Git\OHDSI> git clone https://github.com/OHDSI/WebAPI.git
Once we've downloaded the code, we want to ensure that we are using a released version of WebAPI. This is done by performing a git checkout of the code at a specific tagged version. You can find the latest released version of WebAPI at https://github.com/OHDSI/WebAPI/releases and note the tag as shown in the left hand menu. For example, if I want to check out v2.14.0 I would change to the WebAPI directory and use the following command:
C:\Git\OHDSI\WebAPI> git checkout refs/tags/v2.14.0
Where v2.14.0 is the released version you would like to use.
In the root of the WebAPI project folder, there is a file named sample_settings.xml. Copy this file into a new folder WebAPIConfig and rename it to settings.xml. Note: WebAPIConfig will be subfolder off of the root WebAPI folder.
WebAPI v2.8 and higher provides optional support for an Apache Solr installation which provides improvements in vocabulary search speed. The details for the setup are found in the Apache Solr Setup Guide.
🙌 NOTE: Since the v2.14 release of WebAPI, if you plan to use Solr for search you must also include the webapi-solr profile when creating the WebAPI.war file.
Next we need to configure the maven profile in WebAPIConfig\settings.xml to match the your environment setup. Open the settings.xml, find the profile corresponding to your database setup and then make the adjustments for your environment.
🙌 NOTE: WebAPI dropped support for SQL Server/Oracle with the 2.8. So the only valid profile is webapi-postgresql.
Here are some important settings to review:
-
datasource.url: This is the JDBC URL to your database server. If your database is not on the same machine as WebAPI, you'll want to make sure this is set. If you tested this in the previous section, make note of the settings that allowed for proper connection from your database query tool. -
datasource.usernameanddatasource.password: These are the application username and password respectively. If you followed the database setup guides, this will be theohdsi_app_useraccount. -
flyway.datasource.usernameandflyway.datasource.password: These are the application administrator username and password respectively. This is theohdsi_admin_userfrom the database setup guide. -
security.origin: This is the name of the server where WebAPI is running. Note thatlocalhostis not the server name but rather a standard network term that refers to the current machine. So, leaving this aslocalhostwill allow WebAPI to work when accessing it from within the same computer however it will not be reachable from outside of the machine. You can also change this to*if you are comfortable with any machine connecting to WebAPI. -
server.port: This is the default port where WebAPI will be accessed. Thesecurity.originandserver.portsettings make up the basis for your root URL to WebAPI. In this case, it will behttp://<security.origin>:<server.port>(i.e. http://localhost:8080).
By default, WebAPI does not require authentication and authorization. The Basic Security Configuration Guide covers this in more detail if you'd like to use security.
From the root of the WebAPI Project folder (C:\Git\OHDSI\WebAPI) run the following maven command to create the .war file which will be used to deploy and run WebAPI:
C:\Git\OHDSI\WebAPI> mvn clean package -DskipUnitTests -DskipITtests -s WebAPIConfig/settings.xml -P {profile id}
👉 Note: {profile id} is set to the value of the profile ID from the example configuration as described in the Clone the WebAPI project section. The valid values for this are webapi-postgresql, webapi-mssql or webapi-oracle.
🙌 NOTE: WebAPI dropped support for SQL Server/Oracle with the 2.8. So the only valid profile is webapi-postgresql.
☀️ If you are using Apache Solr and are compiling v2.14 or higher of WebAPI, you must also include the webapi-solr profile when creating the WebAPI.war file. This is the same as the command above with the addition of the -P {profile id},webapi-solr to the list of profiles:
C:\Git\OHDSI\WebAPI> mvn clean package -DskipUnitTests -DskipITtests -s WebAPIConfig/settings.xml -P {profile id},webapi-solr
This will create the file WebAPI.war in the target WebAPI subfolder (C:\Git\OHDSI\WebAPI\target\WebAPI.war). Note this location in order to deploy this .war to the Tomcat container which will then provide you a container to run the Java application and provide you with the service to allow communications via HTTP.
For the purposes of this guide, we'll start Tomcat from a command line. In an environment where you'd like to have WebAPI running continuously, you'll want to consider setting up a dedicated service so that the Tomcat service can start/stop when the computer starts/stops. Furthermore, since this is a simple setup guide, it is important to note that you do not want to set up a production instance of Tomcat in this way. This is simply a quick way to get Tomcat running for use with WebAPI.
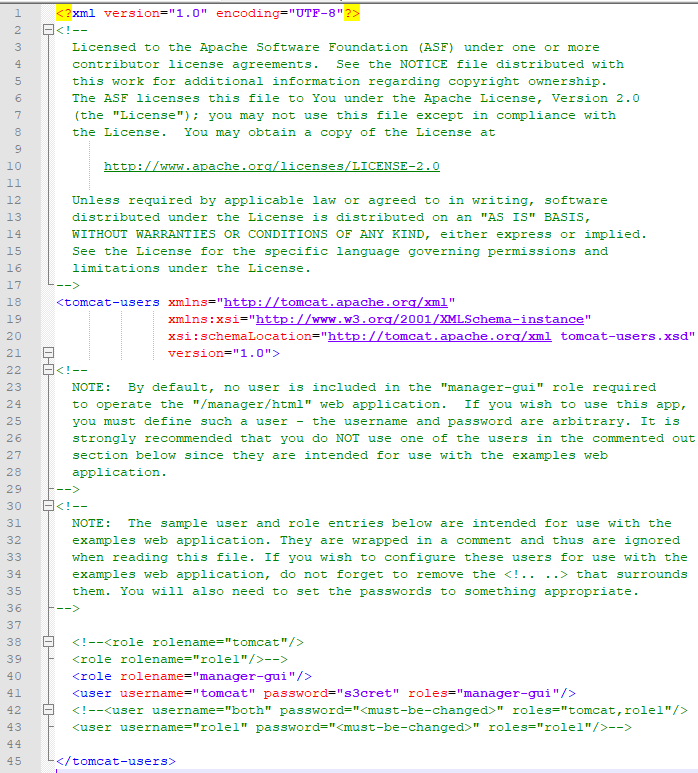
Before we can deploy WebAPI, we need to configure Tomcat to allow us to log into the manager interface. To do this, navigate to the conf folder (C:\tomcat\conf) and edit the file tomcat-users.xml. Add the following XML in the <tomcat-users> block:
  <role rolename="manager-gui"/>
  <user username="tomcat" password="s3cret" roles="manager-gui"/>
Your file should look similar to this one:
Next, we will need to configure the Tomcat manager application to allow for uploads larger than 50MB to ensure we can deploy WebAPI. Edit the file: C:\tomcat\webapps\manager\WEB-INF\web.xml and find the section that reads:
    <multipart-config>
      <!-- 50MB max -->
      <max-file-size>52428800</max-file-size>
      <max-request-size>52428800</max-request-size>
      <file-size-threshold>0</file-size-threshold>
    </multipart-config>
Update this to read:
    <multipart-config>
      <!-- 150MB max -->
      <max-file-size>154857600</max-file-size>
      <max-request-size>154857600</max-request-size>
      <file-size-threshold>0</file-size-threshold>
    </multipart-config>
To start Tomcat, open a command prompt and navigate to the bin folder where you installed Tomcat (C:\tomcat\bin) and run:
C:\tomcat\bin> catalina.bat run > ..\logs\webapi.log 2>&1
In the command above, catalina.bat run will start the Tomcat service and the > ..\logs\webapi.log 2>&1 portion of the command will write the output to Tomcat's logs\webapi.log.
Open a web browser, navigate to http://localhost:8080/manager and you will be prompted for credentials. Enter the user name of tomcat and password of s3cret as configured in the step above. You will then see the manager screen:

At the bottom of the manager screen, you will see an area labled WAR file to deploy. Click on the Choose File button and navigate to the location of the WebAPI.war file ((C:\Git\OHDSI\WebAPI\target\WebAPI.war). Click the Deploy button to deploy and start up WebAPI.
Give the .WAR time to upload and then open c:\tomcat\logs\webapi.log using a text editor to monitor the progress. If all has worked, you will see a message in the logs such as:
org.ohdsi.webapi.WebApi - - Started WebApi in xx.xxx seconds (JVM running for yy.yy)
Using the database query tool, you can also confirm that a large number of tables are created in the webapi schema of your ohdsi database.
Reading the Tomcat logs, the following output should appear indicating that the tables have been created (in this example, we see an Oracle output):
2016-02-24 11:01:08.148 INFO org.ohdsi.webapi.WebApi.main() org.flywaydb.core.internal.dbsupport.DbSupportFactory -  - Database: jdbc:oracle:thin:@//127.0.0.1:1521/xe (Oracle 11.2)
2016-02-24 11:01:08.358 INFO org.ohdsi.webapi.WebApi.main() org.flywaydb.core.internal.metadatatable.MetaDataTableImpl -  - Creating Metadata table: "OHDSI"."schema_version"
2016-02-24 11:01:08.468 INFO org.ohdsi.webapi.WebApi.main() org.flywaydb.core.internal.command.DbMigrate -  - Current version of schema "OHDSI": << Empty Schema >>
2016-02-24 11:01:08.468 WARN org.ohdsi.webapi.WebApi.main() org.flywaydb.core.internal.command.DbMigrate -  - outOfOrder mode is active. Migration of schema "OHDSI" may not be reproducible.
2016-02-24 11:01:08.468 INFO org.ohdsi.webapi.WebApi.main() org.flywaydb.core.internal.command.DbMigrate -  - Migrating schema "OHDSI" to version 1.0.0.1
2016-02-24 11:01:08.608 INFO org.ohdsi.webapi.WebApi.main() org.flywaydb.core.internal.command.DbMigrate -  - Migrating schema "OHDSI" to version 1.0.0.2
2016-02-24 11:01:08.628 INFO org.ohdsi.webapi.WebApi.main() org.flywaydb.core.internal.command.DbMigrate -  - Migrating schema "OHDSI" to version 1.0.0.3
2016-02-24 11:01:08.668 INFO org.ohdsi.webapi.WebApi.main() org.flywaydb.core.internal.command.DbMigrate -  - Migrating schema "OHDSI" to version 1.0.0.3.1
2016-02-24 11:01:08.778 INFO org.ohdsi.webapi.WebApi.main() org.flywaydb.core.internal.command.DbMigrate -  - Migrating schema "OHDSI" to version 1.0.0.3.2
2016-02-24 11:01:08.798 INFO org.ohdsi.webapi.WebApi.main() org.flywaydb.core.internal.command.DbMigrate -  - Migrating schema "OHDSI" to version 1.0.0.4
2016-02-24 11:01:08.987 INFO org.ohdsi.webapi.WebApi.main() org.flywaydb.core.internal.command.DbMigrate -  - Migrating schema "OHDSI" to version 1.0.0.4.1
2016-02-24 11:01:09.007 INFO org.ohdsi.webapi.WebApi.main() org.flywaydb.core.internal.command.DbMigrate -  - Migrating schema "OHDSI" to version 1.0.0.4.2
2016-02-24 11:01:09.027 INFO org.ohdsi.webapi.WebApi.main() org.flywaydb.core.internal.command.DbMigrate -  - Migrating schema "OHDSI" to version 1.0.0.4.3
2016-02-24 11:01:09.068 INFO org.ohdsi.webapi.WebApi.main() org.flywaydb.core.internal.command.DbMigrate -  - Migrating schema "OHDSI" to version 1.0.0.5
2016-02-24 11:01:09.148 INFO org.ohdsi.webapi.WebApi.main() org.flywaydb.core.internal.command.DbMigrate -  - Migrating schema "OHDSI" to version 1.0.0.5.1
2016-02-24 11:01:09.168 INFO org.ohdsi.webapi.WebApi.main() org.flywaydb.core.internal.command.DbMigrate -  - Migrating schema "OHDSI" to version 1.0.0.6.1
2016-02-24 11:01:09.348 INFO org.ohdsi.webapi.WebApi.main() org.flywaydb.core.internal.command.DbMigrate -  - Migrating schema "OHDSI" to version 1.0.0.6.2
2016-02-24 11:01:09.750 INFO org.ohdsi.webapi.WebApi.main() org.flywaydb.core.internal.command.DbMigrate -  - Migrating schema "OHDSI" to version 1.0.0.6.3
2016-02-24 11:01:09.780 INFO org.ohdsi.webapi.WebApi.main() org.flywaydb.core.internal.command.DbMigrate -  - Migrating schema "OHDSI" to version 1.0.0.7.0
2016-02-24 11:01:09.840 INFO org.ohdsi.webapi.WebApi.main() org.flywaydb.core.internal.command.DbMigrate -  - Migrating schema "OHDSI" to version 1.0.0.7.1
2016-02-24 11:01:09.920 INFO org.ohdsi.webapi.WebApi.main() org.flywaydb.core.internal.command.DbMigrate -  - Migrating schema "OHDSI" to version 1.0.0.7.2
2016-02-24 11:01:10.020 INFO org.ohdsi.webapi.WebApi.main() org.flywaydb.core.internal.command.DbMigrate -  - Migrating schema "OHDSI" to version 1.0.0.8
2016-02-24 11:01:10.060 INFO org.ohdsi.webapi.WebApi.main() org.flywaydb.core.internal.command.DbMigrate -  - Migrating schema "OHDSI" to version 1.0.1.0
2016-02-24 11:01:10.090 INFO org.ohdsi.webapi.WebApi.main() org.flywaydb.core.internal.command.DbMigrate -  - Migrating schema "OHDSI" to version 1.0.1.1
2016-02-24 11:01:10.130 INFO org.ohdsi.webapi.WebApi.main() org.flywaydb.core.internal.command.DbMigrate -  - Migrating schema "OHDSI" to version 1.0.1.1.1
2016-02-24 11:01:14.482 INFO org.ohdsi.webapi.WebApi.main() org.flywaydb.core.internal.command.DbMigrate -  - Successfully applied 21 migrations to schema "OHDSI" (execution time 00:06.124s).
Use your DB platform's query tool to verify tables now exist in the schema.
If all worked, you can verify that WebAPI is working by navigating to http://localhost:8080/WebAPI/info and you should see the following output:
{"version":"2.14.0"}
This output indicates that WebAPI version 2.14.0 is now running. Next, you will need to establish a connection between WebAPI and your CDM v5 database(s) which is covered in the CDM Configuration section.
If errors are encountered in the logs of WebAPI, the most likely reason is JDBC url was not set properly (note: database names are case sensitive!), or the admin user was not granted privileges to create the necessary tables in the webapi schema.
The most likely error you will receive when accessing http://localhost:8080/WebAPI/source/sources
is the ohdsi_app_user does not have permission on relation source. This means the default privileges were not assigned when logged into the database as ohdsi_admin_user. These table permissions will have to be granted manually.
If no error is appearing in the logs at all, please confirm the Tomcat servlet engine is listening on port 8080. If it is on a different port, you will need to adjust the URLs above to the correct port.