This is an open-source solution to deploy AutoTagging using CloudTrail and route the deployemnt event through Cloudwatch Events, EventBrigdge, and SNS Topics across accounts to an endpoint - a lambda function to tag resources at the moment of creation a AWS Resource with the arn of who created, the username ID, and the time of creation.
Insofar we have the following services sucessfully tested for auto-tag creation; all ec2 services, S3, CloudTrail, CloudWatch, System Manager, Code Pipeline, CodeBuild, Sns, Sqs, IAM, and Cloudformation. Each of those services get a tag with Creator ID, the ARN, and Time of Creation.
- Intermedial to advance level in Python. So, you can adapt and customized the
CreateTagCreatorID.pyfiles to your need an use cases. - Basic to intermedial level in json to edit json policies in
EventBridge Rulesto change the rules and policies to the needs of your use cases since we have not cover every single resource in AWS. - An existing
AWS Organization - A
Resource Access Manager (RAM)> Settings with "Enable Sharing with AWS Organizations" checked.
- One AWS Account known as the "the Central or Receiver Account" to centralize and receive all creation events. Here is where we deploy AutoTagging Lambda function.
- In Every other linked/ sender account included in your organization will need the following
A.
Cloudwatchlog group collectingcloudtrailfor every region. B.Eventbridgerules for every region for Receiver account and Linked Accounts in order to create a pipeline to pass the create events from the source region in any linked account to the lambda function in us-east-1 in central or receiving account.
- IAM
- EC2
- S3
- SNS Topics
- SQS
- CloudTrail
- Cloudwatch Logs
- CodePipeline
- CodeBuild
- CloudFormation
- MediaStore
- Resource Group Tagging
- Tag Editor
More Auto-Tagging for AWS Services coming!!!
A Receiver/Central AWS Account One existing AWS account attached to and organization used to deploy the auto tagging lambda function in us-east-1 as endpoint and that for the purpose of this project its Id will be 111111111111
A Sender/linked AWS Account A Second existing AWS account with Id 222222222222 and that is attached to the same organization than Receiver Account. We all intents and purposes of this demo we are going to deploy AWS resources in us-east-1, action which will create an event. This event will be sent through a pipeline that will have as endpoint the lambda autotagging in us-east-1 in account 111111111111. Thus fulfilling the purpose of centralizing auto-tagging of resources any region for any Linked Account that is set and configured in the pipeline.
An Existing AWS organization that for the purpose of this project has an ID my-org-id-1234
Resource Access Management (RAM)
Must be sure that Enabling sharing with AWS Organizations is checked. In the Central Account go to Services Tab > type RAM in the search for services text box > select Resource Access Manager > In the RAM menu go to Settings - "Enable sharing with AWS Organizations" must be selected.
In this case Identity and Access Management (IAM) is a global element, so do not worry in what region you are in at the moment of loggin in. Though some AWS Services are global like this one and S3 some others like EventBridge, CloudWatch, SNS Topics, and Lambda is regional; therefore, be sure you are in us-east-1 (N. Virginia) for most of the purposes of this project.
We need two roles, one in Receiver Account with tailored permissions to assume a role in the linked account and to execute basic lambda functions, and another in the linked account with least priviledge access to create tags for newly launched resources sucha as such as VPCs, S3 Buckets, SNS Topics, etc . In is important to follow the least priviledge access principle when attaching or creating policies for any roles we create.
"MasterAutoTaggingLambda" - IAM Resource Role to give permission to lambda autotagging function in receiver account to assume role in linked account with AWS STS service and to execute basic lambda functions.
More Details about the policies we need in the Steps section of this document.
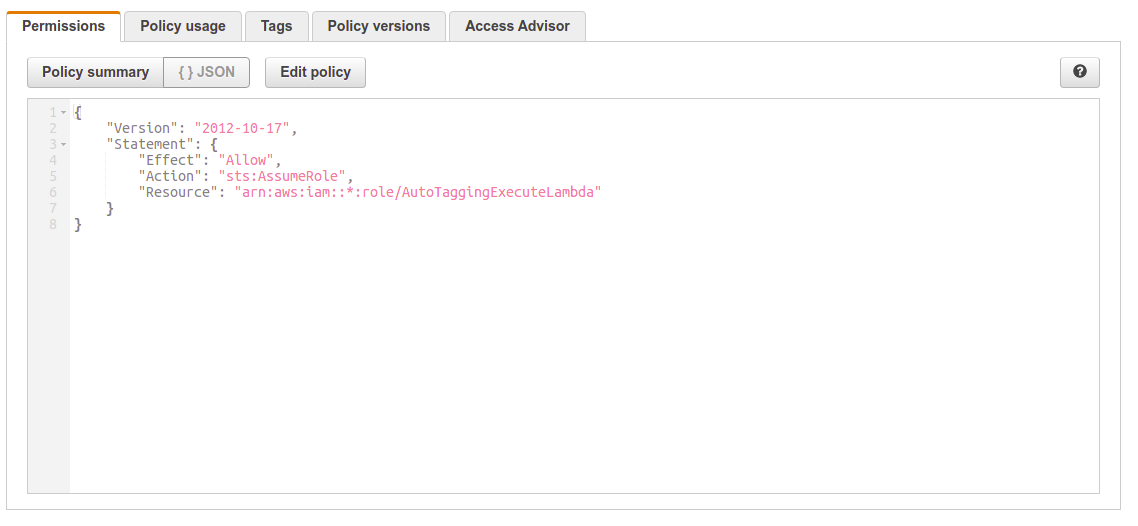
See AssumeLinkedRolePolicy.json
or copy paste from here...
{
    "Version": "2012-10-17",
    "Statement": {
        "Effect": "Allow",
        "Action": "sts:AssumeRole",
        "Resource": "arn:aws:iam::*:role/ExecuteAutoTaggingLambda"
    }
}
The "" wildcard in **"Resource": "arn:aws:iam:::role/AutoTaggingExecuteLambda"** allow it to include any Linked Account in the Organization.
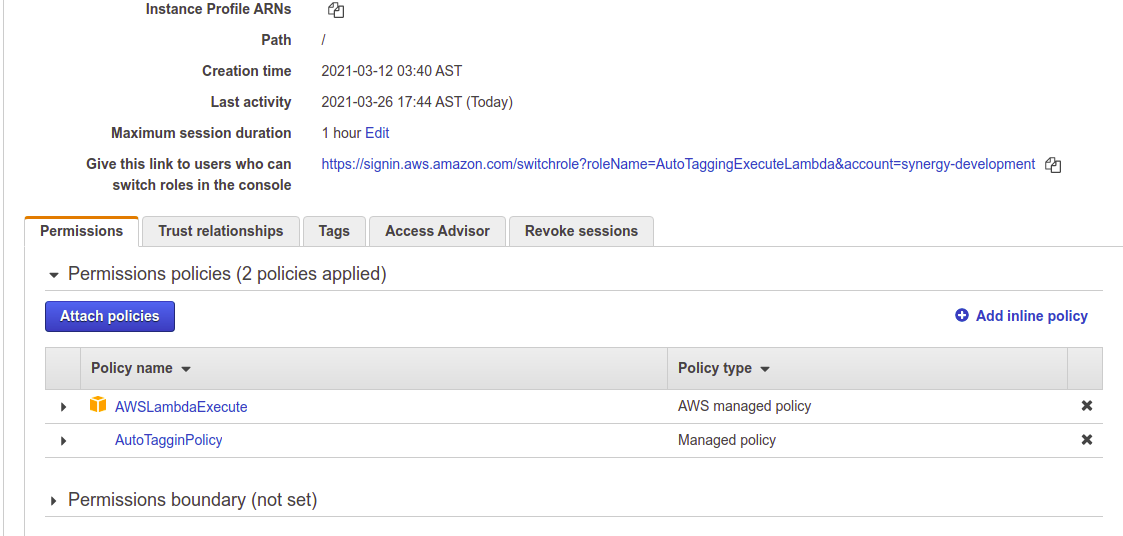
ExecuteAutoTaggingLambda - IAM Role we create in every linked account with a limited access policy to do the tagging of newly deployed resources. This is the role that "MasterAutoTaggingLambda" assumes to make possible the execution of tags for creation events across accounts.
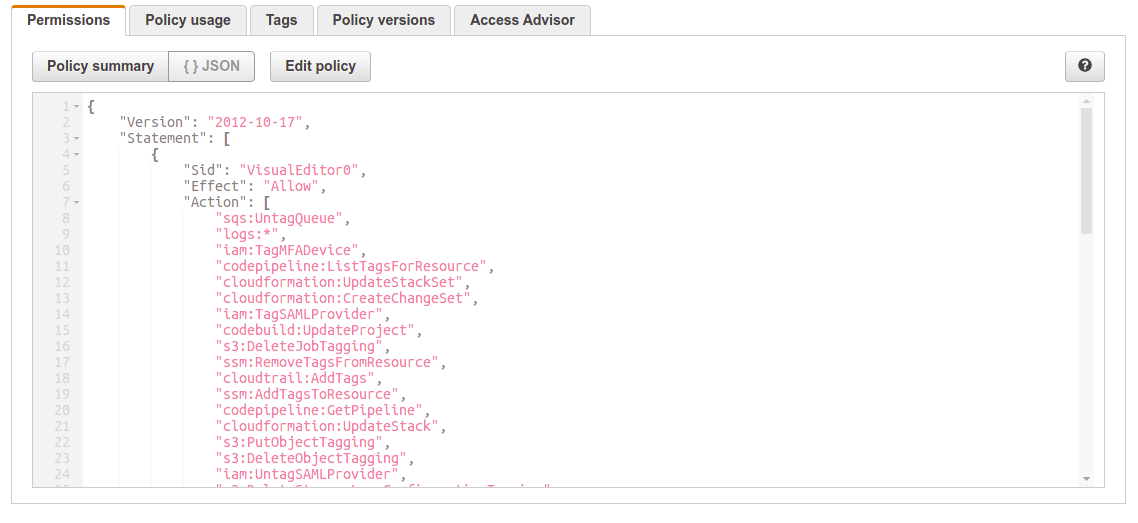
ExecuteAutoTaggingLambdaPolicy - IAM Policy to authorize ExecuteAutoTaggingLambda to tag resources
See ExecuteAutoTaggingLambdaPolicy.json
or copy paste from here...
{
"Version": "2012-10-17",
"Statement": [
{
"Sid": "BasicWritePermissionstoCloudWatchLogs",
"Effect": "Allow",
"Action": [
"logs:CreateLogGroup",
"logs:CreateLogStream",
"logs:PutLogEvents"
],
"Resource": "*"
},
{
"Sid": "AutoTaggerforAWSResources",
"Effect": "Allow",
"Action": [
"resource-explorer:*",
"tag:*",
"logs:DescribeLogGroups",
"logs:DescribeLogStreams",
"logs:GetLogEvents",
"iam:*Tags",
"iam:Tag*",
"iam:Untag*",
"cloudtrail:*Tags",
"*:*Tags",
"s3:*Tagging",
"s3:*Tags",
"sns:TagResource",
"sns:UntagResource",
"sqs:TagQueue",
"sqs:UntagQueue",
"cloudformation:UpdateStackSet",
"cloudformation:CreateChangeSet",
"cloudformation:UpdateStackInstances",
"codepipeline:CreatePipeline",
"codepipeline:TagResource",
"codepipeline:UntagResource",
"codepipeline:CreateCustomActionType",
"codepipeline:ListTagsForResource",
"codepipeline:GetPipeline",
"codepipeline:PutWebhook",
"codebuild:UpdateProject",
"codebuild:BatchGetProjects",
"ssm:GetParameters",
"ssm:ListTagsForResource",
"ssm:AddTagsToResource",
"ssm:RemoveTagsFromResource",
"ssm:GetParametersByPath",
"mediastore:TagResource",
"mediastore:UntagResource",
"cloudformation:TagResource",
"cloudformation:UpdateStack",
"cloudformation:UntagResource",
"cloudformation:UpdateTerminationProtection",
"lambda:*tag*"
],
"Resource": "*"
}
]
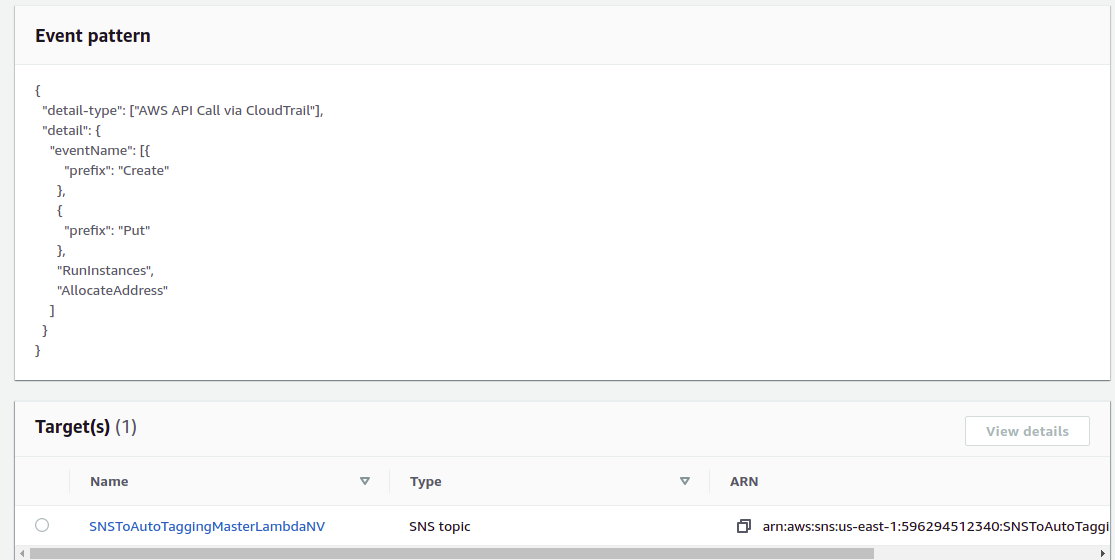
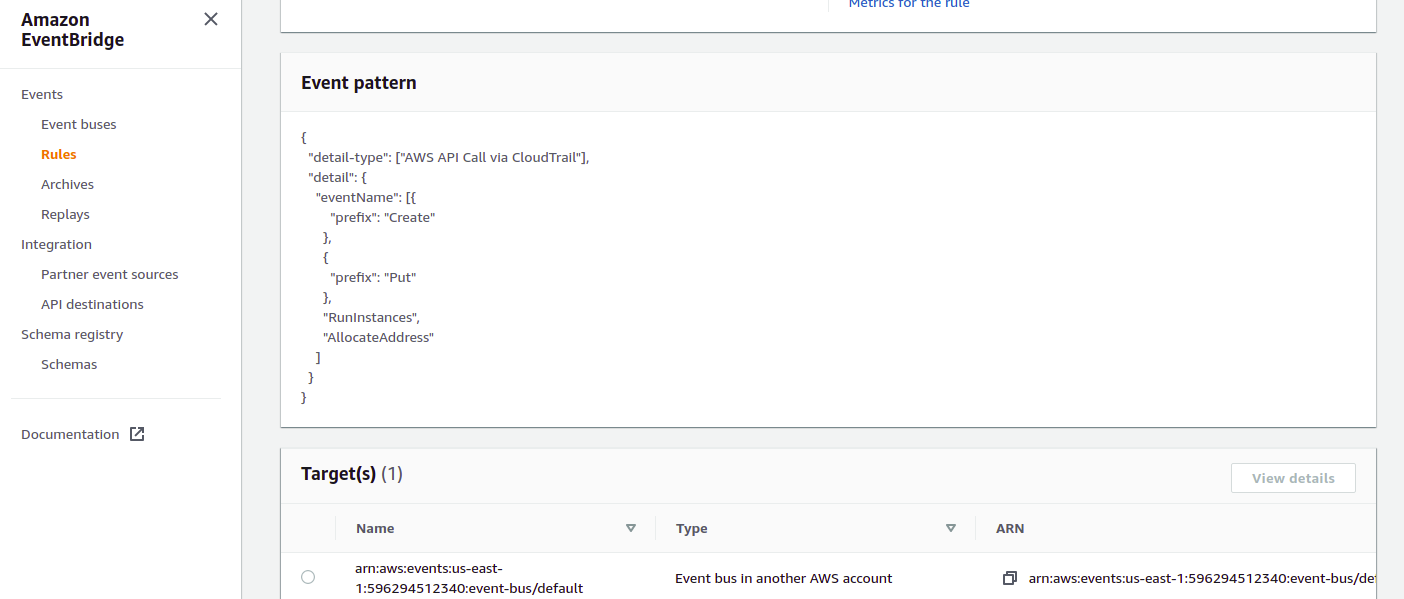
}EventAutoTaggingRule - This rule filters create or launch events coming from AWS API Call via CloudTrail that start with the prefix "Create", "Put", RunInstances (the one to launch a new EC2 instances), and "AllocateAddress" (for creating an Elastic IP Adress). We used Prefix Matching feature in order to reduce the need to update and rewrite the rule written in json format . There are about 650 create events for the different AWS Services and about 147 put events that start with "Create" or "PUt" so our rule may need little if nothing updating and upgrading to cover new events launched by AWS.
{
  "detail-type": [
    "AWS API Call via CloudTrail"
  ],
  "detail": {
    "eventName": [
      {
        "prefix": "Create"
      },
      {
        "prefix": "Put"
      },
      "RunInstances",
      "AllocateAddress"
    ]
  }
}
We will create a rule for every region in the linked account that we want to include in the Auto Tagging and a matching rule in every matching region in the receiver account
When using prefix feature to create rules in EventBridge and try to update the very same rules in CloudWatch directly it did not work. Hence, we configure the rules in EventBridge even though the end result is also shown in CloudWatch.
Add Permissions in Event Buses -
CloudWatch and EventBridge have a default Event Bus that is the recommended one to pass events for AWS Services. We have to set the proper permissions for it to start to send and receive events from the organization. Therefore, we add the Permissions to sent events from linked account and get all events in Receiver Account, both members of the organization.
CloudWatch and EventBridge only pass events between matching regions across accounts, from Default Event Bus in linked account/ us-east-1 to Default Event Bus in Receiver Account / us-east-1. Therefore, when a Vpc deployment happens in us-east-1 in the linked account it ends up in Default Event Bus in Receiver Account. From there we set a Rule and a target to keep moving the event along the pipeline.
We have to do this permission setting from every region we want to incorporate in the autotagging process and that is why we use the organization, to reduce the modifications needed in the receiver account. Once we set the permissions in a certain region in receiver account it is ready to pass events from any linked account in the organization, instead adding each new account at once. A more detail explanation in the pipeline configurations steps.
It is one of the few AWS services that can deliver event data across regions and it is key part in this project to make it scalable.
SnsSendToLambda - The SNS Topic that have to be created in every region of the Receiver Account that we want to include in the auto-tagging. This SNS Topic helps to centralize the collection process of creation events from all regions. It sends the event metadata to us-east-1 to the Autotagging lambda the Lambda function that does the auto tagging throughout the organization.
We set this SNS topic as a target for "EventAutoTagging" rule in EventBridge in order to futher route the event to lambda (then again from any region). In this demo we are using us-east-1, but by repeating some steps we can add us-east-2, us-west-1 and any region into the auto-tagging pipeline. So in order to make our pipeline as scalable as possible we use SNS Topics as intermedial step.
In our project a EventBridge Rule could be deployed in us-east-2 or us-west-1 and stil relay the event to Lambda in us-east-1 by using SNS Topic as intermedial target to pass the events.
It is important to mention that by using SNS Topics as intermedial step in the pipeline allow us to modify this function to automate tagging from a single to multiple accounts with very little modifications. We have a separate Git where we explain how you can do the autotagging in a single account.
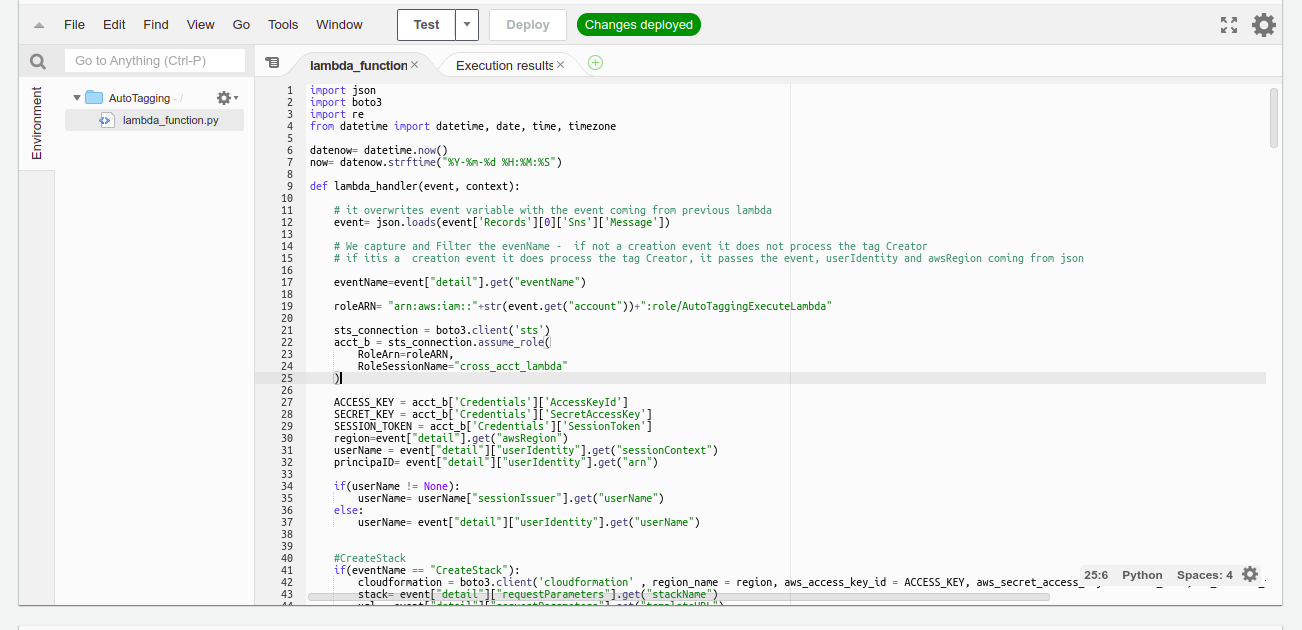
AutoTagging - Lambda function that we deploy in the Receiver Account in the us-east-1 region. It is triggered by a message coming from SnsSendToLambda. First, It converts the message containing the event in a form of a string back into json format. Then it sorts every creation case and creates a set of tags; the creator ID, the ARN, and the timestamp to track who did what and when. This is a highly valuable feature to help keep tracking resources and reduce the time consuming resource management, and cut cost.
A AWS resource, a VPC is deployed by Sender or linked account either by using the console or the AWS SDK for Python (Boto3). Yet, all tagging is going to be done by the AutoTagging lambda function in us-east-1 in Receiver Account. The VPC deployment generates an event metadata; the timestamp, who was the creator, ARN of the creator, etc. Thus the meta data is passed from the region of origin us-east-1 in linked account to trigger the lambda function in receiver account and do the tagging.
AWS CloudTrail in linked account 222222222222 in us-east-1 records API activity and logs the creation event - "CreateVpc".
The Amazon EC2 CreateVpc API CloudTrail event provides a lot of tagging information. For example:
User ID of the entity that created the resource from the principalId key
The IAM role the entity assumed during resource creation from the arn key.
The date/time of resource creation from the eventTime key.
The Vpc ID and other metadata contained in the event.
Then, CloudWatch in us-east-1 filters the creation event based on EventAutoTaggingRule. This rule looks for any event that has "Create", "PUT", or "Allocate" as a prefix, it matches the event and sends the metadata to the default event bus in Linked Account. It routes it to the default event bus in Receiver Account in us-east-1 as a result.
Now tat event metadata of is in the Default Event Bus in EventBridge in Receiver Account in us-east-1 it filters and prefix-matches the event with the same EventAutoTaggingRule. rule forwards the event to SnsSendToLambda.
SnsSendToLambda* targets AutoTagging lambda function and passes the event to it in a form of string.
Autotagging lambda function is fired. First it converts the event message from a string back to a json readable format. Then by sorting the metada data, it determines from what AWS Service the create event is coming from and does the tagging based on a series of conditional statements and does a response. Thus the new deployed resource gets a set of tags added. What UserName created the resource, the ARN of the creator, and the timestamp of the creation time.
In Summary, The purpose of this pipeline is to centralize the control and tagging of resources being deployed in any linked account of the organization with a Lambda function in Receiver Account. Only Users with priviledge access can modify, update, copy this function, so it reduces the human error factor at the moment of tagging amd makes the management of resources easier.
Following this configuration we can repeat the same process for the other regions like us-east-2, us-west-1, etc in any other linked accounts within the organization that we want to include in the autotagging. process.
Log in to Account ID 111111111111. This is the account we are going to use to centralized the Autotagging in the Organization. This AWS Service is global.
First, we create an "AssumeLinkedRolePolicy" to allow AutoTaggingMasterLambda role in receiver account to assume any role named ExecuteAutoTaggingLambda in any Linked account:
a.- Be sure you are in Receiver Account 111111111111
b.- At the console screen go to services and type in the text box "IAM" or under All
Services > Security, Identity, & Compliance > IAM
c.- In Identity and Access Managment (IAM) menu > go to Policies and click "Create policy" button
d.- Click Create policy next.
e.- In Create policy window select JSON tab. Click and copy-paste the following policy and click the "Next: tags" button:
{
    "Version": "2012-10-17",
    "Statement": {
        "Effect": "Allow",
        "Action": "sts:AssumeRole",
        "Resource": "arn:aws:iam::*:role/ExecuteAutoTaggingLambda"
    }
}
h.- Click "Next: Review" button i.- In Review policy window in Name type "AssumeLinkedRolePolicy" j.- In Description type "Rule to enable AutoTaggingMasterLambda Role to assume any role named "AutoTaggingExecuteLambda" in any Linked Account" and click "Create policy".
a.- Be sure you are in Receiver Account 111111111111
b.- At the console screen go to services and type in the text box "IAM" or under All services > Security, Identity, & Compliance > IAM
d.- In Create Role window > Under "Select type of trusted entity" keep AWS service as your choice
e.- In "Choose a use case" select "Lambda" and click "Next: Permissions" button
f.- In next window, under Attach Permissions policies in the search box type "lambdabasic"
g.- Checkmark the AWS managed policy "AWSLambdaBasicExecutionRole"
h.- Under Create policy clear the Search box
i- Click Filter policies and checkmark "Customer managed"
j.- Scroll down and checkmark the Customer managed policy "AssumeLinkedRolePolicy"
k.- Click "Next:Tags" button and click "Next: Review" button too
l.- Under Review, in Role name * type "MasterAutoTaggingLambda"
m.- In Role description type "Resource Role to give permission to lambda autotagging function in receiver account to assume roles named "ExecuteAutoTaggingLambda" in linked account with AWS STS service".
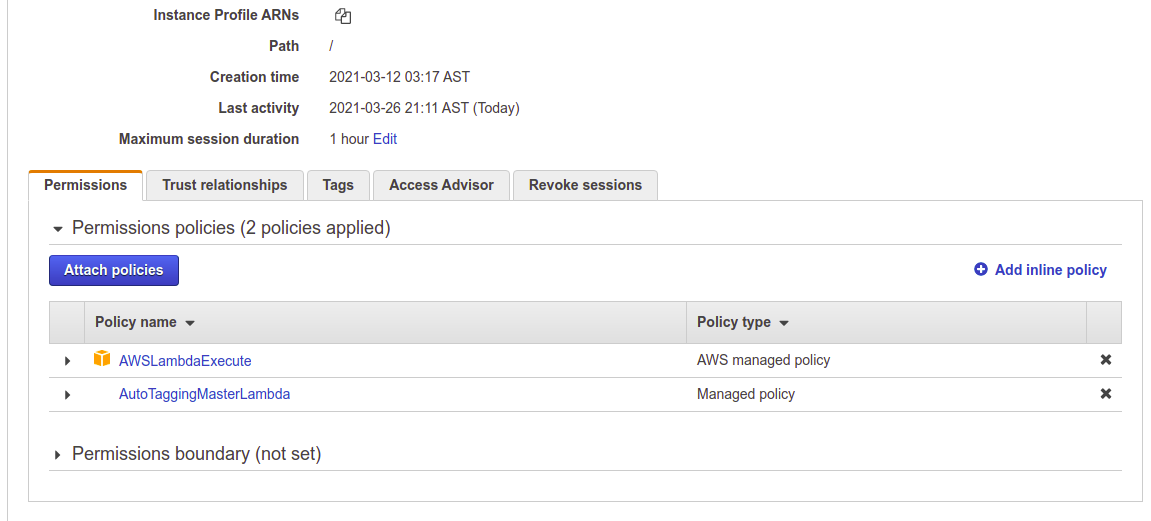
Observe that in Trusted entities you got AWS service: lambda.amazonaws.com and two policies attached to the role
n.- Click "Create Role Button"
Is noteworthy to say you should keep the same role name "ExecuteAutoTaggingLambda" in every new or existing linked accounts in your organization that you want to include in the Auto-tagging pipeline.
Create a role in Linked Account that has enough permissions to execute lambda to add tags to resources.
Follow the steps:
**Create a Policy "ExecuteAutoTaggingLambdaPolicy" to allow ExecuteAutoTaggingLambda role in Linked Account to enable Lambda to tag resources. Remember this role will be assumed by "MasterAutoTaggingLambda" in Receiver Account:
a.- Be sure you are in Linked Account 222222222222
b.- At the console screen go to services and type in the text box "IAM" or under All
Services > Security, Identity, & Compliance > IAM
c.- In Identity and Access Managment (IAM) menu > go to Policies and click "Create policy" button
d.- Click Create policy next.
e.- In Create policy window select JSON tab. Click and paste the following policy and click the "Next: tags" button:
{
    "Version": "2012-10-17",
    "Statement": [
        {
            "Sid": "BasicWritePermissionstoCloudWatchLogs",
            "Effect": "Allow",
            "Action": [
                "logs:CreateLogGroup",
                "logs:CreateLogStream",
                "logs:PutLogEvents"
            ],
            "Resource": "*"
        },
        {
            "Sid": "AutoTaggerforAWSResources",
            "Effect": "Allow",
            "Action": [
                "resource-explorer:*",
                "tag:*",
                "logs:DescribeLogGroups",
                "logs:DescribeLogStreams",
                "logs:GetLogEvents",
                "iam:*Tags",
                "iam:Tag*",
                "iam:Untag*",
                "cloudtrail:*Tags",
                "*:*Tags",
                "s3:*Tagging",
                "s3:*Tags",
                "sns:TagResource",
                "sns:UntagResource",
                "sqs:TagQueue",
                "sqs:UntagQueue",
                "cloudformation:UpdateStackSet",
                "cloudformation:CreateChangeSet",
                "cloudformation:UpdateStackInstances",
                "codepipeline:CreatePipeline",
                "codepipeline:TagResource",
                "codepipeline:UntagResource",
                "codepipeline:CreateCustomActionType",
                "codepipeline:ListTagsForResource",
                "codepipeline:GetPipeline",
                "codepipeline:PutWebhook",
                "codebuild:UpdateProject",
                "codebuild:BatchGetProjects",
                "ssm:GetParameters",
                "ssm:ListTagsForResource",
                "ssm:AddTagsToResource",
                "ssm:RemoveTagsFromResource",
                "ssm:GetParametersByPath",
                "mediastore:TagResource",
                "mediastore:UntagResource",
                "cloudformation:TagResource",
                "cloudformation:UpdateStack",
                "cloudformation:UntagResource",
                "cloudformation:UpdateTerminationProtection",
                "lambda:*tag*"
            ],
            "Resource": "*"
        }
    ]
}
h.- Click "Next: Review" button. i.- In Review policy window in Name type "ExecuteAutoTaggingLambdaPolicy" j.- In Description type "Policy to enable ExecuteAutoTaggingLambda Role to tag newly deployed resources" and click "Create policy"
a.- Be sure you are in Receiver Account 222222222222
b.- At the console screen go to services and type in the text box "IAM" or under All services > Security, Identity, & Compliance > IAM
d.- In Create Role window > Under "Select type of trusted entity" keep AWS service as your choice
e.- In "Choose a use case" select "Lambda" and click "Next: Permissions" button
 f- Click Filter policies and checkmark "Customer managed"
g.- Scroll down and checkmark the Customer managed policy "ExecuteAutoTaggingLambdaPolicy"
h.- Click "Next:Tags" button and click "Next: Review" button too
i.- Under Review, in Role name
f- Click Filter policies and checkmark "Customer managed"
g.- Scroll down and checkmark the Customer managed policy "ExecuteAutoTaggingLambdaPolicy"
h.- Click "Next:Tags" button and click "Next: Review" button too
i.- Under Review, in Role name * type ExecuteAutoTaggingLambda.
j.- In Role description type "Resource Role to give permission to lambda autotagging function in receiver account to tag resources deployed in this Linked Account".
Observe that in Trusted entities you got AWS service: lambda.amazonaws.com and two policies attached to the role.
k.- Click "Create Role Button"
Is noteworthy to say you should keep the same role name "ExecuteAutoTaggingLambda" in every new linked accounts in your organization so as not to keep adding new policies into the Receiver Account
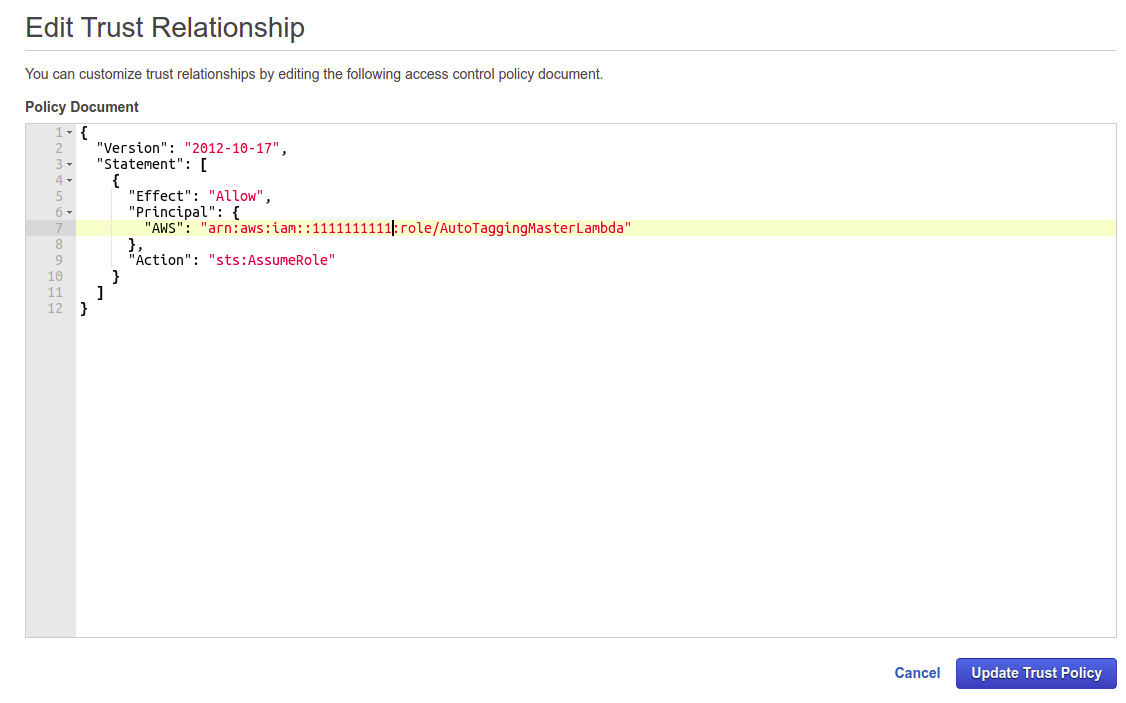
We have to modify the trust policy to enable "MasterAutoTaggingLambda" in Receiver Account assumes ExecuteAutoTaggingLambda in Linked Account a. Search for the Role we just created. In the text box under "Create role" button type "ExecutAauto b. Click ExecuteAutoTaggingLambda c. In Summary window you can see all related info about the role. Click the "Trust relationships" tab and click "Edit trust relationship" button d. In Edit Trust Relationship window you can customize trust relationships by editing the following access control policy document with the following json:
 {
  "Version": "2012-10-17",
  "Statement": [
    {
      "Effect": "Allow",
      "Principal": {
        "AWS": "arn:aws:iam::111111111111:role/MasterAutoTaggingLambda"
      },
      "Action": "sts:AssumeRole"
    }
  ]
}
Note: Edit the 111111111111 Account number with your Receiver Account ID
e. CLick "Update Trust Policy" button and next stept
We set our lambda function in virginia region or us-east-1. This is the endpoint for any deployment or creation event happening in any region in any account that is configured in the pipeline for *Auto-tagging and in this lambda function.
Create a AutoTagging lambda function with the console:
a.- First, be sure you are in Receiver Account in us-east-1 . In the console click the services tab and look for Lamdba under (It seems repetive, but it is easy to be in the wrong account and fail to do the settings)
All services > Compute > Lambda or just type lambda in the text box. then hit Lambda
b.- In the AWS lambda window go to Functions.
c. Click the "Create function" buttom.
d. You will the following options to create your function Author from scratch, Use blueprint, Container Image, and Browse serverless app repository, choose Author from scratch.
e. In Function name type "AutoTagging" or any name you choose to, in Runtime look for Python 3.8
f.- In Permissions - click Change default execution role and select "Use an existing role". In the dialog box that opens up look for "MasterAutoTaggingLambda", this is the role we created in the previous step.
g.- Click "Create function" button
h.- Under Code source > In Environment click lambda_function.py
i.- Delete all existing code an replace it with the code provided in the CreateTagCreatorID.py file
j.- Once you paste the new code click "Deploy"
j.- In the Code Source menu click Test
k.- In "Configure test event" leave Create new test event selected, In event template leave "Hello-world". In name type "create_tags", leave the rest as it is and click "Create Test" Button. Voila your lambda function is set!
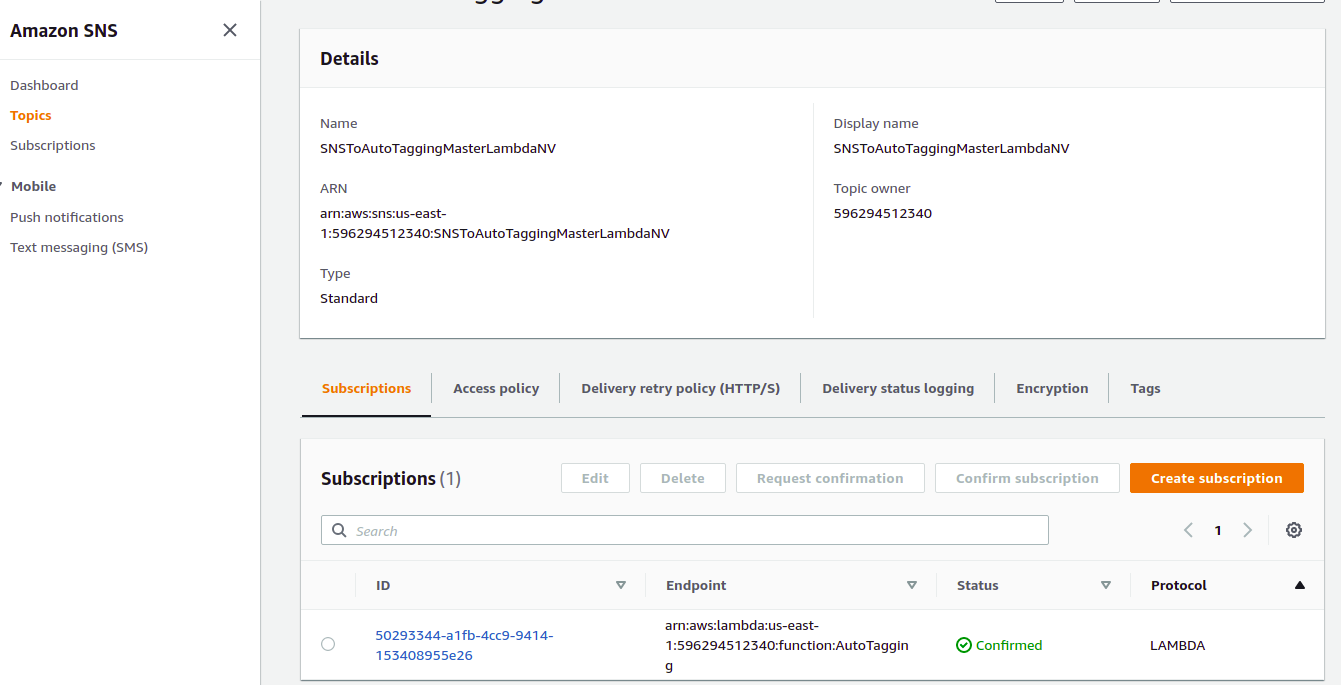
Create a topic - "SNStoAutoTaggingLambda" and Subscribe it to Lambda Function "AutoTagging" in ReceiverAccount. So let us follow the next steps:
a.- Be sure you are in us-east-1 region (SNS works across regions, but still is a regional resource) b.- At the console screen go to services and type in the text box "sns" or under All ```
services > Aplication Intergration > Simple Notification Service
c. -CLick at the Simple Notification Service
e.- In the menu to the left click Topics and then The "Create Topic" orange buttom.
f.- In Create topic window choose Stardard, In Name type "SNStoAutoTaggingLambda"
g.- In the Access policy section we keep the Basic method
h.- Click Create topic buttom. The topic is created.
i.- Now, we create the subscription. Click the Create subscription button.
j. In Details > Topic ARN look for the topic created in the previous steps
k.-In Protocol choose AWS Lambbda and look for the ARN of the lambda function AutoTagging.
l.- Hit the Create Subscription Button. Voila! the subscription is done.
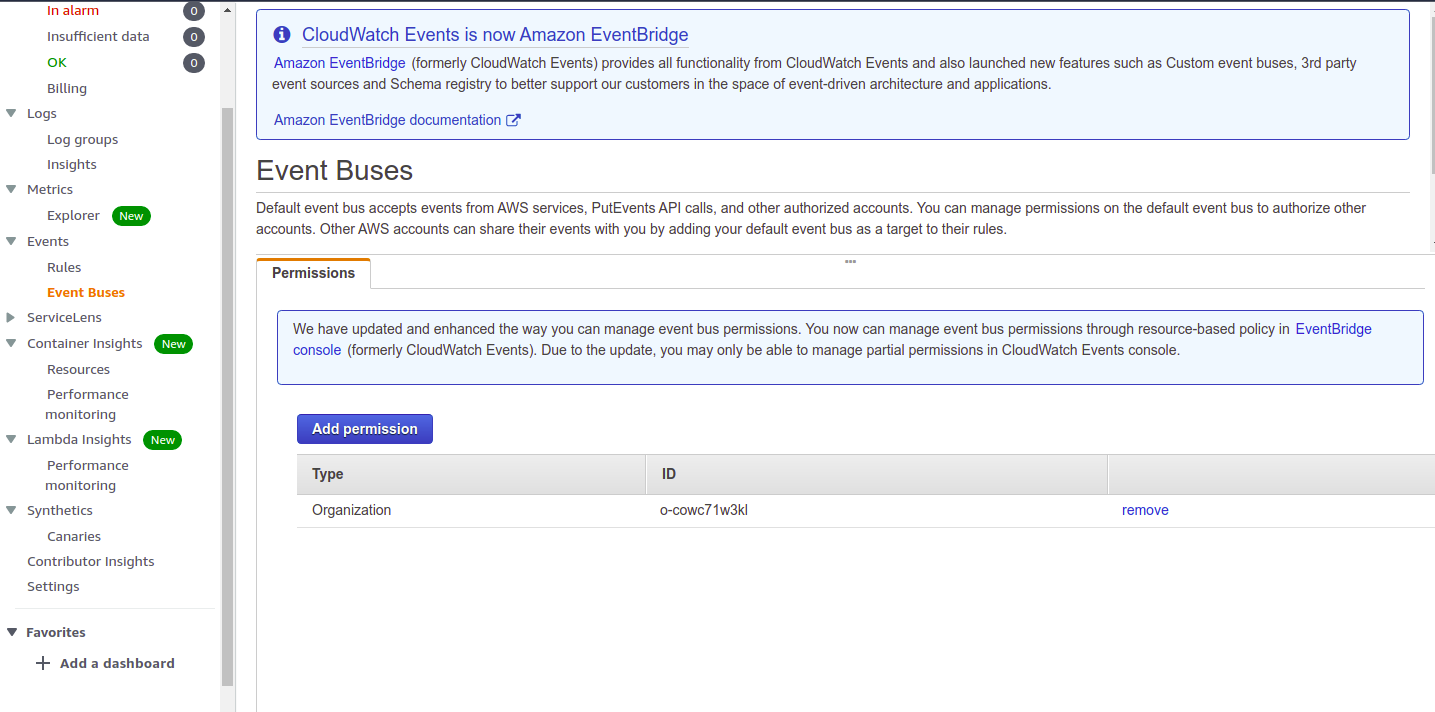
In Event Buses we have to manage event bus permissions to enabble passing event metadata:
a.- Be sure you are in us-east-1 region in Receiver Account
b.- At the console screen go to services and type in the text box "Cloudwatch" or under All
services > Management & Governance > Cloudwatch
c.- In Event Buses item in the menu go to Event Buses
d.- Under the permissions section click add permission. A "Add Permission" dialog box opens up. In the Type text box click the arrow and select Organization. In Organization ID select My Organization, your organization Id "my-org-id-1234" should be pre-populated. Hit the Add blue button.
A Resource-based policy for default event bus is automatically generated.
To check the policy go to Amazon EventBridge > Event buses > default and you check Permissions tab you will see a Resource-based policy like this
The default event bus name is something like this - arn:aws:events:us-east-1:111111111111:event-bus/default
And the resulting policy would look something like this:
{
  "Version": "2012-10-17",
  "Statement": [{
    "Sid": "this-is-how-i-pass-events-btwn-accounts-in-my-org",
    "Effect": "Allow",
    "Principal": "*",
    "Action": "events:PutEvents",
    "Resource": "arn:aws:events:us-east-1:111111111111:event-bus/default",
    "Condition": {
      "StringEquals": {
        "aws:PrincipalOrgID": "my-organization-id"
      }
    }
  }]
}
7 In Receiver Account create an EventBridge Rule in us-east-1 -or Virginia Region and use as target SnsSendToLambda.
Create a rule that captures all creation events in Sender Acccount using AWS API Call via CloudTrail and select SnsSendToLambda as target:
a.- Be sure you are in us-east-1 region in Receiver Account
b.- At the console screen go to services and type in the text box "EventBridge" or under
All services > Application Integration > Amazon EventBridge
c.- In the Amazon EventBridge menu select Rules and click "Create Rule" button
d.- Under Name and Description > Name type "EventAutoTaggingRule"
e.- Add a Description "Rule to send creation events to SnsSendToLambda" if you choose to, it is optional
f.- In Define pattern choose "Event pattern" > Custom Pattern
g.- Copy paste the following json in Event Pattern Text Box
{
  "detail-type": [
    "AWS API Call via CloudTrail"
  ],
  "detail": {
    "eventName": [
      {
        "prefix": "Create"
      },
      {
        "prefix": "Put"
      },
      "RunInstances",
      "AllocateAddress"
    ]
  }
}
... Click "Save" Notice that this is exactly the same rule we used in CloudWatch in Receiver Account
h.- In Select event bus leave it as it is, "AWS default event bus" and "Enable the rule on the selected bus"
i.- In Select Targets > in Target click the text box, scroll up and select "SNS Topic"
j.- In Topic text box select "SnsSendToLambda"
k.- Click "Create Rule" button.
8 In Linked Account create a matching EventBridge Rule in same region (we are using us-east-1 - Virginia Region) and use as target theevent Busin matching us-east-1 region in Receiver Account.
Create a rule that captures all creation events in Sender Acccount using AWS API Call via CloudTrail and select default event bus as target:
a.- Be sure you are in us-east-1 region in Sender Account
b.- At the console screen go to services and type in the text box "EventBridge" or under ``All services > Application Integration > Amazon EventBridge```
c.- In the Amazon EventBridge menu select Rules and click "Create Rule" button`` d.- Under Name and Description > Name type "EventAutoTaggingRule"e.- Add a Description "Rule to send creation events to default event bus in receiver account" if you choose to, it is optional f.- In Define pattern choose"Event pattern" > Custom Pattern``
g.- Copy paste the following json in the Event Pattern Text Box
{
  "detail-type": [
    "AWS API Call via CloudTrail"
  ],
  "detail": {
    "eventName": [
      {
        "prefix": "Create"
      },
      {
        "prefix": "Put"
      },
      "RunInstances",
      "AllocateAddress"
    ]
  }
}
...Click "Save" Notice that this is exactly the same rule we used in CloudWatch in Receiver Account
h.- In Select event bus leave it as it is, "AWS default event bus" and "Enable the rule on the selected bus"
i.- In Select Targets > in Target click the text box, scroll up and select "Event bus in another AWS account"
j.- In Event Bus text box type "arn:aws:events:us-east-1:111111111111:event-bus/default" (be sure to replace the Account number with your designated Receiver Account)
k.- Select "Create a new role for this specific resource". EventBridge will create a role for you with the right permissions to pass events into the event bus. Click configure details button.
l.- Click "Create Rule" button.
In Event Buses we have to manage event bus permissions to enabble passing event metadata:
a.- Be sure you are in us-east-1 region in Sender Account
b.- At the console screen go to services and type in the text box "Cloudwatch" or under All services > Management & Governance > Cloudwatch
c.- In Event Buses item in the menu go to Event Buses.
d.- Under the permissions section click add permission. A "Add Permission" dialog box opens up. In the Type text box click the arrow and select Organization. In Organization ID select My Organization, your organization Id "my-org-id-1234" should be pre-populated. Hit the Add blue button.
A Resource-based policy for default event bus is automatically generated.
To check the policy go to Amazon EventBridge > Event buses > default and you check Permissions tab you will see a Resource-based policy like this
The default event bus name is something like this - arn:aws:events:us-east-1:222222222222:event-bus/default
And the resulting Reso policy would look something like this:
{
  "Version": "2012-10-17",
  "Statement": [{.
    "Sid": "this-is-how-i-pass-events-btwn-accounts-in-my-org",
    "Effect": "Allow",
    "Principal": "*",
    "Action": "events:PutEvents",
    "Resource": "arn:aws:events:us-east-1:222222222222:event-bus/default",
    "Condition": {
      "StringEquals": {
        "aws:PrincipalOrgID": "my-organization-id"
      }
    }
  }]
}Either by console or by AWS CLi SDK for boto3 deploy a Vpc or any resource that you desire. Using the AWS Console: a. In Sender Account, in us-east-1 go to the resource tab b. In the services search text box type vpc or under "Networking & Content Delivery" look for VPC. Click VPC c.- In the menu to the left click "Your VPCs" d.- In Your VPCs window click "Create VPC" button e.- In Create VPC > VPC settings > Name tag type test-project or any name you want to. f.- In IPv4 CIDR block type 10.0.0.0/24, leave the rest of the settings as it is. g.- Click the "Create VPC" button. {pegar imagen aqui} h.- You will be redirected to the newly created vpc window details. under the "Tags" tab click it and check for the tags.
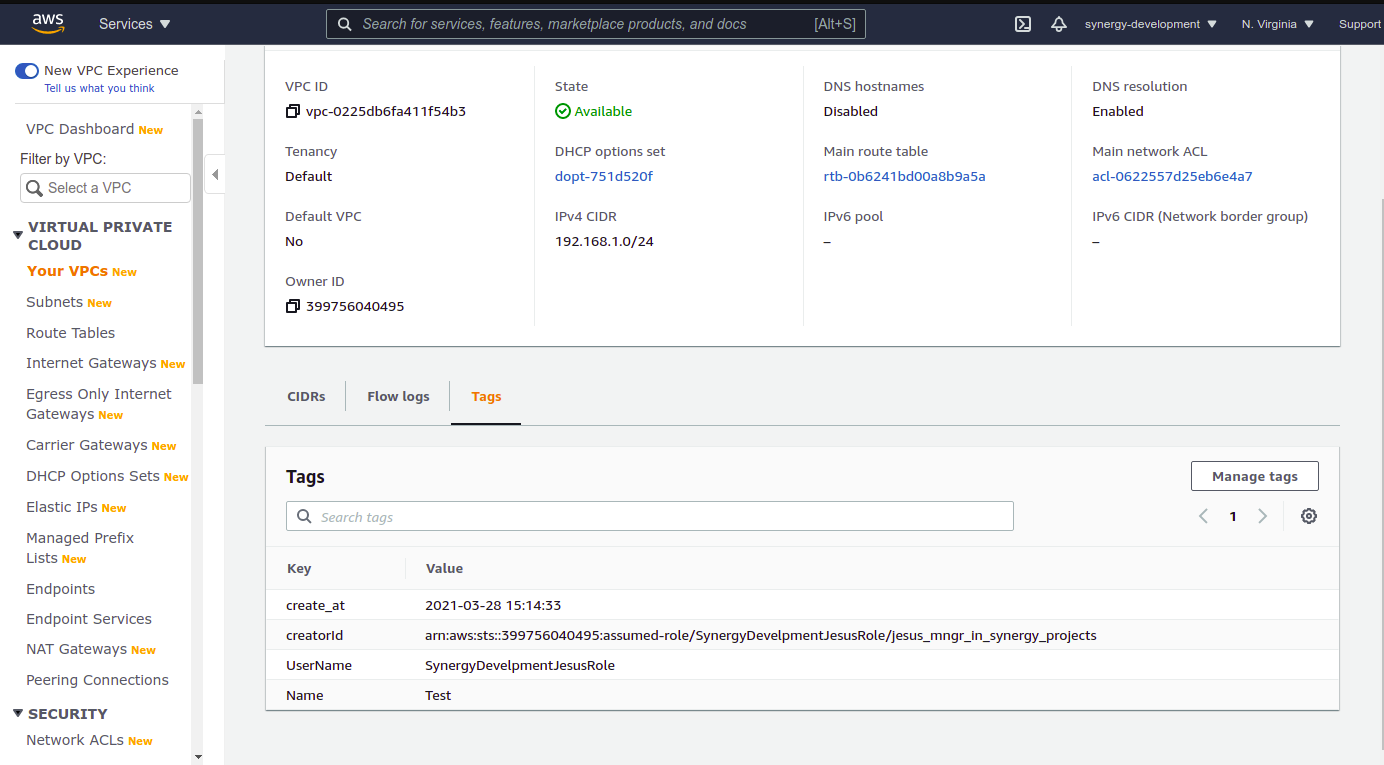
You will see the Following tags; create_at, UserName, Name, and creatorId.