VisualVault allows you to define microservices (Outside Services) which may be called from Form Buttons, Form Scripts, event handlers, and on a scheduled basis. Two types of Outside Services you can create are Web services or NodeJs Scripts. The Web service type of outside service is discussed on our developer site at [http:/developer.visualvault.com][1].
VisualVault Node.js integration allows you to store and execute JavaScript files capable of interacting with the VisualVault API. The scripts are stored and executed server-side allowing you to build a re-useable script library of business processes and automation.
If you create node.js scripts that you wish to be executed by VisualVault Servers these scripts must be uploaded into the VisualVault microservices library (Outside Process library) from within the VisualVault control panel.
For production use, VisualVault will select an available node.js server and transmit your script to the node server for execution when required. VisualVault can execute a node.js script on a scheduled basis or as the result of a VisualVault iForm event handler function.
For development and debugging you can instruct VisualVault to send scripts to be executed to your development machine. A public IP or DNS host name is required. To specify a node.js debugging server address, log into VisualVault and click on the User menu (top right), next select the "My Preferences" menu option. Within the preferences screen scroll down to locate the node.js server option. Enable the debugging server and enter your node.js server URL where scripts will be posted to.
Note: The node.js server option will only be displayed on the my preferences screen if your account has admin access.
When a script it sent to server hosting the VisualVault Node.Js Client Library (the library is an express app), the app will execute the script's Main function and provide parameter values.
Install node.js version 14.18.0 on your dev machine.
The VisualVault node.js client library requires node version 14.18.0 which may not the latest version of node. Newer version of node may work but have not been tested. Prior node release downloads can be found here: https://nodejs.org/en/download/releases/
If you have a newer version of node.js on your development machine and don't wish to downgrade we suggest using the Node Version Manager available for Linux / Mac and Windows
There is a good Node.js tutorial for Visual Studio code with platform specific installation instructions located here:
https://code.visualstudio.com/docs/nodejs/nodejs-tutorial
If using Visual Studio Code
- Navigate to the View menu and select the 'Command Palette" option.
- Enter GIT:Clone into the Command Palette text box, press enter.
- You will be prompted for the URL of a GIT repository. Paste in: https://github.com/VisualVault/nodeJs-rest-client-library
- You will be prompted for a local folder path where the respository files will be placed. Select a folder path.
- Repository will be cloned to your local workspace. Open the Repository folder, continue followng the instructions below.
If adding the node.js client library to an existing project, create the following subdirectory structure in the existing project
\lib
\lib\VVRestApi
\lib\VVRestApi\VVRestApiNodeJs
\lib\VVRestApi\VVRestApiNodeJs\files
\lib\VVRestApi\VVRestApiNodeJs\routes
If adding the node.js client library to an existing project, copy the following files into the existing project
\lib\VVRestApi\VVRestApiNodeJs\app.js
\lib\VVRestApi\VVRestApiNodeJs\config.yml
\lib\VVRestApi\VVRestApiNodeJs\VVRestApi.js
\lib\VVRestApi\VVRestApiNodeJs\log.js
\lib\VVRestApi\VVRestApiNodeJs\package.json

\lib\VVRestApi\VVRestApiNodeJs\routes\scheduledscripts.js
\lib\VVRestApi\VVRestApiNodeJs\routes\scripts.jsAfter cloning the repository OR copying the repository files to your existing project, you will need to install the NPM packages required by the VisualVault node.js client library.
Navgiate to the directory containting \lib\VVRestApi\VVRestApiNodeJs\package.json file and execute the following the npm install command from a terminal window. npm install will use the Package.json file to determine which packages and package versions to install.
npm installIf using Visual Studio Code, create a "launch configuration" file which instructs VS Code that you wish to launch a Node.js script. By launching the \vvnodeserver\app.js script, you will have a debug environment which is listening for http requests on port 3001.
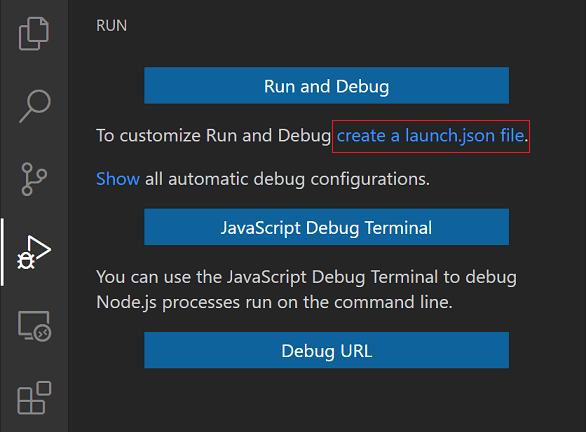
To create a launch.json file, open your project folder in VS Code (File > Open Folder) and then click on the Configure gear icon on the Debug view top bar.
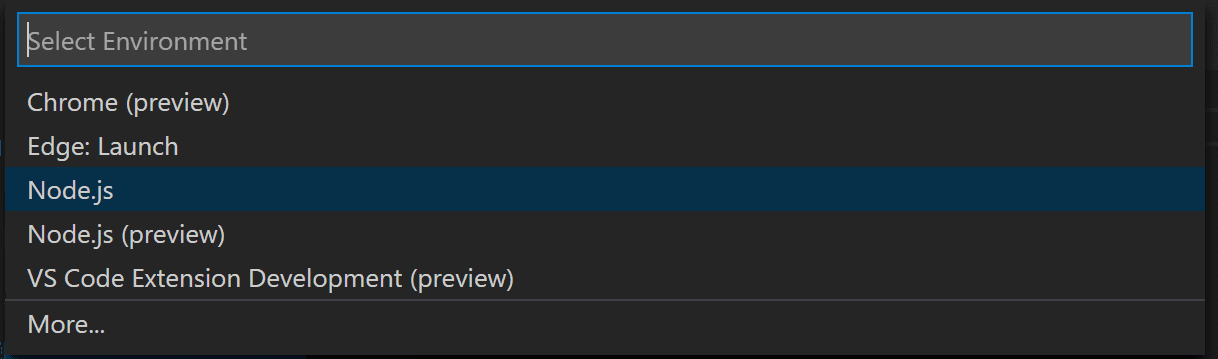
VS Code will try to automatically detect your debug environment but if this fails, you will have to choose your debug environment manually:
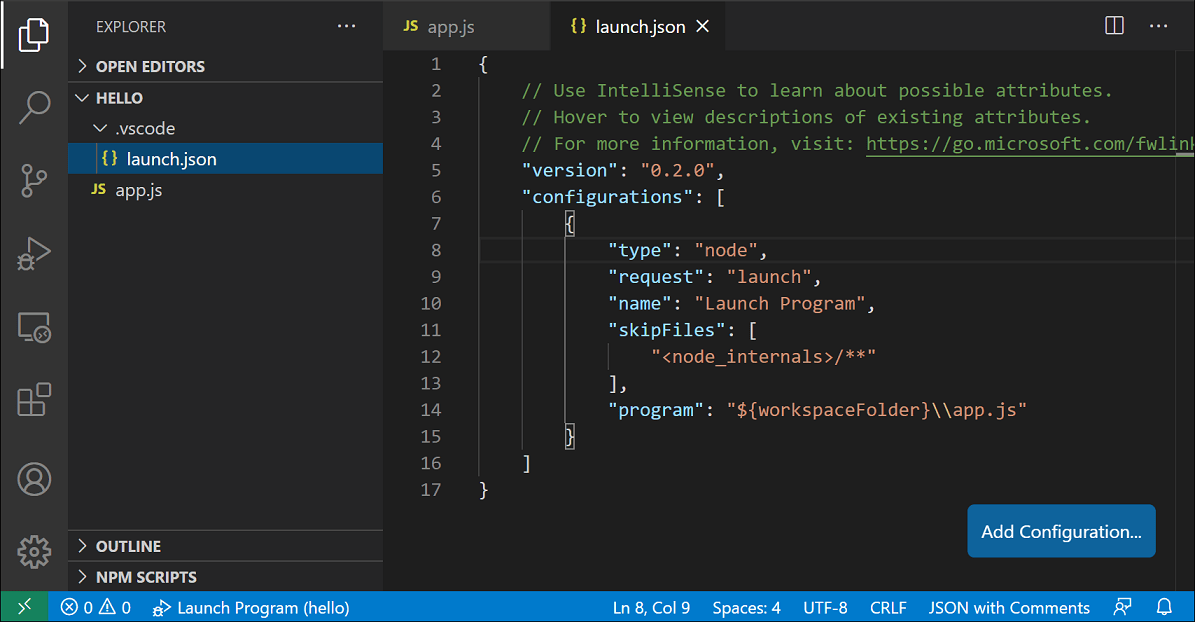
If you go back to the File Explorer view (Ctrl+Shift+E), you'll see that VS Code has created a .vscode folder in the root of your project and added the launch.json file to your workspace.
Example launch configuration to launch Node.js and execute the VisualVault node.js client library.
{
    "version": "0.2.0",
    "configurations": [
    {
        "type": "node",
        "request": "attach",
        "name": "Attach to Process",
        "processId": "${command:PickProcess}",
        "port": 5858
    },
        {
            "type": "node",
            "request": "launch",
            "name": "Launch Program",
            "program": "${workspaceRoot}/lib/VVRestApi/VVRestApiNodeJs/app.js"
        },
        {
            "type": "node",
            "request": "attach",
            "name": "Attach to Process",
            "address": "localhost",
            "port": 5858
        }
    ]
}
VisualVault will execute node scripts using Form buttons, Form scripts, or the script scheduler which executes a script at pre-defined intervals.
If you have not already read the section above "How node.js scripts are integrated with VisualVault" please take a moment to read.
Redirect scripts stored in VisualVault to your Development machine
VisualVault sends a script to execute to a server hosting the VisualVault node client library app; the app then invokes the script's "Main" function.
When developing scripts, you can instruct VisualVault to send scripts to your development machine vs. sending the scripts to servers located within the VisualVault cloud.
The redirection of scripts to your development machine is enabled on a per user basis and does not affect all users.
Redirection steps:
-
Authenticate with the VisualVault Web user interface using an admin account (member of the VaultAdmin or VaultAccess role).
-
Navigate to your user preferences screen (user drop down menu in top right corner of screen)
-
Scroll down to the bottom of the user preferences screen and enter your development machine's public URL
If you do not have a public URL for your development machine, follow steps 4-5 below and use the free service provided by NGROK to create one.
-
Install NGROK using the instructions for your OS
-
From a terminal window in the NGROK directory, enter the command below which assumes your VisualVault Node.Js Client Library app is listening on port 3000 which is the default. The port number can be changed within the app.js file.
ngrok http 3000- If using NGROK as a secure reverse proxy to your machine, copy the NGROK Public URL generated by the command.
- Paste the public development machine URL into your VisualVault user preferences screen's Development Node Server field and save.
Execute Scheduled scripts directly from your Development machine
Scheduled scripts can be executed directly from your development machine for testing vs. uploading the script to VisualVault and using the Test button within the Scheduled Processes screen.
Below are the steps required to test scheduled scripts directly on your development machine:
- Copy or move the script to be tested into the '/scripts/test-scripts/scheduled' folder path within your project. The VisualVault node.js client library app contains a route which will execute scripts located in this folder.
- From a web browser or other http client, request the following resource: http://localhost:3000/TestScripts/Scheduled/{ScriptName} where localhost is your development machine's name and port 3000 is the default port the VisualVault Node.Js Client Library app is listening on.
/*
    Script Name:   CreateUser

    Example of a Scheduled Script

    Creates a user account

    Script may be run manually by http://localhost:3000/TestScripts/Scheduled/CreateUser
*/

//import Q NPM to assist with complex async promise patterns
var Q = require('q');

//import logging script
var logger = require("../../../lib/VVRestApi/VVRestApiNodeJs/log");

//getCredentials function will be called by the VisualVault NodeJs client library (/lib/VVRestApi/VVRestAiNodeJs/VVRestApi.js) when appropriate
//Use this as a template and replace with your API credentials and VisualVault Customer/Database alias values
module.exports.getCredentials = function () {
    var options = {};
    //baseUrl is optional
    //if script is sent from VV server, the baseUrl is provided
    //if executing the script via HTTP GET for testing then provide the baseUrl here
    options.baseUrl = "https:/demo.visualvault.com";
    options.customerAlias = "YOUR Customer Name";
    options.databaseAlias = "YOUR Database Name";
    options.userId = "YOUR User Id";
    options.password = "YOUR PASSWORD";
    options.clientId = "YOUR API KEY";
    options.clientSecret = "YOUR API KEY";
    return options;
};

//main function will be called by the VisualVault NodeJs client library (/lib/VVRestApi/VVRestAiNodeJs/VVRestApi.js) when appropriate
//main function parameters (vvClient, response, scriptId) are provided when a Scheduled Script is called
module.exports.main = function (vvClient, response, scriptId) {
    logger.info("Start of TestScript on " + new Date());


    //configure parameters for fetching a list of user sites from VisualVault
    //We are asking for three fields and defining a query to filter the list where site name = "home"
    var siteParams = {};
    siteParams.fields = "id, name, sitetype";
    siteParams.q = "name eq 'home'";

    var PasswordLength = 8;
    var GeneratePassword = function () {
        var text = "";
        var possible = "ABCDEFGHIJKLMNOPQRSTUVWXYZabcdefghijklmnopqrstuvwxyz0123456789!@#$%^&*()_+";

        for (var i = 0; i < PasswordLength; i++)
            text += possible.charAt(Math.floor(Math.random() * possible.length));

        return text;
    };

    var GenerateUserId = function () {
        var text = "";
        var possible = "ABCDEFGHIJKLMNOPQRSTUVWXYZabcdefghijklmnopqrstuvwxyz0123456789";

        for (var i = 0; i < PasswordLength; i++)
            text += possible.charAt(Math.floor(Math.random() * possible.length));

        return text;
    };

    //we need a site Id to create a user account
    //fetch the home site and get its Id.
    //Each customer should always have a 'home' uer site which is the default site.
    vvClient.sites.getSites(siteParams)
        .then(function (sitesResponse) {

            //convert response from VisualVault API to an object
            var siteData = JSON.parse(sitesResponse);

            //VisualVault API response always contains a 'data' property and a 'meta' property
            //data property will contain the data requested as either an object or an array of objects. In this case, we get an array of user site objects
            //Meta property will contain an object with two or more properties. If the "code" property is not = 200 then the "error" property will typically have a message


            var siteRecords = siteData['data'];

            if (siteRecords.length > 0) {
                //we only requested the home site so assume first item in array is the home site
                var siteId = siteRecords[0]['id']

                var newUserData = {
                    userid: GenerateUserId(),
                    firstname: 'Test',
                    lastname: 'User',
                    emailaddress: 'user@something.com',
                    password: GeneratePassword(),
                    passwordNeverExpires: 'false',
                    mustChangePassword: 'true',
                    sendEmail: 'true'
                };

                //first parameter for postUsers is ignored but must be empty array
                //second parameter is the user data
                //third parameter is the siteId GUID value
                vvClient.users.postUsers({}, newUserData, siteId)
                    .then(function (sitesResponse) {

                        //respons back to http client (typically a VisualVault form or the process scheduler)
                        response.json(200, "User account created");

                    }).fail(
                        function (error) {
                            console.log(error);

                            //Scheduled scripts should be sent a response back with two values.
                            //The name assigned to each of the values is not important
                            //value 1 should be a boolean (true/false)
                            //value 2 is an optional string value which will be written to the history log for the scheduled script

                            //If value 1 = true, this signals to the VisualVault scheduler that the script ran successfully.

                            //In the example below, { 'success': false, 'message':"Scheduled script finished with error" }
                            //value 1 = false, value 2 = "Scheduled script finished with error"

                            //respond back to http client (typically the VisualVault process scheduler)
                            //first parameter is the http status code (should be 200 unless unexpected error ocurred)
                            //second parameter should be an object with two properties
                            response.json(200, { 'success': false, 'message':"Scheduled script finished with error " + error });
                        }
                    );
            }
            else {
                response.json(200,{ 'success': false });
            }
        })
        .catch(function (err) {
            response.json(200,{ 'success': false, 'message': err });
        });
};