Push Notification Setup
See the Yerdy iOS Push Notification Setup page for details on setting up your push notification SSL certificates.
You'll need to use Unity's NotificationServices class to register for push notifications and then pass that on to Yerdy via Yerdy.SetPushToken(). For example:
void Start()
{
	StartCoroutine("RegisterForPush");
}

IEnumerator RegisterForPush()
{
	NotificationServices.RegisterForRemoteNotificationTypes(
		RemoteNotificationType.Alert | RemoteNotificationType.Badge | RemoteNotificationType.Sound);

	// Wait for the token (or a failure message)
	while (NotificationServices.deviceToken == null &&
	 		NotificationServices.registrationError == null)
		yield return null;

	if (NotificationServices.deviceToken != null) {
		Yerdy.SetiOSPushToken(NotificationServices.deviceToken);
	} else {
		Debug.LogError("Failed to register for push notifications: " + NotificationServices.registrationError);
	}
}
Currently, only production tokens/certificates are supported by Yerdy. If you wish to test push notifications, you should create an Ad Hoc build (see here for details) and use that for testing.
Go to Google API Projects and create an API project if you don't already have one. You don't need a Sender ID (Google Project Number) for each application you can use the same Sender ID across multiple applications.
The Project Number visible on the Overview tab is your Sender ID this needs to be put into the manifest.

<meta-data android:name="Yerdy_GCMSenderId" android:value="gcm:[SenderID]"/>
Enable "Google Cloud Messaging for Android" under "APIs & auth" if it is not already enabled

- "Crendentials" under "APIs & auth"
- "Create New Key"
- "Server Key"
- Add the following IP value
78.47.162.198 - The generated API key needs to be applied to our system
- In the Yerdy Dashboard on the Account page you will find the entry for the API Key


NOTE: These changes are also mentioned in the Android Setup section
These permissions are used to allow Google Cloud Messaging (Google Push Messaging) to fully function enhancing the Yerdy feature set.
<permission android:name="[Your Package Name].permission.C2D_MESSAGE" android:protectionLevel="signature" />
<uses-permission android:name="[Your Package Name].permission.C2D_MESSAGE" />
<uses-permission android:name="android.permission.WAKE_LOCK" />
<uses-permission android:name="com.google.android.c2dm.permission.RECEIVE" />
<uses-permission android:name="android.permission.VIBRATE"/>
<application ...>
        <receiver
            android:name="com.yerdy.services.push.gcm.GCMBroadcastRecieverEx"
            android:permission="com.google.android.c2dm.permission.SEND" >
            <intent-filter>
                <action android:name="com.google.android.c2dm.intent.RECEIVE" />
                <action android:name="com.google.android.c2dm.intent.REGISTRATION" />
                <!-- Must match package on OS level 10-15 -->
                <category android:name="[Your Package Name]" />
            </intent-filter>
        </receiver>
        <service android:name="com.yerdy.services.push.gcm.GCMIntentService" />
        <meta-data android:name="Yerdy_GCMSenderId" android:value="gcm:[SenderID]"/>
</application>
Go to Obtaining Amazon Device Messaging Credentials and follow the directions on how to retrieve your ADM credentials.
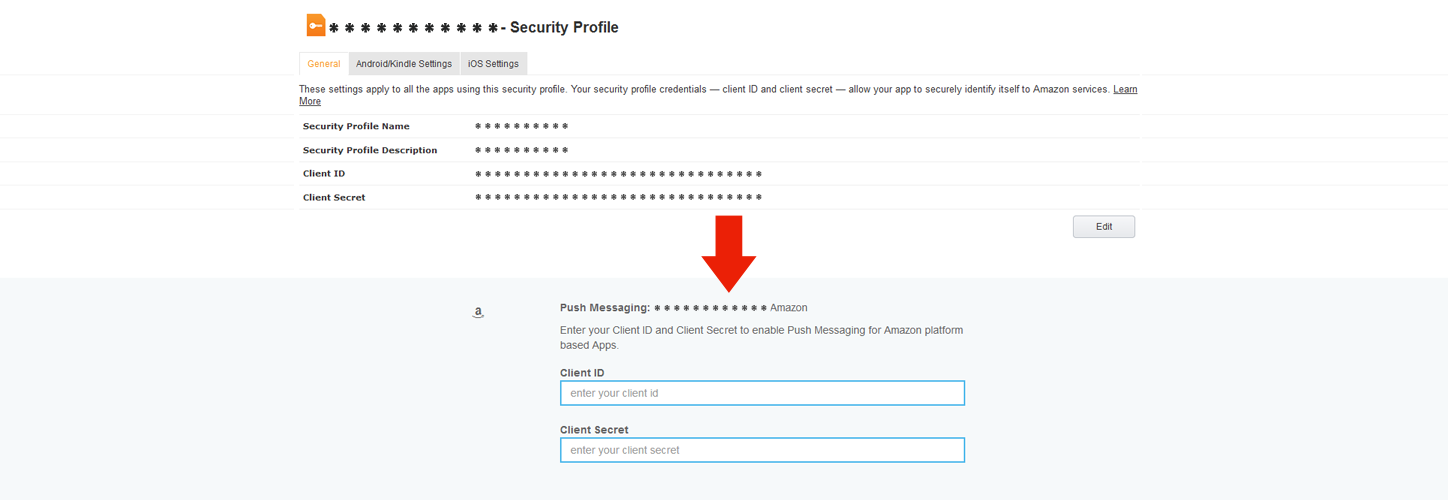
After following the steps above to generate your Amazon API keys they need to be copied into the configuration section of the dashboard for the application.
[Project]/Assets/Plugins/Android/assets/api_key.txt.
NOTE: These changes are also mentioned in the Android Setup section
These permissions are used to allow Amazon Device Messaging to fully function enhancing the Yerdy feature set. Do not forget to add the xmlns:amazon entry to the root manifest tag.
<manifest ... xmlns:amazon="http://schemas.amazon.com/apk/res/android">
    <permission android:name="[Your Package Name].permission.RECEIVE_ADM_MESSAGE" android:protectionLevel="signature" />
    <uses-permission android:name="[Your Package Name].permission.RECEIVE_ADM_MESSAGE" />
    <uses-permission android:name="com.amazon.device.messaging.permission.RECEIVE" />
    <uses-permission android:name="android.permission.WAKE_LOCK" />

    <application ...>
        <amazon:enable-feature android:name="com.amazon.device.messaging" android:required="false"/>
        <service android:name="com.yerdy.services.push.adm.ADMIntentService" android:exported="false" />
        <receiver android:name="com.yerdy.services.push.adm.ADMIntentService$ADMBroadcastReciever"
            android:permission="com.amazon.device.messaging.permission.SEND" >

            <!-- To interact with ADM, your app must listen for the following intents. -->
            <intent-filter>
                <action android:name="com.amazon.device.messaging.intent.REGISTRATION" />
                <action android:name="com.amazon.device.messaging.intent.RECEIVE" />
                <!-- Replace the name in the category tag with your app's package name. -->
                <category android:name="[Your Package Name]" />
            </intent-filter>
        </receiver>
    </application>
</manifest>
You can customize the look of the push message icons that display on the device. Placing the necessary variations of notification_icon.png in the res/drawable_____ folders will load the icons from your project instead of the SDK.