Demo Ambari service for easily installing and managing NiFi on HDP cluster and viewing metrics. As of Sept 2016, the officially supported Ambari integration with Nifi is available as part of HDF stack. Details here
Features:
- This is a Demo Ambari service that can be used to install Nifi on sandbox or test clusters (not for production use)
- By default, downloads the current GA version
- Exposes nifi.properties, bootstrap.conf, logback.xml in Ambari UI (so you can configure port, memory, log dir etc)
- Sets up initial flow.xml.gz that sets up Ambari reporting task to send Ambari metrics
- Includes metrics widgets from here
Updates:
- Apr-05-2017: updated to support installing HDF 2.1.2.0 (Nifi 1.1) on Ambari 2.5/HDP 2.6
- Dec-12-2016: updated to support installing HDF 2.1.0.0 (Nifi 1.1) on Ambari 2.4/HDP 2.5
- Sept-14-2016: updated to support installing HDF 2.0.0.0 (Nifi 1.0) on Ambari 2.4/HDP 2.5
- Jul-10-2016: updated to support installing HDF 1.2.0.0 on Ambari 2.4/HDP 2.5 tech preview build/VM
Installing on older Ambari versions:
- Refer to archives folder for older versions of the service definition
- To install on Ambari 2.4 and earlier use HDF-1.2.0.0-Nifi-0.6.0.1.2.0.1.zip
Limitations:
- This is not an officially supported service and is not meant to be deployed in production systems. It is only meant for testing/demo purposes
- It does not support Ambari/HDP upgrade process and will cause upgrade problems if not removed prior to upgrade
- Does not support secured clusters
For the officially supported Ambari-managed Nifi, please use the HDF stack
Authors:
- Ali Bajwa: Nifi Install/start/stop via Ambari
- Bryan Bende: Ambari metrics integration
- Download HDP 2.5 sandbox VM image from Hortonworks website
- Import ova file into VMWare and set the VM memory size to 8GB
- Now start the VM
- After it boots up, find the IP address of the VM and add an entry into your machines hosts file. For example:
192.168.191.241 sandbox.hortonworks.com sandbox
-
Note that you will need to replace the above with the IP for your own VM
-
Connect to the VM via SSH (password hadoop)
ssh root@sandbox.hortonworks.com
-
(Optional) To see Nifi metrics in Ambari, login to Ambari (admin/admin) and start Ambari Metrics service http://sandbox.hortonworks.com:8080
-
To download the NiFi service folder, run below
VERSION=`hdp-select status hadoop-client | sed 's/hadoop-client - \([0-9]\.[0-9]\).*/\1/'`
rm -rf /var/lib/ambari-server/resources/stacks/HDP/$VERSION/services/NIFI
sudo git clone https://github.com/abajwa-hw/ambari-nifi-service.git   /var/lib/ambari-server/resources/stacks/HDP/$VERSION/services/NIFI
- Restart Ambari
#sandbox
service ambari restart

#non sandbox
sudo service ambari-server restart
- Then you can click on 'Add Service' from the 'Actions' dropdown menu in the bottom left of the Ambari dashboard:
On bottom left -> Actions -> Add service -> check NiFi server -> Next -> Next -> Change any config you like (e.g. install dir, port, setup_prebuilt or values in nifi.properties) -> Next -> Deploy
-
By default:
- Port is set to 9090
- Max JVM memory size is 512mb
- Run schedule for Nifi's Ambari reporting task is 1 min
-
Note: On the latest sandbox there is a bug where when user gets to the 'Customize Services' page of the 'Add service wizard', it prompts for:
- On Ranger tab: "Ranger Admin user's password for Ambari"
- Type
rangeradmin
- Type
- On Oozie tab: it complains about a security related property
- Delete the property
- On Ranger tab: "Ranger Admin user's password for Ambari"
-
On successful deployment you will see the NiFi service as part of Ambari stack and will be able to start/stop the service from here:
-
You can see the parameters you configured under 'Configs' tab

-
One benefit to wrapping the component in Ambari service is that you can now monitor/manage this service remotely via REST API

export SERVICE=NIFI
export PASSWORD=admin
export AMBARI_HOST=localhost
export CLUSTER=Sandbox

#get service status
curl -u admin:$PASSWORD -i -H 'X-Requested-By: ambari' -X GET http://$AMBARI_HOST:8080/api/v1/clusters/$CLUSTER/services/$SERVICE

#start service
curl -u admin:$PASSWORD -i -H 'X-Requested-By: ambari' -X PUT -d '{"RequestInfo": {"context" :"Start $SERVICE via REST"}, "Body": {"ServiceInfo": {"state": "STARTED"}}}' http://$AMBARI_HOST:8080/api/v1/clusters/$CLUSTER/services/$SERVICE

#stop service
curl -u admin:$PASSWORD -i -H 'X-Requested-By: ambari' -X PUT -d '{"RequestInfo": {"context" :"Stop $SERVICE via REST"}, "Body": {"ServiceInfo": {"state": "INSTALLED"}}}' http://$AMBARI_HOST:8080/api/v1/clusters/$CLUSTER/services/$SERVICE
- ...and also install via Blueprint. See example here on how to deploy custom services via Blueprints
-
Bring up 4 VMs imaged with RHEL/CentOS 6.x (e.g. node1-4 in this case)
-
On non-ambari nodes, install ambari-agents and point them to ambari node (e.g. node1 in this case)
export ambari_server=node1
curl -sSL https://raw.githubusercontent.com/seanorama/ambari-bootstrap/master/ambari-bootstrap.sh | sudo -E sh
- On Ambari node, install ambari-server
export install_ambari_server=true
curl -sSL https://raw.githubusercontent.com/seanorama/ambari-bootstrap/master/ambari-bootstrap.sh | sudo -E sh
yum install -y git
sudo git clone https://github.com/abajwa-hw/ambari-nifi-service.git   /var/lib/ambari-server/resources/stacks/HDP/2.4/services/NIFI
- Restart Ambari
service ambari-server restart
service ambari-agent restart
- Confirm 4 agents were registered and agent remained up
curl -u admin:admin -H  X-Requested-By:ambari http://localhost:8080/api/v1/hosts
service ambari-agent status
- (Optional) - You can generate BP and cluster file using Ambari recommendations API using these steps. For more details, on the bootstrap scripts see bootstrap script git
yum install -y python-argparse
git clone https://github.com/seanorama/ambari-bootstrap.git

#Select the services to be deployed

#option A: for only NIFI
#export ambari_services="NIFI"

#option B: for minimal services
#export ambari_services="HDFS MAPREDUCE2 YARN ZOOKEEPER HIVE NIFI"

#option C: for most services
#export ambari_services="ACCUMULO FALCON FLUME HBASE HDFS HIVE KAFKA KNOX MAHOUT OOZIE PIG SLIDER SPARK SQOOP MAPREDUCE2 STORM TEZ YARN ZOOKEEPER NIFI"

bash ./ambari-bootstrap/deploy/deploy-recommended-cluster.bash
- You can monitor the progress of the deployment via Ambari (e.g. http://node1:8080).
-
The NiFi webUI login page should come up at the below link: http://sandbox.hortonworks.com:9090/nifi
- On VirtualBox you will need to manually forward port 9090 before you can do this. This is not required on VMWare
-
You can also open it from within Ambari via iFrame view

- Sample steps to automate this (requires maven):
git clone https://github.com/abajwa-hw/iframe-view.git
sed -i "s/IFRAME_VIEW/NIFI_VIEW/g" iframe-view/src/main/resources/view.xml
sed -i "s/iFrame View/Nifi View/g" iframe-view/src/main/resources/view.xml
sed -i "s#sandbox.hortonworks.com:6080#sandbox.hortonworks.com:9090/nifi/#g"  iframe-view/src/main/resources/index.html
sed -i "s/iframe-view/nifi-view/g" iframe-view/pom.xml
sed -i "s/Ambari iFrame View/Nifi View/g" iframe-view/pom.xml
mv iframe-view nifi-view
cd nifi-view
mvn clean package

cp target/*.jar /var/lib/ambari-server/resources/views
ambari-server restart

- Install Nifi via Ambari service on sandbox by running below and running 'Add service' wizard
VERSION=`hdp-select status hadoop-client | sed 's/hadoop-client - \([0-9]\.[0-9]\).*/\1/'`
sudo git clone https://github.com/abajwa-hw/ambari-nifi-service.git   /var/lib/ambari-server/resources/stacks/HDP/$VERSION/services/NIFI
#sandbox
service ambari restart
#non sandbox
service ambari-server restart
- Drag processors (first icon on upper left) to Nifi canvas and make below configurations:
- ListenUDP: pull data from port 9091 info flow files
- Set
Port=9091
- Set
- ExtactText: extract text from flow file
- MergeContent: merge multiple text into one
- Set
Min num entries=5 - Set
Max Bin Age=5s - Terminate all relationships except for 'Merged'
- Set
- PutHDFS: write merged content into HDFS files into /tmp/logs
- Set
Directory=/tmp/logs - Set
Hadoop Config resources=/etc/hadoop/conf/core-site.xml - Auto terminate all relationships (Succcess and Failure)
- Set
- ListenUDP: pull data from port 9091 info flow files
- Alternatively, you can import this template for the above flow

- Start the flow by clicking the Play icon
- Push name node log to port 9091 in UDP format using netcat:
tail -f /var/log/hadoop/hdfs/hadoop-hdfs-namenode-sandbox.hortonworks.com.log | nc -4u localhost 9091
- After few seconds data should start flowing into
/tmp/logsdir in HDFS.- Open Files view: http://sandbox.hortonworks.com:8080/#/main/views/FILES/1.0.0/Files

- Open Files view: http://sandbox.hortonworks.com:8080/#/main/views/FILES/1.0.0/Files

-
Note: The below steps refer to installing Nifi Twitter demo on HDP sandbox. Another option is to deploy HDP cluster (on any cloud) with this demo already setup. Automation script for this is provided here
-
Install Nifi via Ambari service on sandbox by running below and running 'Add service' wizard
VERSION=`hdp-select status hadoop-client | sed 's/hadoop-client - \([0-9]\.[0-9]\).*/\1/'`
sudo git clone https://github.com/abajwa-hw/ambari-nifi-service.git   /var/lib/ambari-server/resources/stacks/HDP/$VERSION/services/NIFI
#sandbox
service ambari restart
#non sandbox
service ambari-server restart
-
Import simple flow to read Tweets into HDFS/Solr and visualize using Banana dashboard
-
HDP sandbox comes LW HDP search. Follow the steps below to use it to setup Banana, start SolrCloud and create a collection
- If running on an Ambari installed HDP 2.4 cluster (instead of sandbox), run the below to install HDPsearch first. These are not needed on sandbox.
yum install -y lucidworks-hdpsearch sudo -u hdfs hadoop fs -mkdir /user/solr sudo -u hdfs hadoop fs -chown solr /user/solr- Ensure no log files owned by root
chown -R solr:solr /opt/lucidworks-hdpsearch/solr #current sandbox version has files owned by root here which causes problems- Run remaining setup steps as solr user
su solr- Setup the Banana dashboard by copying default.json to dashboard dir
cd /opt/lucidworks-hdpsearch/solr/server/solr-webapp/webapp/banana/app/dashboards/ mv default.json default.json.orig wget https://raw.githubusercontent.com/abajwa-hw/ambari-nifi-service/master/demofiles/default.json- Edit solrconfig.xml by adding
<str>EEE MMM d HH:mm:ss Z yyyy</str>underParseDateFieldUpdateProcessorFactoryso it looks like below. This is done to allow Solr to recognize the timestamp format of tweets.
vi /opt/lucidworks-hdpsearch/solr/server/solr/configsets/data_driven_schema_configs/conf/solrconfig.xml<processor class="solr.ParseDateFieldUpdateProcessorFactory"> <arr name="format"> <str>EEE MMM d HH:mm:ss Z yyyy</str>- Start Solr in cloud mode and create a collection called tweets
export JAVA_HOME=<JAVA_HOME used by Ambari> /opt/lucidworks-hdpsearch/solr/bin/solr start -c -z localhost:2181 /opt/lucidworks-hdpsearch/solr/bin/solr create -c tweets \ -d data_driven_schema_configs \ -s 1 \ -rf 1- Exit to run remaining steps as root
exit- Ensure the time on your sandbox is accurate or you will get errors using the GetTwitter processor. To fix the time, run the below:
yum install -y ntp service ntpd stop ntpdate pool.ntp.org service ntpd start -
-
Now open Nifi webui and run the remaining steps there:
-
Download prebuilt Twitter_Dashboard.xml template to your laptop from here
-
Import flow template info Nifi:
-
Import template by clicking on Templates (third icon from right) which will launch the 'Nifi Flow templates' popup

-
Browse and navigate to where ever you downloaded Twitter_Dashboard.xml on your local machine
-
Click Import. Now the template should appear:

-
Close the popup
-
-
Instantiate the Twitter dashboard template:
-
Drag/drop the Template icon (7th icon form left) onto the canvas so that a picklist popup appears

-
Select 'Twitter dashboard' and click Add
-
-
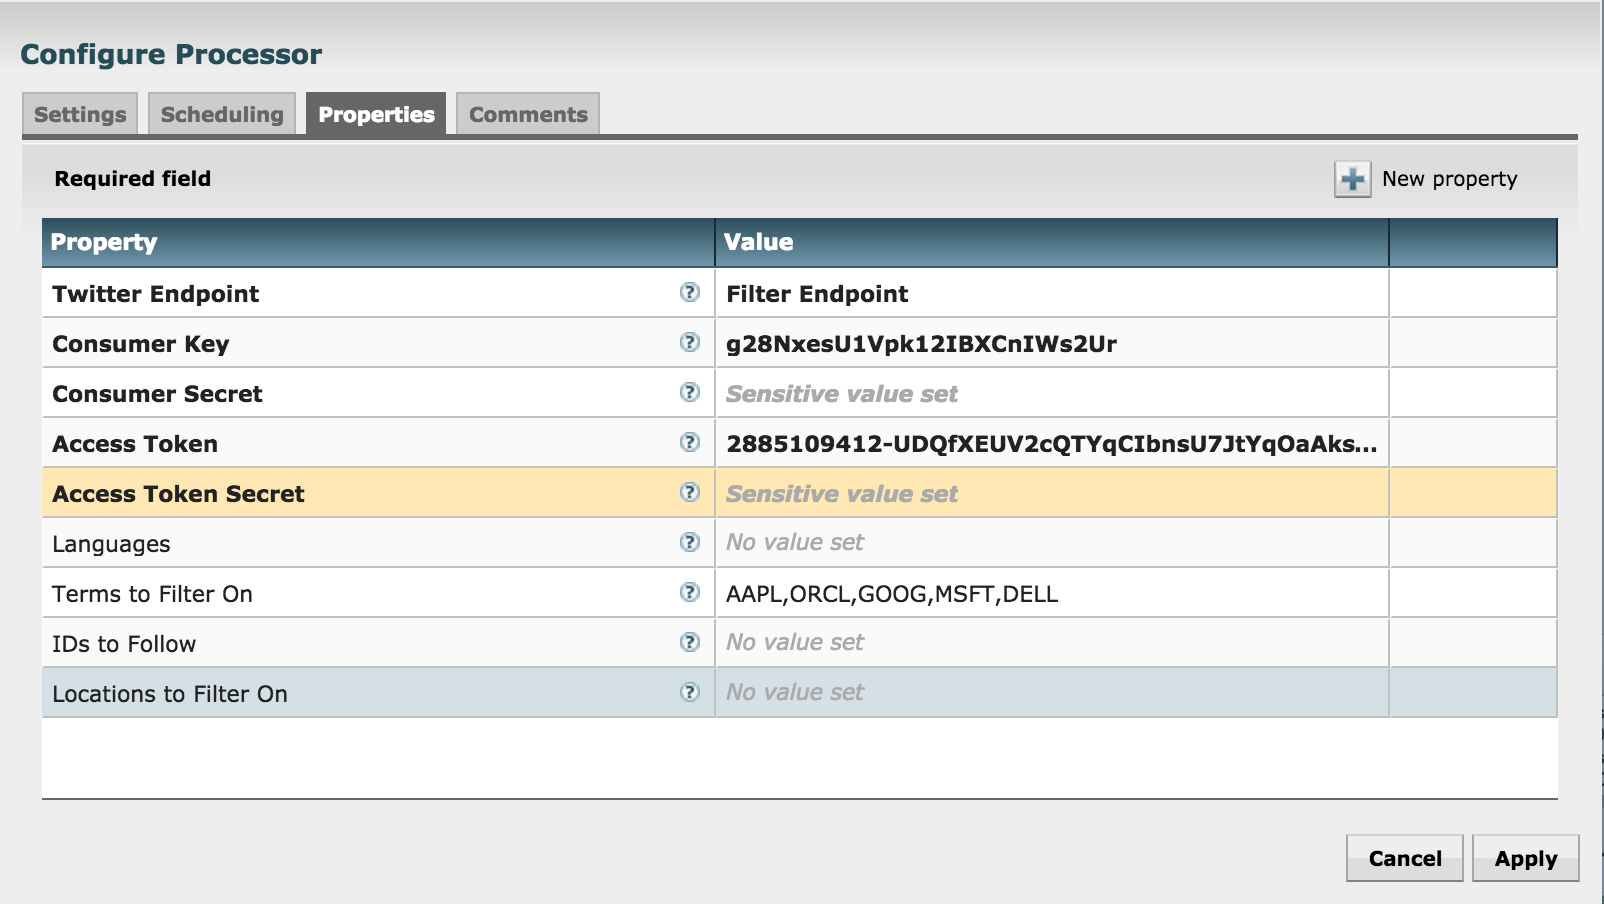
Configure GetTwitter processor
- Right click on 'GetTwitter' processor (near top) and click Configure
- Under Properties:
- Enter your Twitter key/secrets
- ensure the 'Twitter Endpoint' is set to 'Filter Endpoint'
- enter the search terms (e.g. AAPL,GOOG,MSFT,ORCL) under 'Terms to Filter on'

- Under Properties:
- Right click on 'GetTwitter' processor (near top) and click Configure
-
Review the other processors and modify properties as needed:
- EvaluateJsonPath: Pulls out attributes of tweets
- RouteonAttribute: Ensures only tweets with non-empty messages are processed
- PutSolrContentStream: Writes the selected attributes to Solr. In this case, assuming Solr is running in cloud mode with a collection 'tweets'
- ReplaceText: Formats each tweet as pipe (|) delimited line entry e.g. tweet_id|unixtime|humantime|user_handle|message|full_tweet
- MergeContent: Merges tweets into a single file (either 20 tweets or 120s, whichever comes first)
- PutFile: writes tweets to local disk under /tmp/tweets/
- PutHDFS: writes tweets to HDFS under /tmp/tweets_staging
-
If setup correctly, the top left hand of each processor on the canvas will show a red square (indicating the flow is stopped)
-
Click the Start button (green triangle near top of screen) to start the flow
-
After few seconds you will see data flowing

-
Create Hive table to be able to run queries on the tweets
sudo -u hdfs hadoop fs -chmod -R 777 /tmp/tweets_staging hive> create table if not exists tweets_text_partition( tweet_id bigint, created_unixtime bigint, created_time string, displayname string, msg string, fulltext string ) row format delimited fields terminated by "|" location "/tmp/tweets_staging";-
Verify that:
-
tweets appear under /tmp dir in HDFS. You can see this via Files view in Ambari:

-
tweets appear in Solr:
-
-
tweets appear in Banana:
-
Tweets appear in Hive:
-
-
Other Nifi features
-
Flow statistics/graphs:
-
Right click on one of the processors (e.g. PutHDFS) and select click 'Stats' to see a number of charts/metrics:

-
You should also see Nifi metrics in Ambari (assuming you started Ambari metrics earlier)

-
-
Data provenance in Nifi:
- In Nifi home screen, click Provenance icon (5th icon from top right corner) to open Provenance page:

- Click Show lineage icon (2nd icon from right) on any row

- Right click Send > View details > Content

- From here you can view the tweet itself by
- Clicking Content > View > formatted

- Clicking Content > View > formatted
- You can also replay the event by
- Replay > Submit
- Close the provenance window using x icon on the inner window
- Notice the event was replayed

- Re-open the the provenance window on the row you you had originally selected

- Notice that by viewing and replaying the tweet, you changed the provenance graph of this event: Send and replay events were added to the lineage graph
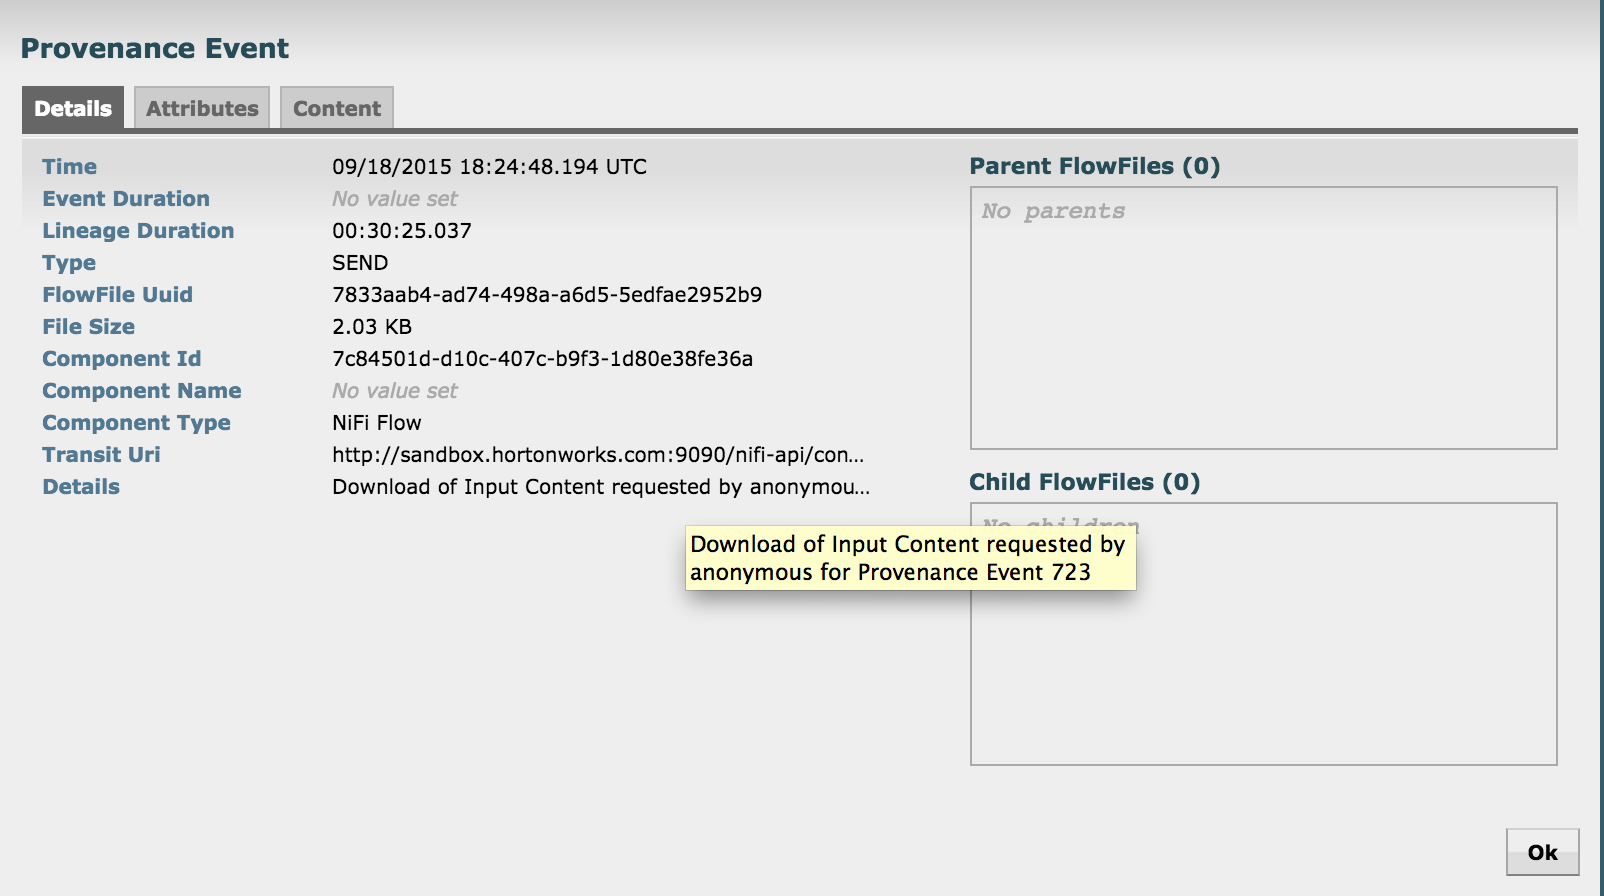
- Right click on the Send event near the bottom of the flow and select Details

- Notice that the details of request to view the tweet are captured here (who requested it, at what time etc)
- Exit the Provenance window but clicking the x icon on the outer window
- In Nifi home screen, click Provenance icon (5th icon from top right corner) to open Provenance page:
-


- To remove the Nifi service:
-
Stop the service via Ambari
-
Unregister the service by running below from Ambari node
-
export SERVICE=NIFI export PASSWORD=admin export AMBARI_HOST=localhost
#detect name of cluster
output=curl -u admin:$PASSWORD -i -H 'X-Requested-By: ambari' http://$AMBARI_HOST:8080/api/v1/clusters
CLUSTER=echo $output | sed -n 's/.*"cluster_name" : "\([^\"]*\)".*/\1/p'
#unregister service from ambari curl -u admin:$PASSWORD -i -H 'X-Requested-By: ambari' -X DELETE http://$AMBARI_HOST:8080/api/v1/clusters/$CLUSTER/services/$SERVICE
#if above errors out, run below first to fully stop the service #curl -u admin:$PASSWORD -i -H 'X-Requested-By: ambari' -X PUT -d '{"RequestInfo": {"context" :"Stop $SERVICE via REST"}, "Body": {"ServiceInfo": {"state": "INSTALLED"}}}' http://$AMBARI_HOST:8080/api/v1/clusters/$CLUSTER/services/$SERVICE ```
- Remove artifacts
rm -rf /opt/nifi* rm /tmp/nifi*.zip