- Explain GraphQL and Hasura
- Set up a Hasura server
- Create GraphQL queries and mutations
Well, according to its documentation, "GraphQL is a query language for APIs." Traditionally, with a REST API, you have all sorts of endpoints where you get access to different data or can change the data in some way. That can become pretty bulky pretty fast, and can also become a bottleneck if you're working with separate frontend and backend teams. GraphQL becomes really helpful as our apps evolve over time and need to display different data.
Sacha Grief wrote an awesome analogy in his article "So what’s this GraphQL thing I keep hearing about?".
The old REST model is like ordering pizza, then getting groceries delivered, then calling your dry cleaner to get your clothes. Three shops, three phone calls.
GraphQL on the other hand is like having a personal assistant: once you’ve given them the addresses to all three places, you can simply ask for what you want (“get me my dry cleaning, a large pizza, and two dozen eggs”) and wait for them to return.
GraphQL is also language agnostic, and it lives between your client and your data sources, so it's super flexible!
Hasura allows you to build a GraphQL backend at lightning speed -- you can just click buttons and make some pretty awesome things.
Hasura:
- Gives you an instant real time GraphQL API on a new or existing database.
- It comes with dashboard that helps you set up your API and database.
- You can react to changes in your database with web hooks, external APIs, or serverless functions on demand.
- You can also stitch together custom GraphQL APIs and other data sources into a unified GraphQL API.
- Go to this link!
- Pick a name for your app
- Click deploy
✨Magic✨
- Go to the data tab
- Add a table
- Add some columns
- Add some data
When we use GraphQL we are going to write queries in order to interact with our data.
Queries look like this:
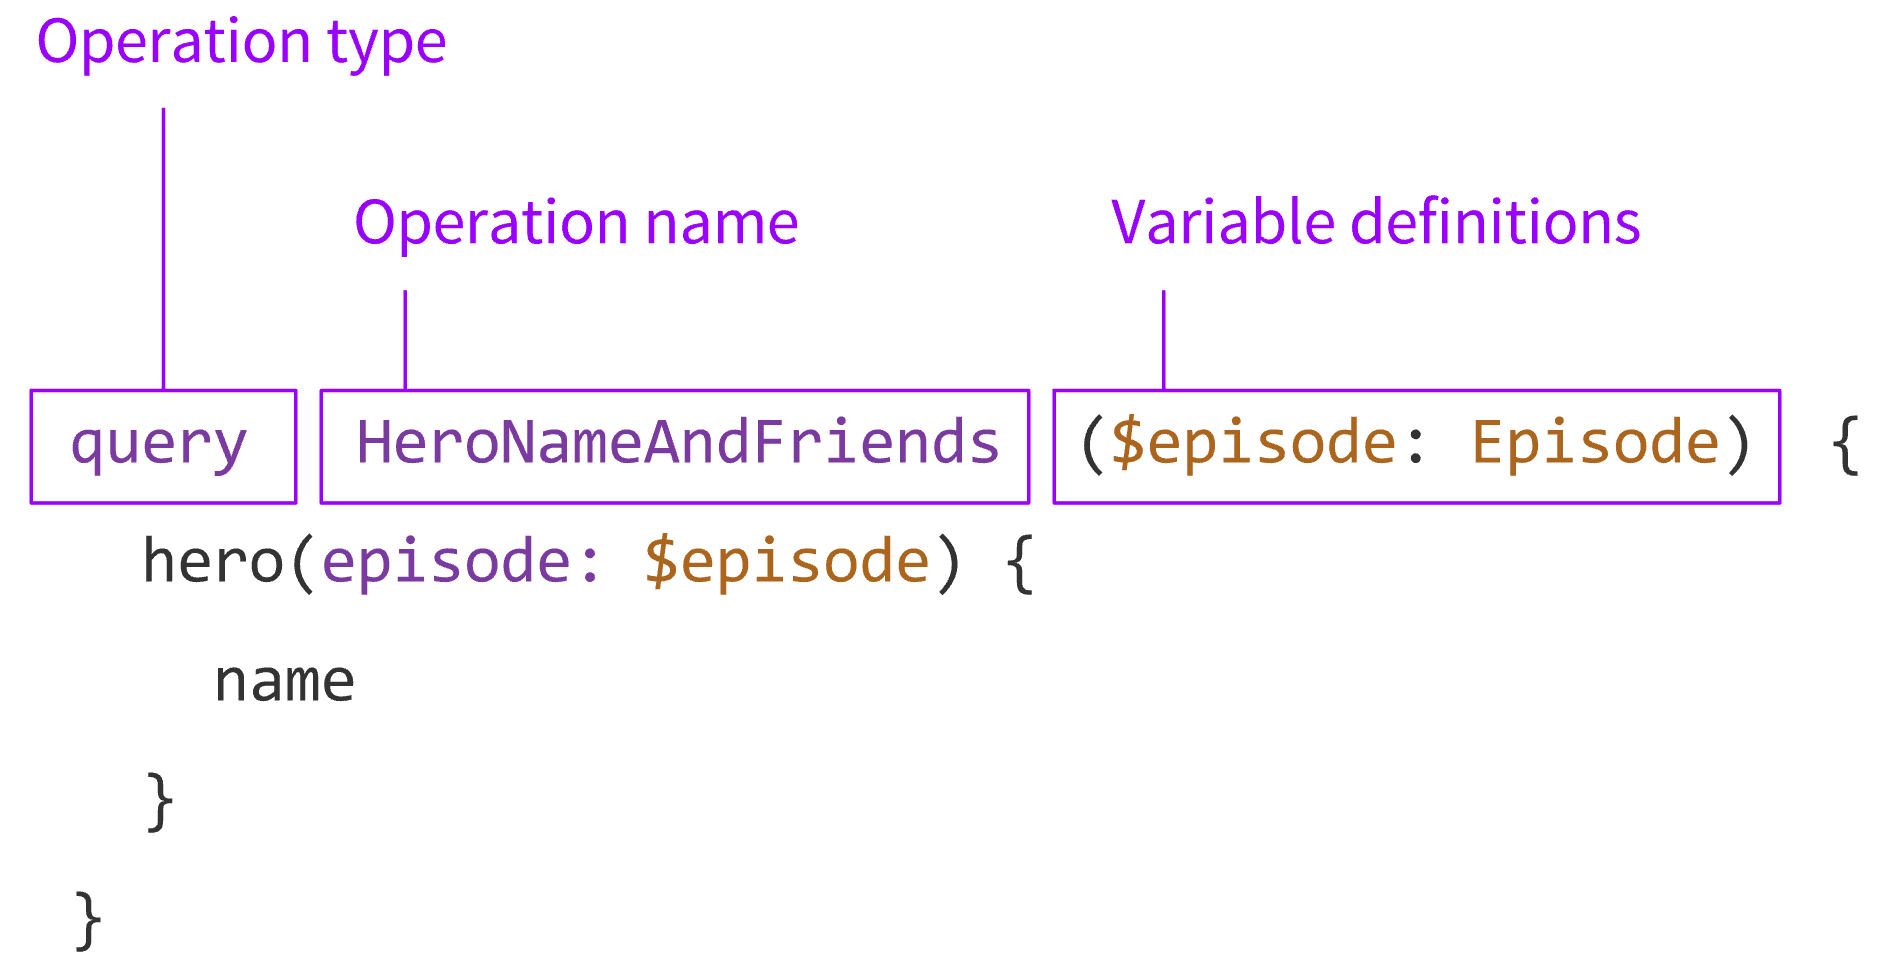
When we use GraphQL, we ask for specific fields on objects.
- The terms between the curly braces is called a selection set.
- Each piece of data that we are requesting is called a field.
- Each piece of data can return arrays and we can get fields from those arrays
- We can also add variables to our queries.
We do need to make sure we specify our data types and stick to them. The Scalar types in GraphQL are:
- Int
- Float
- String
- Boolean
- ID: A unique identifier used to re-fetch an object or as the key for cache.
We can also use mutations to update data in our GraphQL database, and subscriptions to subscribe to data updates with websockets.
We will also be using GraphiQL, which is an in-browser IDE for exploring GraphQL queries, it comes setup in Hasura!
Let's set up our database for our game we're going to be building for the rest of the workshop.
We're going to need a pixels table in our database that has two columns - id and color.
Then, we'll seed the database with the populate.sql script in this repo.
Let's also clone down the starter repo.
Once you do that, cd into the repository, install the dependencies, and check out the code!
$ cd hasura-tutorial
$ npm iWe're going to use Apollo to connect to our Hasura backend.
In our Connection.js we'll add:
import { HttpLink } from "apollo-link-http";
import { ApolloClient } from "apollo-client";
import { InMemoryCache } from "apollo-cache-inmemory";

export default new ApolloClient({
  cache: new InMemoryCache(),
  link: new HttpLink({
    uri: "http://pixart-together.herokuapp.com/v1/graphql/"
  })
});
And then we'll update our index.js to connect our app to our connection.
import React from "react";
import ReactDOM from "react-dom";
+import { ApolloProvider } from "@apollo/react-hooks";

import "./index.css";
import App from "./App";
import * as serviceWorker from "./serviceWorker";
import connection from "./Connection";

ReactDOM.render(
+  <ApolloProvider client={connection}>
    <App />
+  </ApolloProvider>,
  document.getElementById("root")
);

// If you want your app to work offline and load faster, you can change
// unregister() to register() below. Note this comes with some pitfalls.
// Learn more about service workers: https://bit.ly/CRA-PWA
serviceWorker.unregister();
Yay! Now let's go ahead and add our queries so that we're getting live data from our database. We'll use the gql template literal tags to write our queries. We'll also use the useQuery hook to run our query when our App component is created.
import React, { useState } from "react";
+ import { useQuery } from "@apollo/react-hooks";
+ import gql from "graphql-tag";
import Pixel from "./Pixel";
import ColorPicker from "./ColorPicker";

+ const GET_PIXELS = gql`
+  query GetPixels {
+    pixels(order_by: { id: asc }) {
+      color
+      id
+    }
+  }
+`;

function App() {
+  const { loading, error, data } = useQuery(GET_PIXELS);
  const [color, changeColor] = useState("white");

+  if (loading) {
+    return <></>;
+  }

  return (
    <div className="content">
      <div className="logo">Draw</div>
      <p>Pick a Color</p>
      <ColorPicker changeColor={changeColor} />
      <p>Click a Pixel</p>
      <div className="container">
+        {data.pixels.map(pixel => (
+          <Pixel {...pixel} key={pixel.id} newColor={color} />
+        ))}
      </div>
    </div>
  );
}

export default App;
Let's also update our Pixel component to send a GraphQL mutation whenever we draw on a pixel!
import React from "react";
+ import { gql } from "apollo-boost";
+ import { useMutation } from "@apollo/react-hooks";

+ const UPDATE_COLOR = gql`
+   mutation ChangePixelColor($id: Int!, $color: String!) {
+     update_pixels(where: { id: { _eq: $id } }, _set: { color: $color }) {
+       returning {
+         x
+         y
+         color
+         id
+       }
+     }
+   }
+ `;

const Pixel = ({ id, color, newColor }) => {
+  const [updatePixelColor] = useMutation(UPDATE_COLOR);

  return (
    <span
      className="pixel"
      onClick={() => {
+        updatePixelColor({ variables: { id, color: newColor } });
      }}
      style={{ backgroundColor: color }}
    ></span>
  );
};

export default Pixel;
Awesome, now our app works, but let's make it real time! So that if I draw on my computer, you immediately see that on your computer!
Let's update the Connection.js to use a websocket connection!
import { WebSocketLink } from "apollo-link-ws";
import { ApolloClient } from "apollo-client";
import { InMemoryCache } from "apollo-cache-inmemory";

export default new ApolloClient({
  cache: new InMemoryCache(),
  link: new WebSocketLink({
    uri: "wss://pixart-together.herokuapp.com/v1/graphql",
    options: {
      reconnect: true
    }
  })
});
We'll change our query to a subscription:
import React, { useState } from "react";
+ import { useSubscription } from "@apollo/react-hooks";
import gql from "graphql-tag";

import Pixel from "./Pixel";
import ColorPicker from "./ColorPicker";

const pixels = new Array(400).fill("white");

const GET_PIXELS = gql`
+  subscription GetPixels {
    pixels(order_by: { id: asc }) {
      color
      id
    }
  }
`;

function App() {
  const [color, changeColor] = useState("white");
  const { loading, error, data } = useSubscription(GET_PIXELS);

  if (loading) {
    return <></>;
  }
  return (
    <div className="content">
      <div className="logo">Draw</div>
      <p>Pick a Color</p>
      <ColorPicker changeColor={changeColor} />
      <p>Click a Pixel</p>
      <div className="container">
        {data.pixels.map(pixel => (
          <Pixel {...pixel} key={pixel.id} newColor={color} />
        ))}
      </div>
    </div>
  );
}

export default App;
And we'll add a useEffect in our pixel component so our pixels update their color when a new prop is passed in!
+ import React, { useState, useEffect } from "react";

import { gql } from "apollo-boost";
import { useMutation } from "@apollo/react-hooks";

const UPDATE_COLOR = gql`
  mutation ChangePixelColor($id: Int!, $color: String!) {
    update_pixels(where: { id: { _eq: $id } }, _set: { color: $color }) {
      returning {
        x
        y
        color
        id
      }
    }
  }
`;

const Pixel = ({ id, color, newColor }) => {
  const [pixelColor, changeColor] = useState(color);
  const [updatePixelColor] = useMutation(UPDATE_COLOR);

+  useEffect(() => {
+    changeColor(color);
+  }, [color]);

  return (
    <span
      className="pixel"
      onClick={() => {
        changeColor(newColor);
        updatePixelColor({ variables: { id, color: newColor } });
      }}
      style={{ backgroundColor: pixelColor }}
    ></span>
  );
};

export default Pixel;
Thank you so much for coming out tonight and a huge thanks to Hasura for having me put on this workshop. I'm going to turn it over to them to show you all some brand new features they've been working on!