During a visit in an IKEA store, I saw the PS 2014 lamp. It's a wonderful manually expandable lamp whose movement was controlled by a twine...

The first step that I made was to hack the hardware: to do this, I replaced the string with a stepper motor with a threaded rod. Then I added a microcontroller: in particular, I've used a NodeMCU ESP8266 that is an Open-source, Interactive, Programmable, Low cost and WI-FI enabled integrated development kit. It can be easily configured and manipulated using the Arduino IDE and it allows to reduce the time to prototype the hardware.


The last thing to do was to design a firmware for the NodeMCU board, using the Arduino IDE. The two critical parts were:
- How to control the lamp;
- How to interact with the stepper motor.
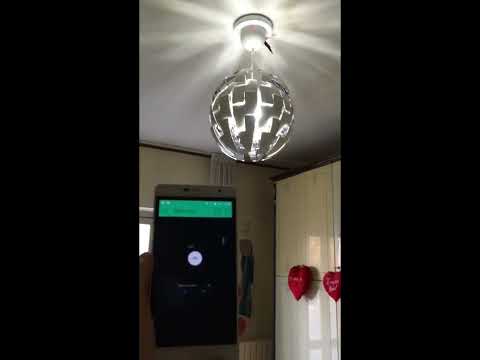
Since the NodeMCU boards allows to connect the lamp to my home Wi-Fi, I decided to interact with it using the Blynk mobile application (it's available both for Android and iOS). Blynk is extremely easy to use with Arduino IDE: once downloaded the Blynk Library, to connect the device to a network requires only 3 fields: the Authentication Token (given by the mobile app), the Wi-Fi SSID and the Wi-Fi Password. A very simple sketch could be:
#include <ESP8266WiFi.h>
#include <BlynkSimpleEsp8266.h>

char auth[] = "Your-Auth-Token";
char ssid[] = "Your-WiFi-SSID";
char pass[] = "Your-WiFi-Password";

void setup() {
  Serial.begin(9600);
  Blynk.begin(auth, ssid, pass);
}

void loop() {
  Blynk.run();
}
In order to open/close the lamp, I need to control the stepper motor. To do this, I've chosen the AccelStepper library which is an improvement of the basic Arduino Stepper Library since it supports acceleration and deceleration, a large variety of stepper motors and it also supports the DRV8825 Driver Board that I've chosen for the project.
The code is a ready-to-work firmware ONLY IF the project is implemented exactly as the circuit diagram. But it can be easy adapted according to the subjective purpose. To install the firmware, simply download it, open it using the Arduino IDE and load it into the NodeMCU board.
Click on image: