Getting Started
Installing the Engine
Installing the Proper Version of Xcode
Creating an Unreal Engine C++ Project
Compiling Your Code from within the Editor
Compiling Your Code from within Xcode
Modifying Your Code to add New Features
Xcode Conclusion
Using Visual Studio Code to Build Your Code
Building Your Project in Visual Studio Code
Building or Cleaning Your Project in Visual Studio Code
Visual Studio Code Conclusion
Using VSCode with Older UE4 and macOS
Check this webpage for the system requirements before you download the engine:
(click the dropdown in the upper right to select 'MacOS')
https://docs.unrealengine.com/en-US/GettingStarted/RecommendedSpecifications/index.html
Make sure your OS version, processor, RAM and Video card meet the minimum requirements.
(Note: Currently this page says "Xcode Version" is "9.4" which is wrong and out of date.)
-
Download Epic Games Launcher from:
https://www.epicgames.com/store/en-US/download -
Launch the EpicInstaller .dmg and drag "Epic Game Launcher" into the Applications folder.
-
After it's done copying, close the .dmg app and launch the Epic Games Launcher from the Applications folder.
-
After downloading an update (if necessary), sign in with your Epic account (or sign up for an account).
-
Click on "Unreal Engine" on the left, then click on the "Install Engine" button on the upper right.
-
Accept the EULA, and choose the install location (USE THE DEFAULT UNLESS YOU KNOW WHAT YOU ARE DOING!!!).
(the default install location will be /Users/Shared/Epic Games/<engine_version>) -
Click "Install" to install the UE4 engine. It will take a while to download.
-
You can click on "Downloads" on the lower left to see the progress and download speed.
-
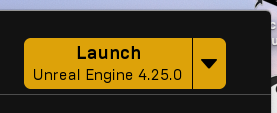
After the engine has downloaded, before you do anything else, click the "Launch" button in the upper right to launch the Unreal Engine editor. Run the Unreal Engine FIRST to make sure it will work on your system. There's no sense spending more time download and configuring additional software if the engine won't even run on your machine!!!
-
You should see a splash screen with "Initializing..." followed by a percentage complete. It will have to build shaders for your specific hardware configuration and this will take some time (it could be 10 or 15 minutes or it could be an hour or more depending on your hardware). Just let it sit and run until it's done. It may look like it's stuck at 45% or 75% or whatever, but just let it sit. You can run Activity Monitor (in Applications -> Utilities) if you want to watch the processes doing work. You should see several 'ShaderCompileWorker' processes building shaders.
-
You may see a warning message saying "Xcode was not detected on this Mac. Metal shader compilation will fall back to runtime compiled text shaders, which are slower. Please install latest version of Xcode for best performance and make sure it's set as default using xcode-select tool." Which we will do shortly (but not necessarily the latest version of Xcode, see below).
-
Once you get to the "Select or Create New Project" screen, select "Cancel" to quit
(we're going to set up some other stuff first).
You can run the Unreal Engine launcher by using the "Epic Games Launcher" going into the "Unreal Engine" section and clicking "Launch" button in the upper right, as you did the first time, or you can run the Unreal Engine launcher from the following folder (assuming you installed things in the default path as mentioned above):
/Users/Shared/UnrealEngine/Launcher/Unreal Engine (or "Unreal Engine.app" if you are showing filename extensions)
You can make an alias for "Unreal Engine.app" on the desktop by selecting "Unreal Engine.app" in Finder and pull down the "File" menu in Finder and select "Make Alias". Then drag the alias to the desktop to be able to click on it to launch it.
If you want to run the editor directly, you can find the editor app in Finder by going into the /Users/Shared/Epic Games/<engine_version> folder, and then down into "Engine", then "Binaries", then "Mac" and scroll down until you see "UE4Editor" (or "UE4Editor.app" if you are showing filename extensions). For example:
/Users/Shared/Epic Games/UE_4.25/Engine/Binaries/Mac/UE4Editor.app
Select the UE4Editor app in Finder and then pull down the "File" menu and select "Make Alias". Then drag the alias to the desktop. You can click on that alias to launch the editor directly.
The engine needs Xcode to properly build shaders and to build code from your C++ project. You can't just use any version of Xcode you want. Epic uses a specific version of Xcode for each version of the engine as that engine version is being developed. You WANT to make sure you use exactly the same version of Xcode that Epic did to prevent any issues. If the engine requirements say to use Xcode 10.4, don't use Xcode 9.3 or Xcode 10.1 or Xcode 10.8. You will run into issues compiling your code if you do.
You can find the recommended version of Xcode for a specific engine version by going to the "Release Notes" webpage and click on the link for the release notes of the engine major and minor version you downloaded:
https://docs.unrealengine.com/en-US/Support/Builds/index.html
For example, if you downloaded UE 4.25, you would look at the following page:
https://docs.unrealengine.com/en-US/Support/Builds/ReleaseNotes/4_25/index.html
Search for "Xcode" to find the specific version of the Xcode app that is REQUIRED to build that specific version of the engine. For example, UE 4.25 release notes has this "Xcode - Xcode 11.1". Don't use an earlier version of Xcode and don't use a more recent version of Xcode or you may not be able to compile the code properly and you will have to manually fix up the engine source code so that it will compile with the version of Xcode that you decided to use. Stick with the version of Xcode explicitly mentioned in the release notes unless YOU KNOW WHAT YOU ARE DOING!!!
The latest version of Xcode can be found by going here and clicking on the "Download" link:
https://developer.apple.com/support/xcode/
Sign in using your Apple Developer account (you can create an account for free) and you should see the latest version of Xcode. As of this writing, the latest version of Xcode is "Xcode 11.5 beta 2". WE DON'T WANT THAT! Don't bother downloading it. We want to find Xcode 11.1 instead. Use the following link to see older versions of developer applications:
https://developer.apple.com/download/more/?q=xcode
Scroll down until you see "Xcode 11.1" (you can sort them by "Description" to make it easier to find). Once you see the proper version of Xcode, click on it to expand it, then click the link to download the ".xip" file. It will take a while to download.
Once you have downloaded the Xcode .xip, launch it to run the Archive Utility to uncompress it. Drag the "Xcode" app to the Applications folder. You may want to keep the .xip file in case something goes wrong and you need to re-install Xcode again later. After moving the Xcode app to the Applications folder, run it to set up Xcode.
Xcode will set up some stuff and present the "Xcode and iOS SDK License Agreement" dialog. Click "Agree" to continue. Enter your account credentials so that Xcode can install components. Eventually, you should see the "Welcome to Xcode" dialog with "Getting started...", "Create a new Xcode project" and "Clone an existing project" options. Close this window (by clicking the 'X' in the upper left corner). In the Xcode menu at the top, select "Xcode" and then "Preferences" to verify that the Xcode Command Line Tools are set up properly. Click "Locations" and on the "Locations" page, look at the "Command Line Tools:" setting. If this is blank, click the drop down list selector on the right and select the Xcode version you just installed (for me, this is "Xcode 11.1 (11A1027)"). If something ever complains about the command line tools not being found, you can come back here to make sure this is set properly.
Now you can close Xcode.
Run the "Epic Games Launcher" and click on "Unreal Engine" on the left. Click the "Launch" button on the upper right to launch the Unreal Engine project selector. Select "Games" from the "New Project Categories", then click "Next". You should see a list of Templates that you can select from. Let's start with a third person game. Select "Third Person" and click "Next". In the "Project Settings" page, click the "Blueprint" drop down where it says "Choose whether to create a Blueprint or C++ project" and select "C++". Leave the other settings at "Maximum Quality", "Raytracing Disabled", "Desktop / Console" and "With Starter Content".
The default folder for your project will be under your user's Documents folder (i.e. "/Users/<username>/Documents/Unreal Projects"). Use the default for the "Folder" setting, and change the name from "MyProject" to "TPGame" (short for "Third Person Game"). Then click "Create Project" to create the new C++ project.
This should generate the project and automatically compile all the C++ code for your project and then launch the editor using "TPGame". This will also automatically launch Xcode with your TPGame project loaded in Xcode.
Before doing anything else, let's look at what got created for your TPGame projects. In Finder, go into your Documents folder, then into "Unreal Projects" then into "TPGame". You should see several folders and files here. The "Binaries" folder is where all executables (apps) for your game are stored. There is a "Config" folder with .ini files that contain default settings for your game. There is a "Content" folder which contains UE4 assets (content) specific to your game. There is a "DerivedDataCache" folder which holds cached versions of data used by the editor and engine to build your game. There is an "Intermediate" folder which is where all the source code gets compiled to intermediate files (object files) that get used to create the executable for your game. There is a "Saved" folder which contains user specific editor settings as well as backup files and collections created in the editor. And there is a "Source" folder which contains all the C++ source code used to create your game. You will also see a "TPGame.uproject" file which is the Unreal Engine project file for your TPGame project. It contains project specific information like which plugins (if any) your game is using. Finally there is a "TPGame.xcworkspace" file which is the Xcode project file used for your game.

In the Unreal editor, you can take a tour of the Unreal editor, or you can dismiss this by clicking 'X' in the upper right of the "Welcome to Unreal Engine 4" dialog to close it, then right click the blinking "graduation mortarboard" icon and select "Don't remind me again".
I won't go through how to use the Unreal editor since there are many, many tutorials and videos available for that on the internet.
Notice in the editor toolbar at the top middle of the editor, you will see a "Compile" button. This is used to compile your C++ code from within the editor. Click on that and you should see a notification saying "Compiling Code" and then "Compile Complete". To see the results of the compile, click on "Window" in the Unreal editor menu then select "Developer Tools" and then "Message Log". On the left, you should see "Compiler Log" with a number in parenthesis. Click on "Compiler Log" to see the compiler output.
The "Compile" toolbar button in the editor is for "hot reloading" and allows you to build and reload code without having to close and re-open the editor. If you use Finder to look in your Documents/Unreal Projects/TPGames/Binaries folder, you will see a "Mac" folder. Go into that and look at the .dylib files in this folder. You will see one named "UE4Editor-TPGame.dylib". This is the dynamic library built when you first generated the TPGame project in the Unreal Project Selector. You will also see a "UE4Editor-TPGame-xxxx.dylib" file (where xxxx is some number). This file will have a more recent date than the "UE4Editor-TPGame.dylib" file. The one with the number is the "hot reload" version of your game that you built by clicking the "Compile" button in the editor.
You can also build your game executable (the .dylib file) using Xcode instead of building it in the editor.
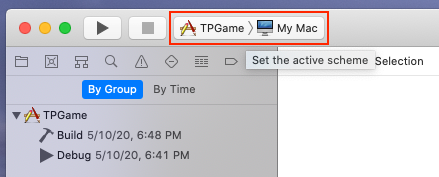
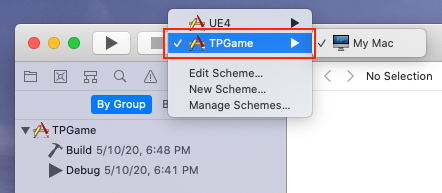
Flip over to the running instance of Xcode with your TPGame project. At the top of the Xcode app in the drop down to "Set the active scheme", you will see two projects, "UE4" and "TPGame". You always want to select your game project (in this case "TPGame"). The other project is used to build the UE4 engine and editor (which you don't currently have the source code to do that).
With "TPGame" selected as the active scheme, in the Xcode menu, select "Product" then "Scheme", then "Edit Scheme..." and you should see the "Info" pane for your project's scheme.
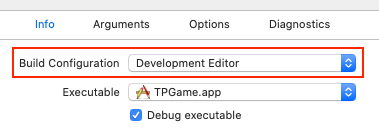
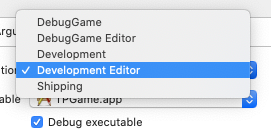
In the "Build Configuration" drop down, you will see a list of build configurations. Here is what each of these is for:
"Development Editor" - This is the default and used to build the game code that loads as part of the editor.
"DebugGame" - This is used to build the Debug version of the standalone executable (app) for your game.
"DebugGame Editor" - This is used to build the Debug version of the game code that loads as part of the editor.
"Development" - This is used to build the Development version of the standalone executable (app) for your game.
"Shipping" - This is used to build the Shipping version of the standalone executable (app) for your game.
The "DebugGame", "Development" and "Shipping" version are what is used when you cook and package your game. The "DebugGame" version includes log output and has compiler optimizations disabled to make it easier to debug information in the standalone version of your game. The "Development" version includes some log output (but not all) and allows you to build the standalone version of your with better performance than the DebugGame version. You can still use the debugger with the Development version, but because of compiler optimizations, some variables will be optimized out and you can't examine them in the debugger. The "Shipping" version is what you would use when cooking and packaging the shipping version of your game that would go to end users (players). This version has the best performance and has more compiler optimizations. Log output is disabled in the shipping version of the game (for performance reasons). Debugging the shipping version in the debugger is possible, but you may not be able to set breakpoints and won't be able to examine the value of many variables in the debugger.
When running your game in the editor, you want to use the "Development Editor" version.
Close the "Edit Scheme" dialog.
Let's try building the game in Xcode and see what happens...
To build your project, select "Product" then "Build" from the Xcode menu.
If you click on "Show the report navigator" in the pane on the upper left, then click on "Build" under "TPGame", you should see the log output of the build.
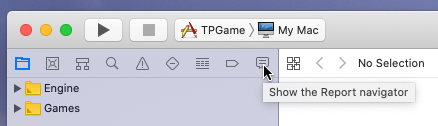
It should say "Build succeeded". If you click "All Messages" at the top of the build output, you can see more detail showing what was run. This should look similar to the "Compiler Log" output in the "Message Log" window of the editor.
If you look at the "Documents/Unreal Projects/TPGames/Binaries/Mac" folder in Finder, you will notice that the "UE4Editor-TPGame.dylib" file modification time did not change. This is because there were no changes to your project's source code and so there was nothing required to build in Xcode. So the build in Xcode essentially ran without updating anything.
Now let's try doing this a bit differently. Quit out of Xcode (make sure to select "Xcode" then "Quit Xcode" in the Xcode menu to completely shut it down) and quit out of the Unreal editor ("Unreal Editor" then "Quit Unreal Editor" in the Unreal Editor menu).
Launch Xcode by clicking on the "TPGame.xcworkspace" file in your "Documents/Unreal Projects/TPGame" folder in Finder.
This will open Xcode as before when you first created your project in the Unreal Project Selector dialog. This time, click "Product" then "Run" in the Xcode menu. This will build the game and launch the editor for the TPGame by running it in the Xcode debugger.
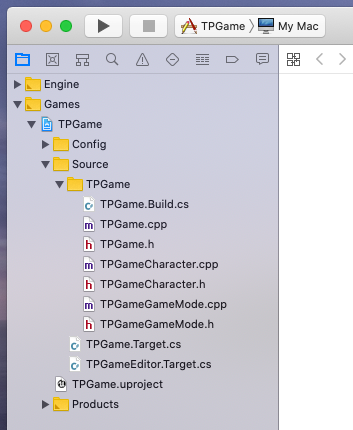
In Xcode, click on the "Show the project navigator" folder button in the upper left, and expand the "Games" folder.
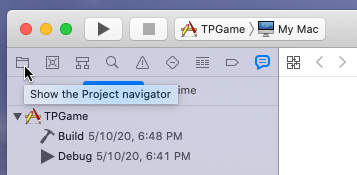
You should see "TPGame". Expand it, then expand the "Source" folder to see the source code folder. Expand the "TPGame" folder there.
Now let's edit some code!
Click once on "TPGameCharacter.h" to open it in the Xcode editor. Scroll down the to very bottom of the file and add this line before the final "};" at the end:
virtual void BeginPlay() override;
You should have something like this at the end of the TPGameCharacter.h file:
    /** Returns FollowCamera subobject **/
    FORCEINLINE class UCameraComponent* GetFollowCamera() const { return FollowCamera; }

    virtual void BeginPlay() override;
};
Click "File" then "Save" in the Xcode menu to save your changes to the TPGameCharacter.h file.
Then click once on "TPGameCharacter.cpp" to open it in the Xcode editor. Scroll down to the very bottom of the file and add this after the last "}" closing brace character:
void ATPGameCharacter::BeginPlay()
{
    GEngine->AddOnScreenDebugMessage(-1, 5.0f, FColor::Red, TEXT("Hello from Xcode!"));
    Super::BeginPlay();
}
You should have something like this at the end of the TPGameCharacter.cpp file:
}

void ATPGameCharacter::BeginPlay()
{
    GEngine->AddOnScreenDebugMessage(-1, 5.0f, FColor::White, TEXT("Hello from Xcode!"));
    Super::BeginPlay();
}
Again, click "File" then "Save" in the Xcode menu to save your changes to the TPGameCharacter.cpp file.
Now let's build the code as before. Click "Product" then "Build" in the Xcode menu. It should build without error and you should see a notification message in the editor saying "Hot Reload Complete!". If you get an error message when compiling, carefully examine the line where the error message appears in the Xcode editor and verify that it matches EXACTLY to what I have presented above. Correct any differences, save the file and build again until you get no errors building the code.
Now let's launch the game in the Unreal editor. Switch over to the running editor application and click on the "Play" button in the editor toolbar. This will run the game in the 3D perspective viewport in the center of the editor window.
As soon as the game starts, you should see a message in the upper left of the game window saying "Hello from Xcode!" in red.
The BeginPlay() function on your character is called when the character is created by the engine and spawned into the world. This function gets called once when the character is created. To see the message again, quit from the Play session you just started by pressing the 'Esc' key (or clicking the "Stop" button in the editor toolbar) to return to the editor. Click the "Play" button again to launch the game.
Now, let's try changing the code we just added in Xcode, build from within the editor and launch the game to see what happens.
Switch over to the running Xcode app and change the "Hello from Xcode!" text to say "Hello from Unreal editor!" and save the TPGameCharacter.cpp file. Make sure you keep both the opening and closing double quotes like so:
GEngine->AddOnScreenDebugMessage(-1, 5.0f, FColor::Red, TEXT("Hello from Unreal editor!"));
After saving the file, switch back to the editor and click the "Compile" toolbar button like you did before.
You should see "Compiling C++ Code" and "Compiling Complete". Now run the game again by clicking the "Play" button in the toolbar.
Now it should say "Hello from Unreal editor!" in red.
Congratulations! You've just successfully created a C++ project in Unreal, you've modified the source code to your project and you've been able to build your C++ project in both Xcode and in the Unreal editor! Good job!
You can now quit out of the Unreal editor and quit out of Xcode.
NOTE: There will be times when you make more complex code changes where hot reloading will not work. In these cases, you should save your work and exit from the editor, then rebuild the code in Xcode, then launch the editor again and continue working.
You can also use Microsoft's Visual Studio Code IDE to build your Unreal C++ project.
Follow all the steps above to install Xcode first (you need Xcode even if you are only using Visual Studio Code as your IDE).
Download Visual Studio Code for Mac by going to the following website:
https://code.visualstudio.com/download
Unzip the .zip file you just downloaded and drag it into the "Applications" folder, then run Visual Studio Code once from the Applications folder so it can initialize itself.
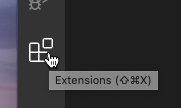
In Visual Studio Code, click the "Extensions" button in the upper left (it looks like 3 blocks with 1 block floating above them).
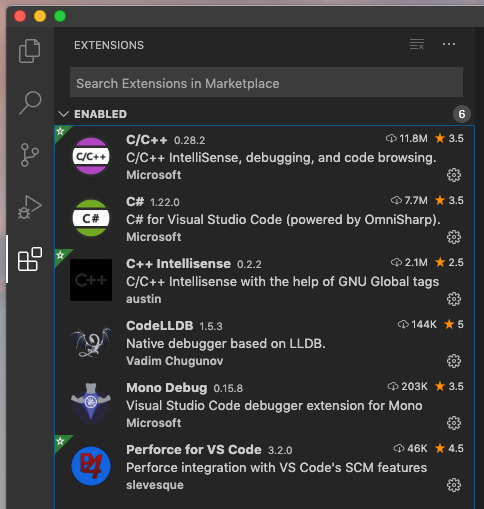
You can use the "Search Extensions in Marketplace" to search for extensions. You want to install the following extensions:
-
"C/C++ Intellisense, debugging and code browsing" - from Microsoft
-
"C# for Visual Studio Code (powered by OmniSharp)" - from Microsoft
-
If you are using Perforce or Git for source control, you may want to install an extension for those (there are many to choose from)
NOTE - While installing "C# for Visual Studio Code", you may be prompted to "Get the .NET Core SDK". If so, click on that, download it and install it. If not prompted, you will need to go to the following website and download the .NET Core SDK:
https://dotnet.microsoft.com/download
In the "macOS" section, click on the "Download .NET Core SDK" link. Then double click on the "dotnet-sdk" package that was downloaded to run the installer and install it.
You should see a message when the installation is complete saying that the "NET Core SDK" was installed at /usr/local/share/dotnet. To test the NET Core SDK installation, you can run the following command in a new Teminal window:
dotnet --version
This should report the current NET Core SDK version (for me it reports "3.1.403").
If you get "command not found", you may want to create a symbolic link from /usr/local/share/dotnet/dotnet to /usr/local/bin like so:
sudo ln -s /usr/local/share/dotnet/dotnet /usr/local/bin
Then run the "dotnet --version" command again. Note that Catalina and later won't allow you to do this as the root file system is mounted read-only.
Here's an image showing the extensions I have installed for Visual Studio Code:
After installing the extensions, you can quit out of VSCode for now. We have to set up some other things first.
Open a Terminal window. Enter the command "which brew" to see if you already have brew installed. If the response is "brew not found" then you need to install it. Go to the following website:
Copy the "bin/bash" line from the brew homepage and paste that into your Terminal window and run it:
/bin/bash -c "$(curl -fsSL https://raw.githubusercontent.com/Homebrew/install/master/install.sh)"
Follow the instructions, press the "RETURN" (or Enter) key to continue. Enter your password to install brew. This will take some time to download and install.
Now you will install the "mono runtime" for C#. Enter the following command in the Terminal window to install mono:
brew install mono
Once the mono runtime is installed, we can create the VSCode workspace for your game project.
To create the Visual Studio Code workspace, you will need the full path to the .uproject file for your Unreal Engine project. For the TPGame example above, it would be:
/Users/<username>/Documents/Unreal\ Projects/TPGame/TPGame.uproject
...where you replace "<username>" with your user name folder.
In the Terminal window, change to the Unreal Engine "Engine/Build/BatchFiles/Mac" folder...
cd /Users/Shared/Epic\ Games/UE_4.25/Engine/Build/BatchFiles/Mac
...then run the following command (using the full path to your .uproject file):
./GenerateProjectFiles.sh -project=/Users/<username>/Documents/Unreal\ Projects/TPGame/TPGame.uproject -game -vscode
If you see "ERROR: Unhandled exception:" followed by "Unable to find project file based on argument...", double check the full path to your project file (you didn't use "<username>" did you? :) )
You may see a warning about "Project file formats specified via the command line will be ignored when generating project files from the editor and other engine tools." This is fine. You can ignore this warning.
If you get the message "ERROR: Invalid SDK MacOSX.sdk, not found in /Library/Developer/CommandLineTools/Platforms/MacOSX.platform/Developer/SDKs" then we need to fix up the SDK path in Xcode.
Launch Xcode and in the Xcode menu, click "Xcode", then "Preferences". Click on "Locations" to view that page. In the "Locations" pane, look at the "Command Line Tools:" setting. If that is blank, then click the drop down and select the version of Xcode you have installed (for example, "Xcode 11.1 (11A1027)". You will need to enter you password to change the "Command Line Tools:" setting. Now that the command line tools is set properly, close the Preferences dialog and quit from Xcode.
Run the ".GenerateProjectFiles.sh" command again in Terminal and it should work this time.
If you see "Writing project files... 100%" then it worked! If not, you may want to reboot your Mac then start up Xcode again and check the "Command Line Tools:" setting to verify that it is set properly.
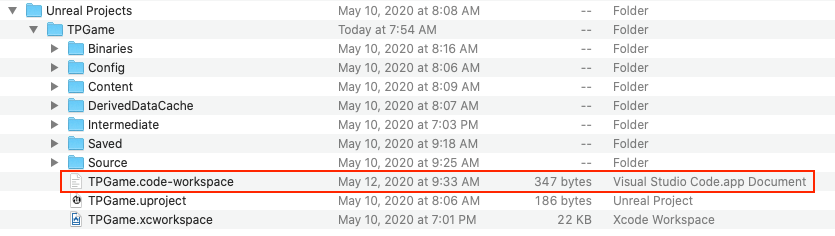
Now open up Finder and go to your Documents/Unreal Project/TPGame folder and you should see a "TPGame.code-workspace" file there which is the Visual Studio code workspace for your project.
You can click on it to launch the Visual Studio Code app and load your new workspace.
If you see a notification in Visual Studio Code that says "This workspace has extension recommendations", you should click on "Install All" to install them. This should add the "CodeLLDB" native debugger.
You can ignore any notifications about installing "Insider" stuff since you don't need it.
You should see something like this:
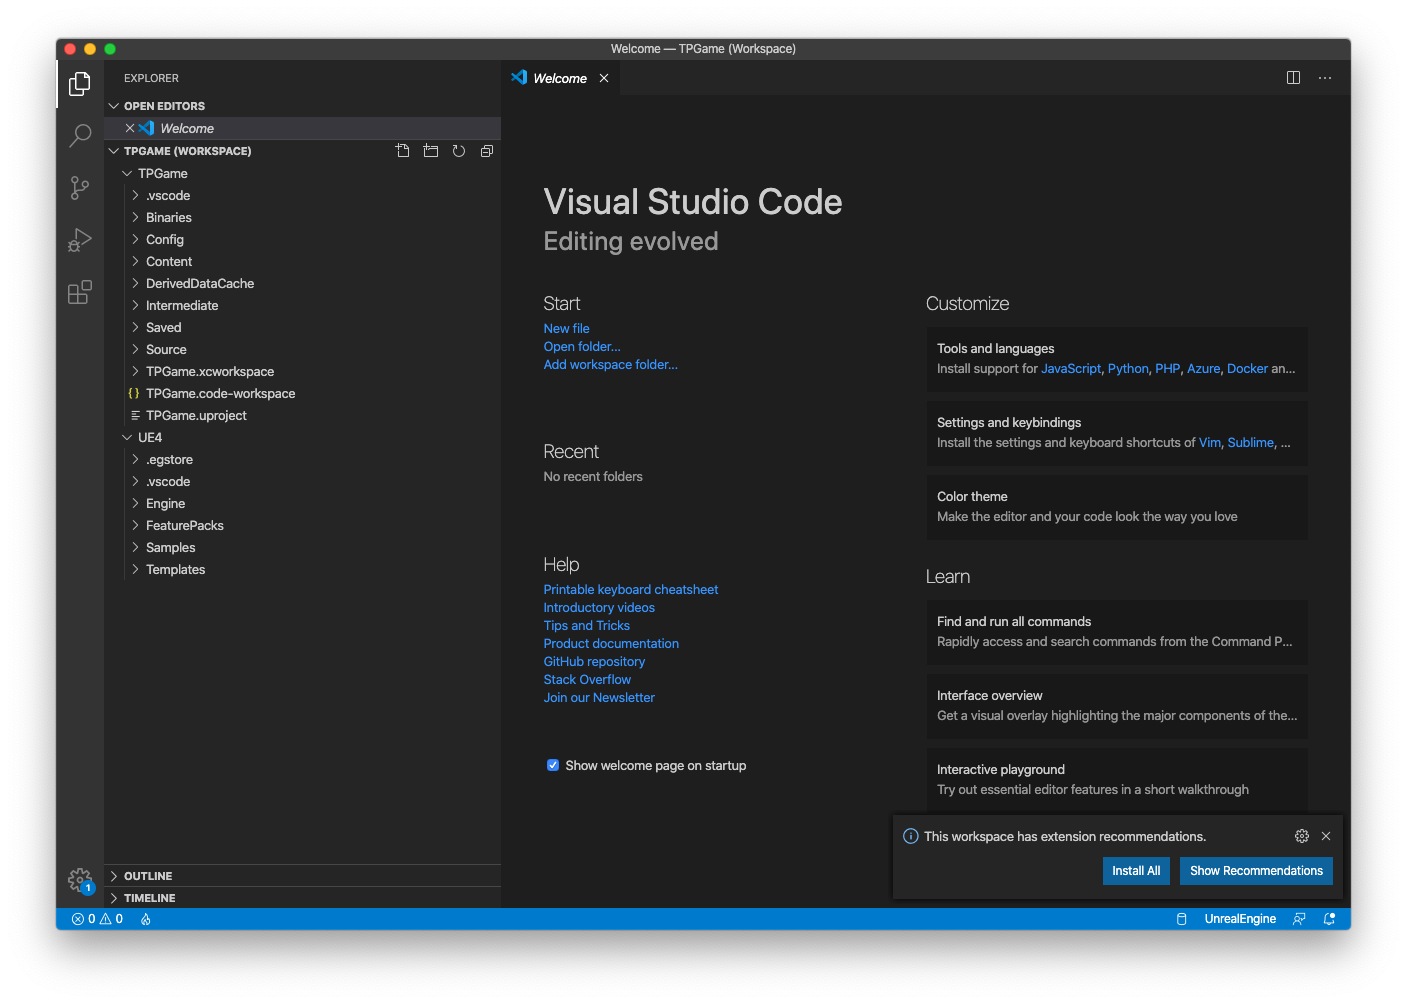
You can close the "Welcome" screen if you want to (or leave it open for future reference).
By default, you should have the "Explorer" pane selected on the left, but if not, you can click on the "Explorer" button on the left to select it.

In the "Explorer" pane on the left, you can expand or collapse items by clicking on them.
For now, collape the "UE4" item and expand the "Source" item under "TPGame", then expand "TPGame" there to see the source code files.
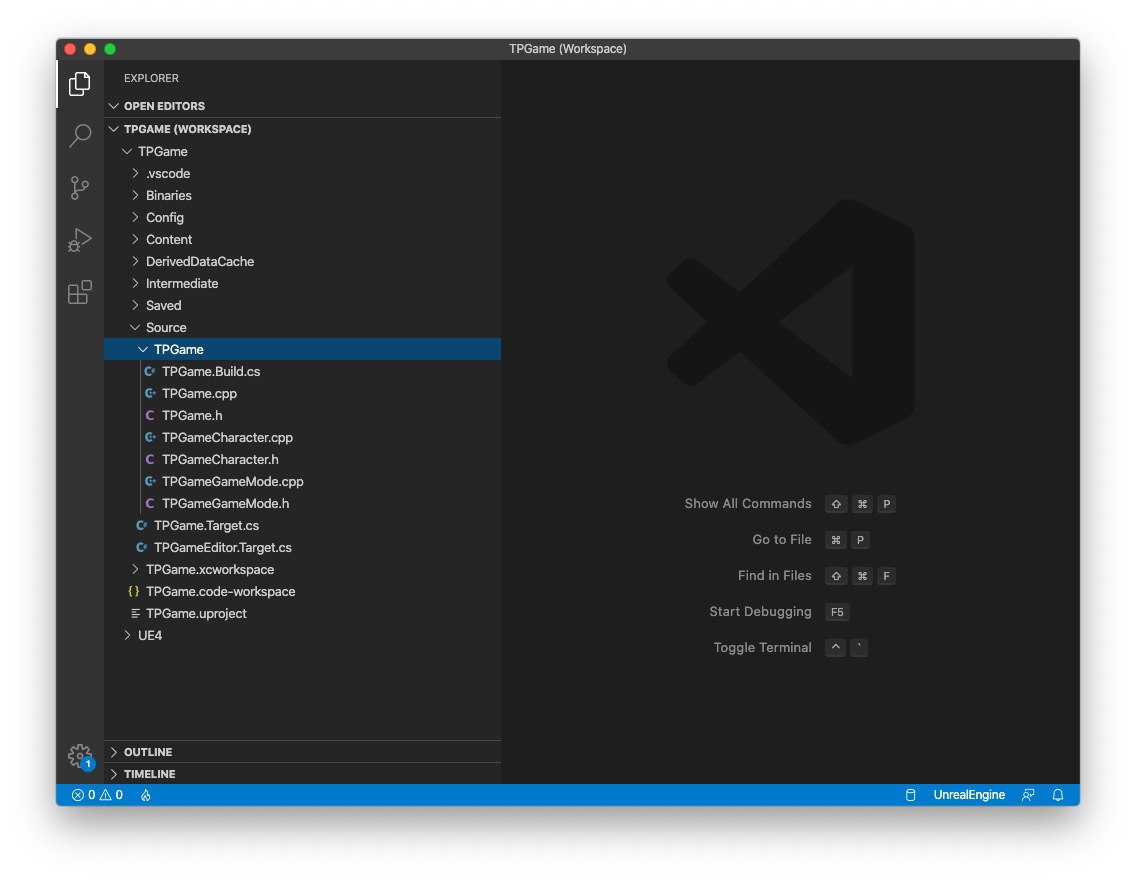
Like in Xcode, you can click once on a file in the explorer pane to open it in the editor view.
To build and run your code, you can click on the "Run" button on the left.
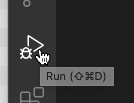
In the "Run" pane, at the top, you will see a drop down list with the different configurations you can build and run.

Click on the drop down button to select the build configuration you want. In this case, we want "TPGameEditor (Developemt) (TPGame)"
After switching to "TPGameEditor (Development) (TPGame)", you can build and run by clicking the green "Start Debugging" button on the left of the build configuration you just selected.

Or, in the Visual Studio Code menu, select "Run" then "Start Debugging", or press F5.
This will compile your project code and launch the app to run the editor with your project.
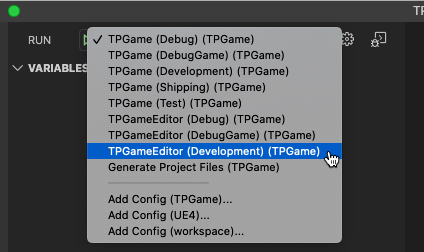
You will see the "Terminal" window open in the right hand pane with output from the build. You should see the debugger toolbar at the top of the Visual Studio Code window.
There is a "grabber" on the left that allows you to grab this toolbar and drag it where you want. Followed by the following buttons.
"Pause" (if the application is running) that allows you to pause execution and break into the debugger, or "Continue" (F5) if the application has hit a breakpoint and you wish to continue running.
"Step Over" (F10) that allows you to step over code when stepping in the debugger.
"Step Info" (F11) that allows you to step into code when stepping in the debugger.
"Step Out" (Shift-F11) that allows you to step out of the current function when stepping in the debugger.
"Restart" (Shift-Command-F5) that allows you to stop and restart the application in the debugger.
"Stop" (Shift-F5) that allows you to stop execution of the application and exit from the debugger.
The editor will launch, but you will break into the debugger with some assembly code displaying in the right pane of the debugger. This is normal. There's nothing wrong. By default, the VSCode project for Unreal is set to "stop on entry" which will pause your debug session at the first line of code in the debugger. Since you don't have the source code for the engine, you see assembly code instead of the first line of the engine source code. See this webpage for details:
https://code.visualstudio.com/docs/python/debugging#_stoponentry
You can tell that we are stopping on entry by looking at the "CALL STACK" pane on the left of the debugger view and noticing that the the only thing in the callstack is "_dyld_start" which is the stating point of the dynamic library (your UE4Editor-TPGame.dylib executable).
Let's change this so that we don't stop on entry. Click the "Stop" button in the toolbar or in the Visual Studio Code menu, click "Run" then "Stop Debugging" to stop the debugger.
Then click on the "gear" button to the right of your build configuration to edit the "launch.json" file.

The will open launch.json (a text file) in the right hand pane of the debugger and will automatically position the cursor at the currently selected build configuration.
We need to add the "stopOnEntry" field and set it to "false" to prevent stopping on the first line of code (the default for this setting is "true" so not having it specified uses the default). Add a comma after the last line of the "TPGameEditor (Development)" section and add the following line:
"stopOnEntry": false
As soon as you start typing "stop", you should see the auto-complete suggestion for "stopOnEntry" and you can just choose that. Change the "true" to "false" (without the double quotes) and you should wind up with something like this:
	{
		"name": "TPGameEditor (Development)",
		"request": "launch",
		"preLaunchTask": "TPGameEditor Mac Development Build",
		"program": "/Users/Shared/Epic Games/UE_4.25/Engine/Binaries/Mac/UE4Editor.app/Contents/MacOS/UE4Editor",
		"args": [
			"/Users/jeff/Documents/Unreal Projects/TPGame/TPGame.uproject"
		],
		"cwd": "/Users/Shared/Epic Games/UE_4.25",
		"type": "lldb",
		"stopOnEntry": false
	},
Note the comma (",") at the end of the "type" line above the line you added!
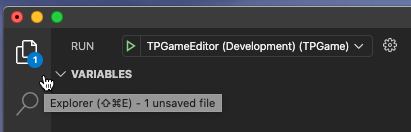
Visual Studio code will indicate that you have one or more unsaved files by showing a number on the "Explorer" button on the left...
You can save your changes by clicking on "File" then "Save" (Command-S) in the Visual Studio menu. Or you can click "File" then "Save All" (Option-Command-S) to save all unsaved files.
You can close the "launch.json" file window and then click the "Start Debugging" button again to launch the editor.
Now we are getting a little bit further, but the debugger stops again. This time we are hitting an exception. Notice there is much more in the "CALL STACK" pane this time.
If you scroll down in the "CALL STACK" pane, you will see what exception we are hitting. Look for "__cxa_throw" and then some lines after that. You should see something like the following:
__cxa_throw (@__cxa_throw:3)
Security::MacOSError::throwMe(int) (@Security::MacOSError::throwMe(int):18)
Security::CodeSigning::SecStaticCode::staticValidateCore(unsigned int, Security::CodeSigning::SecRequirement const*) (@Security::CodeSigning::SecStaticCode::staticValidateCore(unsigned int, Security::CodeSigning::SecRequirement const*):344)
<snip>
_pthread_start (@_pthread_start:36)
thread_start (@thread_start:8)
See the "Security::CodeSigning" lines? That means we are getting an exception because we haven't signed our code with a security certificate. We don't care about that at this point, so we will just contine debugging from this point.
Click the "Continue" button in the toolbar, or click "Run" and then "Continue" in the Visual Studio Code menu or just click the F5 button to continue running.
We'll get a bit further and hit another exception. Keep clicking the "Continue" button or press F5 to continue running until you see the editor window start up.
In the "Terminal" window in the lower right, you will see log output from the engine as it starts up the editor.
You should eventually see the editor splash screen and may get a few more exceptions. Just keep hitting the "Continue" button or pressing F5 to get to the running editor.
Once you see the editor window appear in the background, you can switch over to it and continue using the editor as normal.
Unfortunately, there doesn't seem to be an easy way to disable all exceptions in the C++ debugger for Visual Studio Code (like there is for Visual Studio on Windows). So you will have to continue in the debugger each time you hit an exception. One work-around would be to build the engine from source code and comment out the code that's throwing the exceptions so you don't keep hitting these while debugging.
You can quit out of the Unreal editor at this point. The debugger should automatically stop once the editor application has exited.
If you want to just build your project, but not launch it in the debugger, you do that in Visual Studio Code by using Tasks.
https://code.visualstudio.com/docs/editor/tasks
There are some tasks that are created automatically as part of the Visual Studio Code workspace for your Unreal project. You can also add new tasks yourself (see the documentation on the webpage linked above).
To run a Task, click "Terminal" then "Run Task..." in the Visual Studio Code menu.
This will give you a list of tasks that you can select from to "Build", "Rebuild", or "Clean" a project.
Let's clean the project to remove the intermediate files and the binary executable files.
From the "Run Task..." list, scroll down until you see "TPGameEditor Mac Development Clean" and click on it to run it.
You should see output in the Terminal window where it's running the task to clean the project. When it is done, if you use Finder to look in your "Documents/Unreal Projects/TPGame/Binaries/Mac" folder. You will notice that it is empty. Visual Studio Code has removed these files as part of the clean task.
Now let's build the project again without automatically running it. As before, click "Terminal" then "Run Task..." from the Visual Studio Code menu and select "TPGameEditor Mac Development Build" to build the project.
Again, you will see output in the Terminal window while the project is being built. When it is done, you can use Finder to look in your "Documents/Unreal Projects/TPGame/Binaries/Mac" folder and you should see the binary files once more with a recent timestamp.
Now you know how to create an Unreal C++ project for Visual Studio Code. You know how to build your C++ project and run it in the Visual Studio Code debugger to launch the editor with your game project.
A few days ago, I needed to load up UE 4.20 on a machine running Mojave and I thought I'd use VSCode for building and debugging. UE 4.20 uses Xcode 9.4.1 and 9.4.1 won't run on Catalina, so I had to use Mojave. When I stated up Visual Studio Code, I got the following message:
"Could not initialize Python interpreter - some features will be unavailable (e.g. debug visualizers)."
Digging into this, I discovered this was due to Mojave using Python version 2 by default. The latest Visual Studio Code and extensions need Python 3.
To see which version(s) of Python you have installed, open a Terminal window and enter the following command:
python --version
You should see something like "Python 2.7.10" indicating you have Python 2 installeed.
Now try the following command:
python3 --version
If you see "python3: command not found" then you don't have Python 3 installed. If you see something like "Python 3.7.7" then you have Python 3 installed.
If you don't have Python 3, you can install it using brew with the following command:
brew install python
When it is done, run the "python3 --version" command again and you should get something that says "Python 3.x.y" where x and y are version numbers.
After installing Python 3, Visual Studio Code should work as expected.