A map-based application for estimating the power potential of microhydropower installations.
This was built as a demonstration project for Bard College and Current Hydro LLC. The project was funded by NYSERDA.
The Microhydropower Calculator helps estimate the power generation potential of a micro-hydroelectric turbine installation. It guides you through these steps:
Use the map and available data layers to identify a spot suitable for a potential microhydropower installation. Dam locations (New York State only) and national hydrographic data from US Geological Survey (USGS) are available as map layers. Switch the basemap between several available imagery and topographic styles from Esri and Mapbox to get a better sense of the terrain.
Once you've found a stream or weir, you diagram the location of the installation on the map with the draw tool. The calculator will automatically estimate head (elevation change) and delineate the contributing area using available topographic data.
The underlying elevation data driving the calculations is provided by the USGS through web services hosted by ESRI. Where available in New York state, head calculations will rely first on high resolution elevation data services hosted by the NY State GIS Program Office, and fall back to coarser USGS elevation data if needed.
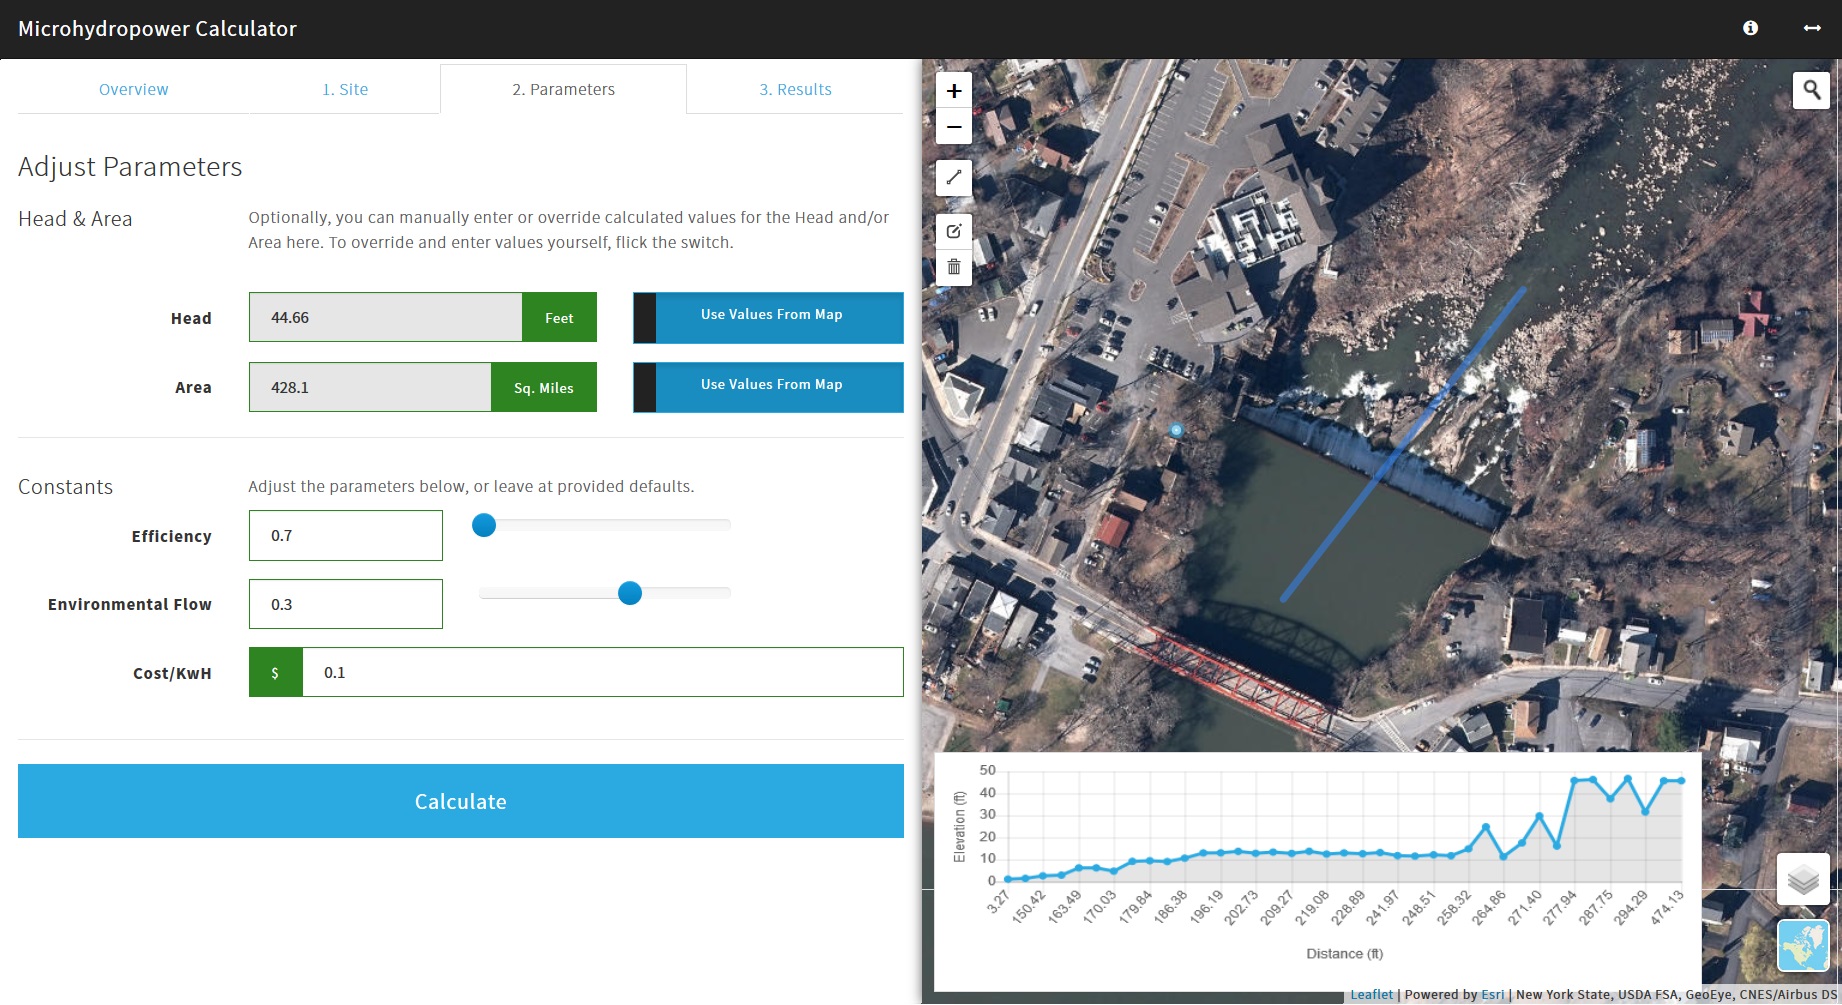
You can input calculation coefficients and other assumptions used in the calculation (sensible defaults are provided).
Optionally, you can also override the head and area estimates derived from map in Step 1.
View the analysis results, including total kilowatt hours and estimated revenue generation.
The calculator logic is described in the calculator's About section; you can see that same documentation here.
The Bard Microhydropower Calculator is built with Python-Flask, Leaflet, Esri-Leaflet, Bootstrap, and jQuery. Data and Geoprocessing services are from the Esri Living Atlas in ArcGIS Online (AGOL).
Python Flask provides a server-side framework for assembling the web application from templates and assets. Since this is a single page app, it doesn't have much to do in that regard. Rather, its role is primarily to serve as a proxy for authenticating into secured Esri ArcGIS Online (AGOL) resources. It retrieves an AGOL authentication token on page load and returns it to the client side code (javascript), where it is used to make calls to elevation and other data services from Esri.
On the front-end:
- Bootstrap and jQuery provides the stack for the mobile-adaptive layout
- Leaflet is used for the map
- Esri-Leaflet helps utilize Esri services in conjunction with the Leaflet map
Front-end business logic is written in javascript with only jQuery. Javascript and CSS compliation and bundling is being handled by GulpJS and Browserify.
The application requires a few global configuration variables to be set, mainly to enable access to 3rd-party Esri and Mapbox services. Required services include:
- Esri Application ID
- Esri Application Secret
Get these by registering an application at https://developers.arcgis.com
- Token
Get this by generating a token from https://www.mapbox.com
(for editing HTML and Python only).
To develop this, you must have installed:
- Python 3.4+, and you can call
pythonandpipor (python -m pip) from the command line - Node/NPM and you can call
nodeandnpmfrom the command line - GulpJS installed (available via
npm) gitinstalled, also available from the command line.
git clone https://github.com/civicmapper/bard-hydropower
cd bard-hydropowerIf you don't have pipenv (and you won't with an out-of-the-box python installation)
pip install pipenvThen:
pipenv install...to install dependencies, and then:
pipenv shell python run.pyNavigate to http://localhost:5000 to see the site.
This is sufficient for modifying html in the app/templates/ folder, or changing any of the python scripts. However, it only serves up pre-compiled client-side code stored under app/static/; it does not run the client-side build tasks, so you won't see edits made to code in src if you only develop using this method.
You can kill this development server by pressing ctrl-c in the command line.
for editing JS, CSS, HTML, and python.
(assuming you've installed Python dependencies above)
In the repository root:
npm installThis will download and install a whole lot of javascript in a node_modules folder.
gulp watchThis does a bunch of things:
- it compiles and bundles
jsfiles from thesrcandnode_modulesdirectory, and puts them in the theapp/staticdirectory (where the application wants them to be) - it does the same with
cssfiles - it copies assets from certain
jsmodules to theapp/static/assetsdirectory, - it fires up the Python-Flask application and its development web server for you (runs
pipenv shell python run.py) - it opens up your default browser and loads the page.
With #2 complete, when you change code in the src folder, the browser will either:
- live reload (inserting your changes into the page)
- refresh automatically (if it needs to reload an entire script or asset again)
Use gulp build from the command line to compile source code and copy assets in the app folder. Once built, only the app folder (and its contents) and application.py script are required for running the web application in production.
Make sure your config.py DEBUG parameter is set to False for production!
There are many ways to deploy this application. Some options:
PythonAnywhere provides a great place for deploying a Flask applications like this. Follow this guide for deployment.
Follow this guide for deployment to AWS EBS.
As of this writing, AWS Elastic Beanstalk supports Python 3.4.
Application by Christian Gass @ CivicMapper.