Build client, samples, gtest
Notice : Before reading this article, please read wiki page Build clBLAS library (*.a or *so) first on the right side. Before your proceed, I assume you have already obtained *.a or *.so successfully. If you only care about *.a or *.so files, you do not need things outlined in this article. On cmake-gui or ccmake command, it provides building options to let you turn them OFF.
The included test and benchmark programs require several others. CMake makes it easy to manage dependencies, but they must be compiled beforehand, with the proper environment variables declared to point to them. The build dependencies include:
- Boost
- GoogleTest
- CPU BLAS ACML or [CBLAS] (http://www.netlib.org/blas/)
Boost is provided in source form, and must be compiled by the user. After extracting into the desired location, run the bootstrap script to compile the build engine, and then compile the program_options module. Boost version 1.54 or later is recommended. To compile boost and set up an appropriate environment variable for CMake to subsequently locate Boost during its configure step, see the following example:
- pushd c:\BOOST_DIR\boost_1_54_0
- bootstrap.bat
- b2 -j 4 --with-program_options address-model=64 toolset=msvc-10.0 link=static stage install --prefix=c:\MY_INSTALL_DIR
- setx BOOST_ROOT c:\MY_INSTALL_DIR
For Linux, by default, it is installed in /user/local. Follow similar steps, except that bootstrap is a shell script--so the environment variable would be set similar to:
- export BOOST_ROOT=/BOOST_DIR/boost_1_54_0
Test relies on Googletest framework. Test is linked with CPU BLAS (ACML or CBLAS) and supposed to be run very long time. Users need to check "BUILD_TESTS=ON" on cmake-gui to enable it. In recent versions, Googletest should automatically be downloaded on you machine and build. But if it fails, please install it according to the following instructions.
Googletest is provided in source form, and needs to be compiled by the user. After extracting into the desired location, you can compile it with the provided native build files (which for Windows are very old)-- but Googletest also comes with its own set of cmakefiles. It is recommended to use the cmakefile to generate the Googletest binaries, especially for the modern Visual Studio versions. These directions are the same across Windows and Linux.
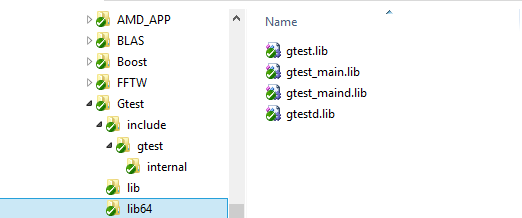
When configuring gtest, it is also recommended to change gtest_force_shared_crt to ON, to reduce problems associated with multiple CRTs linked into a single application. Unfortunately, the gtest cmake files do not define an 'INSTALL' target, so it is necessary to build the gtest binaries first and then copy them in a convenient format for googletest to find, such as in the picture below. It is also convenient to go ahead and build both 64- and 32- bit libraries with release/debug builds, such that four flavors of gtest are available for cmake to discover. A directory layout like the following works well.
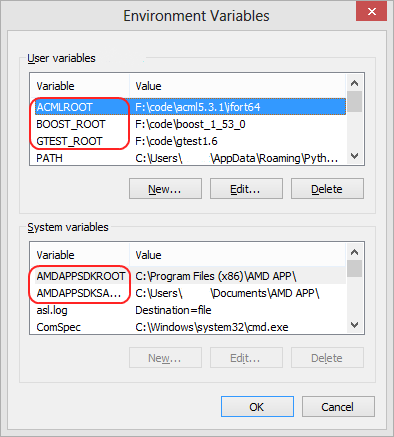
The testing tools from clBLAS use ACML as a gold version to compare against. It is recommended to download the ifort compiled version of ACML, run its installer, and pick a suitable location to extract it to. Once installed, create an environment variable named ACML_ROOT (note the picture incorrectly says ACMLROOT) that points to the the flavor of ACML that you would like to use, such as c:\code\acml5.3.1\ifort64 or /opt/acml5.3.1/ifort64 on Linux. CMake then locates the appropriate ACML dependencies and compiles clBLAS. On Linux, set the LD_LIBRARY_PATH environment variable to /opt/acml5.3.1/ifort64/lib to locate the ACML .so files at runtime.
Note: After all the dependencies have been installed and built, the environment variables must contain at least the minimum set of all the environment variables circled below in red. CMake works exactly the same way for Linux.
If you choose ACML as your CPU BLAS, then you do not need to install CBLAS, vice versa. Installing CBLAS is super easy on Ubuntu:
- sudo apt-get install libblas-dev