This repository contains software which provides the ability to send and receive infrared signals for a variety of devices usually controlled using Infrared Remote Controllers (TV's, CD players, etc) on a Raspberry Pi. In order to use it, you'll need some IR Sending and Receiving hardware, which you can build yourself (more details below) or purchase.
The types of remote controls supported may have one of the following encoding schemes:
- Sony 12- 15- and 20- bit (CODEC_SONY12,CODEC_SONY15,CODEC_SONY20)
- Panasonic (CODEC_PANASONIC)
- NEC 32- and 16- bit (CODEC_NEC32, CODEC_NEC16 and CODEC_APPLETV)
- Philips RC5 (CODEC_RC5) In development
It's fairly easy to add other encoding schemes, please see the Appendix below. There is some software available to interact with your remotes:
ir_learncan be used to learn a new remote or update an existing remote in the database of "key mappings"ir_rcvcan be used for debugging remotesir_sendcan be used for sending commands
In addition there are a couple of microservice binaries which allow remote services and clients to interact remotely through gRPC:
remotes-serviceis a microservice allowing remotes to be interacted with remotely through the gRPC protocolremotes-clientis an example command-line client which can interact with the microservice through the gRPC protocol
Ultimately the mircoservice should form a larger service for home automation or could be used to develop a web-accessible application; this is being developed elsewhere.
Please see the LICENSE file for how to redistribute in source or binary form. Ultimately you should credit the authors on redistribution as per paragraph four of that license.
All feedback gratefully received, either as bugs, features or questions. For the former, please use the GitHub issue tracker. For the latter, send me an email which is listed in the GitHub repository.
You'll need an IR sender and/or receiver plugged into your GPIO port. There is a schematic and bill of materials below, plus a link to manufacture a PCB, if you want to make one up, or you can easily purchase one or breadboard it.
The hardware has been tested on a modern Raspbian installation but ultimately
any Linux which is compiled with the lirc module should work fine. For a
Raspberry Pi, you should add this to your /boot/config.txt file modifying
the GPIO pins in order to load the LIRC (Linux Infrared Control) driver,
and then reboot your Raspberry Pi:
dtoverlay=lirc-rpi,gpio_in_pin=22,gpio_out_pin=23
Your LIRC should then be able to see the device /dev/lirc0. If not check output
of the lsmod command. The best reference for how to interact with the device at the low
level is here.
You'll need a working Go Language environment to compile and install the software:
bash% go get github.com/djthorpe/remotes
bash% cd ${GOPATH}/src/github.com/djthorpe/remotes
bash% cmd/build-tool.sh # To install the command-line utilities
This will result in a number of binaries installed in ${GOBIN}: ir_learn,
ir_rcv and ir_send which are described below. For microservices installation
on Raspberry Pi you can download and install Protocol Buffers, gRPC and then
install the binaries:
bash% sudo apt install protobuf-compiler
bash% sudo apt install libprotobuf-dev
bash% go get -u github.com/golang/protobuf/protoc-gen-go
bash% cd ${GOPATH}/src/github.com/djthorpe/remotes
bash% cmd/build-rpc.sh # To install the RPC binaries
On a Macintosh with MacPorts try the following:
bash% brew install protobuf
bash% go get -u github.com/golang/protobuf/protoc-gen-go
bash% cd ${GOPATH}/src/github.com/djthorpe/remotes
bash% cmd/build-rpc.sh # To install the RPC binaries
This will result in the installation of the service remotes-serviceand and example
command-line client remotes-client. More information on these binaries below.
Before you use the command-line tools, you will need to create a folder at
/var/local/remotes which will be used for storing the key mapping
database files for the remotes, which is stored in XML format with the file
extension .keymap. The command-line tools are invoked as follows:
  ir_rcv <common flags>
  ir_learn <common flags> -device <device_name> -repeats <n> -multicodec <key_list>
  ir_send <common flags> -device <device_name> -repeats <n> <key_list>
You can use the following optional common flags with all the binaries:
  -debug
    	Set debugging mode
  -verbose
    	Verbose logging
  -log.append
    	When writing log to file, append output to end of file
  -log.file string
    	File for logging (default: log to stderr)
  -lirc.device string
      	LIRC device (default "/dev/lirc0")
  -keymap.db string
    	Key mapping database path (default "/var/local/remotes")
  -keymap.ext string
    	Key mapping file extension  (default ".keymap")
Here is a detailed description of how to use each tool. You can check to see if the software is working with the following command:
bash% ir_rcv
This will display a table of learnt keys and also display scan codes which have yet to be
matched (marked as <unmapped>.) This is what some example output might look like:
Name                 Key                       Scancode   Device     Codec           Event                  Timestamp
-------------------- ------------------------- ---------- ---------- --------------- ---------------------- ----------
Menu                 KEYCODE_MENU              0x00000040 0x0000009F CODEC_APPLETV   INPUT_EVENT_KEYPRESS   2.117s
Eject                KEYCODE_EJECT             0x0000808D 0x40040D00 CODEC_PANASONIC INPUT_EVENT_KEYPRESS   11.643s
Eject                KEYCODE_EJECT             0x0000808D 0x40040D00 CODEC_PANASONIC INPUT_EVENT_KEYREPEAT  11.773s
Pad 3                KEYCODE_KEYPAD_3          0x00004845 0x40040D00 CODEC_PANASONIC INPUT_EVENT_KEYPRESS   12.425s
Pad 3                KEYCODE_KEYPAD_3          0x00004845 0x40040D00 CODEC_PANASONIC INPUT_EVENT_KEYREPEAT  12.555s
Nav Right            KEYCODE_NAV_RIGHT         0x0000111C 0x40040D00 CODEC_PANASONIC INPUT_EVENT_KEYPRESS   13.925s
Nav Right            KEYCODE_NAV_RIGHT         0x0000111C 0x40040D00 CODEC_PANASONIC INPUT_EVENT_KEYREPEAT  14.056s
<unmapped>           <unmapped>                0x0000CCC1 0x40040D00 CODEC_PANASONIC INPUT_EVENT_KEYPRESS   14.97s
<unmapped>           <unmapped>                0x0000CCC1 0x40040D00 CODEC_PANASONIC INPUT_EVENT_KEYREPEAT  15.102s
<unmapped>           <unmapped>                0x0000CCC1 0x40040D00 CODEC_PANASONIC INPUT_EVENT_KEYREPEAT  15.929s
Pad 2                KEYCODE_KEYPAD_2          0x00000008 0x00000076 CODEC_NEC32     INPUT_EVENT_KEYPRESS   18.98s
Pad 2                KEYCODE_KEYPAD_2          0x00000008 0x00000076 CODEC_NEC32     INPUT_EVENT_KEYPRESS   19.231s
Pause                KEYCODE_PAUSE             0x00000020 0x00000076 CODEC_NEC32     INPUT_EVENT_KEYPRESS   21.628s
<unmapped>           <unmapped>                0x000000C0 0x00000076 CODEC_NEC32     INPUT_EVENT_KEYPRESS   22.52s
Once you've finished using ir_rcv press CTRL+C to quit the software.
To learn a new or existing remote, use the ir_learn command-line tool as follows:
bash% ir_learn -device "DVD Player"
This will cycle through all keys and will prompt you to press a key on your remote to map it. If you don't press the key within a few seconds, no mapping is created and the next key is learnt. Press the CTRL+C combination in order to abort the learning without saving.
You can learn specific keys by including keys as arguments. For example, to learn the keypad digits and the navigation buttons use:
bash% ir_learn -device "DVD Player" keypad,nav,play,pause,stop
You can re-invoke the tool with the same device name to modify existing key mappings. Once the
remote device has been learnt, you can use the ir_send utility to check the keymapping database
and send codes to your device:
bash% ir_send
NAME                 CODEC                DEVICE     KEYS    REPEATS
-------------------- -------------------- ---------- ------- -------
appletv              CODEC_APPLETV        0x0000009F       6       0
KR21                 CODEC_NEC32          0x000000FF      39       0
Squeezebox           CODEC_NEC32          0x00007689      31       0
Rotel                CODEC_NEC32          0x0000C188      15       3
Panasonic DVD        CODEC_PANASONIC      0x00000D00      32       0
Sony TV              CODEC_SONY12         0x00000010      28       3
Sony VCR             CODEC_SONY12         0x0000001A      26       3


bash% ir_send -device dvd
KEY                  CODE                      CODEC             DEVICE     SCANCODE   REPEATS
-------------------- ------------------------- ----------------- ---------- ---------- -------
Nav Back             KEYCODE_NAV_BACK          CODEC_PANASONIC   0x40040D00 0x0000818C       0
Nav Down             KEYCODE_NAV_DOWN          CODEC_PANASONIC   0x40040D00 0x0000616C       0
Nav Left             KEYCODE_NAV_LEFT          CODEC_PANASONIC   0x40040D00 0x0000E1EC       0
Pad 0                KEYCODE_KEYPAD_0          CODEC_PANASONIC   0x40040D00 0x00009895       0
Pad 2                KEYCODE_KEYPAD_2          CODEC_PANASONIC   0x40040D00 0x00008885       0
Pad 7                KEYCODE_KEYPAD_7          CODEC_PANASONIC   0x40040D00 0x00006865       0
Search Left          KEYCODE_SEARCH_LEFT       CODEC_PANASONIC   0x40040D00 0x0000202D       0
Power Toggle         KEYCODE_POWER_TOGGLE      CODEC_PANASONIC   0x40040D00 0x0000BCB1       0
Sleep                KEYCODE_SLEEP             CODEC_PANASONIC   0x40040D00 0x0000D7DA       0
If you invoke ir_send without any arguments, it will display a list of learnt devices. If you invoke
it with a -device flag it should display a list of learnt keys. If you also include a -repeats
flag with a value, it will modify the default number of times a code is transmitted. For example:
bash% ir_send -device appletv -repeats 3
NAME                 CODEC                DEVICE     KEYS    REPEATS
-------------------- -------------------- ---------- ------- -------
appletv              CODEC_APPLETV        0x0000009F       6       3
Finally and most importantly, you can invoke it with one or more arguments to send an IR command. If you have some ambigious key names, then you'll need to modify what you use on the command line to specify a key more exactly. For example,
bash% ir_send -device "appletv" volume
Ambiguous key: volume (It could mean one of 'Volume Down','Volume Up')

bash% ir_send -device "appletv" volume_down
KEY                  CODE                      CODEC             DEVICE     SCANCODE   REPEATS
-------------------- ------------------------- ----------------- ---------- ---------- -------
Volume Down          KEYCODE_VOLUME_DOWN       CODEC_APPLETV     0x0000009F 0x000000B0       3
There are some cases where a single remote outputs different types of encoding. For example,
I have a Sony TV remote which does this. In order to learn both sets of encodings for a single
"device" use the -multicodec flag when learning the new encoded commands, or just switch it
on before learning new commands.
If you have any problems with the database, you can clean up the individual files which are simple
XML files usually stored under /var/local/remotes unless you've changed the path.
The "microservice" has been developed with a view to integrating the IR sending and receiving into
a wider home automation environment. The service binary is called remotes-service and there is
an example client which communicates with the server called remotes-client. I recommend you
generate an SSL certificate and key you place in the /var/local/remotes folder, if you have
OpenSSL installed:
bash% DAYS=99999
bash% OUT=/var/local/remotes
bash% ORG="mutablelogic"
bash% HOST=`hostname`
bash% openssl req \
  -x509 -nodes \
  -newkey rsa:2048 \
  -keyout "${OUT}/selfsigned.key" \
  -out "${OUT}/selfsigned.crt" \
  -days "${DAYS}" \
  -subj "/C=GB/L=London/O=${ORG}/CN=${HOST}"
Assuming you can a working LIRC module, you can invoke the service in the background as follows:
bash% remotes-service \
  -rpc.sslkey /var/local/remotes/selfsigned.key \
  -rpc.sslcert /var/local/remotes/selfsigned.crt \
  -log.append -log.file=/var/local/remotes/remotes-service.log \
  -verbose &
It will use any random unused port or you can use the -rpc.port flag to set a specific port.
It also registers using mDNS under the service type _remotes._tcp. The Protocol Buffer definition
for the service is called remotes.Remotes and has the following read-only methods:
service Remotes {
    // Return array of codecs supported
    rpc Codecs (EmptyRequest) returns (CodecsReply);

	// Return array of keymaps
	rpc KeyMaps (EmptyRequest) returns (KeyMapsReply);

	// Return keys learnt by keymap name, or all keys if an
	// empty request
	rpc Keys (KeysRequest) returns (KeysReply);

	// Return all possible keys with one or more search terms
	rpc LookupKeys (LookupKeysRequest) returns (KeysReply);

    // Receive remote events
    rpc Receive (EmptyRequest) returns (stream ReceiveReply);

	// Send a remote scancode
	rpc SendScancode (SendScancodeRequest) returns (EmptyReply);

	// Send a remote keycode
	rpc SendKeycode (SendKeycodeRequest) returns (EmptyReply);
}
Possibly in a future version it might be worth adding write-methods as well but you can use the command-line tools for the moment to learn new kep mappings.
The remotes-client binary is an example client to communicate with the server,
but in reality of course you would develop your own client. Here are a couple
of ways to invoke the example client:
- Use
remotes-clientwith no arguments to print out a list of codecs and keymaps supported, and stream events generated by key presses. - Use
remotes-client -keymap <name>to display a list of learnt keys - Use
remotes-client -keymap <name> -send <key> <key>to lookup keys and transmit the pulses
There are a variety of other flags you can use when invoking remotes-client:
bash% remotes-client -help
Usage of remotes-client:
  -keymap string
    	Keymap
  -send
    	Send keycode
  -repeats uint
    	Override repeats value
  -addr string
    	Gateway address
  -mdns.domain string
    	Domain (default "local.")
  -rpc.insecure
    	Disable SSL Connection
  -rpc.service string
    	Comma-separated list of service names
  -rpc.skipverify
    	Skip SSL Verification (default true)
  -rpc.timeout duration
    	Connection timeout
  -verbose
    	Verbose logging
  -debug
    	Set debugging mode
  -log.append
    	When writing log to file, append output to end of file
  -log.file string
    	File for logging (default: log to stderr)
The client uses mDNS to discover the microservice. Set the rpc.timeout parameter if
the microservice isn't being discovered in the time allotted for discovery. Set the
addr parameter to choose a specific microservice or port:
-addr 192.168.86.35:33841connects by IP address and port-addr 192.168.86.35connects to any discovered microservice with a specific IP address-addr :33841connects to any discovered microservice with a specific port
Here is the schematic of the circuit with the bill of materials:
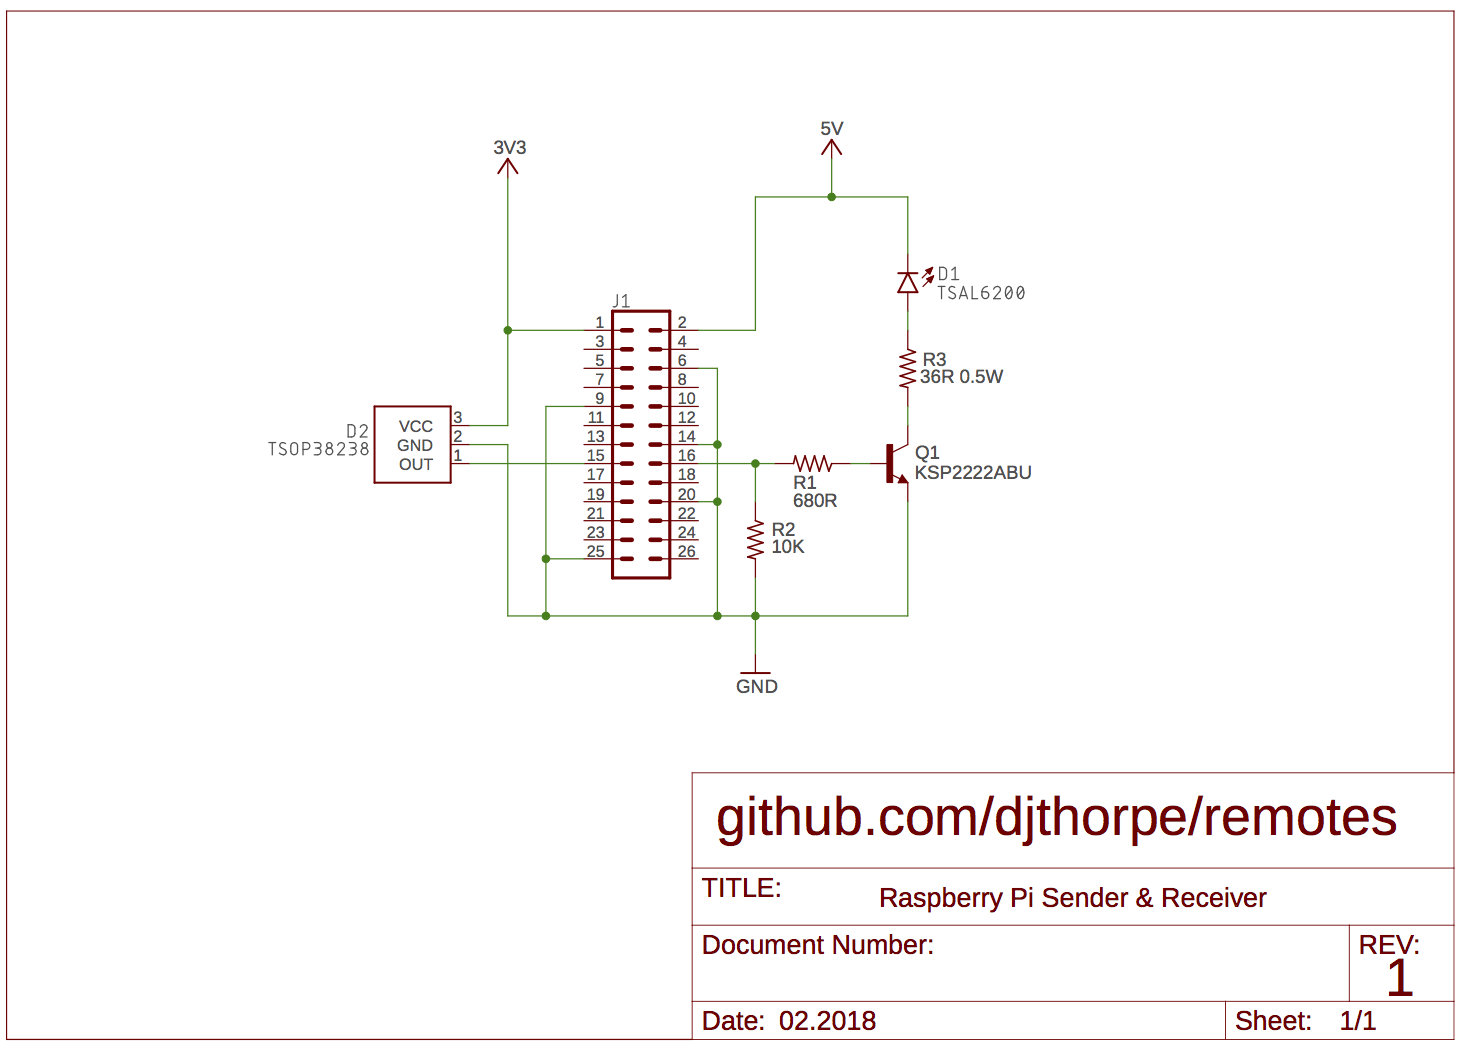
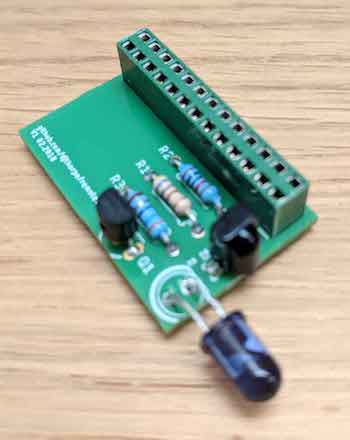
If you want to make a PCB of this design you can manufacturer one here from Aisler. Total cost including components would cost about £5 / €5 / $5 per unit. Here's a picture of what the populated PCB looks like:
This is the bill of materials:
| Name | Part | Description |
|---|---|---|
| D1 | Vishay TSAL6200 | 940nm IR LED, 5mm (T-1 3/4) Through Hole package |
| D2 | Vishay TSOP38238 | 38kHz IR Receiver, 950nm, 45m Range, Through Hole, 5 x 4.8 x 6.95mm |
| Q1 | Fairchild KSP2222ABU | NPN Transistor, 600 mA, 40 V, 3-Pin TO-92 |
| R1 | 680Ω ±5% 0.25W | Carbon Resistor, 0.25W, 5%, 680R |
| R2 | 10K ±5% 0.25W | Carbon Resistor, 0.25W, 5%, 10K |
| R3 | 36Ω ±1% 0.6W | Carbon Resistor, 0.6W, 1%, 36R |
| J1 | 26 Way PCB Header | 2.54mm Pitch 13x2 Rows Straight PCB Socket |
You can add in any number of Codecs which respond to LIRC pulse/space messages.
In order to do so, I would firstly understand how to develop a 'module' for the
gopi framework. When registering the module in your init function, use
module type gopi.MODULE_TYPE_OTHER and the module should have the name
prefix remotes/. You will want a dependency on the lirc module. Here is what
a typical init() function may contain:
	gopi.RegisterModule(gopi.Module{
		Name:     "remotes/panasonic",
		Requires: []string{"lirc"},
		Type:     gopi.MODULE_TYPE_OTHER,
		New: func(app *gopi.AppInstance) (gopi.Driver, error) {
			return gopi.Open(Codec{
				LIRC: app.ModuleInstance("lirc").(gopi.LIRC),
			}, app.Logger)
		},
	})
Secondly, your module should subscribe to events from the LIRC module instance, and process them in the background. You'll receive a stream of LIRC events:
type LIRCEvent interface {
	Event

	// The type of message
	Type() LIRCType

	// The value
	Value() uint32
}
The LIRC type will be one of LIRC_TYPE_SPACE,LIRC_TYPE_PULSE,
LIRC_TYPE_FREQUENCYor LIRC_TYPE_TIMEOUT. Practically the Raspberry
Pi module only supports pulses and spaces and the value is measured
in nanoseconds. For receiving and recognizing commands, it's perhaps
easiest to develop a state machine which responds to and recognizes
commands, or resets back to the initial state if not recognized. Your
codec should then emit a RemoteEvent structure on recognition:
type RemoteEvent struct {
	source   Codec           // Codec that emitted the event
	ts       time.Duration   // Rolling timecode
	device   uint32          // Unique device identifier, or 0
	scancode uint32          // Scancode identifying command
	repeat   bool            // Whether this is a repeat code
}
To send a command, you need to implement the following function. The
repeats value should be zero to send a single command, or greater than
zero to send one or more repeats for the command.
func (this *codec) Send(device uint32, scancode uint32, repeats uint) error {
	var pulses[]uint32

	// Send a pulse and a space
	pulses = append(pulses, pulse_nanoseconds,space_nanoseconds)

  // ...Continue to send pulses and spaces and end on a pulse...

	// Perform the pulse send
	return this.lirc.PulseSend(pulses)
}
You can of course see the examples in the repository. The codec folder contains
all of the implemented codecs so far. If you want to include your codec here, send
me a pull request!