Webson is an easy-to-use JSON syntax for representing DOM elements, enabling entire web pages to be described without any HTML. It has a number of key features such as variables and repeat blocks to avoid the repetition found in large HTML scripts, and includes a JavaScript runtime engine to build pages in the browser.
A web page is the visual representation of a Document Object Model, or DOM, the data structure maintained internally by all browsers. Traditionally, the DOM is constructed by the browser from HTML scripts, but as pages get bigger and more complex HTML becomes ever more cumbersome. In recent years it has become increasingly common to create the DOM using JavaScript, with no HTML ever being seen, but while this suits programmers well it requires a different skill set from that needed to build pages the traditional way.
Today's Web pages may have hundreds or thousands of elements, all carefully positioned to create the desired result. There's no way to hide this complexity, whether it's done with HTML/CSS, JavaScript or some kind of no-code visual builder. In the end it's a human brain that's doing the real work of translating the customer's requirements - a mental picture - into something the browser can use to create the DOM.
HTML is not program code; it's a form of "markup", the ultimate expression of which came in the form of XML, able to represent not only visual structures but a wide range of other data too. Unfortunately, XML is wordy and hard to read and is not greatly loved. In 2001, Douglas Crockford invented (he would say "discovered") a simpler syntax for representing data structures, as a means of transferring data in and out of JavaScript programs in the form of plain text. The syntax is JavaScript Object Notation, or JSON, and in the past 2 decades it has widely supplanted XML. Virtually every programming language has the ability to read and write JSON and it's now the most common way to transfer data across the Web.
Since HTML shares many of the disadvantages of XML, the question might be asked, Can JSON also replace HTML?. If the answer is "yes", a couple of supplementary questions might be
Can we have user-defined variables and reusable blocks?
How about conditional structures?
which would greatly reduce the amount of markup needed to describe a complex web page, where items are commonly repeated with only minor differences.
Webson is a markup syntax that allows JSON to be used to describe a DOM, together with a JavaScript rendering engine that can be embedded in any web page to process scripts at runtime. The system is immediately usable by HTML/CSS coders and no JavaScript experience is required. It's aimed at simplifying the design and implementation of highly complex layouts, where precise positioning of large numbers of elements is hard to achieve manually, and it achieves this with JSON markup rather than with code.
Let's start with a simple example; a layout commonly found in online magazines and social media. At the top there's a full-width header; under this a central panel with 2 sidebars and at the bottom a footer. As this is only an example I've given each of the component divs its own background color so it stands out clearly. It looks like this:
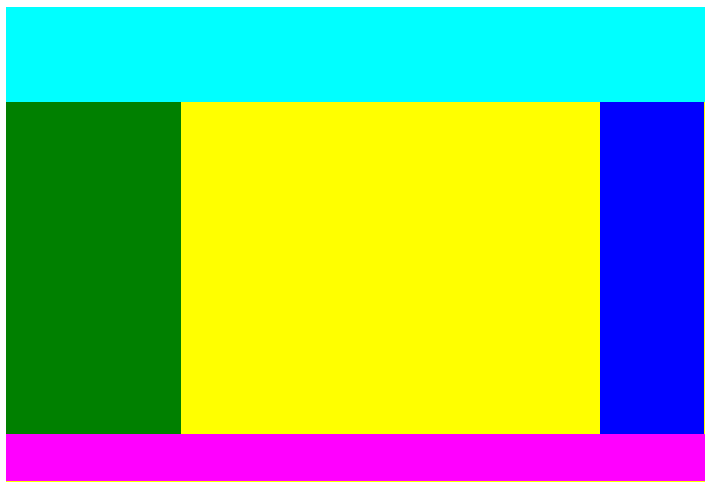
Here's the HTML that will create this screen. It uses inline styles to avoid the need to present a separate CSS file:
    <div style="width:50%;height:50%;display:flex;flex-direction:column">
        <div id="top" style="height:20%;background:cyan">
        </div>
        <div style="width:100%;flex:1;display:flex;flex-direction:row">
            <div id="left" style="display:inline-block;width:25%;height:100%;background:green">
            </div>
            <div id="center" style="display:inline-block;height:100%;background:yellow;flex:1">
            </div>
            <div id="right" style="display:inline-block;width:15%;height:100%;background:blue">
            </div>
        </div>
        <div id="bottom" style="height:10%;background:magenta">
        </div>
    </div>
This is a total of 655 characters. The corresponding Webson script to create the same screen is 1172 characters, nearly twice as many, and occupies 61 lines rather than 14, but before you dismiss Webson as being too wordy I must say in its defence that this is a very basic example which doesn't make use of any of the more advanced features of the system. More complex scripts tend to be far smaller than their HTML equivalents, as we'll see later.
The reason for the extra size in this example is partly that every item is named and partly because JSON itself is fairly bulky (lots of double-quotes), while the increase in lines is mainly because it's a lot more spaced out. This is in the interests of readability; high information density makes code hard to read at a glance as the eye has to pick out specific details from a dense surrounding mass. With Webson, the CSS properties are separated out, one per line, rather than all being crammed onto a single line. This can of course be done with HTML too, but because there's no agreed way to present it the result is usually an unstructured mess, so most coders just put everything on the same line.
Here's the script. It just uses a basic feature set; I'll get on to some of the advanced features later.
{
    "#debug": 2,
    "width": "50%",
    "height": "50%",
    "display": "flex",
    "flex-direction": "column",
    "#": ["$Top", "$Middle", "$Bottom"],

    "$Top": {
        "#element": "div",
        "@id": "top",
        "height": "20%",
        "background": "cyan"
    },

    "$Middle": {
        "#element": "div",
        "width": "100%",
        "flex": 1,
        "display": "flex",
        "flex-direction": "row",
        "#": ["$Left", "$Center", "$Right"]
    },

    "$Bottom": {
        "#element": "div",
        "height": "10%",
        "background": "magenta"
    },

    "$Left": {
        "#element": "div",
        "display": "inline-block",
        "width": "25%",
        "height": "100%",
        "background": "green"
    },

    "$Center": {
        "#element": "div",
        "display": "inline-block",
        "flex": 1,
        "height": "100%",
        "background": "yellow"
    },

    "$Right": {
        "#element": "div",
        "display": "inline-block",
        "width": "15%",
        "height": "100%",
        "background": "blue"
    }
}Running through the script, you will see that every DOM element has its own named block of JSON data. User-defined names all start with $. There are also directives and other system items; the names of these start with #. Everything else in the script above is a CSS style to be applied to the current element.
In the above, most of the blocks include a #element directive, which names the DOM element type. If this is missing, everything in the block applies to the current element (the one defined in the block that calls this one). Here the only block that lacks an #element is the very first one, so the styles all apply to the parent container that was created outside Webson and passed to its renderer as a parameter.
The symbol # by itself signals that child elements are to be added. This directive takes either a single name or an array of names.
The structure we've built here isn't much use unless we can add further items to the various divs. Some of this can be done with further Webson code but ultimately you'll either use an onClick="<something>" callout or a JavaScript function that populates or interacts with the DOM. For the latter to work, elements must have unique ids to allow JavaScript to find them. Here's the $Left block again, with an id and a couple of other additions:
    "$Left": {
        "#debug": 2,
        "#doc": "The left-hand sidebar",
        "#element": "div",
        "@id": "left",
        "display": "inline-block",
        "width": "25%",
        "height": "100%",
        "background": "green"
    },
Here we have another new symbol, @, which (appropriately) signifies an attribute. Various HTML elements require special attributes such as @id, @class, @type, @href, @src, etc. In each case the name is that of the HTML attribute prefixed by @.
Another feature above reveals a built-in debugging capability. When hand-building HTML, errors are common, often resulting in strange layout that are not at all as intended. Webson allows you to specify 3 different debug levels:
"#debug": 0 - no debugging output
"#debug": 1 - Show all #doc properties
"#debug": 2 - Show every item
which enables you to see clearly what is happening. The output for the above is
Build $Left
The left-hand sidebar
#element: div
Style display: "inline-block" -> inline-block
Style width: "25%" -> 25%
Style height: "100%" -> 100%
Style background: "green" -> green
This is a simple example where all values are constants. The values appear to be repeated but this will not always be the case. In more complex scripts you will often see the results of expressions being evaluated.
#doc items can be either single lines of text or arrays of lines. They are just there for the benefit of the programmer and have no effect on the screen being constructed.
A #debug directive affects its own block and those below it (defined using #).
Webson implements nesting, whereby items declared at one level apply to all those in lower (contained) levels. Changing a value at one level only affects those at that level and beneath it; those above are unaffected.
For example, let's suppose the two sidebars share a common feature; they each have an inner div and padding to produce a border. Here's what it should look like:

To achieve this we can rewrite the last part of the script as follows:
    "$Left": {
        "#doc": "The left column",
        "$ID": "left",
        "$Width": "25%",
        "$Color": "green",
        "#": "$LRPanel"
    },

    "$Right": {
        "#doc": "The right column",
        "$ID": "right",
        "$Width": "15%",
        "$Color": "blue",
        "#": "$LRPanel"
    },

    "$LRPanel": {
        "#element": "div",
        "display": "inline-block",
        "width": "calc($Width - 2em)",
        "height": "calc(100% - 2em)",
        "padding": "1em",
        "#": "$LRSubPanel"
    },

    "$LRSubPanel": {
        "#element": "div",
        "@id": "$ID",
        "width": "100%",
        "height": "100%",
        "background": "$Color"
    }
Here I've left out the block for $Center as it's unchanged. Both $Left and $Right now no longer declare their own #element; instead they set up user-defined variables $ID, $Width and $Color and invoke $LRPanel to construct the element. I suggest using an initial capital letter for each variable name, to make them easier to spot, but it's not mandatory. Any variable declared or modified at a given level in the structure will be visible at all points beneath that one, but changes do not propagate upwards.
$LRPanel creates a div, applies padding to it and creates an inner div called $LRSubPanel. Note how the $Color variable is passed down and used here, resulting in a colored panel with a white border. Note also the use of calc() in $LRPanel to allow for the padding, which in a conformant browser adds to the width or height of the element.
To view this demo on a PC, place the following HTML file on your server:
<html>
  <head>
    <meta charset="UTF-8">
    <meta name="viewport" content="width=device-width, initial-scale=1.0">
    <title>Webson demo</title>
    <script type='text/javascript' src='https://webson.netlify.app/webson.js'></script>
  </head>

  <body>
    <script>
        const element = document.createElement(`div`);
        element.style.width = `640px`;
        element.style.height = `480px`;
        render(`resources/json/simple.json`);

        async function render(file) {
            const response = await fetch(file);
            const script = await response.text();
            Webson.render(element, `simple`, script);
            document.body.appendChild(element);
        }
    </script>
  </body>
</html>
For mobile, the width and height can both be set to `100%`. The JSON script is assumed to be in a folder on your server at (your domain)/resources/json/simple.json. The code above uses the relatively-new standard function fetch() to get the named script from a file on the server. It then calls render() in the Webson package to create the DOM tree that corresponds to the JSON script.