I got a Ciclop 3D scanner, figured it can't work well on modern Linux distributions, started to hack...
This scanner is fully opensource, uses double lasers and is quite decent for the price. You can find some for around $100 on the web. This software only targets Linux users.
- Makes any scanner work on Linux (currently Ciclop is supported, any can be added in few hours)
- Colored two lasers scanning done in 2.5 minutes (in bright condition)
- Fully automated calibration done in 30s !
- Manual laser segmentation mode (to avoid calibration mistakes)
- Two passes scanning mode for difficult objects
- User friendly CLI
On Archlinux system:
% yaourt -S --needed opencv python-numpy python-scipy
% wget https://github.com/fdev31/thot/archive/master.zip
% unzip master.zip
% cd thot-master
% python setup.py build
% sudo python setup.py install
If you prefer using python2, just replace "python" with "python2" on the lines above
You may also want to install guvcview to setup the webcam before starting the app
After installing all dependencies, unpack sources and open a terminal emulator:
% cd thot-master
% ./run.sh
Calibrate software (after changing exposure to get the pattern recognized):
Scan Bot> cam_exposure 3000
Scan Bot> calibrate
Scan 3D object
Scan Bot> scan
The 3D (.ply) file will be saved as "model.ply" in the current working directory
From the shell you can enable more commands using advanced command, the most useful is probably the cfg command.
You can also call the application from the command line:
$ thot recalibrate
Reconstruct previously scanned mesh (to test new calibration):
$ thot make
A special "exec" command allows command chaining from the command line:
$ thot exec calibrate, keep_laser 1 , make
Rebuild mesh from previous scan, keeping first laser information only:
$ thot exec keep_laser 1, make
Rebuild mesh with different line detection threshold
$ thot exec algop threshold 5, make
Images are saved into capture/ folder Pointcloud is saved as capture.ply
Result of a 2 lasers scan (unprocessed point cloud):


- Make "first start" commands:
- make separate shots for camera
- calibrate camera from the shots
- ask user to place the pattern on the surface
- start calibration
- Blender integration
- compute normals or mesh directly
- opencv
- numpy
- pyserial
- prompt_toolkit
- scipy
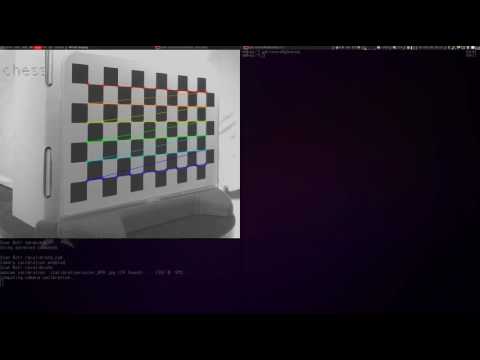
If you have a mesh inside another mesh, this is probably a camera calibration issue:
take many shots with the shot command (changing position of chessboard each time to cover maximum surface), then use calibrate_shots to compute camera calibration again.
Scan Bot> advanced
Scan Bot> shot
Scan Bot> shot
Scan Bot> shot
Scan Bot> shot
Scan Bot> shot
Scan Bot> calibrate_shots
After this you will need to do standard calibration again (platform and lasers), in case you didn't change the setup and you calibrated the scanner recently, you can avoid capturing pictures by typing:
$ thot recalibrate
This is probably a laser calibration issue, some lines are probably badly detected. You can fix it by discarding the frames that are not well analyzed:
$ thot recalibrate_manual
In case you want to capture the pictures again, just type:
$ thot calibrate_manual
The angles are probably inverted. Try reversing your motor wires and retry.
- no release yet: may not work out of the box, consider unstable