- Generate H.264/AAC encoded MPEG-TS file from Raspberry Pi Camera (v1/v2) and optionally USB microphone or Wolfson Audio Card
- Generate HTTP Live Streaming files with optional encryption
- Display timestamp on video image
- Display Unicode text with arbitrary font
- Raspberry Pi
- Raspberry Pi Camera Board (v1 or v2) or compatible cameras
- (optionally) USB microphone or Wolfson Audio Card
- Raspberry Pi OS (bullseye) 32-bit or 64-bit (with libcamera enabled)
Binary release is available at https://github.com/iizukanao/picam/releases/latest
If you want to build picam yourself, see BUILDING.md.
The fastest way to use picam is to use a binary release. To set up and use it, run the following commands on your Raspberry Pi OS. It will set up picam in ~/picam/.
# If you have enabled legacy camera support, disable it with raspi-config then reboot
sudo raspi-config

# Install dependencies
sudo apt update
sudo apt install libharfbuzz0b libfontconfig libepoxy0

# Create directories and symbolic links
cat > make_dirs.sh <<'EOF'
#!/bin/bash
DEST_DIR=~/picam
SHM_DIR=/run/shm

mkdir -p $SHM_DIR/rec
mkdir -p $SHM_DIR/hooks
mkdir -p $SHM_DIR/state
mkdir -p $DEST_DIR/archive

ln -sfn $DEST_DIR/archive $SHM_DIR/rec/archive
ln -sfn $SHM_DIR/rec $DEST_DIR/rec
ln -sfn $SHM_DIR/hooks $DEST_DIR/hooks
ln -sfn $SHM_DIR/state $DEST_DIR/state
EOF

chmod +x make_dirs.sh

# Run make_dirs.sh each time the OS is rebooted
./make_dirs.sh

# Optionally, increase microphone volume with alsamixer
alsamixer

# For bullseye version - separate build is used
is_bullseye=""
if [ "$(cat /etc/*-release | grep VERSION_CODENAME | awk -F '=' '{ print $2 }')" == "bullseye" ]; then
  is_bullseye="bullseye-"
fi

# Install picam binary
wget https://github.com/iizukanao/picam/releases/download/v2.0.12/picam-2.0.12-$is_bullseye`uname -m`.tar.xz
tar xvf picam-2.0.12-*.tar.xz
cp picam-2.0.12-*/picam ~/picam/

# Run picam
cd ~/picam
./picam --alsadev hw:1,0Please make sure that at least 160 MB is assigned to GPU.
You can take advantage of RAM drive (/run/shm/) and reduce access to SD card. It also provides better quality of recording.
First, stop picam if it is running. Create rec, hooks, and state directories in /run/shm/, then change directories with the same name in picam to symbolic links. Create another symbolic link from /run/shm/rec/archive to somewhere on SD card.
Result:
picam
| ...
|-- archive
|-- hooks -> /run/shm/hooks
|-- rec -> /run/shm/rec
`-- state -> /run/shm/state

/run/shm/
|-- hooks
|-- rec
|   |-- archive -> /home/pi/picam/archive
|   `-- tmp (automatically created by picam)
`-- state
First, find ALSA device name of your microphone.
$ arecord -l
**** List of CAPTURE Hardware Devices ****
card 1: Device [USB PnP Sound Device], device 0: USB Audio [USB Audio]
  Subdevices: 1/1
  Subdevice #0: subdevice #0
ALSA device name is consisted of hw:<card>,<device>. In the above example, the ALSA device name is hw:1,0.
If you got no soundcards found error, try sudo arecord -l. If that output looks good, you might want to add your user to audio group.
$ sudo usermod -a -G audio $USER
(once logout, then login)
$ groups
wheel audio pi  <-- (make sure that 'audio' is in the list)
$ arecord -l
**** List of CAPTURE Hardware Devices ****
card 1: Device [USB PnP Sound Device], device 0: USB Audio [USB Audio]
  Subdevices: 1/1
Subdevice #0: subdevice #0Run picam with your ALSA device name.
$ ./picam --alsadev hw:1,0
configuring devices
capturing startedTo start recording, create a file named hooks/start_record while picam command is running.
$ touch hooks/start_recordYou will see smth like disk_usage=23% start rec to rec/archive/2017-08-05_16-41-52.ts in the picam command output.
To stop recording, create a file named hooks/stop_record.
$ touch hooks/stop_recordYou will see stop rec in the picam command output.
The recorded MPEG-TS file is in rec/archive/ directory.
To convert MPEG-TS to MP4, run:
$ ffmpeg -i test.ts -c:v copy -c:a copy -bsf:a aac_adtstoasc test.mp4
# or
$ avconv -i test.ts -c:v copy -c:a copy -bsf:a aac_adtstoasc test.mp4To mute microphone temporarily, create a file named hooks/mute.
$ touch hooks/muteTo unmute microphone, create a file named hooks/unmute.
$ touch hooks/unmutepicam version 2.0.12
Usage: picam [options]
Options:
[video]
-w, --width <num> Width in pixels (default: 1920)
-h, --height <num> Height in pixels (default: 1080)
-v, --videobitrate <num> Video bit rate (default: 3000000)
Set 0 to disable rate control
-f, --fps <num> Frame rate (default: 30.0)
-g, --gopsize <num> GOP size (default: same value as fps)
--vfr Enable variable frame rate. GOP size will be
dynamically controlled.
--minfps <num> Minimum frames per second. Implies --vfr.
--maxfps <num> Maximum frames per second. Implies --vfr.
--hflip Flip image horizontally
--vflip Flip image vertically
--avcprofile <str> Set AVC/H.264 profile to one of:
constrained_baseline/baseline/main/high
(default: high)
--avclevel <value> Set AVC/H.264 level (default: 4.1)
--brightness <num> Adjust image brightness (default: 0.0)
0.0=unchanged / -1.0=darkest / 1.0=brightest
--contrast <num> Adjust image contrast (default: 1.0)
1.0=normal / >1.0=more contrast
--saturation <num> Adjust image color saturation (default: 1.0)
1.0=normal / 0.0=grayscale / >1.0=more saturated
--sharpness <num> Adjust image sharpness (default: 0.0)
0.0=no sharpening / >0.0=sharpened
[audio]
-c, --channels <num> Audio channels (1=mono, 2=stereo)
Default is mono. If it fails, stereo is used.
-r, --samplerate <num> Audio sample rate (default: 48000)
The sample rates supported by libfdk_aac encoder are:
8000, 11025, 12000, 16000, 22050, 24000,
32000, 44100, 48000, 64000, 88200, 96000
-a, --audiobitrate <num> Audio bit rate (default: 40000)
--alsadev <dev> ALSA microphone device (default: hw:0,0)
--volume <num> Amplify audio by multiplying the volume by <num>
(default: 1.0)
--ngate <t,a,h,r> Enable noise gate and set <threshold volume, attack/hold/release times>
optional parameters. Defaults: 1.00, 0.20, 1.00, 0.50.
Enter - to use a parameter default.
--noaudio Disable audio capturing
--audiopreview Enable audio preview
--audiopreviewdev <dev> Audio preview output device (default: plughw:0,0)
[HTTP Live Streaming (HLS)]
-o, --hlsdir <dir> Generate HTTP Live Streaming files in <dir>
--hlsnumberofsegments <num> Set the number of segments in the m3u8 playlist (default: 3)
--hlskeyframespersegment <num> Set the number of keyframes per video segment (default: 1)
--hlsenc Enable HLS encryption
--hlsenckeyuri <uri> Set HLS encryption key URI (default: stream.key)
--hlsenckey <hex> Set HLS encryption key in hex string
(default: 75b0a81de17487c88a47507a7e1fdf73)
--hlsenciv <hex> Set HLS encryption IV in hex string
(default: 000102030405060708090a0b0c0d0e0f)
[output for node-rtsp-rtmp-server]
--rtspout Enable output for node-rtsp-rtmp-server
--rtspvideocontrol <path> Set video control socket path
(default: /tmp/node_rtsp_rtmp_videoControl)
--rtspaudiocontrol <path> Set audio control socket path
(default: /tmp/node_rtsp_rtmp_audioControl)
--rtspvideodata <path> Set video data socket path
(default: /tmp/node_rtsp_rtmp_videoData)
--rtspaudiodata <path> Set audio data socket path
(default: /tmp/node_rtsp_rtmp_audioData)
[MPEG-TS output via TCP]
--tcpout <url> Enable TCP output to <url>
(e.g. --tcpout tcp://127.0.0.1:8181)
[camera]
--camera <num> Choose the camera to use. Use --query to list the cameras.
--autoex Enable automatic control of camera exposure between
daylight and night modes. This forces --vfr enabled.
--autoexthreshold <num> When average value of Y (brightness) for
10 milliseconds of captured image falls below <num>,
camera exposure will change to night mode. Otherwise
camera exposure is in daylight mode. Implies --autoex.
(default: 5.0)
If --verbose option is enabled as well, average value of
Y is printed like y=28.0.
--ex <value> Set camera exposure. Implies --vfr. <value> is one of:
normal short long custom
--wb <value> Set white balance. <value> is one of:
off: Disable auto white balance control
auto: Search over the whole colour temperature range (default)
incandescent: Incandescent AWB lamp mode
tungsten: Tungsten AWB lamp mode
fluorescent: Fluorescent AWB lamp mode
indoor: Indoor AWB lighting mode
daylight: Daylight AWB lighting mode
cloudy: Cloudy AWB lighting mode
custom: Custom AWB mode
--wbred <num> Red gain. Implies "--wb off". (0.0 .. 8.0)
--wbblue <num> Blue gain. Implies "--wb off". (0.0 .. 8.0)
--metering <value> Set metering type. <value> is one of:
center: Center-weighted metering mode (default)
spot: Spot metering mode
matrix: Matrix metering mode
custom: Custom metering mode
--evcomp <num> Set Exposure Value compensation (-8..8) (default: 0)
--shutter <num> Set shutter speed in microseconds (default: auto).
Implies --vfr.
--nohdr Disable HDR mode. HDR is enabled by default on Camera Module 3.
--roi <x,y,w,h> Set region of interest (crop rect) in ratio (0.0-1.0).
(default: 0,0,1,1)
--roi affects performance and may reduce fps.
-p, --preview Display fullscreen preview
--previewrect <x,y,width,height>
Display preview window at specified position
--hdmi Preview output HDMI port (0 or 1; default=0)
HDMI port selection only works in console mode (when X is not running)
--query Query camera capabilities then exit
[autofocus] (available on Camera Module 3)
--autofocus-mode <mode> AF (autofocus) algorithm. <mode> is one of:
continuous: Continuous autofocus (default)
manual: Manual mode
--lens-position <num> Move lens to the reciprocal of the focal distance in
meters, also known as diopters. Implies "--autofocus-mode manual".
To focus on objects 2m away, use 0.5 (1m / 0.5 = 2m).
To focus on objects 25cm away, use 4 (1m / 4 = 0.25m).
Use 0 for maximum focus distance.
[timestamp] (may be a bit heavy on Raspberry Pi 1)
--time Enable timestamp
--timeformat <spec> Timestamp format (see "man strftime" for spec)
(default: "%a %b %d %l:%M:%S %p")
--timelayout <spec> Timestamp position (relative mode)
layout is comma-separated list of:
top middle bottom left center right
(default: bottom,right)
--timehorizmargin <px> Horizontal margin from edge (default: 10).
Effective only if --timelayout is used.
--timevertmargin <px> Vertical margin from edge (default: 10).
Effective only if --timelayout is used.
--timepos <x,y> Timestamp position (absolute mode)
--timefontname <name> Timestamp font name (default: FreeMono:style=Bold)
--timefontfile <file> Timestamp font file. This invalidates --timefontname.
--timefontface <num> Timestamp font face index (default: 0).
Effective only if --timefontfile is used.
--timept <pt> Text size in points (default: 14.0)
--timedpi <num> DPI for calculating text size (default: 96)
--timecolor <hex> Text color (default: ffffff)
--timestrokecolor <hex> Text stroke color (default: 000000)
Note that texts are rendered in grayscale.
--timestrokewidth <pt> Text stroke border radius (default: 1.3).
To disable stroking borders, set this value to 0.
--timespacing <px> Additional letter spacing (default: 0)
[misc]
--recordbuf <num> Start recording from <num> keyframes ago
(must be >= 1; default: 5)
--statedir <dir> Set state dir (default: state)
--hooksdir <dir> Set hooks dir (default: hooks)
-q, --quiet Suppress all output except errors
--verbose Enable verbose output
--version Print program version
--help Print this helpCamera white balance can be set either via command line option (e.g. --wb fluorescent) or hooks. To change the white balance while picam is running, create hooks/wb_<value>, where <value> is the name of white balance.
For example, the following command will dynamically change the white balance to fluorescent.
$ touch hooks/wb_fluorescentFor the list of available white balance modes, see picam --help.
Added in version 2.0.0
picam versions prior to 2.0.0 had --wb greyworld option for NoIR camera, but it is no longer available. Instead, use LIBCAMERA_RPI_TUNING_FILE environment variable to specify a correct tuning file that corresponds to the camera sensor.
Example for NoIR camera v1:
LIBCAMERA_RPI_TUNING_FILE=/usr/share/libcamera/ipa/raspberrypi/ov5647_noir.json ./picamTo find out the name of camera sensor, run picam --query. In the following case, imx219 is the sensor name.
$ ./picam --query
[0:37:47.327293801] [2412]  INFO Camera camera_manager.cpp:293 libcamera v0.0.0+3700-f30ad033
[0:37:47.366360221] [2413]  WARN RPI raspberrypi.cpp:1252 Mismatch between Unicam and CamHelper for embedded data usage!
[0:37:47.367038208] [2413]  INFO RPI raspberrypi.cpp:1368 Registered camera /base/soc/i2c0mux/i2c@1/imx219@10 to Unicam device /dev/media0 and ISP device /dev/media1
Available cameras
-----------------
0 : imx219 [3280x2464] (/base/soc/i2c0mux/i2c@1/imx219@10)
    Modes: 'SRGGB10_CSI2P' : 640x480 1640x1232 1920x1080 3280x2464
'SRGGB8' : 640x480 1640x1232 1920x1080 3280x2464Camera exposure control can be set either via command line option (e.g. --ex long) or hooks. To change the exposure control while picam is running, start picam with --vfr or --ex option, then create hooks/ex_<value>, where <value> is the name of exposure control.
For example, the following command will dynamically change the exposure control to long.
$ touch hooks/ex_longFor the list of available exposure control values, see picam --help.
ngate parameter allows you to enable and tune the noise gate. The noise gate will close if the input sound level is below a certain threshold for a determined amount of time, effectively muting sound entirely. Similarly, the noise gate will open again if the level raises above the threshold. This is useful to suppress background noise and save streaming bandwidth. Four optional parameters can be set, each parameter accepts '-' meaning default will be used.
| Param | Description | Default value |
|---|---|---|
| t | Threshold, expressed as volume between 0.0 and 1.0 | 1.0 (ng disabled) |
| a | Attack time; when gate opens, sound is faded in for this duration in seconds | 0.20 |
| h | Hold time; gate is kept open for this duration in seconds after the level falls below the threshold | 1.0 |
| r | Release time; when gate closes, sound is faded out for this duration in seconds | 0.50 |
If level goes above threshold again during hold or release time, the hold time restarts and the attack envelope is applied if necessary.
Example:
$ ./picam --ngate 0.3,-,2Sound will be muted if the volume level is below 30% of the scale; when sound rises above, it will be faded in for 0.2 seconds (the default). Sound is allowed to fall below the threshold for 2 uninterrupted seconds, after which the gate will close and a fade out of 1 second will be applied (the default)
recordbuf is a parameter which controls how many past keyframes should be included at the start of a recording. For example, recordbuf=1 means that a recording will start from the last keyframe, and recordbuf=2 means that a recording will start from the second last keyframe relative to when hooks/start_record is created. The minimum value of recordbuf is 1.
Added in version 1.4.0
There are two types of recordbuf; global and per-recording. Global recordbuf is the default value for all recordings. Per-recording recordbuf only applies to the current recording. Per-recording recordbuf must be less than or equal to global recordbuf.
Global recordbuf can be specified by either --recordbuf option or hooks/set_recordbuf.
# Set global recordbuf to 30
echo 30 > hooks/set_recordbufPer-recording recordbuf has a default value which is the same value as global recordbuf. Per-recording recordbuf can be specified via hooks/start_record.
# Start recording with per-recording recordbuf set to 2
$ echo recordbuf=2 > hooks/start_recordAdded in version 1.4.0
picam can display text with correct ligatures and kerning, with a font of your choice. To display a text, create hooks/subtitle.
$ echo 'text=Houston, we have a problem' > hooks/subtitle
Each line of hooks/subtitle must be in the format of key=value. Lines starting with # will be ignored. Supported keys are:
| Key | Description | Default value |
|---|---|---|
| text | UTF-8 encoded text. \n will be treated as a line break. |
(none) |
| font_name | Font name which can be recognized by Fontconfig | sans |
| font_file | Path to font file. If this is specified, font_name will not be used. | (none) |
| face_index | Font face index. Effective only if font_file is specified. | 0 |
| pt | Text size in points | 28.0 |
| dpi | DPI for calculating text size | 96 |
| duration | Number of seconds the text appears on the screen. If this is set to 0, the text will be displayed indefinitely. | 7.0 |
| layout_align | Layout alignment of the text box on the screen. Comma-separated list of: top middle bottom left center right | bottom,center |
| horizontal_margin | Horizontal margin from the nearest edge in pixels. Does nothing when pos is specified or layout_align has "center". | 0 |
| vertical_margin | Vertical margin from the nearest edge in pixels. Does nothing when pos is specified or layout_align has "middle". | 35 |
| pos | Absolute position of the text box on the screen. This invalidates layout_align settings. | (none) |
| text_align | Text alignment inside the positioned box (left, center, right) | center |
| line_height | Line spacing is multiplied by this number | 1.0 |
| tab_scale | Tab width is multiplied by this number | 1.0 |
| letter_spacing | Additional letter spacing in pixels | 0 |
| color | Text color in hex color code. Rendered in grayscale. | ffffff |
| stroke_color | Text stroke (outline) color in hex color code. Rendered in grayscale. | 000000 |
| stroke_width | Text stroke (outline) border radius in points | 1.0 |
| in_preview | Visibility of the text in the preview | 1 |
| in_video | Visibility of the text in the encoded video | 1 |
NOTE: On the first generation models of Raspberry Pi (before Pi 2), subtitles cause CPU usage high and the video frame rate may drop below 30 fps.
$ cat example1
text=What goes up\nmust come down\nfinally floor AV Wa
font_name=serif
pt=40
$ cat example1 > hooks/subtitle
$ cat example2
text=♨☀♻♥⚠
font_file=/home/pi/NotoSansCJKjp-Regular.otf
pt=120
layout_align=middle,center
letter_spacing=40
$ cat example2 > hooks/subtitle
Added in version 1.4.0
To change the directory and/or filename for the recorded file, specify dir and/or filename parameters in hooks/start_record.
# Start recording to /tmp/myout.ts
$ echo -e "dir=/tmp\nfilename=myout.ts" > hooks/start_recordAdded in version 1.4.0
The file state/recorded_filename has some info about the recording.
$ cat state/2015-11-19_01-18-09.ts
duration_pts=2083530
duration_sec=23.150333
You can remove state/*.ts files if you do not need them.
The hooks allows you to dynamically change the states or settings while picam is running. To use the hooks, create a file in the hooks directory with the appropriate filename and contents as shown below.
| Filename | Contents | Description |
|---|---|---|
start_record |
empty | Start recording (See Recording) |
stop_record |
empty | Stop recording (See Recording) |
mute |
empty | Mute audio (See Mute/Unmute) |
unmute |
empty | Unmute audio (See Mute/Unmute) |
wbred |
decimal | Set red gain (Same as --wbred) |
wbblue |
decimal | Set blue gain (Same as --wbblue) |
wb_* |
empty | Set white balance (See White balance) |
ex_* |
empty | Set exposure (See Exposure control) |
brightness |
decimal | Set brightness (Same as --brightness) |
contrast |
decimal | Set contrast (Same as --contrast) |
saturation |
decimal | Set saturation (Same as --saturation) |
sharpness |
decimal | Set sharpness (Same as --sharpness) |
set_recordbuf |
integer | Set global recordbuf (See Recordbuf) |
subtitle |
text | Display a subtitle (See Overlaying text) |
For example, to change the sharpness value, create hooks/sharpness file as follows.
# Change sharpness to 1.5
$ echo 1.5 > hooks/sharpness

# Revert to default sharpness
$ echo 0 > hooks/sharpness
HTTP Live Streaming is disabled by default. To enable HTTP Live Streaming and generate files in /run/shm/hls, run:
$ ./picam -o /run/shm/hlsSet up nginx (ignore "Additional - Install PHP" step), then open /etc/nginx/sites-available/default with a text editor and add the following code inside server { ... } block.
location /hls/ {
	root /run/shm;
}
Restart the nginx server with sudo service nginx restart then run picam with -o /run/shm/hls option. The HLS will be available at http://YOUR-PI-IP/hls/index.m3u8
Optionally you can enable encryption for HTTP Live Streaming. We will use the following settings as an example.
- HTTP Live Streaming output directory:
/run/shm/hls/ - Encryption key:
0xf0f1f2f3f4f5f6f7f8f9fafbfcfdfeff - Encryption IV:
0x000102030405060708090a0b0c0d0e0f - Encryption key file:
enc.key
First you have to create a file named enc.key which contains 16-byte encryption key. To create such file, run:
$ echo -n $'\xf0\xf1\xf2\xf3\xf4\xf5\xf6\xf7\xf8\xf9\xfa\xfb\xfc\xfd\xfe\xff' > enc.keyPut enc.key in /run/shm/hls/ directory. Then, run picam with the following options:
$ ./picam -o /run/shm/hls --hlsenc --hlsenckeyuri enc.key \
  --hlsenckey f0f1f2f3f4f5f6f7f8f9fafbfcfdfeff \
  --hlsenciv 000102030405060708090a0b0c0d0e0f
You can watch the HTTP Live Streaming by accessing /run/shm/hls/index.m3u8 via HTTP or HTTPS with QuickTime Player.
To use picam with nginx-rtmp-module, add the following lines to nginx.conf:
rtmp {
    server {
        listen 1935;
        chunk_size 4000;
        application webcam {
            live on;

            exec_static /path/to/ffmpeg -i tcp://127.0.0.1:8181?listen
                                        -c:v copy -ar 44100 -ab 40000
                                        -f flv rtmp://localhost:1935/webcam/mystream;
        }
    }
}
Note that /path/to/ffmpeg should be replaced with the actual absolute path to ffmpeg command.
Start nginx server, then run:
$ ./picam --tcpout tcp://127.0.0.1:8181You can access your live stream at rtmp://YOUR_RASPBERRYPI_IP/webcam/mystream.
To upload streams from picam to YouTube, take the following steps.
- Open YouTube Studio and click on the top-right corner CREATE button → Go live.
- When streaming console appears, copy the "Stream URL" and "Stream key" and run the following ffmpeg command. Replace
STREAM_URLandSTREAM_KEYwith the strings provided by YouTube.
$ ffmpeg -i tcp://127.0.0.1:8181?listen -c:v copy -c:a aac -f flv STREAM_URL/STREAM_KEY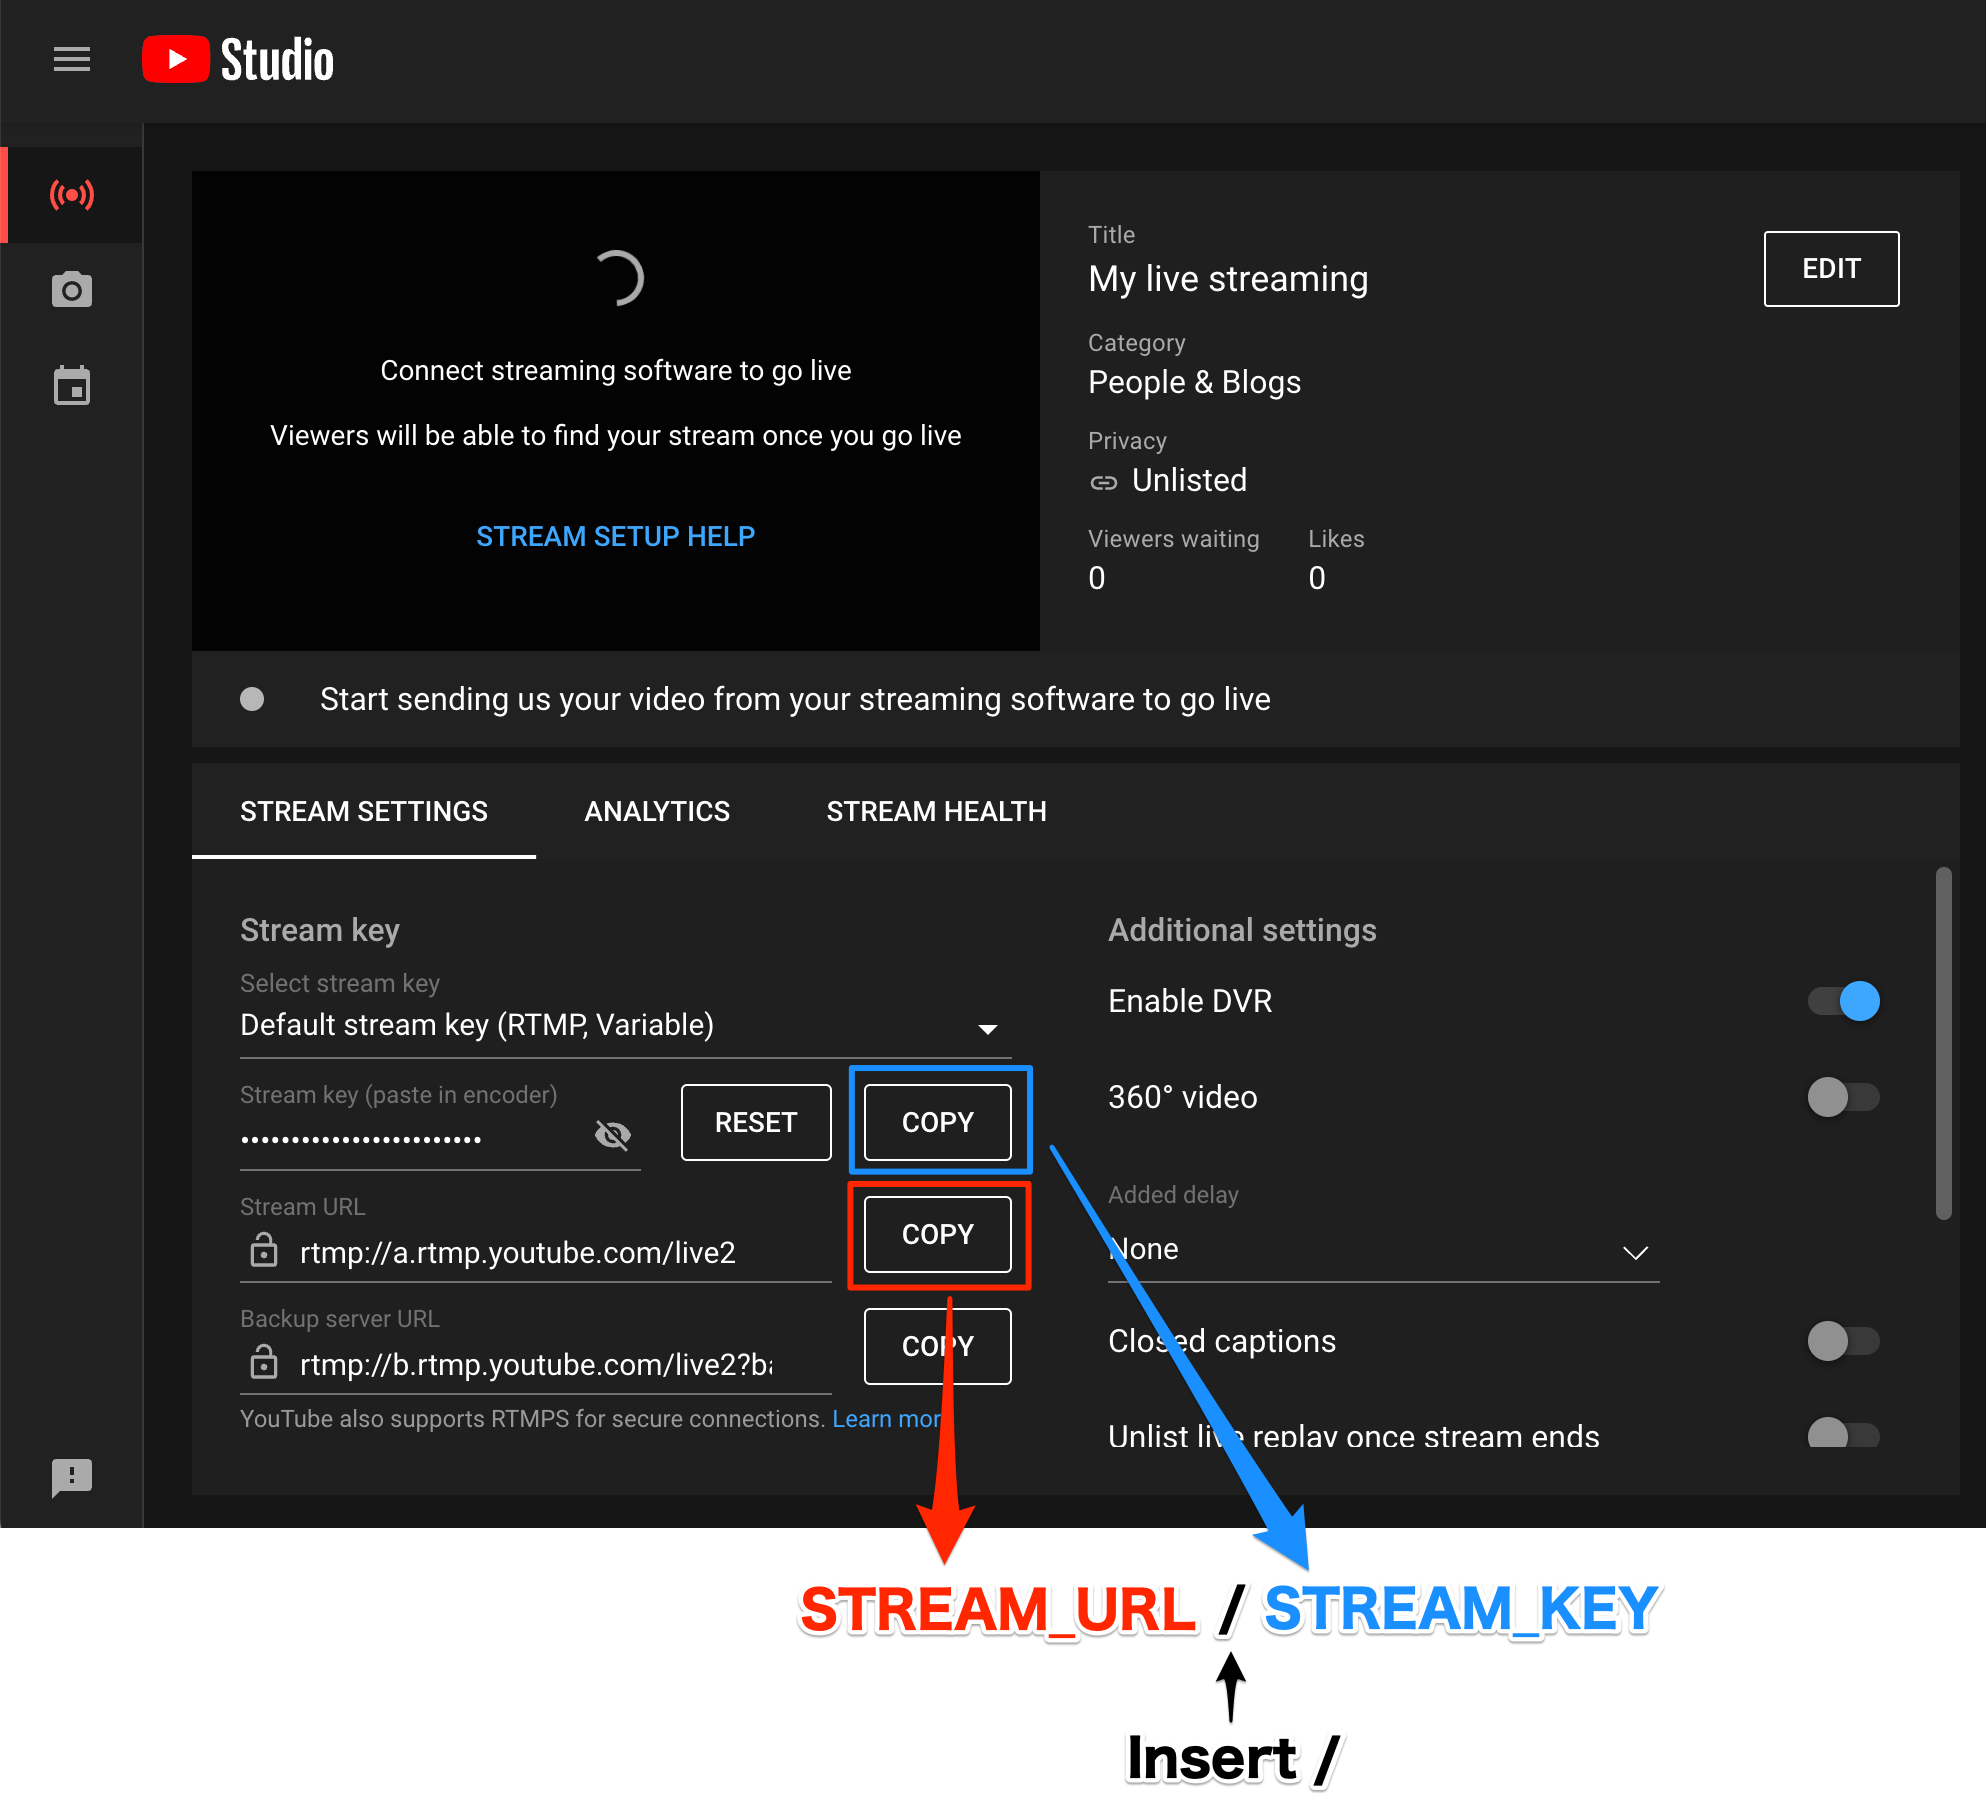
Then, run picam to start streaming.
$ picam --tcpout tcp://127.0.0.1:8181Any cheap USB microphone should work as long as it is supported by ALSA. I have tested this program with the combination of:
- USB to 3.5mm audio adapter: PLANEX PL-US35AP
- Microphone: ELECOM MS-STM95
LGPL v2.1, as some parts of FFmpeg source is included.
- Linus Styrén (@Linkaan)
- White Moustache (@nalajcie)
- Francesco Vannini (@francescovannini)