This repository documents installation and configuration of NASA's Astrobee software for use in ROS and Gazebo simulation. The Cognitive Systems Engineering Laboratory (CSEL) at Ohio State University is currently exploring the development of an experimental human-machine teaming testbed using ROS and Gazebo, prompting exploration into NASA's open source astrobee software.
If you are unfamiliar with astrobee, please refer to NASA's official documentation. This repository addresses and troubleshoots problems encountered when following NASA's official installation documentation), supporting the install of astrobee simulation capabilities on both native Ubuntu 16.04 and Ubuntu 16.04 ran via Windows Subsystem for Linux 2 (WSL2). It is our hope that other researchers and hobbyists will be able to utilize this information to support exploration of the astrobee platform and associated topics in human-robot interaction.
A native Ubuntu 16.04 Operating System is ideal for this installation and recommended by NASA. For more information about installing Ubuntu, visit the official documentation.
If your native machine is using Windows 10, you may want to configure Windows Subsystem for Linux (WSL). I used Windows Subsystem for Linux 2 (WSL2) to run an Ubuntu 16.04 VM. This requires installation of the NVIDIA CUDA Graphics Driver. Your GPU might have different driver requirements or may be incompatible for WSL2.
To install the CUDA Driver, run the following commands in your Ubuntu terminal:
wget https://developer.download.nvidia.com/compute/cuda/repos/ubuntu1604/x86_64/cuda-ubuntu1604.pin
sudo mv cuda-ubuntu1604.pin /etc/apt/preferences.d/cuda-repository-pin-600
wget https://developer.download.nvidia.com/compute/cuda/11.3.1/local_installers/cuda-repo-ubuntu1604-11-3-local_11.3.1-465.19.01-1_amd64.deb
sudo dpkg -i cuda-repo-ubuntu1604-11-3-local_11.3.1-465.19.01-1_amd64.deb
sudo apt-key add /var/cuda-repo-ubuntu1604-11-3-local/7fa2af80.pub
sudo apt-get update
sudo apt-get -y install cuda
The following is a summary of NASA installation instructions for non-NASA users with additional information troubleshooting relevant errors encountered during install.
Once your 64-bit Ubuntu 16.04 environment is configured, run the following:
sudo apt-get install build-essential git
Then, establish a source path for the code on the machine:
export SOURCE_PATH=$HOME/astrobee
Next, we'll clone the astrobee repository and media:
git clone https://github.com/nasa/astrobee.git $SOURCE_PATH
pushd $SOURCE_PATH
git submodule update --init --depth 1 description/media
popd
Note: Since CSEL will be performing guest science, the astrobee_android respotiory will beed to be cloned eventually and these instructions will be updated.
Run the following commands one at a time to install required dependencies:
pushd $SOURCE_PATH
cd scripts/setup
./add_ros_repository.sh
sudo apt-get update
cd debians
./build_install_debians.sh
cd ../
./install_desktop_packages.sh
sudo rosdep init
rosdep update
popd
After running the command ./build_install_debians.sh, an error occured:
/sbin/ldconfig.real: /usr/lib/wsl/lib/libcuda.so.1 is not a symbolic link
To solve this, we'll need to disable automount in /etc/wsl.conf. My WSL2 build did not have this file, but yours might in native Ubuntu 16.04.
Run cd /etc/ then sudo nano wsl.conf. If the file is empty, that means it doesn't exist and you can move on to the next step.
If the file contains text, change the value 'ldconfig = true' to 'ldconfig = false'.
Next, we'll copy a folder:
sudo cp -r /usr/lib/wsl/lib /usr/lib/wsl2/
Then, we'll edit /etc/ld.so.conf.d/ld.wsl.conf and change some text
sudo nano /etc/ld.so.conf.d/ld.wsl.conf and change "/usr/lib/wsl/lib" --> "/usr/lib/wsl2/lib" (new location)
Then run:
sudo rm /usr/lib/wsl2/lib/libcuda.so.1 and sudo ldconfig
This should fix the issue with libcuda. Source for issue solution
Once dependencies are properly installed, we need to configure the build.
$ export BUILD_PATH=$HOME/astrobee_build/native
$ export INSTALL_PATH=$HOME/astrobee_install/native
$ pushd $SOURCE_PATH
$ ./scripts/configure.sh -l -F -D
$ popd
$ pushd $BUILD_PATH
$ make -j2
$ popd
Upon building the code with make -j2 I received an error that caused it to fail around 30% completion:
/usr/include/gazebo-7/gazebo/msgs/altimeter.pb.h:19:2: error: #error regenerate this file with a newer version of protoc.
 #error regenerate this file with a newer version of protoc.
To fix this error, we'll need to reinstall protoc from source:
1.cd /usr/local/include/google;
2.sudo rm -rf protobuf
3.cd ~ && wget https://github.com/protocolbuffers/protobuf/releases/download/v2.6.1/protobuf-2.6.1.zip
unzip protobuf-2-6.1.zip && cd protobuf-2.6.1
5../autogen.sh
6../configure
7.make
8.make check
9.sudo make install
10.sudo ldconfig
(If you haven't already, you will need to fix the 'Libcuda is not a symbolic link' error in order to get this to work.)
Source for solution: this comment
If this doesn't work, you may have conflicting versions of protoc installed with different paths associated to each. To check your protoc for duplicate versions, run the following:
for apt-get:
$ export PATH=/usr/bin:$PATH
$ protoc --version
and for source:
$ export PATH=/usr/local/bin:$PATH
$ protoc --version
We'll want to keep protoc 2.6.1 installed from source. To remove protoc installed via apt-get, run the following:
1.cd /usr/bin/
2.sudo rm -rf protobuf
After following these instructions for protoc, we will need to generate new files for the build using the code from before:
pushd $SOURCE_PATH
./scripts/configure.sh -l -F -D
popd
pushd $BUILD_PATH
make -j2
popd
Now, the build should compile correctly.
If you encounter issues with dependencies, visit this link for documentation and troubleshooting of issues I encountered.
To configure the simulation environment, you'll first need to source the astrobee files so ROS can recognize them:
export BUILD_PATH=$HOME/astrobee_build/native
pushd $BUILD_PATH
source devel/setup.bash
From there, we can attempt to run the simulator in Gazebo:
roslaunch astrobee sim.launch dds:=false robot:=sim_pub sviz:=true
When trying to run this command via WSL2, I got the following error message:
QXcbConnection: Could not connect to display
However, there is a workaround for getting GUI's to work on WSL2. First, we will next to install VcXsrv.
-(Install VcXsrv, then run XLaunch)[microsoft/WSL#4106]


IMPORTANT: Be sure to add additional parameter: -nowgl to VcXsrv in the white box in the last image.
Next find your ethernet IPv4 Address (localhost). If you don't know how to do this, simply google it.
Then run
$ export DISPLAY=localhost:0
with 'localhost' substituted for your IP address.
After trying to run the simulator again with roslaunch astrobee sim.launch dds:=false robot:sim_pub sviz=true, I had another error:
libGL error: No matching fbConfigs or visuals found
libGL error: failed to load driver: swrast
This seems to be another WSL2 graphics configuration problem. It can be fixed by adding a line to bashrc along with the parameter we added to VcXsrv.
$ sudo nano ~/.bashrc
Add LIBGL_ALWAYS_INDIRECT=1 to the bottom.
Also, when starting VcXsrv add -nowgl as a parameter.
Then, run $ export DISPLAY=localhost:0
Test this by running gazebo to see if Gazebo will open. If Gazebo works, we can move on to trying to simulate Astrobee in Gazebo.
To try to run the simulator with Gazebo:
roslaunch astrobee sim.launch dds:=false robot:=sim_pub sviz:=true
To manipulate the simulation, tools for ROS will need installed.
$ sudo apt install rosbash
$ sudo apt install rospack-tools
In any new terminal, be sure to source the astrobee files. One terminal window is reponsible for running the simulation, so a new window must be used for teleoperation.
export BUILD_PATH=$HOME/astrobee_build/native
pushd $BUILD_PATH
source devel/setup.bash
I went ahead and added the above three lines to the bottom of .bashrc, so that it would automatically load upon startup.
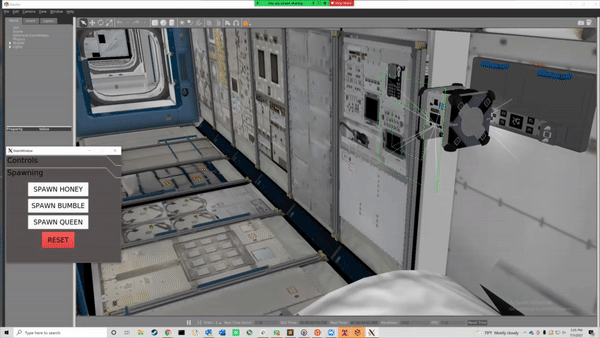
The robot spawns in a docked state. To undock, run the following command in the terminal:
rosrun executive teleop_tool -undock
Now we can move the robot!
To move the robot forward 1, right 2 and down 0.5:
rosrun executive teleop_tool -move -relative -pos "1 2 0.5"
To move the robot back 1:
rosrun executive teleop_tool -move -relative -pos "-1"
To rotate the robot around Y (axis X=0 Y=1 Z=0) by -1.5 radians:
rosrun executive teleop_tool -move -att "-1.5 0 1 0"
To move to the middle of the JEM:
rosrun executive teleop_tool -move -pos "11.25 -6.59"
To move to the dock approach point facing the dock:
rosrun executive teleop_tool -move -pos "10.34 -9.51 4.49" -att
roslaunch astrobee spawn.launch ns:=bumble dds:=false robot:=sim_pub pose:="11 -7 4.5 0 0 0 1"
roslaunch astrobee spawn.launch ns:=queen dds:=false robot:=sim_pub pose:="11 -4 4.5 0 0 0 1"
For multi-robot operations, we'll need to use namespaces. Robots spawn under their aliasas "bumble" and "queen", with the default robot being named "honey".
Example:
rosrun executive teleop_tool -ns "bumble" -undock
First, we need to calibrate the arm:
rosrun arm arm_tool -cal
rosrun arm arm_tool -open
rosrun arm arm_tool -close
rosrun arm arm_tool -set 50
rosrun arm arm_tool -stow
Then, we can use the arm
rosrun arm arm_tool -deploy
rosrun arm arm_tool -pan 45
rosrun arm arm_tool -tilt 30
You can find other supported commands by running this: rosrun arm arm_tool -helpshort
rosrun dock dock_tool -helpshort lists commands available. Basically, can dock and undock in Berth 1 and Berth 2.
To make edits to the GUI, use Qt Creator's design tab to edit form.ui (or main_window.ui in prev version
later: try binder https://mybinder.org/v2/gh/jkeller52/astrobee/HEAD
To save edits in Qt Creator and translate them to Python, run:
pyuic5 form.ui > mainwindow_auto.py
Then, from the same directory, run python main.py to open the GUI.
A challenge in itself, since Astrobee relies heavily on Python 2.7, whereas PyQt5 relies on Python 3.5+.
sudo apt install pyqt5-dev-tools pyqt5-dev
Error I got:
QFontDatabase: Cannot find font directory /usr/lib/x86_64-linux-gnu/fonts - is Qt installed correctly?
This was fixed by running: echo "export DISPLAY=:0.0" >> ~/.bashrc
Then run sudo sed -i 's$<listen>.*</listen>$<listen>tcp:host=localhost,port=0</listen>$' /etc/dbus-1/session.conf to fix the Dbus error message (if you're running WSL2).
So annoying, still can't fix fonts.
jkell@DESKTOP-CSDA0LG:~/astrobee_gui$ python main.py
QFontDatabase: Cannot find font directory /usr/lib/x86_64-linux-gnu/fonts - is Qt installed correctly?
QFontDatabase: Cannot find font directory /usr/lib/x86_64-linux-gnu/fonts - is Qt installed correctly?
QFontDatabase: Cannot find font directory /usr/lib/x86_64-linux-gnu/fonts - is Qt installed correctly?
Note: I think fonts were fixed by adding a line to ~/.bashrc