
![]()
Interact with LEGO Powered Up elements via Twitch chat and a Raspberry Pi
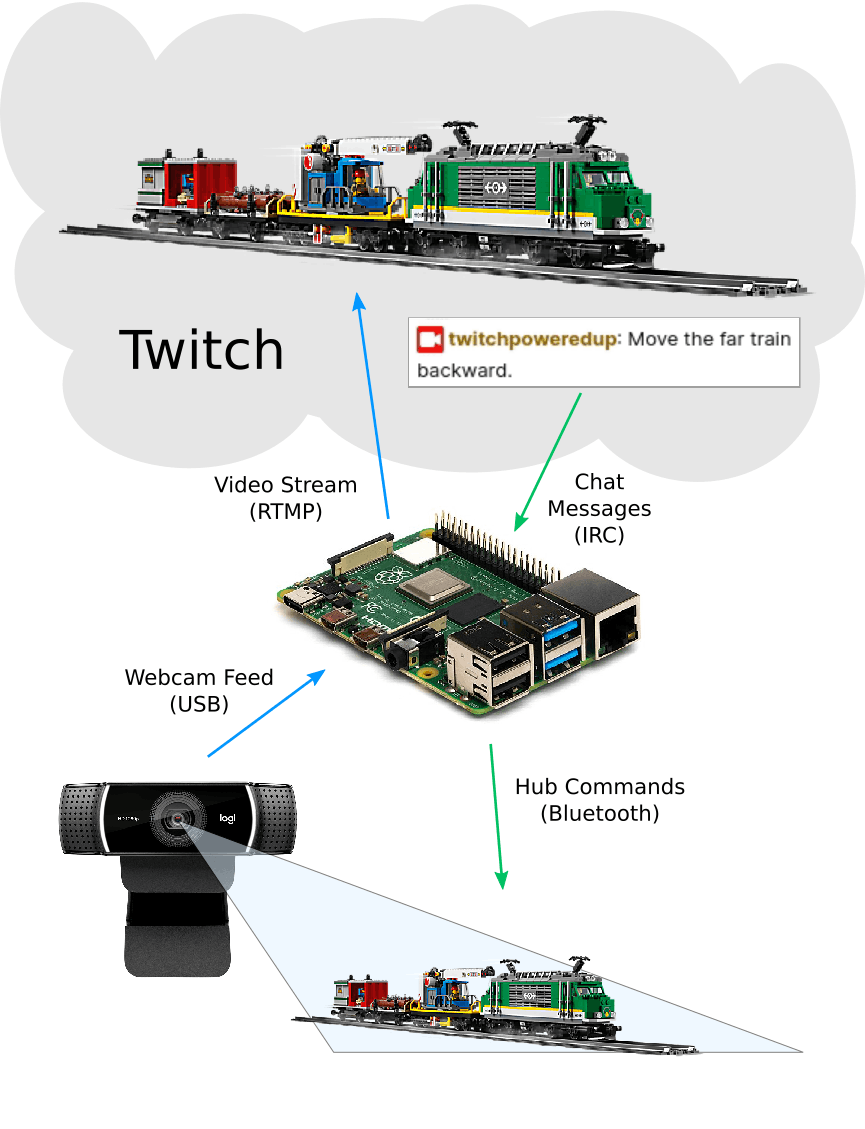
A LEGO model is streamed via Twitch.tv, and viewers are able to control it by sending commands over Twitch chat.
This is similar in concept to the classic Twitch Plays Pokemon (video), and is inspired by a question on Bricks Stack Exchange asking about the ability for multiple users to control a single LEGO train.
We assume you are using a Raspberry Pi 4 running the latest Raspberry Pi OS.
We first install a number of dependencies on our Pi. If you are using another device or OS, there may be other dependencies that also need to be installed.
sudo apt install -y npm ffmpeg bluetooth bluez libbluetooth-dev libudev-dev
node needs permission to access BLE messages. We can grant is permission like this:
sudo setcap cap_net_raw+eip $(eval readlink -f $(which node))
If you don't already have npm configured to allow you to install packages globally, the following commands will take care of this for you:
npm config set prefix '~/.npm'
echo "export PATH=$HOME/.npm/bin:$PATH" >> ~/.profile
source ~/.profile
The following command will download the package from npm and install it to be accessible on your system.
npm install -g twitch-powered-up
The application expects a valid configuration file to be present as ~/.config/twitch-powered-up.json. An example config will be created for you on first run of the following command:
twitch-powered-up
The example configuration file ~/.config/twitch-powered-up.json can be edited using the text editor of your choice. For example:
nano ~/.config/twitch-powered-up.json
The complete config schema with field descriptions is available.
The twitch section is used to configure stream keys and parameters. The following steps will create and add your Twitch keys.
- Create a Twitch Account if you do not already have one.
- Go into settings and set up two-factor authentication.
- Use your account to register on Twitch's app registration website.
- Get an OAuth token from this generator or another. Select the chat bot option. Scroll down and allow chat_login, chat:read, chat:edit, channel:moderate permissions. Copy both the OAuth token and refresh token to the appropriate fields in the config file.
- Copy your stream key and add it to the config file.
You should also add your account's username and channel name to config file.
A webcam will be used to see the device you are interacting with. The framerate and quality preset are in the example config file, and these may need to change depending on your webcam. Twitch provides recommendations for encoding settings.
The devices section is used to map nouns and actions to a port on a hub.
Ports are identified using the single capital letter stamped on the device (A, B, etc). Hubs are identified by their configured names. Names can be discovered and changed using the Powered Up mobile app, or by using the tpu-rename-hub script included with this project.
The program is run as:
twitch-powered-up
Assuming that it has been configured correctly, it should run until killed.
The program will connect to the chat and begin streaming. It will begin scanning for hubs upon start. Turn on the hubs and the Bluetooth will pair automatically.
This example is for the train motor with the motor named "red train".
- The message "red train go 50" in the chat will make the red train go forwards at a speed of 50
- If more commands are given by other users, it will average the speed
- You don't need to arrange the words you want in any way, they just all need to be in the phrase. For example: "I want the red train to move forward at a speed of 50" will only pull out "red train", "forward", and "50".
- A webcam is streamed via Twitch showing the live state of the LEGO model.
- LEGO Powered Up hubs are paired via Bluetooth.
- A Twitch chat room is monitored for commands to control LEGO elements connected to hubs. Similar command messages from different viewers will have their values averaged.
This software has been designed and tested to run on a Raspberry Pi 4, but it should be able to run on most devices that support Bluetooth Low Energy.
The software has been tested on the following components:
- Boost Move Hub (88006)
- Hub (88009)
- Medium Linear Motor (45303)
- Light (88005)
- Train Motor (88011)
It should also be compatible with any devices supported by node-poweredup.
Contributions to this project are welcome. If you have suggestions for features, improvements, or bug fixes, please suggest them via Issues or Pull Requests. For our Javascript code, we follow Standard JS style.
This software was created by Anderson University students. Thanks go to Will Clemens (@waclemens), Amberlie Jock (@AmberlieJock), Dan Keesling (@dpkeesling), Noah Schram (@nsschram), and Stephen Vickery (@sjvickery) for their hard work on this project.